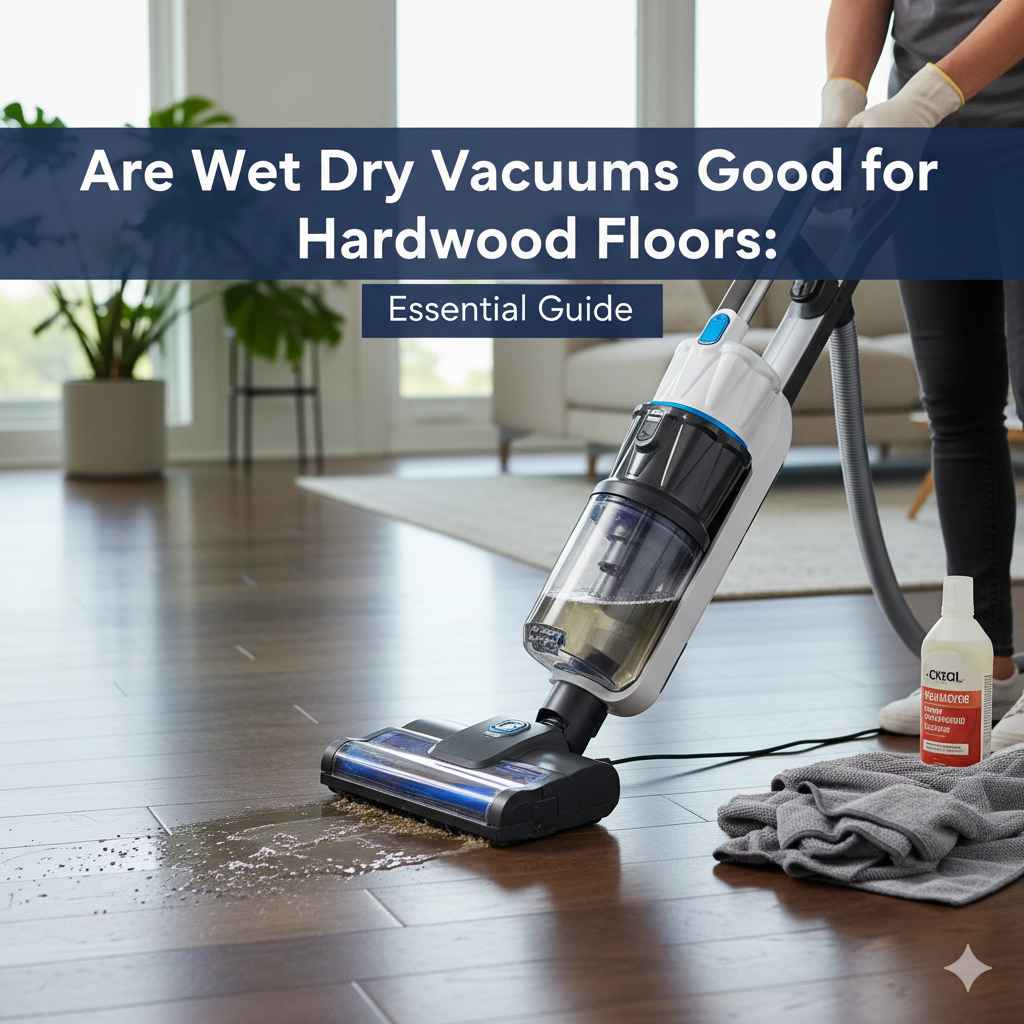
Are Wet Dry Vacuums Good for Hardwood Floors: Essential Guide
Yes, wet dry vacuums can be good for hardwood floors, especially for tackling spills and deep cleaning, but they require careful handling to avoid damage. This guide will show you how to use them safely and effectively.
Taking care of your beautiful hardwood floors doesn’t have to be a chore. You might be wondering if that powerful wet dry vacuum you have can help, or if it’s a recipe for disaster. It’s a common question, and the answer isn’t a simple yes or no. Wood and water, or even excess moisture, can be tricky partners. But with the right approach, a wet dry vacuum can be a surprisingly useful tool for keeping your hardwood looking its best, from everyday messes to unexpected accidents.
In this guide, I’ll walk you through exactly what you need to know. We’ll explore how these vacuums work on hardwood, the potential risks, and the best practices to ensure your floors remain protected and gleaming. Get ready to confidently tackle those cleaning challenges!
Understanding Wet Dry Vacuums and Hardwood Floors
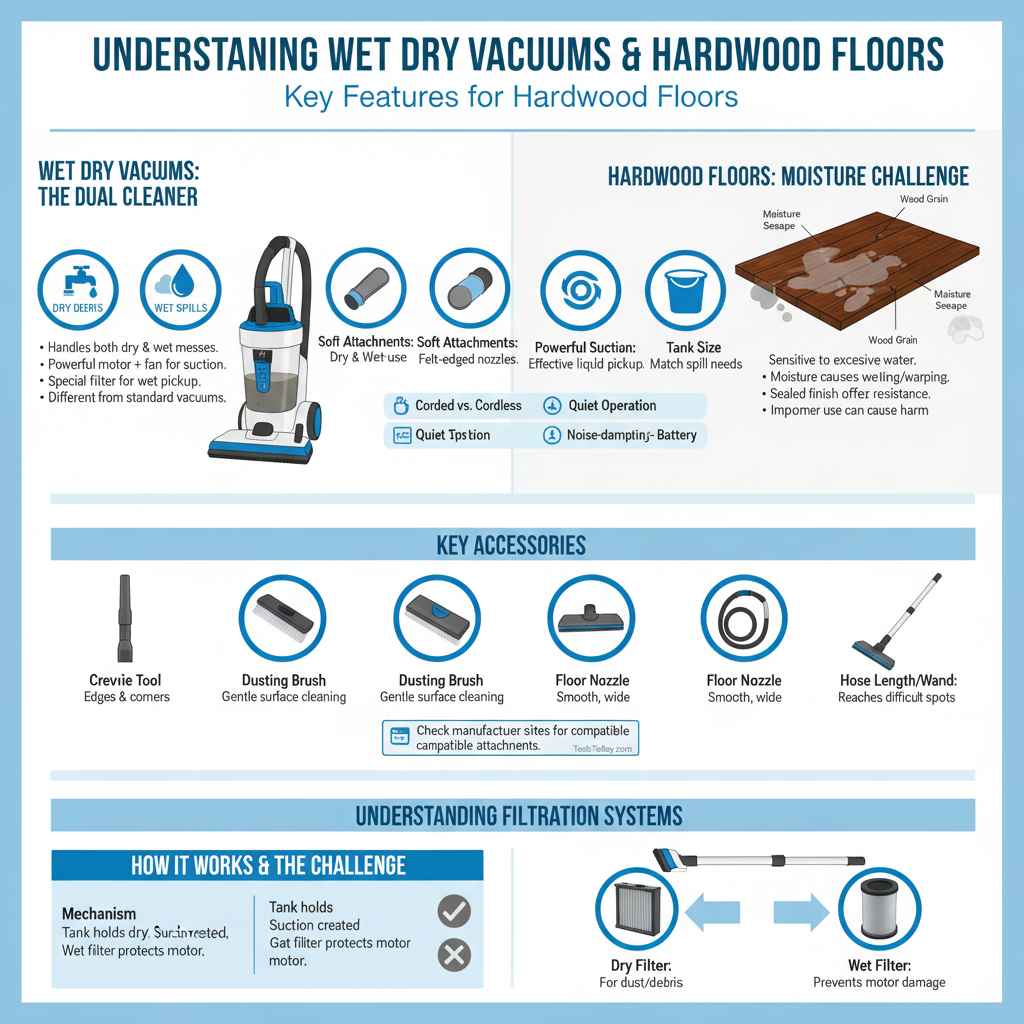
Wet dry vacuums, sometimes called shop vacs, are designed to handle both dry debris (like dust and dirt) and wet messes (like spills). This dual capability is what sparks the question about their suitability for hardwood.
Hardwood floors, while beautiful and durable, are sensitive to moisture. Excessive water can seep into the wood grain, causing it to swell, warp, or even leading to mold and mildew problems. The finish on your hardwood floor also plays a crucial role in its protection. Most modern hardwood floors have a sealed finish (like polyurethane) that offers a good degree of water resistance, but it’s not entirely waterproof.
A wet dry vacuum’s ability to suck up liquids makes it seem like a perfect solution for spilled water, milk, or juice. However, it’s the way you use it and the type of wet dry vacuum that matters most. Using one improperly can lead to more harm than good.
How Wet Dry Vacuums Work
At their core, wet dry vacuums have a collection tank that can hold both dry material and liquid. They use a powerful motor and fan to create suction. For wet pickup, a special filter or a differently designed intake system is often used to prevent water from reaching the motor. The debris or liquid is then deposited into the tank. This makes them different from standard household vacuums, which are typically only designed for dry debris and would be damaged by water.
The Hardwood Floor Challenge
The main concern with using a wet dry vacuum on hardwood floors is the risk of introducing too much moisture. Even when picking up a spill, residual moisture can be left behind if the vacuum doesn’t pick up every last drop. If your hardwood has gaps between the planks, moisture can seep down into those spaces, causing damage over time.
Furthermore, the brush roll or cleaning head of some wet dry vacuums might be too harsh for delicate hardwood finishes, potentially causing scratches. This is why using the right attachments and techniques is key.
When a Wet Dry Vacuum Shines on Hardwood
Despite the potential risks, there are specific situations where a wet dry vacuum can be an invaluable asset for your hardwood floors:
- Immediate Spill Cleanup: This is where a wet dry vacuum truly excels. If you’ve had a significant spill of any liquid, acting quickly is paramount. A wet dry vac can suck up the bulk of the liquid much faster and more effectively than a mop or towels alone, minimizing the time the liquid is in contact with your floor.
- Deep Cleaning After a Problem: If a pipe leaks or a pet has an accident that soaks a larger area, a wet dry vacuum is your best ally to remove standing water before it can cause lasting damage.
- Tackling Grime in Grout Lines (if applicable): For engineered hardwood or floors with very subtle texture, a wet dry vac (with appropriate nozzle) can sometimes help lift grime from any textured areas or tiny crevices that a regular mop might miss.
- Vacuuming Up Large Debris: Beyond spills, they are great for picking up larger dry debris that might clog a regular vacuum.
Remember, the key is to treat these situations as emergencies requiring swift, powerful extraction, rather than routine cleaning.
Immediate Spill Response: A Lifesaver
Imagine you’ve accidentally knocked over a large glass of water. Time is of the essence. Instead of frantically grabbing towels, which can only absorb so much, your ready-to-go wet dry vacuum can be deployed. By quickly switching it to wet vacuum mode (if applicable) and using a suitable nozzle, you can extract the majority of the liquid in seconds. This significantly reduces the chances of water penetrating the wood or its finish.
Dealing with More Serious Water Incidents
For larger water issues, like a leaky appliance or a minor flood, your wet dry vacuum becomes a critical tool in damage control. It can remove standing water from the surface far more efficiently than manual methods. Once the bulk of the water is up, you’ll still need to dry the floor thoroughly with fans and dehumidifiers, but the vacuum buys you precious time and removes the most damaging element.
Potential Risks and How to Avoid Them
It’s crucial to be aware of the downsides and actively prevent them. Using a wet dry vacuum doesn’t mean you can forget about potential damage.
- Excess Moisture Left Behind: Even a powerful vacuum might leave a slight film of moisture. This is why immediate, thorough drying is essential after using the wet function.
- Scratching the Floor: Hard plastic nozzles or abrasive brush attachments can scratch your hardwood’s finish. Always use smooth, non-abrasive attachments.
- Damage to the Vacuum Motor: Using the wrong filter or attempting to vacuum liquids with a vacuum not designed for wet use will destroy the motor. Always confirm your vacuum is rated for wet pickup.
- Swelling or Warping: If water does penetrate the wood and isn’t dried properly, it can lead to irreversible damage, causing planks to expand, buckle, or warp.
Protecting Your Finish: The Right Attachments
The accessories you use with your wet dry vacuum are critical for hardwood floor safety. Many come with a variety of nozzles and brushes. For hardwood floors, you should always:
- Use the crevice tool or a dedicated, soft brush attachment. These are designed to be gentle on surfaces.
- Avoid using the standard floor brush with stiff bristles, as these can scratch.
- If your vacuum has a squeegee attachment, use it cautiously and ensure it’s clean and not likely to drag debris.
- Never use a beater bar or rotating brush attachment on hardwood, as these are designed for carpets and will damage wood finishes.
Moisture Management: The Golden Rule
The absolute most important rule is to ensure your hardwood floor is dried completely and immediately after any wet vacuuming. If you’ve used the wet mode, follow up:
- Wipe down the area with a dry, absorbent microfiber cloth immediately after vacuuming.
- Open windows, use fans, or a dehumidifier to speed up the drying process.
- Periodically check the floor for several hours to ensure no moisture is lingering.
The goal is to remove water as quickly as possible. It’s about extraction, not washing.
Step-by-Step Guide: Using a Wet Dry Vacuum Safely on Hardwood
Ready to give it a go? Follow these steps for a safe and effective cleaning experience:
Step 1: Identify Your Vacuum’s Capabilities
Before you even plug it in, check your wet dry vacuum’s manual. Is it designed for wet pickup? Does it require a specific filter for wet use? Some models are strictly for dry debris, while others are designed to handle both with a simple switch or filter change.
Step 2: Prepare the Vacuum
- For Dry Debris: Ensure the dry filter is installed correctly and the tank is empty.
- For Wet Pickup: Remove the dry filter and install the foam filter or any other wet-use filter specified by the manufacturer. Ensure the collection tank is empty.
Step 3: Select the Right Attachment
Choose a soft brush attachment or a smooth nozzle. Ensure it’s clean and free from any grit that could cause scratches. For general pickup of dry debris or small dry messes, a standard floor nozzle, if it’s smooth, might be okay. But when in doubt, go for the softest option.
Refer to your vacuum’s manual for the most appropriate attachment for hard surfaces.
Step 4: Vacuum Dry Debris First (If Applicable)
If you’re dealing with a spill that also has dry debris (like dirt mixed with spilled soda), it’s often best to vacuum up the loose, dry material first using the dry function or a dry attachment. This prevents unnecessary clogging and makes the wet cleanup more efficient.
Step 5: Tackle Spills with Wet Pickup Mode
If you’re using the wet function for a liquid spill:
- Turn on the vacuum.
- Gently move the attachment over the spill, working from the outside edges inward.
- Allow the vacuum to do the work; don’t press down hard, which could force liquid deeper.
- Make several passes to ensure maximum liquid extraction.
Step 6: Immediate Post-Vacuum Drying
This is non-negotiable. Immediately after vacuuming up a spill:
- Take a clean, dry microfiber cloth and thoroughly wipe down the damp area.
- Ensure you dry any seams between planks as well.
- Follow up by using fans, opening windows, or a dehumidifier to ensure the area is completely dry to the touch within an hour or two.
Test the floor with a dry finger to confirm it’s no longer damp.
Step 7: Clean and Store Your Vacuum
After vacuuming liquids:
- Empty the collection tank immediately.
- Rinse the tank and any reusable filters thoroughly with clean water.
- Allow all parts (tank, filters) to air dry completely before reassembling or storing the vacuum. This prevents mold and mildew growth inside the machine.
Proper cleaning ensures your vacuum is ready for its next use and prevents it from becoming a source of contamination or odors.
Wet Dry Vacuum vs. Traditional Cleaning Methods for Hardwood
Let’s compare how a wet dry vacuum stacks up against other popular methods for keeping hardwood floors clean.
Mops
Traditional mops, especially string mops or traditional sponge mops, can hold a lot of water and tend to leave floors quite wet. While they are good for general dirt removal, they are not ideal for quick spill cleanup and carry a higher risk of over-wetting hardwood floors if not wrung out extremely well. Microfiber mops, when used damp (not wet), are much safer and more effective for routine cleaning.
Steam Mops
Steam mops are often marketed for deep cleaning. However, the hot steam can potentially damage the finish on some hardwood floors or force moisture into the wood. Most hardwood floor manufacturers advise against using steam mops. A reputable source like the This Old House website offers further insights on their use.
Robotic Vacuums
Many robotic vacuums are excellent for daily dry vacuuming and dust collection on hardwood. However, most are NOT designed for wet pickup. Some newer models offer mopping functions, but these typically use a damp pad and are intended for light maintenance cleaning, not for absorbing spills like a wet dry vacuum can. Always check the specific capabilities of your robot vacuum regarding moisture.
Standard Household Vacuums
These are great for dry debris, dust, and pet hair. They often have specialized hardwood floor attachments that are gentle. However, they are useless against liquid spills and can be damaged if they accidentally ingest moisture. The soft brush rolls on some can be beneficial for sweeping up fine dust without scratching.
Table: Best Practices Comparison for Hardwood Floor Cleaning
| Cleaning Method | Pros for Hardwood | Cons for Hardwood | Best Use Case |
|---|---|---|---|
| Wet Dry Vacuum | Excellent for rapid spill absorption; powerful extraction. | Risk of over-wetting if not used carefully; requires immediate drying; potential for scratching with wrong attachments. | Immediate cleanup of significant liquid spills; accident recovery. |
| Microfiber Mop (Damp) | Gentle on finish; effective dust and light dirt removal; low moisture. | Not suitable for picking up large spills or standing water. | Routine cleaning; daily maintenance; light spills. |
| Steam Mop | Deep cleaning (potential); sanitizes. | RISK of wood damage, warping, finish degradation; generally NOT recommended by manufacturers. | None recommended for sealed hardwood. |
| Standard Household Vacuum | Effective for dry debris, dust, pet hair; gentle attachments available. | Cannot handle liquids; can be noisy; may not get into tight crevices as well as other tools. | Daily dry vacuuming; surface debris removal. |
Choosing the Right Wet Dry Vacuum for Hardwood
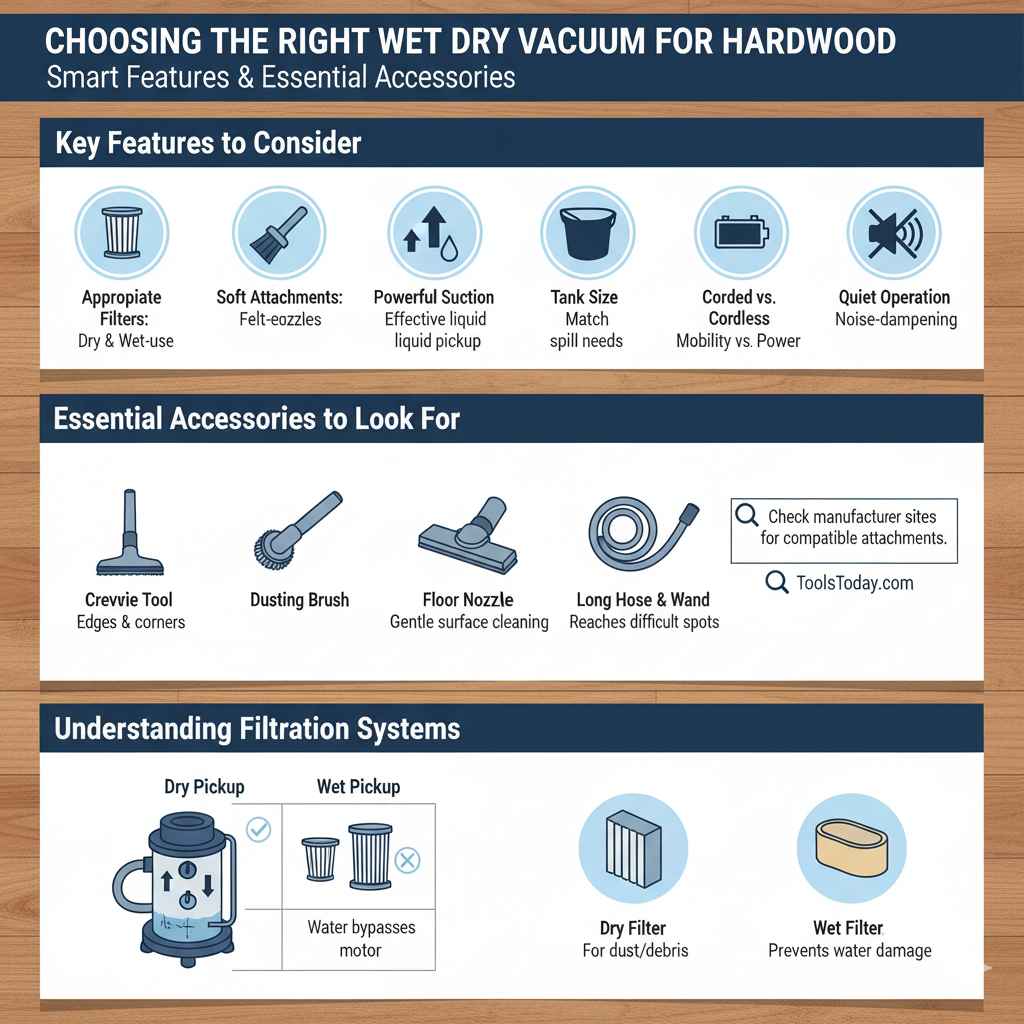
If you decide a wet dry vacuum is the right tool for your home, consider these features when shopping:
- Appropriate Filters: Look for models that include both a dry filter and a foam or wet-use filter.
- Soft Attachments: Ensure it comes with or has available soft brush or felt-edged nozzles.
- Powerful Suction: For effective liquid pickup, good suction power is essential.
- Tank Size: Consider how much liquid you might need to pick up. Larger tanks mean fewer trips to empty.
- Corded vs. Cordless: Cordless offers mobility, but ensure battery life is sufficient for your needs.
- Quiet Operation: Some shop vacs can be very loud. If noise is a concern, look for models with noise-dampening features.
Essential Accessories to Look For
When purchasing, inspect what comes in the box. Key accessories that make a wet vac more hardwood-friendly include:
- Crevice Tool: Great for edges and corners.
- Dusting Brush: One with soft bristles is ideal for gentle surface cleaning beyond mere spills.
- Floor Nozzle: A smooth, wide nozzle is good for larger areas. Ensure it doesn’t have stiff rollers or brushes.
- Hose Length and Wand: Longer hoses and flexible wands make reaching difficult spots easier without dragging the vacuum body.
If your chosen vacuum model doesn’t include these, check the manufacturer’s website or online retailers for compatible attachments. Websites like ToolsToday provide helpful comparisons of wet dry vacuum features.
Understanding Filtration Systems
Filtration is key. For dry use, a particulate filter (often a cartridge filter) is essential to trap fine dust. For wet use, a foam filter is typically placed over the motor inlet. This foam barrier prevents water from reaching the motor, which is a common cause of failure. Always ensure you’re using the correct filter for the task. Using a dry filter during wet vacuums can lead to the dust and debris turning into a sludge that clogs the filter and potentially bypasses it into the motor.
Frequently Asked Questions (FAQ)
Q1: Can I use my shop vac for everyday cleaning on my hardwood floors?
No, it’s generally not recommended for everyday dry cleaning if you have a standard household vacuum or a dedicated hardwood floor cleaner. Wet dry vacuums are best reserved for specific situations like immediate spill cleanup.
Q2: What’s the biggest mistake people make when using a wet dry vac on hardwood?
The biggest mistake is leaving moisture behind. Not drying the floor thoroughly after wet pickup can lead to wood damage.
Q3: Can a wet dry vacuum damage my hardwood floor’s finish?
Yes, if you use attachments with stiff bristles or a rough texture, or if you drag debris across the floor. Always use soft brushes or smooth nozzles and ensure they are clean.
Q4: Do I need to do anything special to prepare my hardwood floor before using a wet dry vac?
Ensure the floor is free of loose debris that isn’t part of the spill if you are vacuuming dry material first. For wet pickup, having absorbent towels ready for immediate post-vacuum drying is key.