Best Way to Clean Paint Brush: Proven Method
The best way to clean a paint brush to preserve its shape and effectiveness involves immediate cleanup after use. For latex paint, wash with soap and water; for oil-based paint, use mineral spirits followed by soap and water. Proper cleaning extends brush life significantly.
Hey there, DIYers and home improvers! Md Meraj here, your go-to woodworking mentor. Ever finished a painting project, looked at your trusty paint brush, and wondered, “Uh oh, how do I clean this thing without ruining it?” You’re not alone! Dried paint gunk can turn a perfectly good brush into a stiff, unusable mess faster than you can say “remodel.” But don’t worry, keeping your brushes in top shape is simpler than you think. With my proven, step-by-step method, you’ll be able to clean your brushes like a pro, making them last for countless projects and saving you money. Ready to give your brushes a spa treatment they’ll thank you for?
As a woodworking enthusiast and someone who’s spent countless hours with brushes in hand, I know how vital a clean paintbrush is to a smooth finish. A well-maintained brush not only applies paint better but also lasts much, much longer. It’s a simple act of care that makes a huge difference in your project’s outcome and your wallet. Let’s dive into the best way to clean your paint brushes, ensuring they stay soft, flexible, and ready for your next creative endeavor.
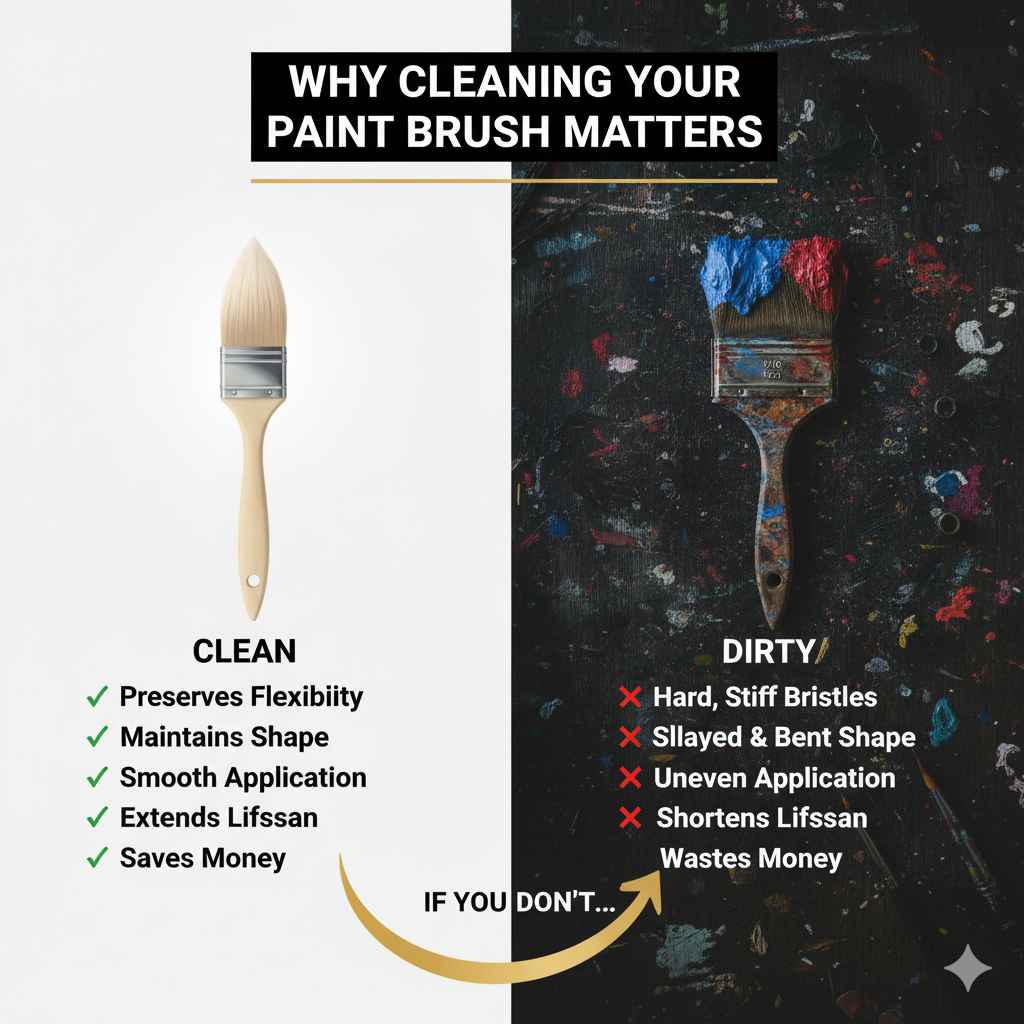
Why Cleaning Your Paint Brush Matters
Think of your paintbrush as a vital tool, much like a chisel or a saw. If you don’t care for it, its performance will suffer. Dried paint:
- Hardens the bristles, making them stiff and ineffective.
- Causes bristles to splay and lose their shape.
- Leads to uneven paint application, streaks, and drips.
- Shortens the lifespan of the brush, forcing you to buy new ones more often.
When you clean your brush immediately after use, you remove the paint before it has a chance to harden. This preserves the bristles’ natural flexibility and their ability to hold paint evenly. It’s a small step that ensures professional-looking results every time.
Gather Your Cleaning Supplies
Before we begin the actual cleaning process, let’s make sure you have everything you need. Having your supplies ready makes the job go much smoother. It’s like prepping your tools before starting a woodworking project – efficiency is key!
For Latex/Water-Based Paints:
- Warm water
- Mild soap (dish soap or hand soap works well)
- A bucket or sink
- A comb or old credit card (for stubborn paint)
- Paper towels or a clean rag
- A brush conditioner or linseed oil (optional, for extra bristle care)
For Oil-Based Paints:
- Mineral spirits (also known as paint thinner)
- A separate, sealable container for the mineral spirits
- A bucket or sink
- Mild soap and warm water
- A comb or old credit card (for stubborn paint)
- Paper towels or a clean rag
- A brush conditioner or linseed oil (optional, for extra bristle care)
You can find mineral spirits at most hardware and home improvement stores. Always use them in a well-ventilated area. For more information on safe handling of solvents, the U.S. Environmental Protection Agency (EPA) provides guidance on safe disposal of household products, which includes solvents.
The Proven Method: Step-by-Step Cleaning Guide
The “best way” really comes down to consistency and acting quickly. Here’s how to tackle it, separating the process for water-based and oil-based paints.
Cleaning Brushes Used with Latex or Water-Based Paints
This is the most common type of paint for interior projects, and thankfully, it’s also the easiest to clean up.
- Scrape Off Excess Paint: Immediately after you finish painting, gently scrape as much excess paint as possible from the brush. Wipe the bristles on the edge of the paint can or on scrap wood. This prevents a lot of paint from going down the drain and makes the washing process quicker and cleaner.
- Rinse with Water: Go to a sink or a bucket of warm water. Hold the brush bristles-down under running water or swish it in the bucket. Work the bristles to release more paint.
- Lather with Soap: Add a few drops of mild soap (dish soap is great!) to the bristles. Gently work the soap into the bristles with your fingers, creating a lather. Continue rinsing and working the soap until the water runs clear and there’s no more paint residue.
- Comb Out Remaining Paint (If Necessary): If you see any stubborn paint remnants deep in the bristles, use a brush comb or an old credit card to gently work them out. Be careful not to bend or damage the bristles.
- Final Rinse: Give the brush a final thorough rinse with clean, warm water.
- Remove Excess Water: Gently squeeze the bristles from the ferrule (the metal part) to the tip to remove most of the water. You can also give it a gentle shake.
- Reshape and Dry: Reshape the bristles back into their original form with your fingers. Hang the brush bristles-down to dry, or lay it flat. This allows water to drain away and helps the bristles maintain their shape. Avoid standing the brush on its bristles, as this can splay them.
- Condition (Optional): Once dry, you can apply a small amount of brush conditioner or a tiny bit of linseed oil to the bristles to keep them extra supple for the next use. Gently work it in and wipe off any excess.
Cleaning Brushes Used with Oil-Based Paints
Oil-based paints are tougher and require a solvent to break them down. This process needs a bit more care and ventilation.
- Scrape Off Excess Paint: Just like with latex paint, scrape off as much excess paint as you can. This is even more important with oil-based paints as they are harder to remove once dried.
- Use a Solvent: Pour a small amount of mineral spirits into a sealable container or an old coffee can. Place your brush into the solvent, bristles-down. Swirl the brush gently to loosen the paint. Don’t let the solvent sit for too long, as it can potentially degrade the glue holding the bristles.
- Wipe and Repeat Solvent Rinse: Take the brush out and wipe the bristles against the inside wall of the container to remove loosened paint. Repeat the process of swirling in the solvent and wiping until most of the paint is out. You’ll likely need to change the solvent if it becomes very thick with paint. A good indicator that it’s time to change is when the solvent looks like chocolate milk!
- Wash with Soap and Water: Once the majority of the paint is removed with the solvent, it’s time to wash away any remaining residue and the solvent itself. Take the brush to a sink and wash it thoroughly with warm water and mild soap. Work the lather through the bristles, rinsing until all traces of solvent and paint are gone and the water runs clear.
- Comb Out Remaining Paint (If Necessary): If any stubborn bits remain, use a brush comb or an old credit card to gently remove them.
- Final Rinse: Rinse thoroughly with clean, warm water.
- Remove Excess Water: Gently squeeze the water out from the ferrule to the tip.
- Reshape and Dry: Reshape the bristles with your fingers and hang the brush bristles-down or lay it flat to dry. Ensure no solvent residue is left, as it could harm the bristles over time.
- Condition (Optional): After drying, a brush conditioner or a tiny bit of linseed oil can help keep the bristles supple.
Storage: Keeping Your Brushes Ready
Proper storage is just as crucial as cleaning. How you store your brushes can impact their shape and readiness for the next job.
Short-Term Storage (While Working on a Project)
If you’re taking a break for a few hours or overnight and using water-based paint, you can wrap the brush tightly in plastic wrap or a damp cloth. For oil-based paint, you can place the brush in a plastic bag with a solvent-dampened rag (not soaking wet!) around the bristles, or immerse the bristles in a shallow amount of solvent in a sealed jar. This keeps the paint from drying out.
Long-Term Storage (Between Projects)
Once your brushes are clean and completely dry, storing them properly is key.
- Wrap them: For best protection, wrap each brush in paper or a thin piece of cardboard, then place it in a plastic bag. This helps maintain the bristle shape.
- Store bristles-down: Store them so the bristles are pointing downwards. You can hang them from a hook or place them in a container where the bristles don’t touch anything at the bottom. This prevents splaying.
- Avoid extreme temperatures: Store brushes in a dry place away from extreme heat or cold.
When to Replace a Paint Brush
Even with the best care, brushes don’t last forever. Here are signs it’s time for a new one:
- Severely splayed or bent bristles that won’t return to shape.
- Bristles are falling out.
- The ferrule (metal part) is loose or damaged.
- The handle is cracked or broken.
Investing in good quality brushes will also pay off, as they are typically made with better materials and are more durable, meaning they’ll last longer even with regular cleaning and use. Reputable brands often have replacement parts or better quality control, ensuring you get more uses out of them.
Troubleshooting Common Brush Cleaning Problems
Sometimes you encounter a stubborn brush. Here are solutions for common issues:
| Problem | Solution |
|---|---|
| Dried paint deep in bristles | For latex paint, try a paint brush cleaner solution (available at hardware stores) according to its instructions, or a bit more warm soapy water and patience. For oil-based paint, a more concentrated solvent soak for a short period (around 30 minutes) might be needed, followed by thorough washing. A brush comb is your best friend here. You can also try soaking it briefly in hot vinegar for latex paint if soap and water aren’t cutting it. |
| Stiff bristles even after washing | This often means some paint has dried onto the bristles. Try the comb thoroughly. If it’s a latex brush, a linseed oil treatment after thorough washing can sometimes help soften them. For oil-based, ensure all solvent was washed out with soap and water. Sometimes, a brush that’s become stiff is past saving and may need to be replaced. |
| Brush smells of solvent after cleaning | Ensure you washed thoroughly with soap and water after the solvent stage. If the smell persists, let the brush air out completely in a ventilated area until it dissipates. Some residual odor might remain, but it shouldn’t be strong enough to affect new paint. |
| Bristles splayed out during drying | This usually happens if the brush wasn’t reshaped properly or was dried standing on its bristles. Gently try to reshape them after drying. For the future, always reshape before drying and hang them bristles-down. If they remain splayed, it might indicate the brush is nearing the end of its life for fine finish work. |
Brush Cleaning Frequency: When and How Often?
The golden rule is to clean your paint brush immediately after each use, no matter the paint type. This is the single most important factor in extending its lifespan and ensuring good performance.
If you are in the middle of a project and need to switch colors or take a break:
- For water-based paints: Wrap the brush in plastic wrap or a damp cloth to keep moisture in.
- For oil-based paints: Submerge the bristles in a shallow amount of mineral spirits in a jar with a tight-fitting lid. This prevents the paint from drying and keeps the bristles saturated enough until you can clean it thoroughly.
If you accidentally leave paint on for a while and it starts to dry:
- Latex paint: Try using a dedicated latex paint brush cleaner or soak the bristles in hot water with a tablespoon of fabric softener for about an hour, then wash as usual.
- Oil-based paint: It will be tougher. You might need a stronger solvent or a specialized oil-based paint brush cleaner. Patience and repeated applications might be necessary. Remember to always rinse thoroughly with soap and water afterward.
Never leave brushes soaking in solvents or water for extended periods in a way that the ferrule is submerged. This can loosen the glue holding the bristles, damaging the brush permanently.
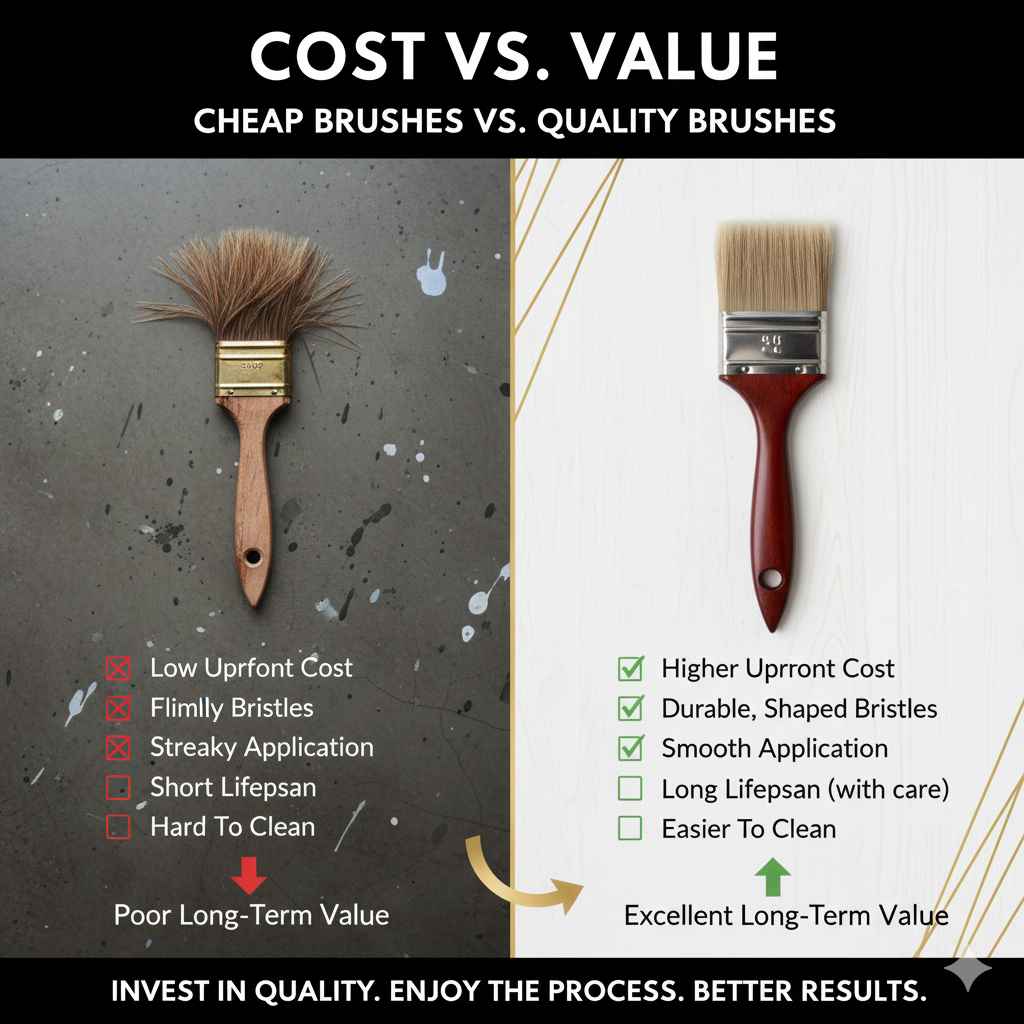
Cost vs. Value: Cheap Brushes vs. Quality Brushes
As a mentor who values craftsmanship, I always encourage using the best tools you can afford. This applies to paint brushes too!
| Feature | Cheap Brushes | Quality Brushes |
|---|---|---|
| Bristle Quality | Often synthetic, prone to splaying, shedding, and not holding shape. | High-quality synthetic or natural bristles, designed for specific paint types, hold shape, less shedding. |
| Paint Pickup & Laydown | Uneven, can be streaky, difficult to control. | Smooth, consistent paint pickup and laydown, smooth finish, excellent control. |
| Durability | Short lifespan, often single-project or few-use brushes. | Long lifespan with proper care, can last for many years. |
| Cleaning Ease | Difficult to clean thoroughly, paint gets trapped easily. | Easier to clean, paint releases more readily. |
| Cost | Low upfront cost. | Higher upfront cost. |
| Long-Term Value | Poor; requires frequent replacement, leads to frustrating results. | Excellent; saves money over time, produces better results, more enjoyable to use. |
While a cheap brush might seem like a good deal for a small, one-off job, investing in a good quality brush will save you money and frustration in the long run. Plus, using a well-made brush makes the painting process more enjoyable and the results more satisfying. For advice on selecting the right brush for your project, consult resources like This Old House’s guide, which often covers tool selection.
Frequently Asked Questions (FAQ)
Got more questions? I’ve got answers!
Q1: How long can I leave a paint brush with latex paint on it before cleaning?
A1: For latex paint, it’s best to clean your brush immediately. If you must delay, wrap it tightly in plastic wrap or a damp cloth to keep the paint from drying out. Ideally, aim to clean within a few hours.
Q2: Can I use my dishwasher to clean paint brushes?
A2: It’s generally not recommended. Dishwashers use strong detergents and high heat that can damage the bristles and loosen them from the ferrule. Plus, washing paint residue in a dishwasher isn’t safe for your dishes.
Q3: What’s the best way to store brushes long-term without them getting dusty or damaged?
A3: After they’re completely dry, wrap each brush in paper or a thin cardboard sleeve to protect bristles, then place them in a plastic bag. Store them hanging bristles-down in a dry, temperature-controlled place.
Q4: Is it safe to reuse oil-based paint brushes after cleaning?
A4: Absolutely! The key is thorough cleaning. If you remove all the oil-based paint and solvent residue with soap and water, the brush will be perfectly reusable for your next oil-based project. Ensure no solvent smell lingers.
Q5: My brush bristles are all bent and splayed. Can I fix it?
A5: For minor splaying after cleaning, try reshaping them with your fingers while damp and drying them bristles-down. If the bristles are severely bent or stiff from dried paint that won’t come out, the brush may be beyond saving for detailed work and might need to be replaced.