Best Way to Remove Poison Oak Safely for Safe Removal
Dealing with poison oak can be tricky, especially if you’re new to it. Knowing the Best Way to Remove Poison Oak Safely is a common challenge because the plant’s oils cause a nasty, itchy rash. Don’t worry, though; it’s possible to manage and get rid of poison oak effectively. We’ll explore a straightforward, step-by-step approach to help you clear this plant without suffering the consequences. Get ready to learn how to keep your skin safe and clear of poison oak’s bothersome effects.
What Is Poison Oak and Why Remove It?
Poison oak, a common plant in many areas, can cause a seriously itchy rash if you touch it. This rash is caused by an oil called urushiol, found in all parts of the plant, including the roots, leaves, and stems. The oil is extremely sticky and can stick to your skin, clothing, and even tools, causing problems. Removing poison oak is important for several reasons. It keeps the plant from spreading to new areas. It prevents accidental contact, which can lead to a painful and uncomfortable experience. Additionally, eliminating poison oak protects pets, kids, and anyone spending time outdoors. Knowing the plant and its dangers is your initial step in removing it.
Recognizing Poison Oak Before Removal
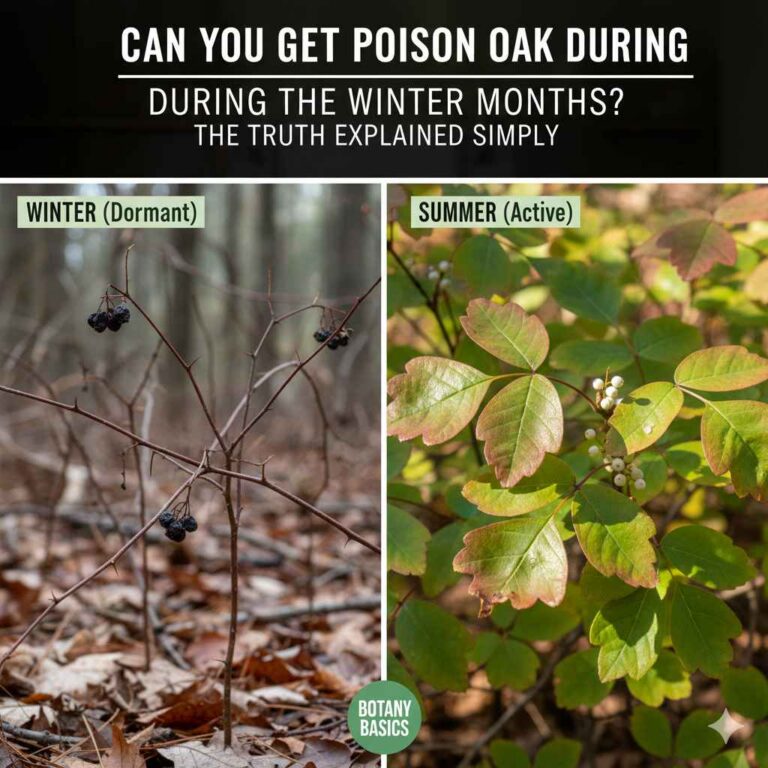
Before you even think about removing poison oak, you have to be able to spot it. Poison oak can look different depending on where it grows and the time of year. Generally, it has three leaflets, like the “leaves of three, let it be” rhyme, which is good advice. The leaves are typically shiny and can be green, red, or yellow, and they may turn colors in the fall. The plant can grow as a low shrub or a climbing vine. Some leaves may have jagged edges, while others have a smoother look. Poison oak can be mistaken for other plants, such as blackberry or Virginia creeper. Therefore, taking a moment to identify it correctly is important before you begin any removal process.
- Leaf Shape and Arrangement: Poison oak always has three leaflets grouped together. The shape of the leaflets varies but often has a slightly lobed appearance, similar to an oak leaf.
- Leaf Color: The leaf color can be green, red, or yellow, depending on the season. New leaves are usually reddish, mature leaves are green, and in the fall, they turn shades of red, orange, or yellow.
- Growth Habit: Poison oak can grow as a low shrub or a climbing vine. When climbing, it may have aerial roots that help it stick to surfaces.
- Presence of Urushiol: The key indicator is the presence of urushiol oil. Even without seeing the plant’s visible features, you can get exposed if it is present. The oils are a clear liquid that might not be visible to the naked eye, so caution is advised.
- Habitat Preference: Poison oak commonly grows in wooded areas, along trails, and in disturbed areas. It thrives in sunlight or partial shade.

Dangers of Contact and Symptoms
Contact with poison oak causes an allergic reaction called contact dermatitis. The reaction occurs when the skin comes into contact with urushiol oil. The oil rapidly penetrates the skin, starting a chain of events that leads to a rash. Within hours to days, you might notice an itchy sensation, followed by redness, swelling, and blisters. The severity of the rash varies from person to person. Even tiny amounts of oil can cause a reaction. The oil can stay active on surfaces for years, making it dangerous. Symptoms may include itching, redness, swelling, and blisters, which can be extremely uncomfortable.
- Itching: Intense itching is one of the first symptoms. It can be incredibly uncomfortable and is often the first sign of a problem.
- Redness: The skin becomes red and inflamed, especially where the urushiol oil touched. This redness is a sign of your body’s immune response.
- Swelling: The affected area may swell, and the severity depends on how much oil touched your skin.
- Blisters: Fluid-filled blisters often appear within a few days of contact. These can break open, and the fluid inside does not spread the rash.
- Severity: The severity of symptoms depends on how much oil you were exposed to, the sensitivity of your skin, and where the rash is located.
Planning the Safest Poison Oak Removal
Removing poison oak safely is about more than just yanking the plant out of the ground. Proper planning reduces your chances of contact with urushiol. The plan involves knowing what tools to use, what to wear for protection, and how to handle the plant. Before starting, it is crucial to ensure you have the right equipment and safety measures in place. This will minimize risks. This also involves scheduling your removal for a time when you have plenty of free time to handle the cleanup and disposal carefully. A well-considered plan makes the process much safer and less stressful.
Necessary Gear and Equipment
You need specific gear and equipment to keep safe. This ensures you’re protected from urushiol contact. A well-stocked kit includes protective clothing, tools for removal, and items for cleanup. Every item is important, from gloves to trash bags. Having the right tools makes the job easier and helps you get rid of poison oak effectively and safely. Always inspect your gear before starting the job. This helps prevent problems during the process. This helps prevent problems during the process. Proper equipment keeps you safe from exposure.
- Protective Clothing:
Wear long sleeves, long pants, and a hat to cover as much skin as possible. A heavy-duty work shirt and pants made from materials that are hard to penetrate, like canvas or certain synthetic fabrics, are helpful. Tuck your shirt into your pants and your pants into your boots to prevent any skin contact.
- Gloves:
Use heavy-duty, disposable gloves such as nitrile or vinyl. Avoid latex gloves, as they might not be as effective at blocking urushiol. Dispose of these carefully after each use to avoid contamination.
- Eye Protection:
Wear safety glasses or goggles. This protects your eyes from any plant matter or debris that might fly into them while working.
- Face Mask:
A disposable face mask protects your nose and mouth from any airborne particles or potential irritation.
- Tools for Removal:
Use tools like long-handled shovels, weed whackers, or pruning shears. Choose tools that allow you to keep a safe distance from the plant. Have a separate set of tools only for poison oak removal to avoid contamination of other equipment.
- Trash Bags:
Use heavy-duty trash bags. Make sure they are sturdy enough to hold the removed plant material. Label these bags clearly as “Poison Oak” to inform others.
- Cleaning Supplies:
Carry some dish soap, rubbing alcohol, and water. These are useful for cleaning tools, equipment, and your skin if you suspect you touched the oil.
Timing and Weather Considerations
When you choose to remove poison oak is very important. The time of year and the weather can affect the removal process. The best time to remove poison oak is during cooler months, such as fall or winter, when the plant is dormant. This period is when the leaves have fallen off, making it easier to spot the stems and roots. The urushiol oil is present all year long, so you have to be careful whenever you remove it. Weather conditions affect safety and ease. Plan to work on a calm, dry day to avoid the spread of urushiol.
- Seasonal Timing: The ideal time is during the dormant season (late fall to early spring). This is when the plant’s leaves have fallen, making the plant easier to identify. Also, there is a lower risk of spreading urushiol through airborne particles.
- Weather Conditions: Choose a dry, calm day for removal. Wind can spread the oil, and rain can wash it onto your clothes and tools, and into the soil. Avoid removing poison oak on windy days or just before rain.
- Temperature: While the plant is dormant, cooler temperatures reduce sweating, making it more comfortable to work in protective clothing. Hot, humid weather increases the chance of sweating, which might spread the oil.
- Sunlight: Consider working in the shade or on a cloudy day to reduce sun exposure while wearing protective gear. This will help you stay comfortable during the removal.
- Avoid peak allergy seasons: Some people find they are extra sensitive during pollen and other allergy seasons. This is also a good time to avoid contact.
Effective Poison Oak Removal Techniques
Successfully removing poison oak goes beyond just pulling the plant out of the ground. Using the right techniques ensures you get rid of the entire plant. Methods range from manual removal to the use of herbicides. Manual removal involves physical effort, such as digging or pulling. Herbicide use requires following specific guidelines to avoid environmental harm. Understanding these methods is key to choosing the correct approach based on your situation and safety needs. The proper technique minimizes risk and ensures effectiveness. The best technique can vary based on factors like the plant’s size, your tolerance, and the area where it grows.
Manual Removal Methods
Manual removal is the most environmentally-friendly way to remove poison oak. It involves removing the plant by hand or with tools. This method requires direct contact with the plant or the soil around it. This means you must have protection, like gloves and clothing. Manual removal works best for small infestations or plants in areas where you don’t want to use chemicals. Be cautious, as any contact with the plant’s parts can trigger a rash. You must remove the entire plant, including the roots, to prevent it from growing back. Manual removal requires more time and effort, but it’s a good way to keep your surroundings safe.
- Pulling by Hand:
Put on your protective gear, including gloves and long sleeves. Grasp the plant at its base. Pull firmly, trying to remove as much of the root system as possible. If the plant is firmly rooted, use a shovel or spade to loosen the soil around the base. Remove all plant parts, roots, stems, and leaves to avoid regrowth.
- Digging:
Use a shovel or spade to dig around the base of the plant. Carefully loosen the soil. Ensure you get as much of the root system as possible. Place the removed plant material directly into a trash bag to avoid accidental contact. Make sure the entire root system is removed to avoid regrowth.
- Using a Weed Wrench:
A weed wrench is a tool designed to grip the plant at its base and pull it out with leverage. This is useful for larger plants. Place the weed wrench jaws around the base of the plant, and tighten. Apply leverage to pull the plant, including the roots, from the ground. Be sure to wear gloves and eye protection.
- Precautions:
Always inspect the area to determine the extent of the poison oak infestation before beginning the manual removal process. Wear all protective gear. Once removed, place all plant parts in a sealed trash bag. Wash tools and any clothing that might have come into contact with the plant. Shower with dish soap.
Herbicide Application Strategies
Herbicide use can be an option if dealing with a larger infestation. There are many herbicides, and each needs special care when using it. Select herbicides designed to kill broadleaf plants. Always follow the directions on the product label to ensure you’re using it correctly. Herbicide use can be more effective than manual removal. It may take several applications to kill the plant completely. Applying herbicide carefully is important to avoid harming other plants and animals in the area. Take extra safety measures when using herbicides. Consider environmental impact, potential hazards, and how to apply the product to make your area safe again.
- Glyphosate: This is a non-selective herbicide. It kills any plant it touches. Glyphosate is effective. However, it can affect non-target plants. Apply it carefully to the leaves of the poison oak. Avoid spraying other plants.
- Triclopyr: This is a selective herbicide. It is effective for broadleaf plants, like poison oak. Triclopyr is less likely to affect grasses. Apply it directly to the leaves, as directed. Use this carefully around desirable plants.
- Application Methods: Use a spray bottle for small areas. Use a backpack sprayer for larger infestations. Be sure the sprayer is adjusted to minimize drift. Follow the manufacturer’s directions for mixing the herbicide solution.
- Safety Precautions:
Wear appropriate personal protective equipment (PPE). This includes gloves, eye protection, and a face mask. Do not spray on windy days to avoid drift. Stay away from the treated area until the herbicide is dry. Read and follow all label instructions.
Post-Removal Procedures and Safety
Once you remove the poison oak, the work isn’t quite done. After removal, you need to clean up the area and take care of yourself. Proper cleaning involves washing tools, clothing, and anything that came into contact with the plant or the oil. Cleaning prevents the spread of urushiol. Personal care includes showering with soap and water to remove any lingering oil from your skin. Always be mindful of preventing further contact. Post-removal steps ensure that urushiol doesn’t linger and cause problems later. These steps are a part of a complete strategy for effective removal. Proper procedures are critical to minimize the risk of a rash and to keep your surroundings safe.
Cleaning Tools and Equipment
Cleaning tools and equipment is an essential step. It removes any urushiol oil. Start by cleaning your tools immediately after removing the poison oak. The oil can stay active on tools. It can cause a rash. Clean the tools in a well-ventilated area, wearing gloves and other protective gear. Use a solution of soapy water, rubbing alcohol, or a specific product designed to remove urushiol. Cleaning makes sure that the tools are safe to use again. This protects your health and keeps the area safe from the spread of urushiol.
- Soap and Water: Wash tools with hot, soapy water. Use a strong dish soap to break down the oil. Scrub the tools thoroughly with a brush to ensure that all surfaces are cleaned. Rinse the tools with clean water and dry them completely.
- Rubbing Alcohol: Use rubbing alcohol (isopropyl alcohol). It can help dissolve the oil. Wipe down tools with rubbing alcohol. This will help remove any urushiol residue. Be certain to follow this up with a soap and water wash.
- Specialized Cleaners: There are many products available that are designed to remove poison oak oil. Follow the manufacturer’s instructions for using these products. Make sure to choose a cleaner designed for tools and surfaces.
- Disposal of Contaminated Materials: Properly dispose of any rags, brushes, or sponges used in cleaning. Make sure to seal them in a plastic bag. Label the bag as “Contaminated with Poison Oak Oil”.
Personal Hygiene and First Aid
Personal hygiene is critical after poison oak removal. Promptly washing your skin can prevent or reduce the rash. If you think you’ve touched poison oak, wash thoroughly with soap and water. Use cool or lukewarm water. Hot water can open pores and spread the oil. Use a dish soap as it is designed to cut through oils. Washing within a few hours of exposure can make a big difference. First aid may include using over-the-counter remedies like calamine lotion or hydrocortisone cream to treat itching and inflammation. Knowing how to react fast can help you minimize the effects of the poison oak rash.
- Washing Your Skin: Wash all exposed skin. Use cool or lukewarm water and a good dish soap. Wash carefully. Focus on areas that may have touched the plant. Rinse thoroughly, and dry gently.
- Washing Clothing: Wash clothes and items that may have come in contact with the plant. Wash them separately, using hot water and detergent. It may be necessary to wash items twice.
- First Aid Treatments:
Apply calamine lotion or hydrocortisone cream to reduce itching and inflammation. Take an oral antihistamine. Avoid scratching the rash. If the rash is severe, or widespread, see a doctor. Over-the-counter treatments provide relief.
- Preventing Further Spread: Avoid scratching. Do not share towels or clothing. Be careful about where you sit. Be sure to wash items to remove the oil and keep it from spreading.
Long-Term Poison Oak Management
Controlling poison oak isn’t a one-time thing. It’s often an ongoing effort, especially in areas where it grows naturally. This involves regular monitoring, preventing the spread, and possibly repeated removal. This approach is key to keeping the plant under control. Regular care is critical to prevent poison oak from taking hold and spreading. Effective management requires constant effort and observation. You can create a safe outdoor area by being careful and vigilant.
Ongoing Monitoring and Surveillance
Monitor your area regularly. This way, you can catch poison oak before it becomes a big problem. Schedule regular checks, particularly during the growing season. Early detection makes the plant easier to remove. When you check for poison oak, pay attention to areas where it grew before, edges of wooded areas, and along trails. Keep a watch on areas that get a lot of sun or partial shade, as they are likely spots. Document any new growth, and take action promptly. Keeping an eye on it is a simple process, but it can stop an infestation from growing.
- Scheduled Inspections: Schedule regular inspections of your property. Check at least twice a year. Pay extra attention during the spring and summer months when the plants grow actively.
- Targeted Surveillance: Focus on areas with previous poison oak growth, edges of wooded areas, and along pathways. Look for seedlings. Look for any areas that could be potential habitats.
- Record Keeping: Record the locations of any poison oak you find. Note the size of the plants and the methods you used to remove them. Keep track of when you did the removal and what products you used.
- Early Intervention: Address any new growth promptly. Act fast to get rid of new plants before they spread. Prompt action will keep the infestation from becoming worse.
Preventive Measures and Maintenance
Preventative steps reduce the chances of poison oak returning. This includes creating a less friendly environment for the plant and maintaining the area. These actions help to prevent new growth. They reduce the need for constant removal. These practices make it less likely for poison oak to spread and cause problems. A consistent approach to keeping your area safe takes time. However, it can help prevent future issues and keep your surroundings safe from contact with urushiol.
- Mulching: Apply mulch to inhibit weed growth. Mulch helps to prevent poison oak from germinating and growing. Use a thick layer of organic mulch. Use wood chips, bark, or other materials around plants.
- Regular Mowing: Mow lawns and grassy areas. This will prevent poison oak from establishing itself. Mowing will remove young plants. Mowing can make it hard for the plant to grow in these areas.
- Planting Competitive Vegetation: Plant other vegetation in areas where poison oak grows. Plant native ground covers. Plants will take up space and resources. This will crowd out the poison oak and limit its growth.
- Educate Yourself and Others: Teach yourself, and others, how to identify poison oak. Show them how to avoid contact and proper removal steps. Teach your children and other household members. Knowing about the plant is the first defense.
| Technique | Description | Effectiveness | Best Used For |
|---|---|---|---|
| Manual Removal | Pulling or digging up the plant. | High, if done completely. | Small infestations, environmentally-friendly approach. |
| Herbicide Application | Applying herbicides like glyphosate or triclopyr. | Varies, depending on the herbicide and application. | Large infestations, areas where manual removal is hard. |
| Preventive Measures | Mulching, mowing, planting competitive vegetation. | High, over time. | Preventing new growth, long-term management. |
Frequently Asked Questions
Question: What’s the best way to protect my skin from poison oak oil while working?
Answer: Wear protective clothing, including long sleeves, long pants, gloves (nitrile or vinyl), and eye protection. Consider a face mask to protect from airborne particles.
Question: What should I do if I think I’ve touched poison oak?
Answer: Immediately wash the exposed area with cool or lukewarm water and a strong dish soap. Rinse thoroughly and repeat several times. Then, consider using rubbing alcohol.
Question: How do I dispose of poison oak after removal?
Answer: Place the plant material in heavy-duty trash bags. Seal the bags securely. Label them clearly as “Poison Oak.” Contact your local waste disposal service for guidelines.
Question: Can the oil spread on tools and clothing?
Answer: Yes, the urushiol oil can stick to tools, clothing, and other surfaces. Proper cleaning is important to prevent its spread.
Question: What are the main signs of a poison oak rash?
Answer: Common signs include intense itching, redness, swelling, and the formation of blisters. The rash usually appears within a few hours or days after exposure.
Final Thoughts
The Best Way to Remove Poison Oak Safely hinges on understanding the plant. Correctly identifying poison oak and knowing its dangers is your first step. Before you remove it, gather the right equipment, including protective clothing and tools. Then, choose a removal technique that suits your situation. Whether you choose manual removal or herbicide application, you must follow the correct procedures. After removing the plant, clean everything that may have contacted the oil. Also, practice good hygiene to prevent a rash. You will also want to monitor the area for any new growth and take steps to keep poison oak from returning. This ensures a safe outdoor space. Implementing these steps is your key to safely getting rid of poison oak. By following these recommendations, you can reduce the risks and keep your skin healthy. So, be proactive, be careful, and enjoy the outdoors.