Can Aluminum Be Painted: Essential Guide
Yes, aluminum can definitely be painted! With the right preparation and materials, you can successfully paint aluminum surfaces to refresh their look, protect them from the elements, and match them to your home’s aesthetic. This guide provides simple, step-by-step instructions for painting aluminum, ensuring a durable and beautiful finish for beginners.
Hey there, my DIY and woodworking friends! Ever looked at an aluminum railing, a shed door, or perhaps some old garden furniture and thought, “This looks a bit dull, but I’m not sure if I can paint it?” That’s a common question, and you’re not alone if you’ve felt a bit unsure about tackling aluminum. The good news is, painting aluminum isn’t a daunting task at all, even for beginners. With a few key steps and the right guidance, you can transform those tired aluminum pieces into something fresh and vibrant.
We’ll walk through everything you need to know to get a smooth, lasting paint job on aluminum. We’ll cover the essential prep work that makes all the difference, the best types of paint to use, and a clear process that’s easy to follow. Ready to give your aluminum items a new lease on life? Let’s get started!
Why Paint Aluminum?
Aluminum is a popular material for many outdoor and indoor items because it’s lightweight and resists rust, which is a big plus compared to iron or steel. However, over time, its original finish can fade, scratch, or become chalky, especially when exposed to sunlight and weather. Painting aluminum achieves several great goals:
- Aesthetic Appeal: Breathe new life into dull or outdated aluminum items. You can choose any color to match your decor or landscaping perfectly.
- Protection: A good paint job adds an extra layer of protection against UV rays, moisture, and minor abrasions, extending the life of the aluminum item.
- Customization: It allows you to personalize your items, making them unique to your style.
- Maintenance: Painting can be a more cost-effective solution than replacing an entire aluminum component that’s simply lost its looks.
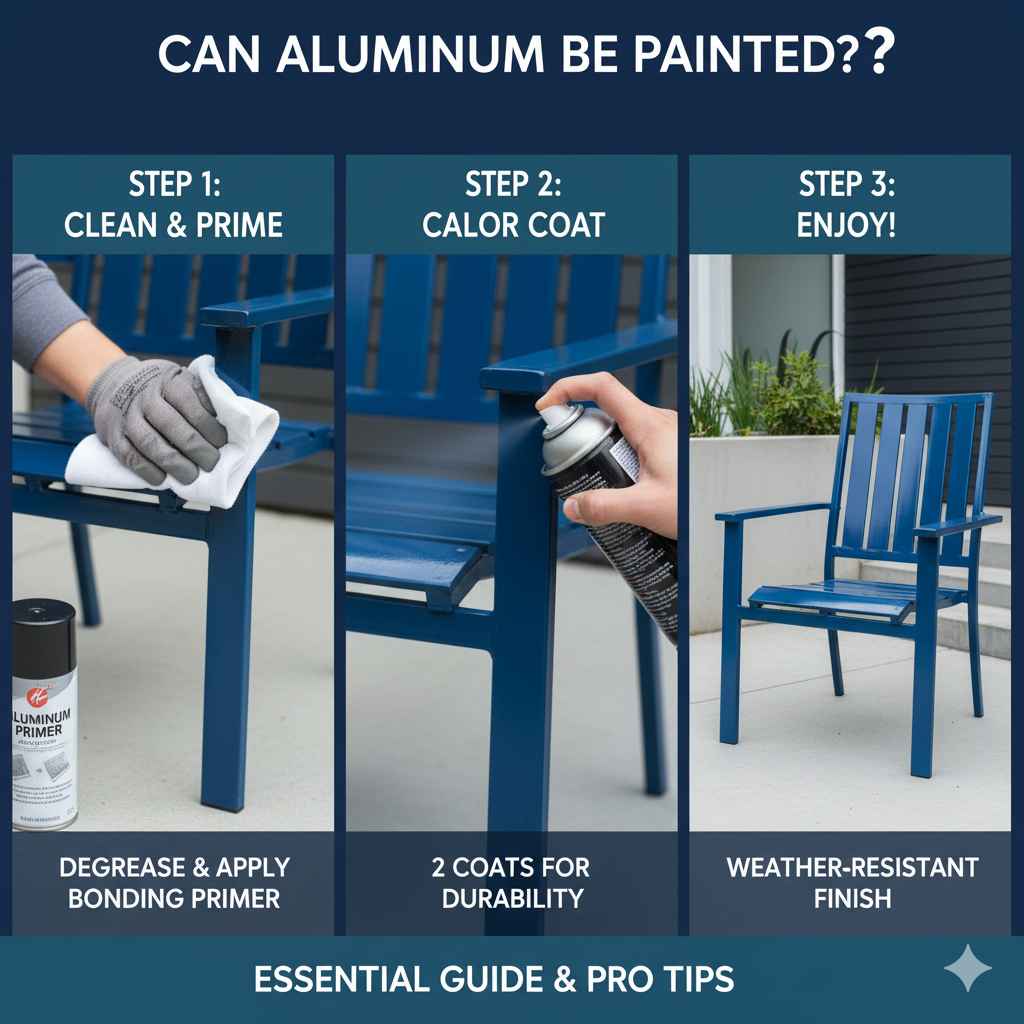
Can Aluminum Be Painted? The Short Answer: Yes!
As we’ve touched on, the answer is a resounding yes! However, the success of painting aluminum hinges on proper preparation. Unlike wood, which provides a porous surface for paint to grip, aluminum is non-porous and can sometimes be smooth. This means paint might not adhere well if you don’t prepare it correctly. Think of it like trying to stick a label on a wet, smooth surface – it just slides off! But with the right steps, we can create a surface that paint loves to stick to.
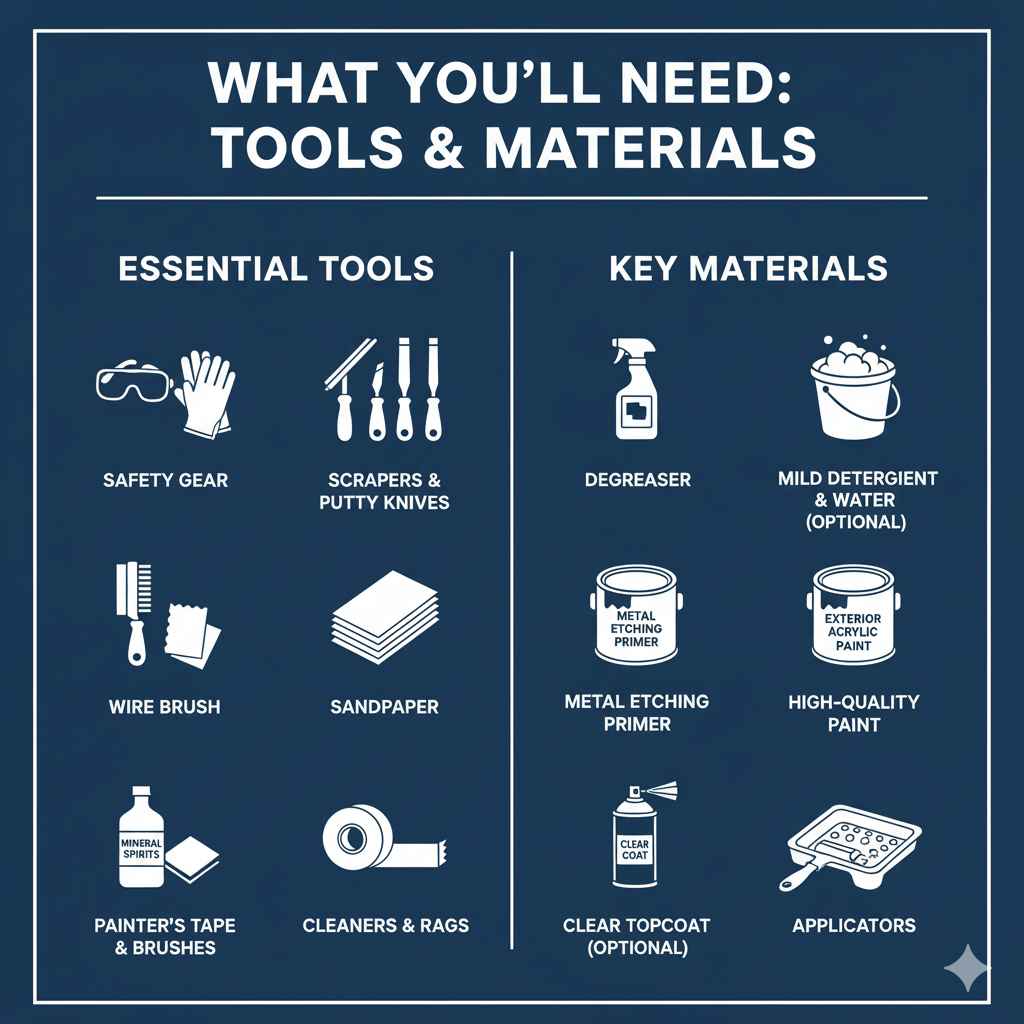
What You’ll Need: Tools and Materials
Gathering your supplies before you start makes the whole process smoother. Here’s a list of what you’ll typically need:
Essential Tools:
- Safety Gear: Safety glasses and gloves are a must to protect yourself.
- Scrapers or Putty Knives: For removing loose paint or debris.
- Wire Brush: To scrub away rust, grime, and chalky residue.
- Sandpaper: Various grits – start with a coarser grit (like 80-120) for cleaning and smoothing, and a finer grit (like 220) for a final smooth finish.
- Denatured Alcohol or Mineral Spirits: For a final degreasing clean.
- Clean Rags or Microfiber Cloths: For cleaning and wiping.
- Painter’s Tape: To mask off areas you don’t want to paint.
- Paint Brushes: High-quality synthetic brushes are good for latex or acrylic paints.
- Paint Rollers: Small foam or microfiber rollers for smooth finishes on larger areas.
- Spray Paint Applicator (Optional): If using spray paint.
Key Materials:
- Mild Detergent and Water: For the initial wash.
- Degreaser (Optional but Recommended): Helps remove stubborn grease.
- Metal Etching Primer: Crucial for aluminum. This product lightly “etches” the surface, creating microscopic pits for the paint to grip. Look for primers specifically designed for bare metal or aluminum.
- High-Quality Exterior or Interior Paint: Choose a paint suitable for metal surfaces. Acrylic latex paints or oil-based enamels are good choices. For outdoor items, ensure it’s formulated for exterior use to withstand weather.
- Optional: Clear Topcoat/Sealer: For added durability and protection, especially for high-traffic items.
Step-by-Step Guide: Painting Aluminum
Let’s break down the process into simple, manageable steps. Following these carefully will ensure your paint job looks great and lasts!
Step 1: Clean the Aluminum Thoroughly
This is arguably the most important step. Any dirt, grease, wax, or chalky residue will prevent the paint from sticking properly. You want a perfectly clean surface.
- Initial Wash: Mix a mild detergent with warm water. Use a sponge or cloth to scrub the entire aluminum surface. Rinse thoroughly with clean water and let it dry completely.
- Scrape and Scrub: If there’s any peeling paint, loose debris, or oxidation (that powdery white or gray stuff), use a scraper or putty knife to gently remove it. A wire brush is excellent for getting into crevices and removing tougher grime or dullness.
- Degrease: After washing and scrubbing, wipe down the entire surface with denatured alcohol or mineral spirits on a clean rag. This removes any lingering oils or residue that water alone might not get. Ensure good ventilation when using these products.
Step 2: Lightly Sand the Surface
Sanding creates a bit of “tooth” for the primer to adhere to. You’re not trying to remove material, just scuff it up.
- Choose Your Grit: Use medium-grit sandpaper, like 120-grit.
- Sand Gently: Lightly sand the entire aluminum surface. You’re aiming to dull the original finish, not to create deep scratches. If you’re painting over an existing painted surface that’s in good condition (no peeling), a light sanding with 220-grit sandpaper might suffice to improve adhesion.
- Clean Up Dust: After sanding, wipe the surface down again with a clean, dry cloth to remove all the dust. You can follow this with another wipe-down using denatured alcohol or mineral spirits for a final, spotless clean.
Step 3: Apply a Suitable Primer
This is where we build a strong foundation for our paint. For aluminum, a specialized metal etching primer is highly recommended because it’s formulated to bond with non-ferrous metals like aluminum.
- Read the Primer Instructions: Always follow the manufacturer’s directions on the primer can.
- Application: Apply a thin, even coat of the etching primer. You can use a brush, roller, or spray can, depending on the primer type and the item you’re painting. For spray primers, use light, even strokes, holding the can about 10-12 inches away. Overlapping your strokes slightly will ensure full coverage.
- Drying Time: Allow the primer to dry completely according to the manufacturer’s recommendations. This is crucial for proper adhesion. Prematurely applying the next coat can compromise the bond.
- Second Coat (If Needed): Some situations might benefit from a second thin coat of primer for maximum adhesion and coverage, especially if the aluminum had significant oxidation or a slick original finish. Again, ensure the first coat is fully dry before applying a second.
Tip: If you’re painting over already-primed aluminum or a good quality factory finish that’s been prepped, you might be able to skip the etching primer and go straight to a good quality metal primer. However, etching primers are generally the safest bet for bare or suspect aluminum surfaces.
Step 4: Apply the Topcoat (Paint)
Now for the color! This is the most satisfying part.
- Choose the Right Paint: Use a high-quality paint designed for metal. Exterior acrylic latex paints offer good flexibility and durability, while oil-based enamels can provide a very hard, glossy finish. For spray painting, look for “direct-to-metal” (DTM) formulas, which often combine primer and paint.
- Stir Your Paint: If using a can of paint, stir it thoroughly to ensure any pigments are evenly distributed.
- Apply Thin Coats: Just like with primer, apply the paint in thin, even coats. It’s much better to apply two or three thin coats than one thick one. Thick coats can drip, sag, and take much longer to cure properly, leading to a less durable finish.
- Application Methods:
- Brushing: Use smooth, even strokes. Work in one direction to maintain a consistent finish.
- Rolling: A high-density foam roller or a microfiber roller will give a smooth finish with fewer roller marks.
- Spraying: For a professional, factory-like finish, spray paint is excellent. Use steady, sweeping motions, overlapping each pass by about 50%. Maintain a consistent distance from the surface.
- Drying Between Coats: Allow each coat of paint to dry according to the manufacturer’s instructions before applying the next. This usually means waiting at least 2-4 hours, but it can vary.
- Final Coat: Apply your final coat, ensuring even coverage.
Step 5: Allow for Proper Curing
Drying is when the paint is touch-dry, but curing is when the paint fully hardens and reaches its maximum durability. This process can take several days to a couple of weeks, depending on the paint type and environmental conditions (temperature and humidity). Avoid heavy use or harsh cleaning of the painted aluminum during the curing period.
Painting Aluminum Spray Paint vs. Brush/Roller
Each application method has its pros and cons, especially for beginners:
| Method | Pros | Cons | Best For |
|---|---|---|---|
| Spray Paint | Quick application, smooth finish, reaches tight areas easily. | Requires good ventilation, potential for overspray, can be trickier to control for beginners, tip can clog. | Intricate items, large flat surfaces, achieving a very smooth finish. |
| Brush & Roller | More control over application, less overspray, easier for beginners to manage. | Can leave brush marks or roller texture, slower application, may require more coats for even coverage. | Smaller projects, detailed areas, achieving a textured finish, when spray painting isn’t feasible. |
Troubleshooting Common Issues
Even with careful preparation, you might run into a few hiccups. Here’s how to handle them:
- Paint Not Sticking/Peeling: This almost always goes back to inadequate cleaning or skipping the primer. If it’s minor, try sanding it down lightly, re-cleaning, and reapplying a good primer and paint. For major peeling, you might need to strip the paint and start over.
- Runs and Drips: Usually caused by applying paint too thickly or not using smooth, even strokes. While the paint is still wet, you might be able to gently smooth it out with a brush. If it’s dried, you’ll need to let it cure, sand the drips smooth, and reapply a thin coat.
- Uneven Coverage: This can happen if the paint wasn’t stirred well, if you’re not applying thin enough coats, or if you’re not overlapping your strokes sufficiently (especially with spray paint). Lightly sand the uneven areas once dry and apply another thin coat.
- Chalky Finish: This indicates the paint hasn’t bonded well or is breaking down. It might be chalky primer or paint that’s old or not suitable for metal. Thorough cleaning and a proper primer are key to preventing this.
A great resource for understanding paint and surface preparation is Paint Quality, which offers detailed guides on preparing various surfaces for painting.
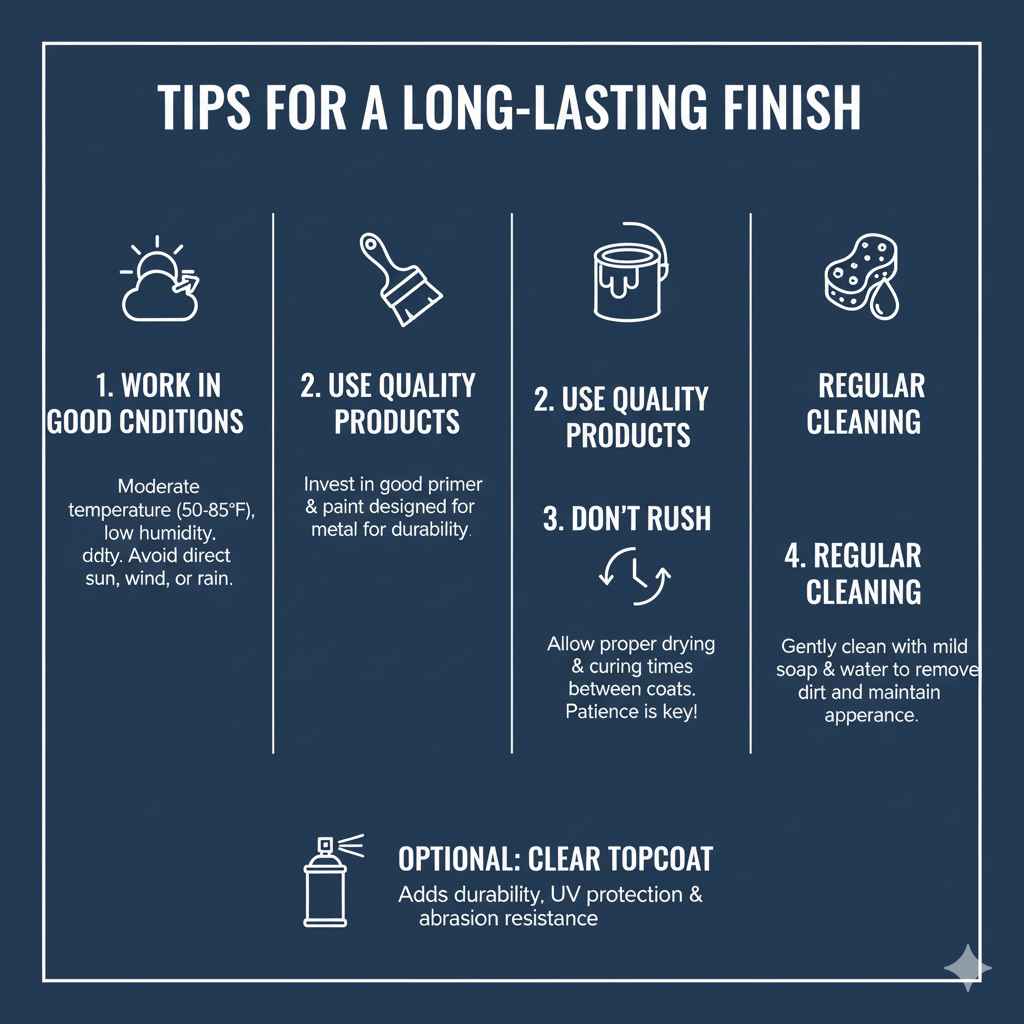
Tips for a Long-Lasting Finish
To make sure your newly painted aluminum looks great for years to come, keep these tips in mind:
- Work in Good Conditions: Paint in moderate temperatures (usually between 50-85°F or 10-30°C) and low humidity. Avoid painting in direct sunlight, on windy days, or when rain is expected.
- Use Quality Products: Investing in good quality primer and paint specifically designed for metal will make a significant difference in durability and ease of application.
- Don’t Rush: Patience is key. Allow proper drying and curing times between coats and before putting the item back into heavy use.
- Regular Cleaning: Gently clean the painted surface with mild soap and water periodically to remove dirt and prevent buildup. This will help maintain its appearance and prevent potential damage.
- Consider a Topcoat: For items exposed to harsh weather or heavy wear, a clear acrylic topcoat can add an extra layer of protection against UV rays and abrasion.
Frequently Asked Questions (FAQs)
Q1: Do I really need a special primer for aluminum?
A1: Yes, it’s highly recommended. Aluminum is a non-ferrous metal, meaning it doesn’t have iron in it, and it’s often smoother than other metals. A specialized etching primer or a good quality metal primer is formulated to grip this type of surface, preventing peeling or chipping later on.
Q2: Can I paint over old, peeling paint on aluminum?
A2: You can, but you must thoroughly scrape away all loose and peeling paint until you reach a sound surface. Then, clean, sand, and prime the entire area, especially bare spots, before painting. If the old paint is extensive, it might be easier to strip it all off and start from scratch.
Q3: What’s the best paint to use on outdoor aluminum furniture?
A3: For outdoor items, look for exterior-grade acrylic latex paint or an oil-based enamel designed for metal. Ensure it’s flexible enough to withstand temperature changes and durable enough to resist UVrays and moisture. Many “direct-to-metal” paints are also excellent choices.
Q4: How long does paint take to dry on aluminum?
A4: “Dry to touch” usually takes 1-4 hours, depending on the paint type and conditions. However, this is not when it’s ready for a second coat or full use. “Recoat time” (when you can apply another layer) is usually specified on the paint can and is often several hours. “Full cure” for maximum hardness can take days to weeks.
Q5: Can I paint aluminum siding?
A5: Absolutely! Painting aluminum siding can give your home a whole new look. The process is similar to painting other aluminum items: thorough cleaning, light sanding, a good metal primer, and multiple thin coats of appropriate exterior paint. You may want to consider hiring professionals for large areas like siding, or if you’re not comfortable using spray equipment.
Q6: Will painting aluminum help prevent oxidation?
A6: Yes, a properly applied paint system (primer and paint) acts as a protective barrier that helps prevent moisture and air from reaching the aluminum surface, thus slowing down or preventing further oxidation. However, if oxidation is already present and not fully removed during prep, it can degrade the paint bond over time.