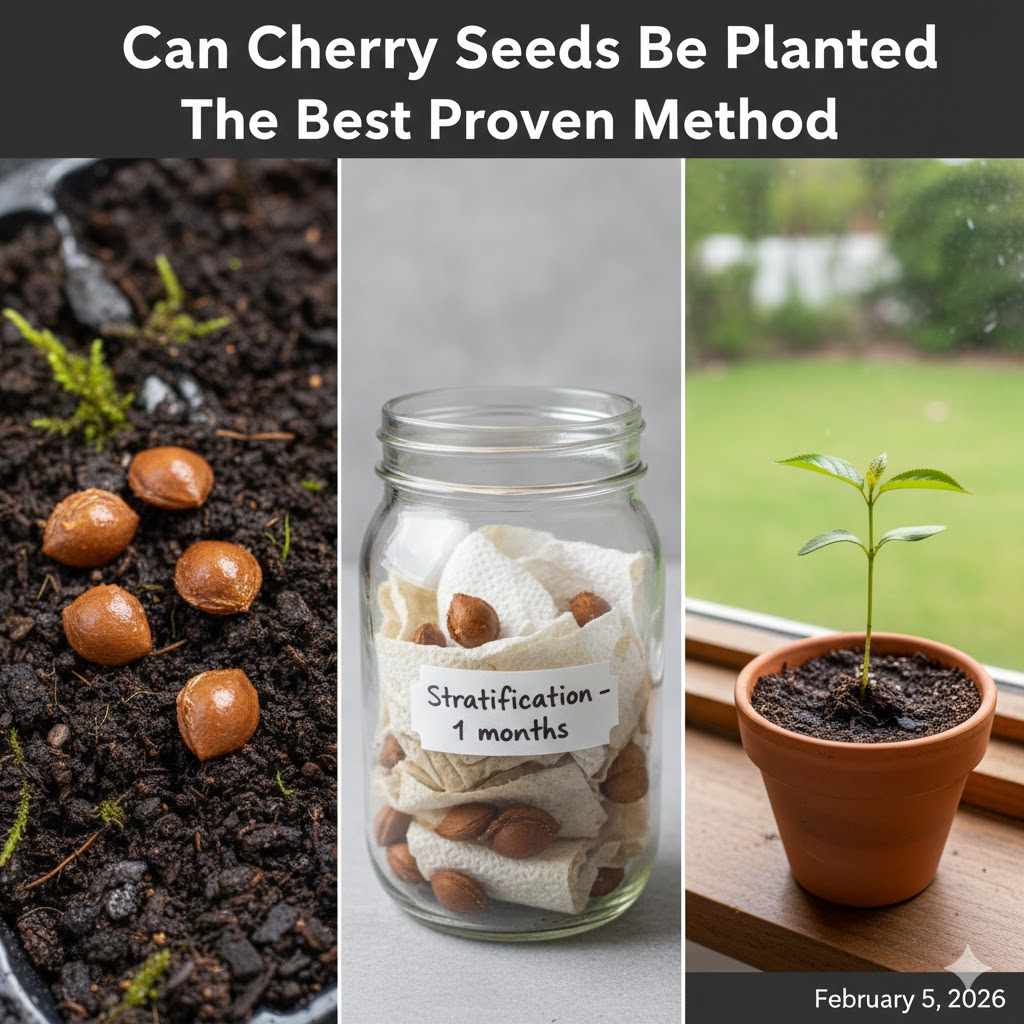
Can Cherry Seeds Be Planted The Best Proven Method
Yes, you can absolutely plant cherry seeds and grow a tree. The proven method requires cleaning the seeds, followed by a crucial cold, moist period called stratification to break their dormancy. With patience and proper care, these prepared seeds can sprout into a new cherry tree, offering a rewarding long-term project.
Hello, friend. It’s Md Meraj. In my workshop, I teach people how to turn a simple piece of wood into something beautiful and useful. The process takes patience, the right steps, and a bit of care. Guess what? Growing a cherry tree from a tiny seed is a lot like that. Many people wonder if you can just plant a cherry pit in the ground. While it sounds simple, there’s a secret step that makes all the difference.
It can feel a little confusing, but I promise it’s easier than it looks. Think of it as a fun project that connects you with nature. In this guide, I’ll walk you through the best proven method, step-by-step. We’ll get those seeds ready, plant them correctly, and give you the best shot at seeing a new tree sprout. Let’s get started and grow something amazing together.
Why Most Cherry Seeds Don’t Sprout (and How to Fix It)
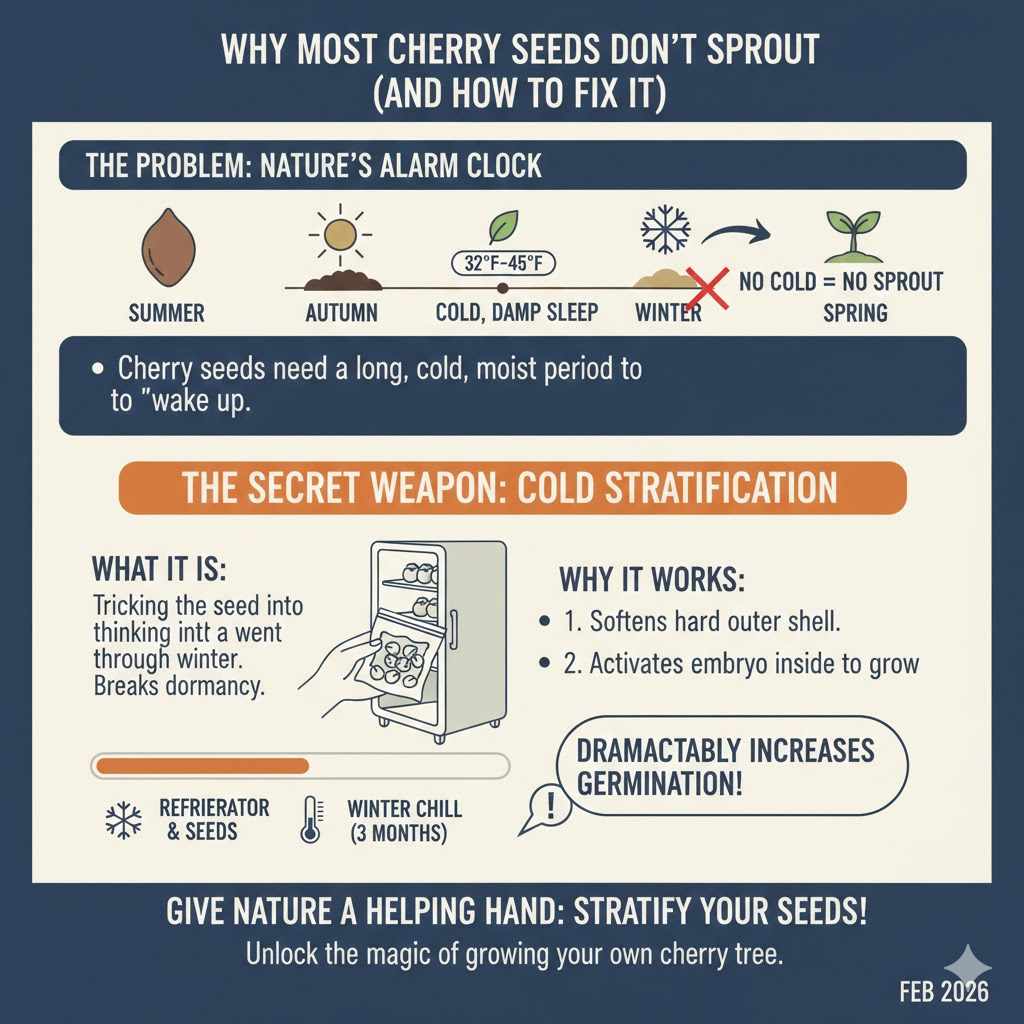
Have you ever tossed a cherry pit into your yard, hoping for a tree, only to find nothing happens? You’re not alone. This is the most common frustration for beginners. The reason is simple: a cherry seed is in a deep sleep, and it needs a special wake-up call before it will grow.
This “wake-up call” is a natural process. In the wild, a cherry falls to the ground in summer. It spends all autumn and winter buried in the cold, damp soil. This long, chilly period signals to the seed that spring is coming and it’s safe to start growing. Without this cold spell, the seed’s hard outer shell won’t soften, and the embryo inside will stay dormant.
The Secret Weapon: Cold Stratification
We can recreate this winter chill right in our own homes. The technique is called cold stratification. It’s the single most important step for successfully growing a cherry tree from a seed. It sounds technical, but it’s just a fancy term for tricking the seed into thinking it has gone through winter.
By giving the seed a cold and moist environment for a few months, we are breaking its dormancy. This proven method dramatically increases your chances of germination. It tells the seed, “Hey, winter is over. It’s time to wake up and grow!” It’s the same principle as chilling flower bulbs before planting them in the spring. We are simply giving nature a helping hand.
Gathering Your Tools and Materials
Just like any good project, success starts with having the right supplies ready. You don’t need anything expensive or hard to find. Most of these items are probably already in your home or garden shed. Here’s a simple checklist of what you’ll need.
- Cherry Seeds: The most important ingredient! We’ll talk about how to choose the best ones in a moment.
- Paper Towels: To hold moisture for the stratification process.
- Airtight Container or Plastic Bag: A small Tupperware-style container or a resealable plastic sandwich bag works perfectly.
- Peat Moss or Sand (Optional but Recommended): This helps retain moisture evenly and prevent mold. You can also use vermiculite.
- Small Pots or Seed Starting Trays: About 4-6 inches deep with drainage holes.
- Potting Mix: A high-quality, well-draining seed starting mix is best.
- Water: For cleaning and moistening.
- A Refrigerator: Your cold stratification chamber!
- A Label or Marker: To write the date on your bag so you don’t forget when you started.
The Step-by-Step Proven Method to Plant Cherry Seeds
Alright, you’ve got your supplies. Now it’s time for the fun part. Follow these steps carefully, and you’ll be on your way to sprouting your very own cherry tree. I’ve broken it down into simple, manageable actions. Don’t rush—each step is important.
Step 1: Choose and Prepare Your Cherry Seeds
The success of your project starts with the right seeds. You can’t always use seeds from cherries you bought at the supermarket. Many commercial cherries are harvested before they are fully mature, which means their seeds may not be viable. Also, many are hybrid varieties, and the tree grown from their seed may not produce fruit like the parent.
Your best bet is to get seeds from a local source:
- Farmer’s Market: Cherries from a local farm are often ripened on the tree and are more likely to have viable seeds. Ask the farmer what variety they are.
- A Neighbor’s Tree: If you know someone with a healthy cherry tree, ask if you can have a few fruits. This is a great way to get seeds that are adapted to your local climate.
- Online Seed Suppliers: You can buy cherry seeds specifically for planting from reputable horticultural websites.
Once you have your cherries, eat the fruit and save the pits. You’ll want to collect more than you think you need—I suggest starting with at least 10 to 20 seeds to increase your chances of success, as not every seed will sprout.
Step 2: Clean the Seeds Thoroughly
After enjoying the cherries, you need to clean every bit of fruit pulp off the seeds. Any remaining flesh can lead to mold during the stratification process, which will ruin the seed.
- Initial Rinse: Place the pits in a colander and rinse them under warm water.
- Gentle Scrub: Use a soft brush (an old toothbrush works great) or your fingers to gently scrub away any clinging fruit pulp.
- Soak (Optional): You can soak the seeds in a bowl of warm water for a few hours. This can help loosen any stubborn bits.
- Final Rinse and Dry: After they are perfectly clean, spread them out on a paper towel and let them air dry for a couple of days in a cool, dry place. They shouldn’t be wet when you put them away for stratification.
This step is like prepping wood before you finish it. A clean, smooth surface gives the best results. A clean seed is a healthy seed.
Step 3: Stratify Your Seeds (The Most Important Step)
Here it is—the key to success. We’re going to give your seeds their artificial winter. The goal is to keep them cold and consistently moist, but not soaking wet, for about three to four months.
- Prepare the Medium: Take a handful of peat moss, sand, or a couple of folded paper towels. Dampen it with water, then squeeze out all the excess. You want it to feel like a damp sponge, not dripping wet.
- Pack the Seeds: Place your clean, dry seeds inside the moist paper towel or mix them into the damp peat moss.
- Seal the Container: Put the seeds and their moist medium into your plastic bag or airtight container. Seal it, but not so tightly that no air can get in. If using a bag, you can poke a few tiny holes in it. If using a container, just closing the lid is fine.
- Label and Refrigerate: Use your marker to write the date and “Cherry Seeds” on the bag or container. Place it in your refrigerator. The back of the fridge, where the temperature is consistent, is a great spot. Avoid the freezer—you want to chill the seeds, not freeze them solid.
Now, the hard part: waiting. You need to leave them in the fridge for at least 10 to 12 weeks. You can check on them once a month to make sure the medium is still damp and to look for any signs of mold. If you see a little mold, you can gently wipe it off the seed, but if it’s widespread, that seed may be a loss.
Step 4: Planting the Sprouted Seeds
After about three months, it’s time to check your seeds. Some may have already started to crack open and sprout a tiny root! This is a fantastic sign. If none have sprouted, don’t worry. They are still ready to be planted. Early spring is the perfect time to move on to this step.
- Prepare Your Pots: Fill your small pots with a good quality seed-starting potting mix. Water the soil until it’s evenly moist before you plant the seeds.
- Plant the Seeds: Plant one seed in each pot. Place it about half an inch to an inch deep in the soil. If a seed has already sprouted a root, be very gentle and make sure the root is pointing downwards.
- Find a Good Location: Place the pots in a warm, sunny location. A windowsill that gets at least 6 hours of sunlight per day is ideal.
- Water Gently: Keep the soil consistently moist but not waterlogged. A spray bottle is great for watering seedlings without disturbing them. Overwatering can cause the seeds to rot.
What to Expect: A Cherry Tree Timeline
Growing a tree from a seed is a journey of patience. It’s not a quick project, but it’s incredibly rewarding to watch something grow because of your care. Here is a realistic timeline to help you know what to expect.
| Stage | Expected Timeframe | What to Look For |
|---|---|---|
| Cold Stratification | 10 – 12 weeks (approx. 3 months) | Seeds remain dormant. Keep them cold and moist. |
| Germination | 2 – 8 weeks after planting | A tiny green shoot emerges from the soil. |
| First True Leaves | 4 – 6 weeks after germination | The seedling develops its first set of characteristic cherry leaves. |
| First Year Growth | By end of first growing season | Your seedling may grow to be 6-12 inches tall. |
| Transplanting Outdoors | 1 – 2 years old | The young tree is strong enough to be planted in its final location. |
| First Fruit | 5 – 10 years | Patience is key! Fruiting depends on variety, pollination, and growing conditions. |
Sweet vs. Sour Cherries: Which Should You Plant?
Before you start, it’s helpful to know that there are two main types of cherries: sweet and sour. They have different needs and uses. Knowing the difference can help you decide what kind of tree you want to grow.
| Feature | Sweet Cherries (e.g., Bing, Rainier) | Sour Cherries (e.g., Montmorency, Morello) |
|---|---|---|
| Best For | Eating fresh from the tree. | Baking, pies, jams, and preserves. |
| Pollination | Most varieties need another cherry tree nearby for cross-pollination to produce fruit. | Most varieties are self-pollinating, meaning you only need one tree to get fruit. |
| Hardiness | Less cold-hardy. Prefer milder climates. | Very cold-hardy and more adaptable to different climates. More disease-resistant. |
| Ease of Growth for Beginners | More challenging due to pollination needs and susceptibility to pests/diseases. | Easier and more reliable for beginners due to self-pollination and hardiness. |
For your first time, I often recommend starting with sour cherry seeds. They are generally more forgiving and reliable, and you only need one tree to eventually get a harvest. For more detailed information on specific fruit tree varieties suitable for your area, your local university extension service is an excellent resource, like this guide from the University of Minnesota Extension.
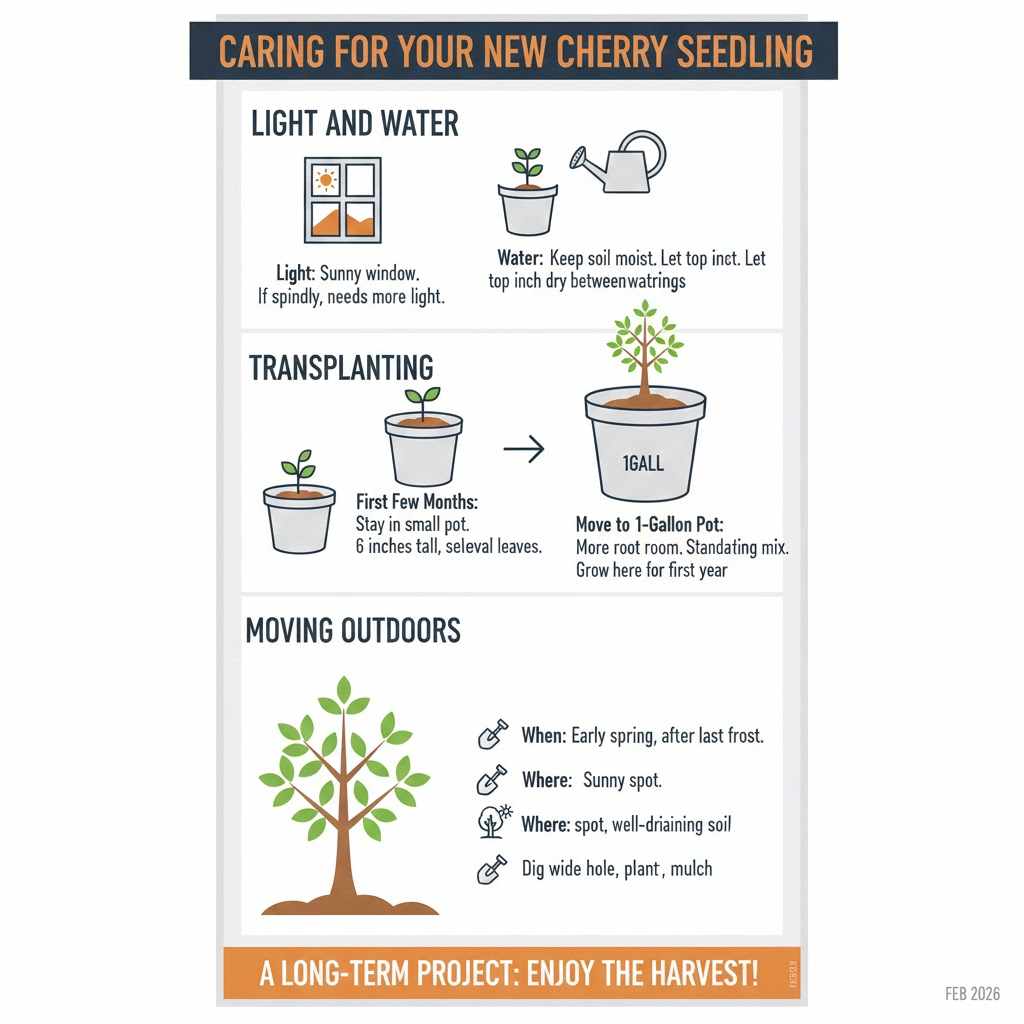
Caring for Your New Cherry Seedling
Congratulations, your seed has sprouted! Now you have a tiny baby tree to care for. The first year is critical. Just like a delicate piece of furniture needs a protective coat of finish, your seedling needs protection and care to grow strong.
Light and Water
Your seedling needs plenty of light. A sunny window is a good start, but if you notice it getting long and spindly, it may need more. Keep the soil consistently moist. Let the top inch of soil dry out slightly between waterings to prevent root rot.
Transplanting
Your seedling can stay in its small pot for the first few months. Once it has several sets of leaves and is about 6 inches tall, you can move it to a larger, one-gallon pot. This gives the roots more room to grow. Use a standard potting mix. Let it grow in this larger pot for its first year.
Moving Outdoors
After its first year, your little tree will be ready for the great outdoors. The best time to plant it in the ground is in the early spring, after the last frost has passed. Choose a sunny spot with well-draining soil. Dig a hole twice as wide as the root ball but no deeper. Gently place the tree in the hole, fill it with soil, and water it thoroughly. A layer of mulch around the base will help retain moisture and keep weeds away.
Remember, this is a long-term project. It’s a wonderful legacy to plant a tree that could provide delicious fruit for generations to come. Every step, from cleaning that first seed to watching it grow, is part of the beautiful process.
Frequently Asked Questions (FAQ)
1. Can I plant a seed from a grocery store cherry?
You can try, but success is less likely. Supermarket cherries are often harvested early, and their seeds might not be mature enough to grow. They are also often hybrids, so the tree you grow may not produce the same type of fruit. For the best results, use seeds from locally grown, tree-ripened cherries.
2. How long will it take to get fruit from my cherry tree?
Patience is essential. A cherry tree grown from seed can take anywhere from 5 to 10 years to mature enough to produce its first crop of fruit. Some may take even longer. Enjoy the process of watching your tree grow!
3. Do I need to plant more than one cherry tree?
It depends on the variety. Most sweet cherry varieties require a different cherry variety nearby for cross-pollination to produce fruit. Most sour cherries are self-pollinating, so you only need one tree. If you only have space for one tree, a sour cherry is a safer bet.
4. What should I do if my seeds get moldy during stratification?
A small amount of white, fuzzy mold can sometimes be wiped off. However, if the seed is covered in black or green mold, it has likely rotted and should be discarded. This is why starting with extra seeds is a great idea. To prevent mold, make sure your starting medium is damp, not soaking wet, and ensure your seeds are perfectly clean.
5. When is the best time of year to start this process?
The best time to start is in the late summer or early fall, right after cherries are harvested. You can clean the seeds and put them in the fridge for stratification. This timing means they will have their 3-month cold period during the fall and winter, and they’ll be ready to plant in pots in the early spring, perfectly mimicking nature’s cycle.
6. Can I plant the cherry seed directly in the ground?
You can plant a fresh cherry pit directly outdoors in the fall and let it stratify naturally over the winter. However, this method is less reliable. The seed is exposed to weather fluctuations, and critters like squirrels and mice might dig it up. Stratifying them in your refrigerator gives you much more control and a higher success rate.
7. My seedling is growing tall and skinny. What does that mean?
A tall, skinny, or “leggy” seedling is usually a sign that it is not getting enough light. It’s stretching to find more. Try moving it to a sunnier window or supplementing with a small grow light to help it grow stronger and more compact.
Conclusion: A Project Worth the Patience
So, can you plant a cherry seed and grow a tree? Absolutely. As you’ve seen, the path from a small pit to a sapling is one of patience and care, much like a detailed woodworking project. It’s not about instant results; it’s about following the right steps and enjoying the journey.
The secret is simple: mimic nature. By cleaning the seed and giving it the cold, moist rest it needs through stratification, you unlock its potential to grow. From there, with a bit of sun, water, and time, you can watch a tiny seed transform into a living, growing tree.
Don’t be discouraged if not every seed sprouts. That’s part of the process. But with the proven method we’ve walked through today, you have the best possible chance for success. This is more than just a gardening task—it’s a connection to nature, a lesson in patience, and a rewarding project that could bring joy for years to come. Now, go find some cherries and start your own growing adventure!