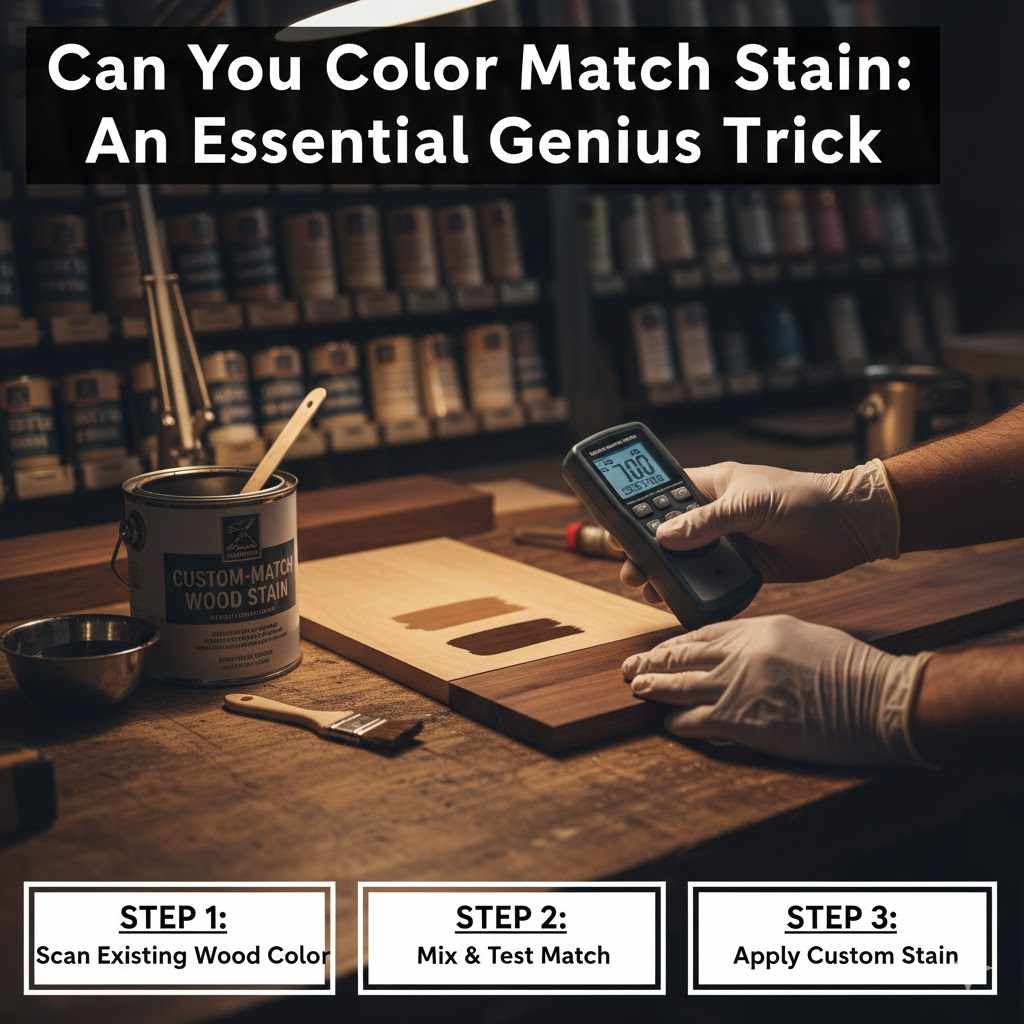
Can You Color Match Stain: An Essential Genius Trick
Yes, you can absolutely color match wood stain! The key is to mix two or more stain colors in small, precise amounts. Always test your custom mix on a hidden spot or a piece of scrap wood from your project before applying it to the main surface.
Ever tried to repair a stained piece of furniture, only to end up with a mismatched patch? It’s a frustrating and common problem. You want a perfect, seamless finish, but store-bought stains rarely match an existing color exactly. Don’t worry, this isn’t a sign of failure. It just means you need a simple trick that the pros use. I’m here to show you a genius method for creating a perfect custom stain color, step by step. You’ll be matching colors like a seasoned woodworker in no time.
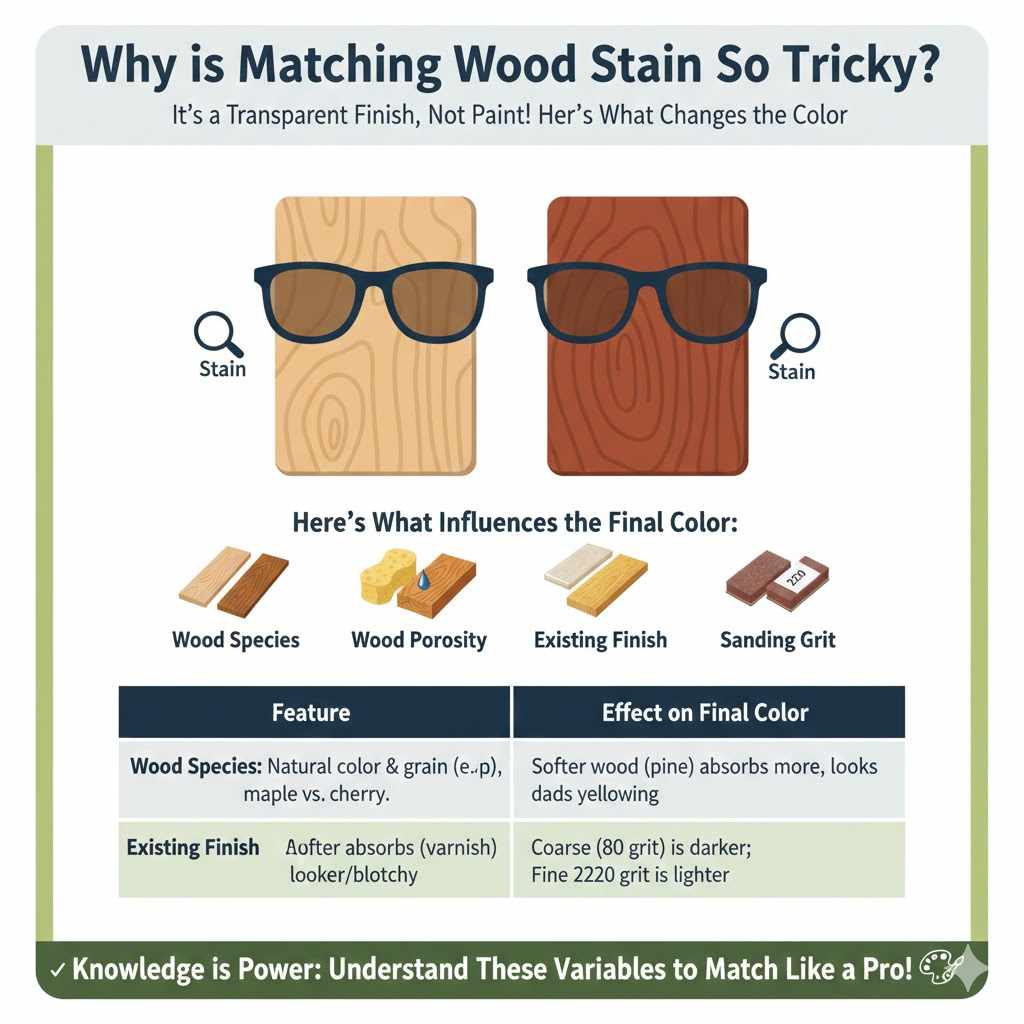
Why is Matching Wood Stain So Tricky?
Before we dive into the “how-to,” let’s understand the “why.” Matching stain isn’t like matching paint. With paint, you’re applying an opaque layer that covers the surface completely. Stain, on the other hand, is transparent. It’s designed to enhance the wood, not hide it. This means several factors can change the final color, making a perfect match a bit of a puzzle.
Think of it like putting on sunglasses. A gray lens makes the world look different than a brown lens. The wood underneath your stain is the world, and the stain is the lens. Here’s what influences that final view:
- Wood Species: Every type of wood has its own natural color and grain. A stain that looks perfect on a light wood like maple will look completely different on a darker, reddish wood like cherry.
- Wood Porosity: Softer woods like pine are more porous and soak up more stain, which often results in a darker and sometimes blotchy appearance. Hardwoods like oak absorb stain more evenly.
- Existing Finish: If you’re trying to match an old finish, you’re not just matching the original stain. You’re also matching years of aging and the yellowing effect of the old topcoat (like shellac or varnish).
- Sanding Grit: The smoothness of your wood matters. A surface sanded with coarse 80-grit sandpaper will absorb more stain and look darker than a surface sanded with fine 220-grit sandpaper.
It sounds like a lot to consider, but don’t be intimidated! Knowing these variables is the first step to controlling them. And that’s exactly what we’re going to do.
Essential Tools and Materials You’ll Need
Great news! You don’t need a professional workshop to do this. You can get fantastic results with a few simple items. Having everything ready before you start makes the process smooth and enjoyable.
Here’s your shopping list:
- Base Stains: Get at least two, preferably three, small cans of oil-based or water-based stain. Start with a color close to your target, a darker one (like ebony or dark walnut), and maybe a warmer one (like a red oak or cherry). Important: Do not mix oil-based and water-based stains. Stick to one type.
- Scrap Wood: This is non-negotiable! You need a piece of the exact same wood as your project, sanded to the same smoothness. If you don’t have scrap, use a hidden area on your project, like the underside of a table or inside a cabinet door.
- Measuring Spoons or Droppers: Precision is key. Plastic medicine droppers or a set of small measuring spoons (1/4 teaspoon, 1/2 teaspoon) work perfectly.
- Mixing Cups: Small, clear plastic cups or clean glass jars are ideal for mixing your custom stain.
- Stir Sticks: Popsicle sticks or simple wooden stirrers.
- Clean Rags or Foam Brushes: For applying the test stains.
- Paper Towels: For cleanup.
- Nitrile Gloves: Protect your hands from the stain.
- A Notebook and Pen: To write down your formulas!
- Your Project’s Topcoat: The clear finish (polyurethane, lacquer, etc.) you plan to use. It often changes the stain’s appearance, so you need it for testing.
The Step-by-Step Guide to a Perfect Stain Match
Alright, let’s get to the magic. This process is more art than science, so be patient and have fun with it. We’ll break it down into simple, easy-to-follow steps. Follow along, and you’ll gain a skill that will serve you for years to come.
Step 1: Identify Your Target Color
First, look closely at the color you want to match. Is it warm with red or yellow tones? Is it cool with gray or ashy tones? Is it dark and rich, or light and subtle? Place your scrap piece of wood next to the target color in good, natural light. This visual comparison will be your guide.
Step 2: Get Your Base Stains Ready
Open your cans of stain and stir them thoroughly. Pigments settle at the bottom, so a good stir is crucial for getting the true color. Based on your target color, choose the stain that seems closest. This will be your primary or “base” color.
For example, if you’re matching a warm medium brown, your base might be “Provincial” or “Early American.” You’ll then use darker stains like “Jacobean” or reddish ones like “Red Mahogany” as your “tinting” colors.
Step 3: Start Mixing – The “Drop-by-Drop” Method
This is where your patience pays off. You want to work in small, measurable batches.
- Pour a small, measured amount of your base stain into a mixing cup. Let’s say you start with one tablespoon. Write this down in your notebook: “Batch 1: 1 tbsp Provincial.”
- Now, add just a tiny amount of your secondary, or tinting, stain. Use a dropper to add just a few drops of a darker or warmer stain.
- Write it down! For example: “Batch 1: 1 tbsp Provincial + 5 drops Jacobean.” This record is your recipe. Without it, you’ll never be able to recreate your perfect match.
- Stir the mix thoroughly until the color is completely uniform.
Step 4: Test, Test, and Test Again!
Now, grab that all-important piece of scrap wood. Make sure it’s sanded the same way as your project.
- Using a clean rag or foam brush, apply a small swatch of your new custom mix to the scrap wood.
- Label it immediately. Use a piece of masking tape and write “Batch 1” on it.
- Wipe off the excess stain after a few minutes, just like you would on your actual project.
- Now, let it dry. The wet stain color is not the final color. It needs to dry completely to be properly evaluated. This can take several hours depending on the stain type and conditions. For reliable color checking, consult the manufacturer’s directions, but waiting at least 4-6 hours is a good starting point.
Step 5: Compare and Adjust
Once your first test patch is dry, hold it right next to your target color. How does it look?
- Too light? Add a few more drops of the darker stain to your mix. Document the change (“Batch 1A: +3 more drops Jacobean”), stir, and apply a new test patch.
- Not warm enough? Add a few drops of a reddish or yellowish stain. Document, stir, test.
- Too dark? You can’t easily remove color. The best solution is to start a new batch. Mix a larger amount of your light base stain and then add a very small amount of your dark mix to it.
Continue this process of mixing, documenting, and testing. It might take three, four, or even ten batches to get it just right. This is normal! Every attempt gets you closer.
Step 6: The Secret Finisher – Apply the Topcoat
This is the step most beginners skip, and it’s a critical mistake. The clear topcoat (like polyurethane) will change the color and sheen of the stain. An oil-based polyurethane, for example, often adds a warm, amber tone. A water-based one is typically crystal clear.
Once you think you have a near-perfect match on your dry test swatch, apply a coat of the exact clear finish you’ll be using on your project. Let that dry completely. Now, do your final comparison. This is the true final color!
Understanding Color Theory and Stain Undertones
Getting a feel for stain undertones is what separates the beginners from the experts. Every color has a hidden “undertone”—a subtle hint of red, yellow, green, or blue. Recognizing these will help you know exactly which stain to add to your mix to get the color you want. It’s like being a color detective!
Here’s a simple chart to help you neutralize or enhance undertones:
| If Your Stain Looks… | The Undertone is Likely… | How to Adjust It |
|---|---|---|
| Too red or orange | Red/Yellow (Warm) | Add a few drops of a stain with a green or gray undertone, like “Weathered Oak” or a dark ash brown. Green is opposite red on the color wheel and will neutralize it. |
| Too yellow or golden | Yellow (Warm) | Add a drop of stain with a subtle purplish undertone. “Ebony” or “Dark Walnut” often have these cool tones and can help balance out strong yellows. |
| Too dull or ashy | Gray/Green (Cool) | Add a few drops of a warm stain with a red or amber undertone, such as “Cherry,” “Red Oak,” or “Golden Oak.” This will bring life and warmth back to the color. |
You don’t need to be an artist to understand this. Just remember that you can “cool down” a warm color or “warm up” a cool color by adding a tiny amount of its opposite.
Common Mistakes to Avoid When Matching Stain
We all learn by doing, but learning from others’ mistakes is much faster (and less expensive!). Here are a few common pitfalls to watch out for on your color-matching journey.
Mistake #1: Not Using Scrap Wood
We’ve said it before, but it’s worth repeating. Testing directly on your project, even in a “hidden” spot, is a huge risk. The only way to be 100% sure of the final color is to test on an identical piece of wood that has been sanded and prepared in the exact same way.
Mistake #2: Mixing Different Stain Bases
Never mix an oil-based stain with a water-based stain. They are fundamentally incompatible, just like oil and water. The result will be a clumpy, unusable mess that won’t absorb into the wood properly. Always check the can to ensure you are mixing like with like.
Mistake #3: Forgetting to Record the Recipe
You finally create the absolute perfect color… but you have no idea how you did it. It’s a heartbreaking moment! Get in the habit of writing down every single drop you add to your mix. This way, you can easily make a larger batch for your project once you’ve perfected the formula on your test pieces.
Mistake #4: Rushing the Drying Time
A wet stain looks very different from a dry stain. A topcoat makes it look different again. If you judge your match based on the wet color, you will almost certainly be disappointed with the final result. Patience is your most valuable tool here.
When working with finishing products, always prioritize safety. Ensure your workspace has good ventilation to avoid inhaling fumes from oil-based stains and finishes. For detailed information on handling these products safely, you can refer to guidelines from safety organizations like the CDC on solvent safety.
Knowing Your Wood is Half the Battle
Different wood species accept stain in vastly different ways. This is due to their density, grain pattern, and natural color. Knowing a little about the wood you’re working with can save you a lot of guesswork.
| Wood Type | Staining Characteristics | Pro Tip |
|---|---|---|
| Pine / Poplar | Soft and porous. Prone to blotching (uneven, dark patches). | Always use a pre-stain wood conditioner before staining. This helps the wood absorb stain more evenly. |
| Oak | Hard and has a very prominent grain. The open pores of the grain will soak up more stain and become much darker than the rest of the wood. | This distinct grain pattern is often a desired look. If you want a more uniform color, use a gel stain. |
| Maple / Birch | Very hard and dense with a tight grain. Can be difficult to stain evenly because it resists absorption. | Dye stains often work better than traditional pigment stains on these woods because the smaller dye particles penetrate the dense wood more effectively. |
| Cherry | Has a beautiful natural reddish color that darkens over time with exposure to light. Also prone to blotching. | Like pine, a pre-stain wood conditioner is highly recommended. Be mindful that any stain you apply will darken significantly as the wood ages. |
If you’re ever unsure what kind of wood you’re working with, resources like the USDA’s Forest Products Laboratory can provide fact sheets to help you identify it. Understanding these basic properties will help you anticipate how your custom stain will behave.

Frequently Asked Questions (FAQ)
Can I mix different brands of stain?
Yes, as long as they have the same base. You can mix a Minwax oil-based stain with a Varathane oil-based stain without any issues. The same applies to water-based stains. Just never mix oil with water.
What if my stain comes out too dark?
Once a stain has been absorbed by the wood, it’s very difficult to lighten it. The best approach is to be cautious and build up to your desired color slowly. If you accidentally go too dark on a test piece, you can try mixing that dark color with a “Natural” or untinted stain base to dilute it for your next test.
Can I use a paint store’s color-matching machine for stain?
Generally, no. Paint matching technology is designed for opaque paint. Because stain is transparent and its final color depends on the wood underneath, a computer can’t accurately predict the outcome. The manual mixing and testing method is far more reliable.
How long should I let my test patch dry before judging the color?
This depends on the stain type and conditions like humidity and temperature. For oil-based stains, wait at least 6-8 hours. For water-based stains, 2-4 hours is often enough. However, waiting 24 hours before applying the topcoat for your final check is the safest bet for a true color read.
Will a wood conditioner change the final color?
Yes, slightly. A pre-stain wood conditioner partially seals the wood pores to prevent blotching. This means the wood will absorb less stain, resulting in a slightly lighter color than applying stain to raw wood. That’s why you must use the conditioner on your test piece if you plan to use it on your project.
Can I lighten an existing finish without stripping it?
Sometimes, but it’s an advanced technique. Products called “stain controllers” or “bleaching oils” can be used, but results vary. For beginners, it’s almost always easier and more effective to strip the old finish down to bare wood and start fresh. For a deeper understanding of wood finishing in general, you can find great resources from educational institutions like the University of Minnesota Extension.
Is it better to start with a lighter or darker stain as my base?
Always start with the lighter color as your base. It’s very easy to make a color darker by adding drops of a dark stain. It is much harder to lighten a stain that is already too dark. Think of it like adding salt to soup—you can always add more, but you can’t take it out.
Your Journey to Stain-Matching Mastery
And there you have it—the essential trick to creating a flawless stain match. It’s not about finding a magic bottle on a store shelf; it’s about becoming a color creator in your own workshop. By understanding how wood and stain interact, testing your mixes on scrap, and being patient, you can move beyond frustrating mismatches and achieve truly professional-looking results.
This skill will unlock a new level of confidence in your woodworking and DIY projects. No longer will you have to settle for “close enough.” You can now repair cherished heirlooms, build additions that seamlessly match existing pieces, and bring your unique creative visions to life. Take your time, trust the process, and don’t be afraid to experiment. Happy woodworking!