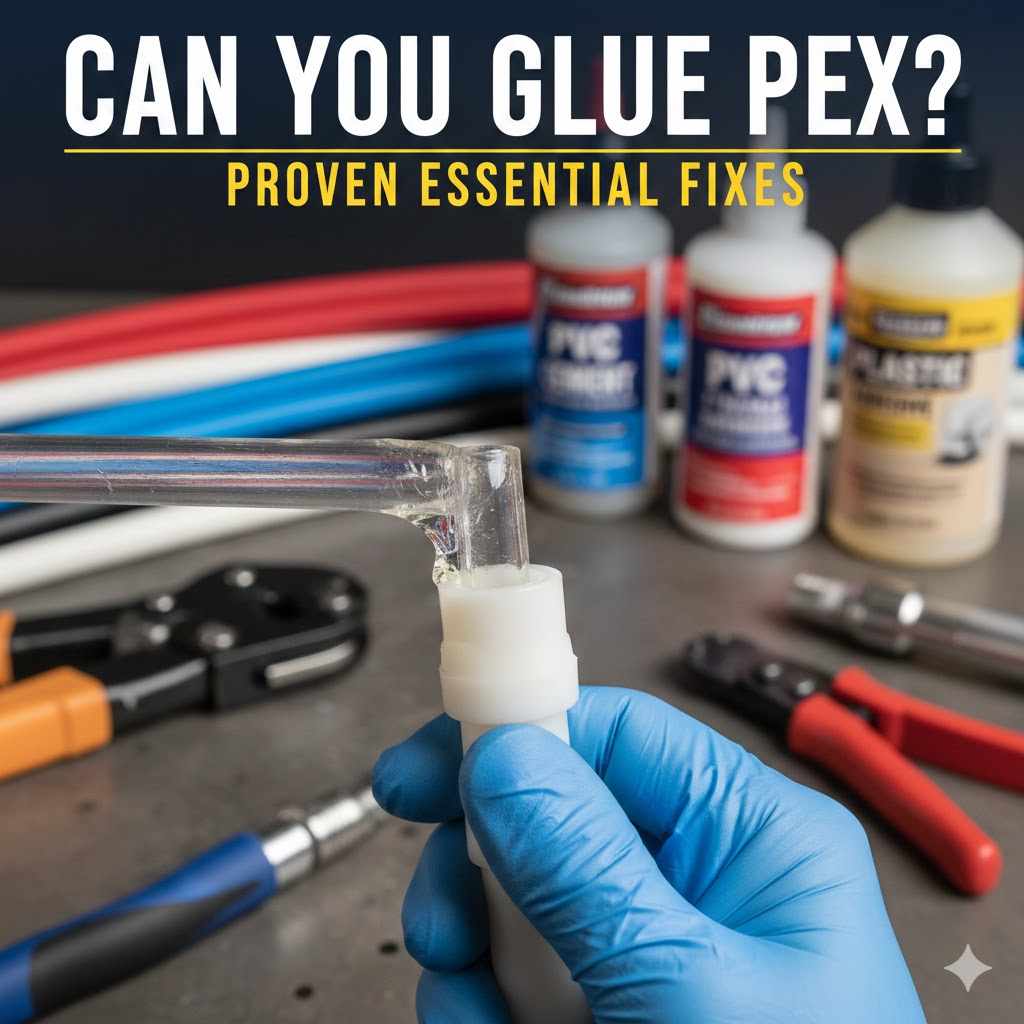
Can You Glue Pex? Proven Essential Fixes
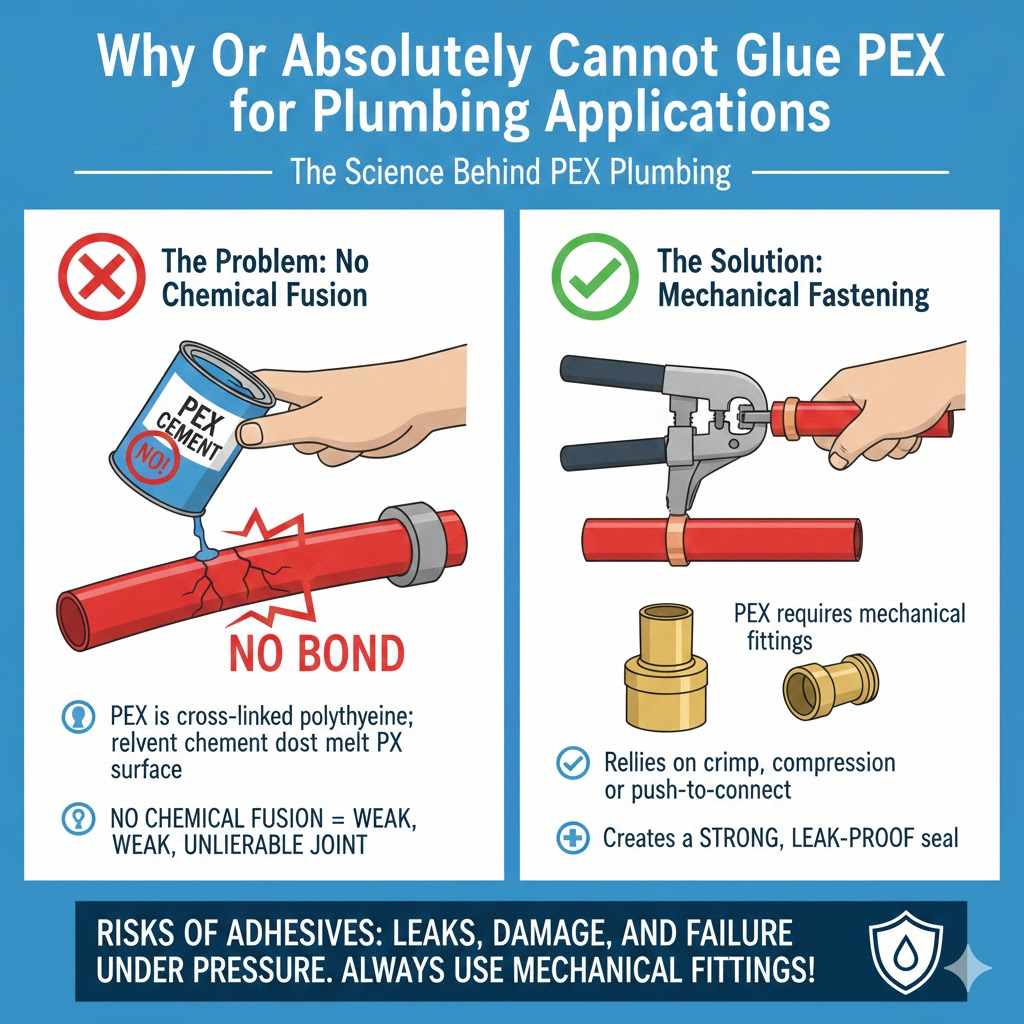
Generally, you cannot use standard glue or adhesive to join PEX tubing for plumbing systems. PEX connections require mechanical fittings—like crimp, clamp, or expansion systems—to create a secure, pressurized seal. Attempting to glue PEX pipes will lead to leaks and system failure.
Welcome to the workshop! If you’ve ever looked at a coil of PEX pipe and wondered if you could use a simple glue or solvent cement for quick repairs, you are not alone. Many DIYers find themselves facing this exact question, usually when a small drip appears or a connection needs a fast fix. Unlike PVC or ABS plastic, PEX (cross-linked polyethylene) plastic simply won’t bond chemically with most common adhesives. This is a common frustration because glue seems like the easiest answer!
But don’t worry. While glue is a no-go, fixing or joining PEX is straightforward once you know the right, proven methods. We will walk through exactly why glue doesn’t work and what the reliable, long-lasting mechanical solutions are. By the end of this guide, you will have the confidence to make safe, durable PEX connections every time. Let’s dive into making connections that actually hold!
Why You Absolutely Cannot Glue PEX for Plumbing Applications
It is crucial to understand the basic science behind PEX plumbing before attempting any repair. Thinking that “if it’s plastic, it can be glued” is a common, yet costly, assumption for beginners working with PEX.
The Difference Between Solvents and Plastics
In the plumbing world, we often talk about solvent welding. This process works beautifully for materials like PVC (polyvinyl chloride) and CPVC (chlorinated polyvinyl chloride). Solvent cements work by temporarily softening the plastic surfaces of the pipe and the fitting. When these softened surfaces press together, the chemical temporarily melts them, causing them to fuse into one solid piece as the solvent evaporates. This creates a monolithic, very strong bond.
PEX, however, is made of cross-linked polyethylene. This unique molecular structure makes it incredibly flexible and durable, perfect for radiant heating and potable water systems. The critical difference is that PEX does not react chemically to standard solvent cements like PVC does. Trying to apply PVC cement to PEX is like trying to glue glass to rubber—they just don’t share the chemistry needed to fuse.
The Pressure Problem
Even if you found a highly specialized, expensive industrial epoxy that superficially stuck PEX to a fitting, it wouldn’t last long in a real-world application. Residential water pressure averages between 40 and 80 PSI. Any connection that relies only on adhesive strength will fail quickly under this consistent stress. PEX fittings require mechanical force to ensure the connection is watertight and can handle the daily pressure cycling. Glue offers no tensile strength or physical lock against separation.
The Risks of Adhesives
Using glue for PEX results in certain failure, leading to several major headaches:
- Immediate or slow leaks that can cause water damage.
- Potential contamination of drinking water if the adhesive breaks down.
- Wasted time and materials by having to redo the joint properly later.
The Proven Fixes: How to Join PEX Correctly
Since we cannot rely on glue, we turn to mechanical joining methods. These are the tried-and-true techniques used by plumbers everywhere to ensure a permanent, leak-proof connection. There are three main, approved methods for joining PEX pipes and fittings.
Method 1: Crimp Connections (The Common Go-To)
The crimp method is very popular, especially for PEX-A and PEX-B systems. It’s often favored for its relative simplicity once you have the right tool.
What You Need:
This method relies on compression to seal the joint:
- PEX Tubing (The pipe itself).
- PEX Fittings (Typically brass or plastic barbs).
- Crimp Rings (Copper or stainless steel rings).
- Crimp Tool (A specialized tool that applies consistent, necessary pressure).
The Step-by-Step Crimping Process:
Making a proper crimp connection requires precision. Don’t rush the tool usage!
- Cut the PEX: Use a dedicated PEX cutter to ensure a perfectly square, clean cut. A ragged edge will compromise the seal.
- Slide the Ring: Slide the crimp ring onto the end of the PEX pipe. Ensure the ring is positioned about 1/8 inch from the end of the pipe.
- Insert the Fitting: Push the PEX tubing firmly over the barbed end of the fitting until the pipe butts right up against the fitting stop.
- Position the Ring: Slide the crimp ring down the pipe until it is positioned over the fitting and just touches the flared edge of the fitting body.
- Crimp: Open the jaws of your crimp tool and place them squarely around the ring, ensuring the crimp tool is fully closed and you feel the satisfying “click” or resistance, which signals a complete, tested crimp.
- Inspect: After crimping, visually check the ring. It should be uniformly compressed into a perfect circle, with no gaps between the ring ends. Most good crimp tools have built-in ring size gauges for quick confirmation.
Expert Tip: Ensure your PEX fitting is approved for the crimp ring type you are using, as systems often require matched components (e.g., using copper rings with a copper-ring crimp tool).
Method 2: Clamp Connections (The Proximity Helper)
Also known as Cinch connections, this method is mechanically similar to crimping but uses a slightly different ring. Clamp connections often use stainless steel rings and can sometimes be quicker for high-volume work or where tool access is tight.
Key Difference from Crimping:
Instead of forming a circular crimp, the clamp method compresses a band or clamp around the fitting. High-quality PEX clamp tools often use an expanding mechanism, creating an oval-shaped compression rather than a uniform circle.
Tip for Inspection: Many clamp tools provide a visual indicator that a connection has been properly cinched, which can be easier for beginners to verify than the subtle look of a copper crimp ring.
Method 3: Expansion Connections (The Premium, Long-Term Choice)
This method is often considered the most durable connection for PEX-A pipe, which has the best “memory” characteristics. This method relies on the elasticity of the PEX tubing itself. This is a favored technique by many professionals who value the highest level of long-term performance, particularly in situations prone to freezing or where minimal fittings are desired.
Understanding the Expansion Process:
Expansion fitting works in three main stages:
- Tooling: An expansion tool stretches the end of the PEX pipe (and slides an expansion ring over it) to a diameter slightly larger than the fitting insertion point.
- Insertion: While the pipe is expanded, the fitting barb is pushed completely inside the pipe.
- Recovery: Over the next several minutes, the PEX tubing slowly shrinks back to its original size, grabbing the fitting extremely tightly, providing a secure seal. The expansion ring provides a barrier against joint separation.
For a deeper dive into reliable plumbing connections, the International Association of Plumbing and Mechanical Officials (IAPMO) provides essential guidance on approved methods that meet residential building codes.
Tools of the Trade: Essential Equipment for PEX Joining
To successfully work with PEX, you need specialized tools. Trying to adapt standard tools often results in a poor seal, wasted materials, and leaks. Investing in the right gear upfront saves tremendous frustration later.
Comparison of Essential PEX Tools
| Tool Name | Primary Use | Best For Beginners |
|---|---|---|
| PEX Cutter | Making straight, burr-free cuts on PEX pipe. | Yes, crucial for clean starts. |
| Crimp Tool | Compressing copper/stainless crimp rings uniformly. | Yes, required for crimp method. |
| Go/No-Go Gauge | Checking if a crimp connection is properly sealed/sized. | Yes, essential for quality assurance. |
| Expansion Tool | Stretching PEX pipe for expansion fittings (PEX-A systems). | No, often higher learning curve/cost. |
| Sliding Cinch Clamp Tool | Installing stainless steel clamp rings. | Medium difficulty; often faster than standard crimping. |
When Can Adhesives Maybe Be Used Near PEX?
While we’ve established that you can’t glue PEX to PEX or PEX to a PEX fitting, there are very niche situations where adhesives are used in conjunction with PEX connections or when connecting PEX to other dissimilar materials.
Connecting PEX to Rigid Piping (Like Copper)
If you need to transition from flexible PEX to a fixed line, such as moving from under a slab to an older copper stub-out, you must use a proper transition fitting.
These fittings are unique—one end accepts the PEX connection (crimp, clamp, or expansion), and the other end is threaded or designed to be soldered (for copper). You do not glue the PEX side, but you might use thread sealant (like PTFE tape or pipe dope) on the transition fitting’s threaded side when screwing it into the fixed plumbing.
Adhesives for Non-Pressure Components
Sometimes, PEX tubing is simply being used as a lightweight conduit or casing, not for pressurized water transport. If a non-plumbing, low-stress structural application calls for attaching the outer jacket of the PEX pipe to a piece of wood or framing material, a heavy-duty construction adhesive (like a polyurethane construction glue) might bond temporarily to the surface of the PEX, but this has absolutely no role in making a water-tight seal.
Troubleshooting Common PEX Connection Mistakes (That Aren’t Gluing)
When your non-glue PEX joint leaks, it’s almost always due to a setup or tool error, not a material defect. Here are the most common mistakes beginners make:
1. Incorrect Cutting Technique
If the cut edge isn’t perfectly perpendicular (square), the ring or clamp cannot seat evenly, creating a channel for water to escape under pressure. Always use a rotary-style PEX cutter; utility knives often crush or angle the pipe end.
2. Improper Fitting Insertion
The PEX tubing must be pushed fully over the barb of the fitting. If the pipe only goes halfway, the securing ring/clamp won’t cover the full sealing surface. You should be able to see the stop inside the fitting through the semi-clear PEX.
3. Failing to Crimp Fully
This is the number one cause of crimp failures. The tool must be squeezed completely shut until it mechanically locks or reaches full force. A light squeeze results in a loose ring that leaks immediately or after only a few cycles of pressure.
4. Using the Wrong Tools or Rings
PEX is standardized, but fittings and rings are not universally interchangeable between the three main types (A, B, C) or manufacturing standards. Using a tool meant for PEX-B/C systems on a PEX-A pipe fitting, for example, can lead to incorrect compression, even if the tool looks right. Always verify tool compatibility based on the manufacturer specifications.
To learn more about safety standards and pipe handling specific to your region, you can reference guidelines from organizations like the Engineering Toolbox on materials used in fluid conveyance systems.
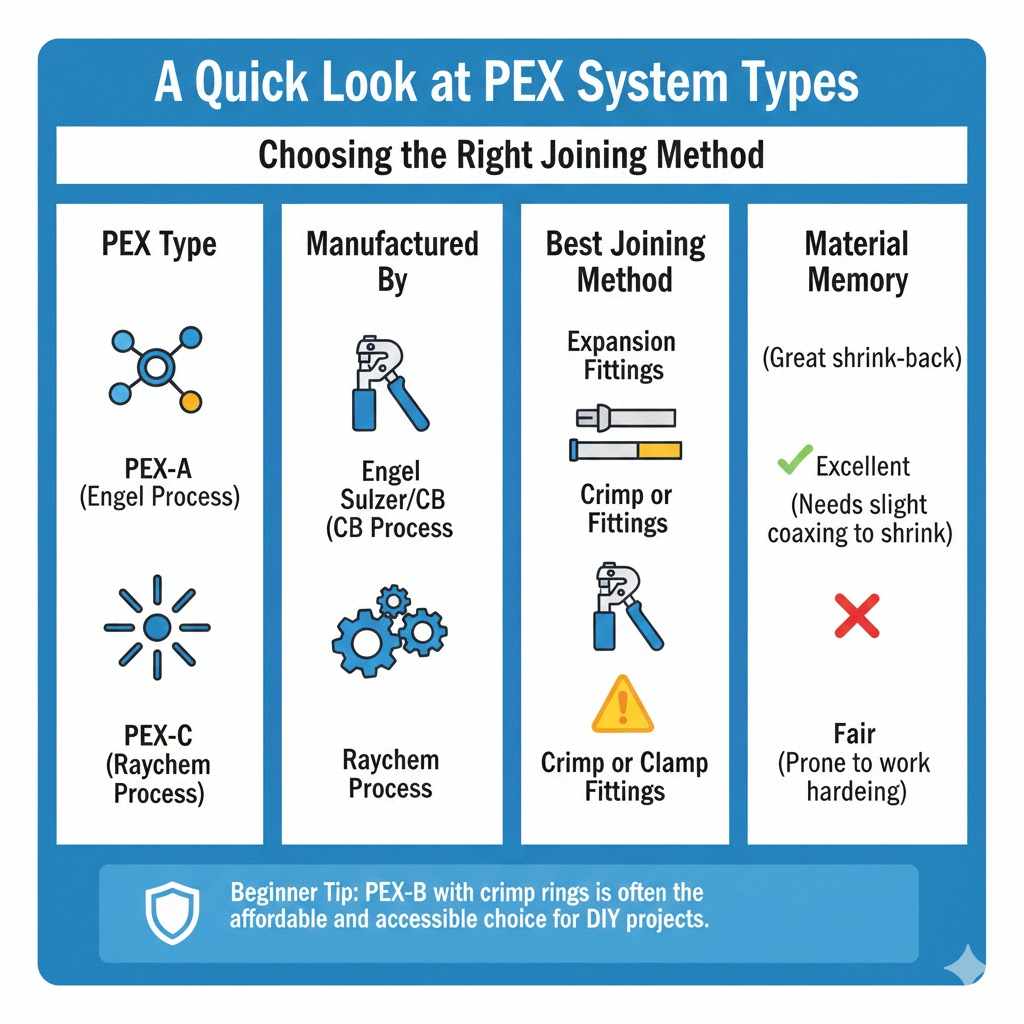
A Quick Look at PEX System Types
Knowing which type of PEX you have helps determine the best mechanical joining method. While most modern PEX fittings are universal, there are subtle differences in how they respond to joining techniques.
| PEX Type | Manufactured By | Best Joining Method | Material Memory |
|---|---|---|---|
| PEX-A | Engel Process | Expansion Fittings | Excellent (Great shrink-back) |
| PEX-B | Sulzer/CB Process | Crimp or Clamp Fittings | Good (Needs slight coaxing to shrink) |
| PEX-C | Raychem Process | Crimp Fittings | Fair (Prone to work hardening) |
For beginners, PEX-B systems, joined with reliable crimp rings and tools, are often the most affordable and widely accessible for standard household plumbing projects.
FAQ: Answering Your Beginner PEX Connection Questions
Q1: If I need a quick patch on a PEX line, is there any temporary glue I can use until I replace the section?
A: No. There is no reliable, safe temporary glue for pressurized PEX lines. Even short-term fixes will eventually fail under pressure or temperature changes. The safest temporary solution is to turn off the water supply to that line and immediately plan to use a proper mechanical coupling.
Q2: Can I use regular plumbing epoxy on PEX?
A: You should avoid using plumbing epoxy or any adhesive. Epoxy may stick to the exterior surface, but it cannot create the necessary structural seal required to withstand water pressure, and it will lead to failure.
Q3: I bought a PEX repair kit. Does that use glue?
A: Repair kits usually contain special push-to-connect fittings or mechanical compression sleeves. They rely on internal o-rings or internal barbs for sealing, not external glue. Read the kit instructions carefully to confirm it’s a mechanical compression fitting.
Q4: Do I need to clean or sand the PEX before using a crimp ring?
A: You must clean off dirt, grease, or markings with a clean cloth or alcohol wipe, but you should not sand the pipe. Sanding removes plastic material and alters the pipe’s necessary diameter, which can lead to a poor crimp seal. Just ensure the cut is clean and the surface is free of debris.
Q5: What happens if I use the wrong size crimp ring on my PEX pipe?
A: If the ring is too large, the tool will bottom out before applying enough compression, resulting in a very weak seal that will definitely leak. If the ring is too small, it might crack the ring or distort the pipe collar under pressure, leading to early failure.
Q6: If I have to repair a damaged line inside a wall, which connection method is the least invasive?
A: Often, repair coupling kits that use a “push-to-connect” mechanism (like SharkBite brand equivalents designed specifically for PEX) can be the least invasive, as they don’t require heavy crimping tools if space is very tight, though expansion fittings remain arguably the most reliable long-term.
Q7: Can PEX ever be joined using heat (like ABS pipe fusion)?
A: No. PEX is designed to handle high heat for water transport, but melting or heating the material intentionally to join it will destroy the crucial cross-linking structure, making the repaired area structurally unsound and unsafe for pressurized water.
Conclusion: Trusting the Mechanics, Not the Glue
We’ve covered a lot of ground today, and the main takeaway should be crystal clear: when it comes to PEX pipe integrity in a plumbing or hydronic system, mechanics always beat chemistry. Glue has no place in securing a pressurized PEX joint because the material science is just not compatible, and the resulting joint cannot handle normal household water pressure.
Remember the golden rule: PEX connections rely on solid mechanical compression—whether it’s crimping, clamping, or expanding. By investing a little time learning to use the correct tool—whether it’s a simple crimper or a dedicated expansion gun—you ensure that your plumbing work will be as durable, leak-free, and reliable as the PEX pipe itself.
You don’t need professional skills to master these reliable joints; you just need the right tools and attention to detail. Keep those cuts square, push those fittings fully on, and always finish the job with a positive, mechanical lock. Now go ahead and make those connections with confidence, knowing your repair is built to last!