Can You Hot Glue Glass? Proven Essential Secrets
Yes, you absolutely can use hot glue to join glass, but it requires specific preparation and the right type of glue gun to achieve a durable and aesthetically pleasing bond. Standard craft hot glue often fails due to the slick nature of glass, but with preparation, hot melt adhesive works well for quick crafts and non-structural decorative projects.
Welcome to the workshop! Are you staring at a broken vase or trying to stick sparkly beads onto a smooth glass jar? Many DIYers run into trouble when trying to hot glue glass. Glass is notoriously slick and non-porous, meaning most adhesives slide right off. It feels frustrating when your beautiful project falls apart after five minutes! But don’t worry.
As your mentor, I’m here to tell you that this common headache has simple fixes. With the right preparation secrets, you can conquer that slippery surface. Today, we unlock the methods that actually work for bonding glass with your trusty glue gun. Let’s get started on making those glass projects stick for good!
Understanding Why Glass and Hot Glue Often Disagree
Before we grab the glue gun, it helps to know why we have this sticking problem in the first place. Think of it like trying to paint perfectly on a sheet of highly polished metal—it’s a real challenge!
The Science of Slick Surfaces
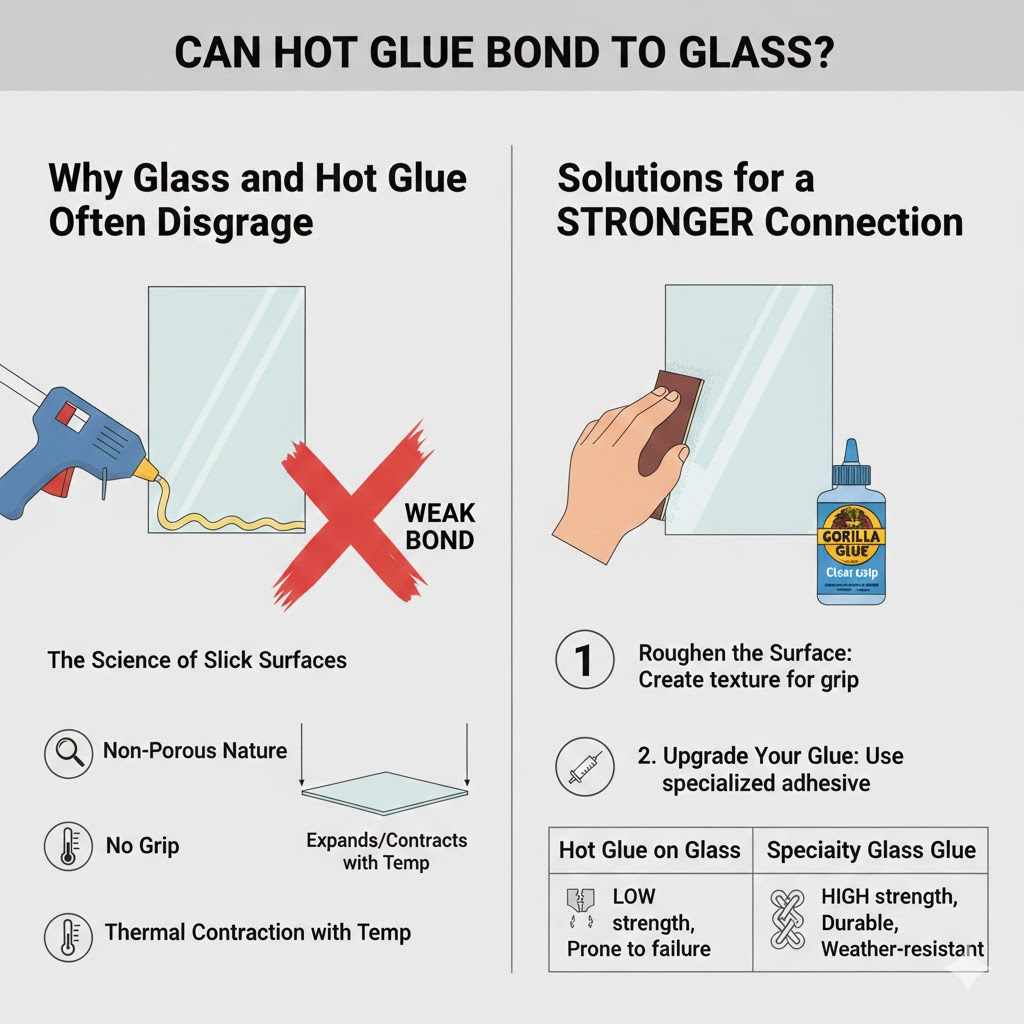
Glass does not “grab” glue well for two main reasons:
- Non-Porous Nature: Glass has virtually zero microscopic holes or texture for the glue to sink into and anchor itself. The glue just sits on top, waiting for gravity or a little vibration to shake it loose.
- Thermal Contraction: Glass changes size very slightly with temperature shifts (thermal expansion/contraction). Hot glue cures quickly and stays somewhat flexible, but this constant, tiny movement can break the weak bond between the glue and the glass surface.
Because of this, using just any old glue stick won’t cut it for a long-lasting job. You need tricks to change the surface or upgrade your glue.
The Essential Secrets: Preparation is Everything for Glass
If you take away just one thing from this guide, let it be this: 90% of success in hot gluing glass relies on how you prep the glass surface. You must create friction and ensure maximum cleanliness.
Secret 1: Absolute Cleaning (No Residue Allowed)
Any tiny speck of dust, grease, oil, or even a fingerprint can act like a release agent, causing the glue to peel right off. We need pristine glass.
Use Rubbing Alcohol: Wipe down the areas you intend to glue with 90% Isopropyl (rubbing) alcohol. This breaks down skin oils and residue left from manufacturing. Let it fully evaporate.
Wipe, Then Wait: Use a clean, lint-free cloth (microfiber works best). Don’t wipe the area again until you are ready to apply the glue, as your hands will deposit new oils.
Secret 2: The Power of Abrasion (Creating Tooth)
Since the glass is too smooth, we need to add some texture, often called creating “tooth.” This provides physical anchor points for the hot melt.
Sanding (For Structural/Permanent Bonds): If the piece is hidden or structural, gently scuff the glass surfaces with fine-grit sandpaper—start around 220 grit and move up to 400. You are not trying to see through the glass afterward; you are just creating a hazy film where the glue will sit. Be careful, as sanding can make the area harder to clean later.
Scoring (For Lighter Loads): If sanding is too risky for your specific glass item, use a sharp object like a utility knife or diamond scribe to lightly scratch cross-hatch patterns (a gentle “X” pattern) into the area where the glue will go. This gives the hot glue something to grab onto mechanically.
Secret 3: Choose the Right Hot Glue Formulation
Not all hot glue sticks are created equal. While traditional low-temp glue is often too weak, some specialty sticks are formulated for tougher jobs.
- Standard Craft Glue (Low Heat): Best for quick, temporary crafts like decorating jars or gluing lightweight fabric/ribbon to glass. Expect poor long-term hold on heavy items.
- High-Temp, Strong Bond Sticks: Look for “heavy-duty” or “industrial strength” clear sticks. These melt at a higher temperature, giving you a faster, harder cure and stronger structural integrity when paired with good prep work.
- Specialty Glue: For professional results, sometimes artisans use silicone-based adhesives which are often applied with a specific dispenser, not a standard hot glue gun. While not technically “hot glue,” they offer excellent flexibility and adherence to glass. For our DIY purposes, stick to high-strength PVA glues if you are unhappy with hot glue results, but focus on prepping for the hot glue first!
The Hot Glue Glass Technique: Step-by-Step Guide
Once the glass is clean and slightly roughed up, it’s time for application. Follow these steps to maximize your hold strength.
Tools You Will Need
This isn’t just about the glue; you need the right setup to handle the heat and speed required for glass bonding.
- High-Temperature Glue Gun (required for best results on glass)
- High-Strength Clear Glue Sticks
- Rubbing Alcohol (Isopropyl 90%+) and Lint-free Cloths
- Fine-Grit Sandpaper (220-400 grit, optional but recommended)
- Heat-Resistant Gloves (Good safety measure)
- Pencil or Marker (for marking placement)
Application Steps for a Stronger Bond
Speed is your friend once the glue starts melting. You need to move quickly from dispensing to pressing.
- Pre-Heat Everything: Let your glue gun heat up fully (5–10 minutes for a high-temp gun). While it heats, use a hairdryer on a low setting to warm the glass surface slightly—not hot, just warm to the touch. This reduces the immediate thermal shock when the hot glue hits the cold glass, improving adhesion time.
- Apply Glue Strategically: Apply the hot glue quickly in zig-zag or wavy lines, rather than a single bead. This spreads the adhesive slightly and allows you to press more surface area down. Do not over-apply; too much glue means a longer cooling time, which gives the glass a chance to pull away.
- Press Immediately and Firmly: As soon as the glue hits the glass, bring the two pieces together. Press them firmly. Since glass transfers heat away quickly, you must maintain firm pressure for a full 30–60 seconds while the glue cools down significantly. This firm squeeze pushes the soft glue into the microscopic scratches you made earlier.
- Cure Time Matters: Do not move, stress, or put weight on the glued area for at least one hour, even though it feels hard instantly. Allow 24 hours for the glue to fully cure for maximum strength before relying on the bond.
- Manage Gaps: Hot glue excels at filling small gaps, but glass pieces should fit snugly. If you have a large gap, hot glue will struggle, as it cools too fast to bond across a large space effectively. For gaps over 1/8 inch, consider a different epoxy adhesive.
Hot Glue vs. Specialized Glass Adhesives: When to Upgrade
It’s important to know the limitations of hot glue. If your project involves moisture, heat fluctuations, or structural load, you might need to level up your adhesive choice. I always tell my students: use the right tool (or glue) for the right job!
Comparison Table: Hot Glue vs. Other Glass Adhesives
This table should help you decide if hot glue is right for your current glass project.
| Adhesive Type | Best Use Case | Pros for Glass | Cons for Glass |
|---|---|---|---|
| High-Temp Hot Glue | Light decorative crafts, quick fixes, non-load-bearing. | Fast setting, inexpensive, easy cleanup. | Poor heat/water resistance, moderate strength. |
| Two-Part Epoxy | Structural repairs, outdoor projects, heavy-duty bonds. | Extremely strong, fills large gaps well, chemical resistant. | Long cure time (12–24 hrs), messy mixing required. |
| Silicone Sealant | Projects needing flexibility (e.g., windows, sealing gaps). | Excellent waterproofing, stays flexible, good gap filling. | Very slow cure time, low tensile strength, messy application. |
| Super Glue (Cyanoacrylate) | Small, thin-walled glass bonding requiring invisibility. | Dries almost instantly, clear finish. | Very brittle, terrible gap filler, can “frost” surfaces. |
If you are interested in understanding the chemical basics of epoxy bonding versus thermal adhesion, you can explore resources from materials science groups, like those often shared by engineering schools regarding surface energy principles.
Project Ideas Where Hot Glue Excels on Glass
If you’ve followed the prep steps, you can feel confident trying these projects. These are low-stress applications perfect for beginners mastering the “Can you hot glue glass?” question.
1. Decorative Jars and Vases
This is the sweet spot for hot glue! Attaching things onto smooth glass is far easier than joining two pieces of bare glass together.
Attaching ribbons, lace, or twine around the neck of a vase.
Gluing lightweight plastic gems, beads, or shells onto a jar exterior.
Creating mosaics using lightweight glass beads or mirror tiles onto a sturdy glass base (like a picture frame backing).
2. Simple Lamp Bases or Stands
If you are creating a custom lamp where the wires aren’t running through the glass, hot glue can secure decorative glass feet or base elements that aren’t bearing weight, just keeping things aligned. Ensure the gun runs hot, and you clean the surfaces of the glass base thoroughly first!
3. Securing Cabinet Decorations
For lightweight ornaments or plastic findings attached to the inside of a curio cabinet glass door, hot glue is perfect because it’s hidden and needs little strength to stay put against interior forces.
Troubleshooting Common Hot Glue and Glass Issues
Even with preparation, things can go sideways. Here are quick fixes for common beginner frustrations when working with glass and hot melt.
Problem: The Glue Line is White and Cloudy
This happens when rapid cooling or contamination traps air bubbles or water vapor, a process called crazing.
The Fix: This usually means your glass was too cold or you used low-temp glue. Re-heat the area very briefly with a hairdryer (low setting) to let the glue slightly soften and let trapped air escape, or re-glue the section using a pre-warmed glass piece and a high-temp gun.
Problem: The Glass Peels Off After a Day
The bond failed because of surface contamination or lack of mechanical tooth.
The Fix: You must remove all old glue. Use rubbing alcohol and a scraper or razor blade (very carefully!). Clean again thoroughly. Re-scuff the area with sandpaper, ensuring you vacuum the glass dust off with a small vacuum or brush before re-gluing.
Problem: Too Much Solder-like Drip
This is common when dealing with curved surfaces where the glue wants to drip before you can position the second piece.
The Fix: Use lower volumes of glue applied in quicker bursts. Alternatively, hold the pieces together until the glue has significantly set (use heat-resistant gloves!). For tricky vertical holds, you can sometimes use a small strip of masking tape on the side of the glass as a temporary shelf for the bead of glue to rest on while setting.
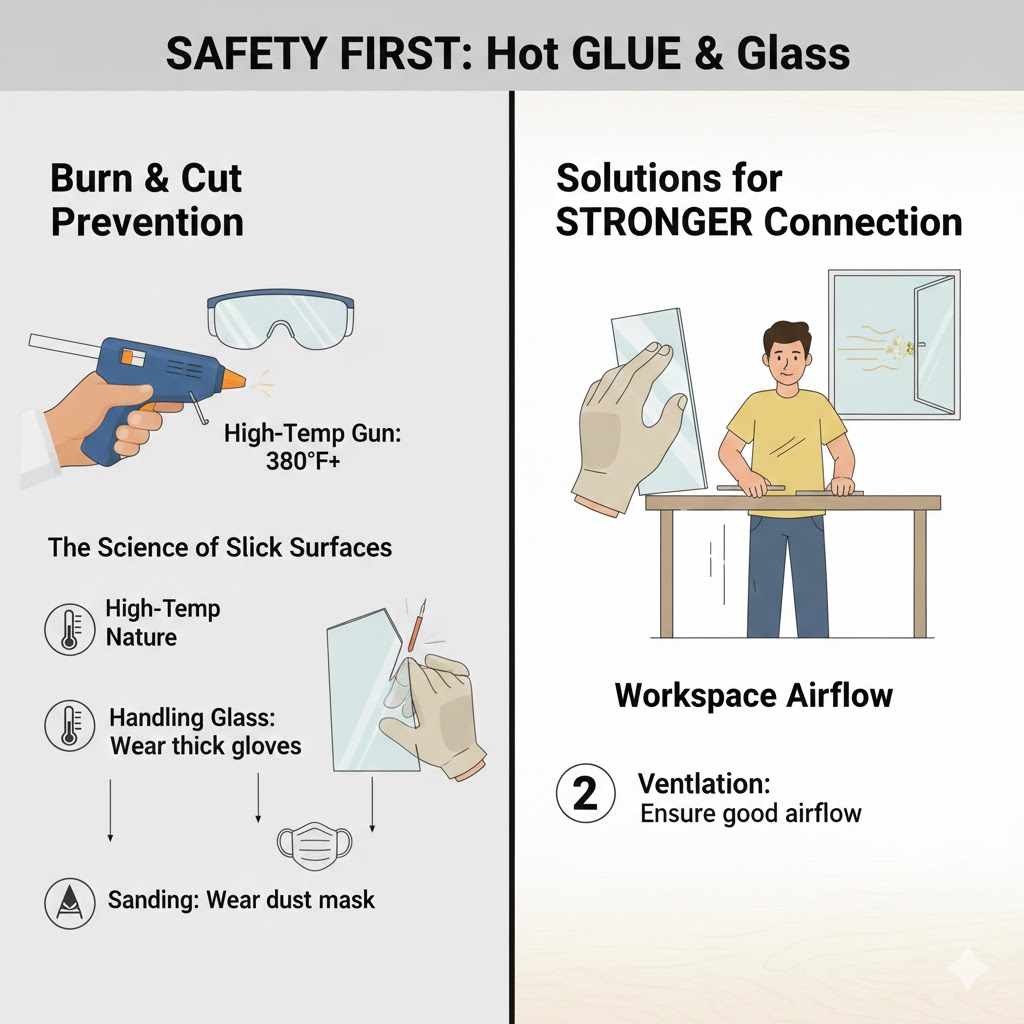
Safety First: Working with Hot Glue and Glass
As your mentor, safety is non-negotiable. We need to handle two potentially dangerous materials: hot liquid adhesive and breakable glass.
- Burn Prevention: High-temp glue guns reach temperatures of 380°F (193°C) or more. Always wear safety glasses. If you are pressing hard for long periods, consider thin craft gloves, especially if you use them frequently.
- Glass Handling: Handle cut or broken glass with heavy gloves or thick cloth. If sanding, wear a dust mask, as tiny glass particles can become airborne.
- Ventilation: While hot glue fumes are generally mild compared to solvent cements, always ensure your workspace has good airflow, especially when using the higher temperatures needed for strong adhesion.
Frequently Asked Questions (FAQ) for Hot Gluing Glass
Here are some quick answers to the most common questions beginner crafters ask about this topic.
Q1: Does hot glue turn yellow when used on clear glass?
A: Yes, lower quality or older craft hot glue sticks often yellow or turn cloudy over time, especially when exposed to sunlight or heat. To minimize this, use high-quality, clear, or “glass-specific” formulation sticks labeled for minimal discoloration.
Q2: Can I use hot glue to fix a broken glass cup handle?
A: For a cup you plan to drink from, absolutely not. Hot glue does not hold up to washing or drinking temperatures and is not food-safe. Use a dedicated glass epoxy for anything functional or related to food/drink contact.
Q3: How long does it take for hot glue on glass to set completely?
A: While it feels hard in 30–60 seconds, the glue needs about 24 hours for the molecular bonds to fully set and reach maximum strength, especially against slick surfaces like glass. Handle it gently for the first few hours.
Q4: Can I use a low-temperature glue gun on glass?
A: You can try, but the bond will be very weak. Low-temp glue melts cooler, which results in less penetration into any surface texture you create, leading to immediate failure on most glass projects.
Q5: What if I don’t want to sand my pretty glass?
A: If sanding ruins the look, you must rely heavily on high-temp glue and extreme cleanliness (Secret 1). You can try applying a very thin coat of primer or specialty adhesive promoter before the hot glue, but for the absolute best, affordable results on glass, some light abrasion is the secret weapon.
Q6: Will hot glue stick to curved glass better than flat glass?
A: No, curved glass presents an added challenge because it’s harder to apply consistent, heavy pressure over the entire contact area as the glue cools. Flat glass is always easier for beginners.
Final Thoughts from Your Mentor on Bonding Glass
Mastering any material in crafting takes a bit of know-how, and glass is definitely tricky! You came here asking, “Can you hot glue glass?” and the answer is a resounding yes, provided you respect the surface. Remember the proven essential secrets we covered: Clean it until it shines, scratch it for tooth, and apply it hot and fast.
Don’t get discouraged if your first attempt doesn’t hold perfectly. That’s how we learn craftsmanship—by trying, observing what went wrong, and adjusting our technique. You now know exactly what high-temperature glue gun and meticulous surface prep can achieve for your next beautiful glass craft. Go on, get those projects stuck together safely and soundly! You’ve got this!