Can You Paint OSB Easy Guide For Best Results
Many folks wonder if they can paint OSB, also known as oriented strand board. This is a common question for DIYers and homeowners starting projects. OSB is a great building material, but painting it can seem tricky.
Some people think it’s too rough or will absorb paint oddly. But don’t worry, painting OSB is totally doable! This guide will show you exactly how to get a great finish.
We’ll cover everything you need to know for the best results, making it simple and clear for anyone to follow. Get ready to transform your OSB surfaces!
Painting OSB A Simple Step By Step Guide
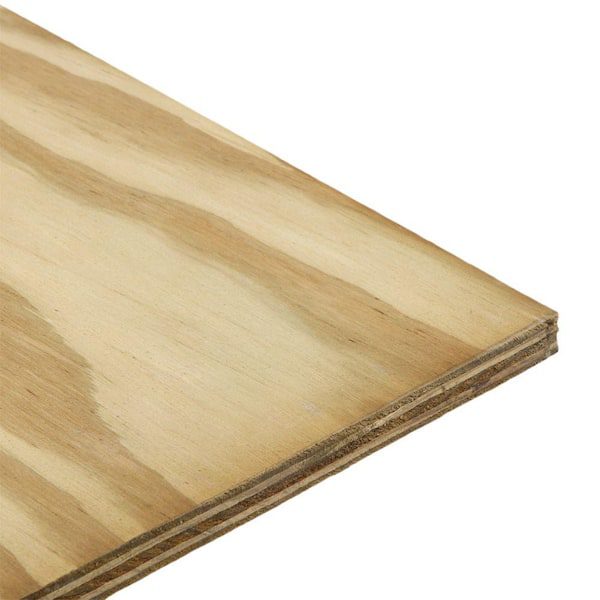
OSB is a popular choice for many construction projects because it’s strong and affordable. It’s made from wood strands, glued together with resins in a specific pattern. This makes it very stable and durable.
However, its textured surface can sometimes make painting a bit challenging if you don’t prepare it correctly. Many beginners worry about getting a smooth, even finish, or if the paint will even stick properly. This section will walk you through each step.
We will explain why preparation is so important and what you need to do. You’ll learn about cleaning, priming, and the best types of paint for OSB. By following these easy steps, you can achieve a professional-looking paint job on your OSB surfaces.
We will cover everything from choosing the right primer to applying the final coat.
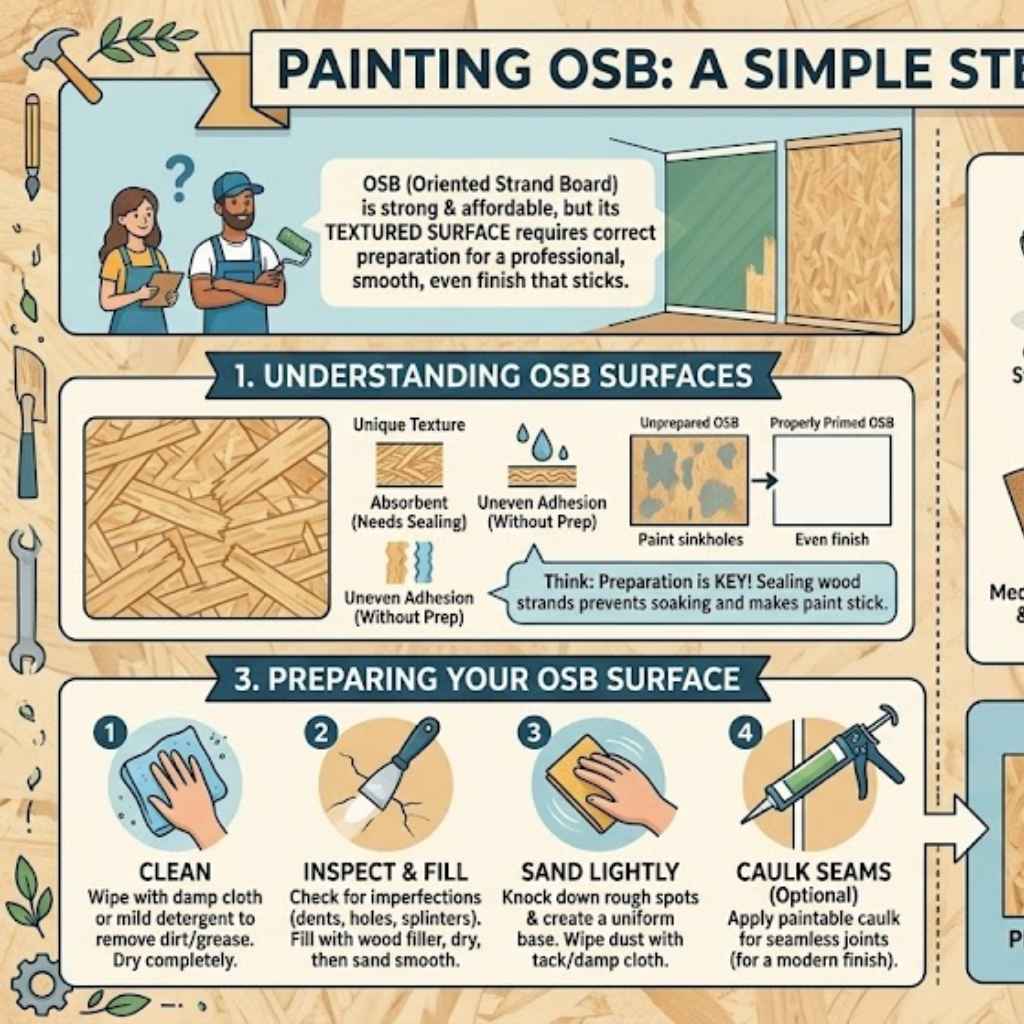
Understanding OSB Surfaces For Painting
OSB has a unique texture. The wood strands are visible on the surface. This texture can affect how paint looks and adheres.
Without proper preparation, paint might look uneven or blotchy. The rough surface can also mean you need more paint than you might expect. Because OSB is made of wood particles and glue, it’s more absorbent than smooth wood panels.
This means primer is very important. It seals the surface and provides a uniform base for your paint. Understanding these qualities helps you choose the right approach for painting.
The key to a good paint job on OSB lies in preparation. This is not a surface you can just slap paint on and expect great results. Think of it like preparing a wall for wallpaper; the better the prep, the better the final look.
You want to create a smooth, uniform surface for your paint to adhere to. This involves cleaning off any dust or debris. It also means filling any gaps or imperfections.
Priming is a crucial step that seals the wood strands and prevents the paint from soaking in too much.
Let’s look at why this matters with a quick example. Imagine you’re painting a fence made of OSB. If you just paint it without priming, the paint might sink into the wood in some spots more than others.
This can make the fence look patchy. Also, the rough texture might show through the paint, making it look less finished. With proper priming and painting, the fence will look smooth, uniform, and much more attractive.
It will also be better protected from the weather.
Essential Tools And Materials For Painting OSB
To paint OSB successfully, you’ll need a few key items. First, you need a good quality primer. An oil-based primer or a stain-blocking primer is often recommended for OSB.
These primers seal the wood well and cover any potential stains or resins that might bleed through the paint. Next, you’ll need paint. For OSB, latex or acrylic paints work well for interior projects.
For exterior projects, you’ll need paints designed for outdoor use. You will also need brushes, rollers, and a paint tray.
For cleaning, grab some mild soap and water. You might also need a putty knife for filling any holes or cracks. Sandpaper is essential.
A medium-grit sandpaper (like 100-120 grit) is good for initial smoothing, and a finer grit (like 220 grit) can be used for a smoother finish after priming. Make sure you have drop cloths or old newspapers to protect your floor and surrounding areas from paint drips. Good ventilation is also important, so open windows or use fans if you’re painting indoors.
Let’s think about the tools more closely. A good quality roller with a medium nap (about 3/8 inch) works well for most OSB surfaces. This nap length helps to get the paint into the texture of the board.
For edges and corners, a good angled paintbrush is very useful. Choosing the right tools makes the job easier and the results look much better. Don’t skimp on your tools; they can make a big difference.
Preparing Your OSB Surface For Paint
The most important part of painting OSB is the preparation. This step sets the stage for everything else. First, you need to make sure the OSB is clean.
Wipe it down with a damp cloth to remove any dust or dirt. If there are any greasy marks, use a mild detergent and water. Let the OSB dry completely before moving on.
This step is crucial to ensure the primer and paint adhere properly.
Next, inspect the OSB for any imperfections. This includes dents, gouges, or loose splinters. You can use a putty knife to fill small holes or cracks with a wood filler or spackle.
Allow the filler to dry completely, then sand it smooth. For a smoother overall finish, you can lightly sand the entire surface of the OSB. Use a medium-grit sandpaper to knock down any rough spots.
After sanding, wipe away all the dust with a tack cloth or a damp cloth. This removes fine particles that could ruin your paint finish.
If your OSB has visible seams or if you’re joining pieces, you might want to consider using caulk. Apply a bead of paintable caulk along the seams. Smooth it with your finger or a damp cloth.
Once the caulk dries, it will create a seamless look. This step is especially helpful if you want a very smooth, modern finish. Proper preparation ensures that your paint job will be durable and look professional.
It’s worth the extra effort.
Priming OSB For A Flawless Finish
Priming is an absolutely essential step when you paint OSB. OSB is very porous and can absorb paint unevenly, leading to a patchy or dull finish. A good primer acts as a barrier, sealing the surface and creating a uniform base.
This means your topcoat of paint will go on more smoothly, require fewer coats, and look much more vibrant. Without proper priming, you might find that paint soaks into the wood strands unevenly. This can make the texture of the OSB more noticeable and the color less consistent.
This section will guide you through choosing the right primer and applying it correctly for the best possible outcome.
Choosing The Right Primer For OSB
When it comes to priming OSB, not all primers are created equal. The best choice is usually a stain-blocking primer or an oil-based primer. These types are excellent at sealing the wood fibers and preventing any resins or tannins from the OSB from bleeding through your paint color.
This is especially important if you are using lighter paint colors, as these pigments are more prone to showing discoloration from bleed-through. An oil-based primer provides a very tough and durable surface that paint can adhere to well.
Alternatively, high-quality water-based or latex primers specifically designed for blocking stains can also work. Look for primers that advertise good adhesion and sealing properties. Some primers are formulated to cover knots and stains in wood, which is exactly what OSB needs.
If you are painting OSB outdoors, you will need an exterior-grade primer that can withstand moisture and temperature changes. Always check the primer’s label to ensure it’s suitable for use on composite wood products like OSB.
A common mistake is using a basic drywall primer on OSB. While it might cover some imperfections, it likely won’t provide the robust sealing needed to prevent bleed-through and ensure an even finish. Investing in a good quality stain-blocking primer will save you time and frustration later.
It ensures your final paint job looks professional and lasts longer. The cost of a good primer is minimal compared to the cost of redoing a poorly painted surface.
Benefits Of Stain-Blocking Primers
Stain-blocking primers offer several advantages when painting OSB. Their primary function is to create a barrier between the OSB material and your topcoat of paint. This barrier prevents any natural wood resins or glues in the OSB from migrating into the paint layer.
If these substances bleed through, they can cause unsightly yellow, brown, or pinkish stains on your painted surface. This is particularly problematic with lighter paint colors.
Furthermore, stain-blocking primers help to unify the surface. OSB has a varied texture and density across its surface. A good primer fills in some of the tiny pores and creates a more consistent porosity.
This even absorption means that when you apply your paint, it will cover the surface evenly, resulting in a smoother and more uniform color. This reduces the need for multiple paint coats, saving you time and paint. The adhesion properties of these primers are also superior, ensuring your paint job sticks well to the OSB.
For instance, if you’re building an accent wall with OSB and want a crisp white finish, a good stain-blocking primer is non-negotiable. Without it, you might see faint yellowish streaks appear after a few days, ruining the clean aesthetic. A primer seals all that potential bleed-through away, ensuring your white paint stays pristine.
It’s a proactive measure that guarantees a much better final appearance and longevity.
Applying Primer To OSB
Once you have chosen your primer, it’s time to apply it. You can use a brush, roller, or sprayer. For most DIYers, a roller and brush combination is easiest.
Start by applying the primer evenly across the OSB surface. Use a roller for the larger areas and a brush for the edges and any tricky spots. Make sure to get the primer into the texture of the OSB.
Don’t brush or roll it on too thinly; you want good coverage.
Apply the primer in long, consistent strokes. Overlap your strokes slightly to avoid missing any spots. If you’re using an oil-based primer, ensure you have good ventilation.
Follow the manufacturer’s instructions for drying times. Most oil-based primers need a few hours to dry. Water-based primers might dry faster.
It’s important to let the primer dry completely before moving to the next step. This ensures the primer has formed a solid, protective layer.
After the primer has dried, you might notice some of the wood fibers have “raised” slightly due to the moisture from the primer. This is normal. You can lightly sand these areas with a fine-grit sandpaper (220 grit) to smooth them out.
Wipe away any dust with a damp cloth or tack cloth. This extra step will give you an even smoother surface for your paint. A well-primed surface is key to a professional-looking finish on OSB.
Painting OSB For The Best Aesthetic Results
Now that your OSB surface is clean, prepared, and primed, you’re ready for the fun part: painting! Choosing the right paint and applying it correctly will transform your OSB from a utilitarian building material into a stylish finished surface. The texture of OSB can be a feature if painted well, adding character and depth to your project.
This section will cover selecting the best paint types and techniques to achieve a beautiful, lasting finish on your OSB. We’ll explore how to get smooth coverage, enhance the texture, or even hide it, depending on your desired look.
Selecting The Right Paint Type
For interior OSB projects, a good quality interior latex or acrylic paint is usually the best choice. These paints are water-based, making cleanup easy, and they come in a vast array of colors and finishes. You can opt for a matte finish for a soft look, satin for a slight sheen, or semi-gloss for durability and easy cleaning.
For most applications where you want a smooth, modern finish, a satin or semi-gloss is often preferred.
If you’re painting OSB for an exterior application, you’ll need an exterior-grade paint. These paints are formulated to withstand UV rays, moisture, and temperature fluctuations. Look for paints labeled as durable and weather-resistant.
A high-quality exterior acrylic latex paint is a good all-around choice for outdoor OSB surfaces like sheds or decorative fences.
Consider the texture you want. If you like the natural texture of OSB, a paint with a satin or semi-gloss finish will highlight it nicely. If you prefer a smoother finish and want to minimize the appearance of the OSB texture, a thicker paint or a paint with a higher sheen might help to fill in some of the gaps.
Sometimes, applying an extra coat of paint can help to level out the surface and create a smoother appearance.
Application Techniques For Optimal Coverage
Applying your topcoat of paint requires care to ensure even coverage and a smooth finish. Start by stirring your paint thoroughly. If you’re using multiple cans of the same color, it’s a good idea to mix them all together in a larger bucket.
This ensures color consistency across the entire project, preventing subtle shade differences.
Use the same tools you used for priming if they are clean. A roller with a medium nap (3/8 inch to 1/2 inch) is excellent for covering the OSB surface. Apply the paint in consistent, overlapping strokes.
Work in sections, ensuring you maintain a wet edge to avoid lap marks. This means painting adjacent areas before the previous section dries completely. This technique is vital for achieving a seamless look, especially on larger surfaces.
For edges and corners, use an angled paintbrush. Take your time to get clean lines. If you’re aiming for a very smooth finish and want to minimize the OSB texture, you might consider using a higher quality paint with better leveling properties.
Applying thin, even coats is generally better than applying one thick coat. It leads to a more durable finish and reduces the risk of drips and runs. Allow each coat to dry completely according to the manufacturer’s instructions before applying the next.
Enhancing OSB Texture vs. Smoothing It
You have a choice when painting OSB: embrace its natural texture or try to smooth it out. To embrace the texture, use a satin or semi-gloss paint. These finishes catch the light in a way that highlights the OSB’s natural pattern.
Applying paint with a roller can gently press it into the grooves, accentuating the strands. This can create a rustic or industrial look that many find appealing.
If you want a smoother finish, it takes more work. After priming and sanding, you might apply two thin coats of paint using a high-quality roller. Some people also find that using a paint sprayer can achieve a very smooth, uniform finish.
For a truly smooth surface that hides the OSB texture almost entirely, you might need to apply multiple thin coats of paint and lightly sand between each coat. Another option is to use a thicker, high-build paint or even a textured paint product designed to fill and smooth surfaces.
A great example of enhancing texture is seen in modern interior design. Exposed OSB walls, painted in a bold color with a satin finish, can be a stunning feature. The paint highlights the wood grain and patterns, adding visual interest.
On the other hand, if OSB is used for a kitchen cabinet front and you want a sleek, modern look, you would aim to smooth it out as much as possible. This involves careful sanding and multiple coats of paint, often in a semi-gloss or gloss finish.
Dealing With OSB Grain And Texture During Painting
The inherent grain and texture of OSB can be both a challenge and an opportunity. The visible strands and the rough surface mean that paint coverage can be less straightforward than on smooth wood. When painting, you’ll notice that the paint sinks into the depressions more than the raised areas.
This is why primer is so critical; it provides a more uniform surface to paint on.
For optimal coverage, work the paint into the texture. A roller with a medium nap is your best friend here. Apply the paint with a bit of pressure, allowing it to get into all the nooks and crannies.
If you’re using a brush, employ a stippling or dabbing motion in addition to brushing to ensure coverage in textured areas. Don’t try to force a perfectly smooth finish if you haven’t aggressively smoothed the OSB beforehand; instead, work with the texture.
If you are trying to achieve a very smooth finish, the key is patience and thin layers. After priming and sanding, apply a thin coat of paint. Let it dry completely, then lightly sand again with very fine sandpaper (220-grit or higher).
Clean off the dust and apply another thin coat. Repeating this process multiple times will gradually build up a smooth surface. This method works well for furniture or decorative items made from OSB.
Troubleshooting Common OSB Painting Issues
Even with the best intentions and careful preparation, you might encounter a few snags when painting OSB. Common issues often relate to uneven paint absorption, bleed-through from the OSB itself, or problems with the paint’s adhesion. Knowing how to identify and fix these problems can save your project and ensure a beautiful, lasting result.
This section will address some of the most frequent challenges people face when painting OSB and provide practical solutions. We’ll cover what to do if you see stains appear, if the paint isn’t sticking, or if your finish looks blotchy.
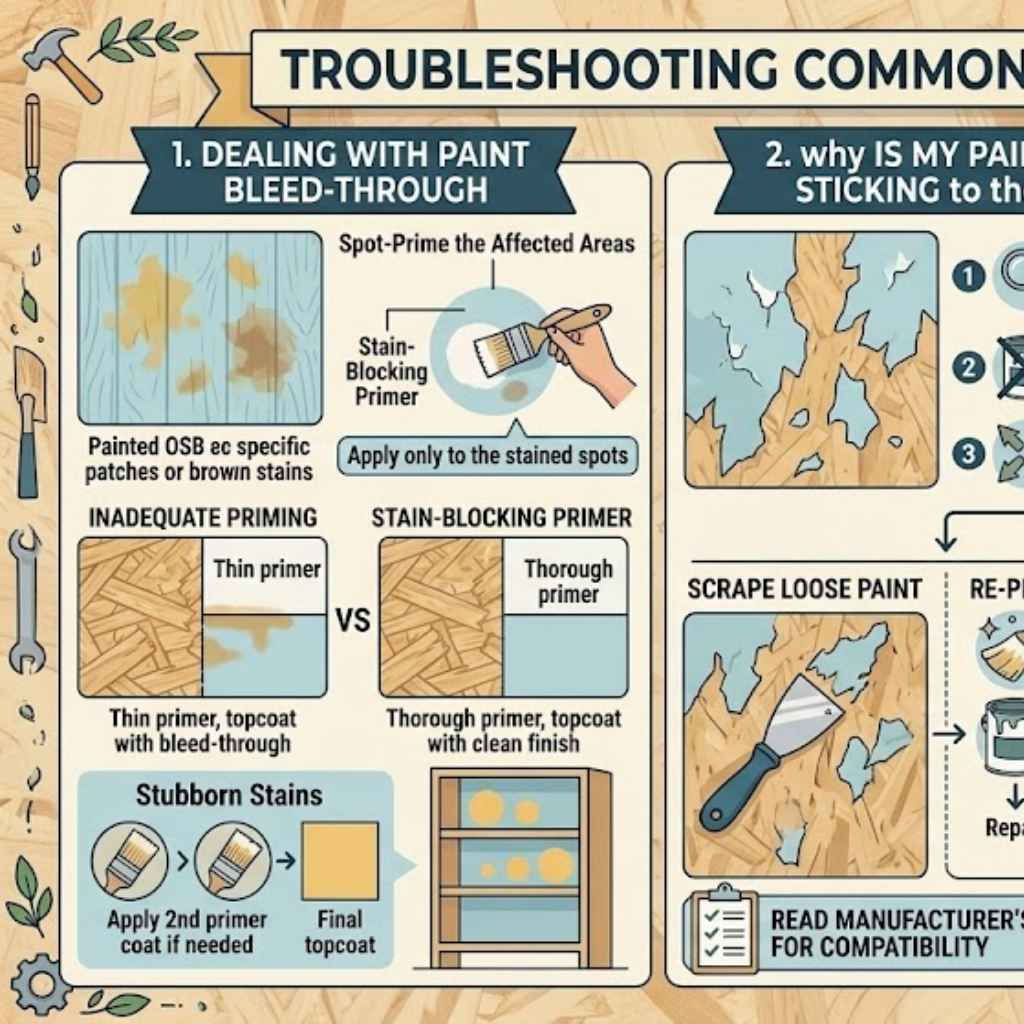
Dealing With Paint Bleed-Through
Paint bleed-through is one of the most common problems when painting OSB, especially if you didn’t use a quality stain-blocking primer. It appears as discolored patches, often yellowish or brownish, showing through your topcoat of paint. These are usually caused by the resins and tannins within the OSB reacting with the paint or simply migrating through the primer layer.
If you notice bleed-through after applying your first coat of paint, don’t panic. The solution is to spot-prime the affected areas. Use a good stain-blocking primer specifically designed for this purpose.
Apply it only to the stained spots. Let the spot primer dry completely. You may need to apply a second coat of primer to stubborn stains.
Once the primer is dry and the stains are covered, you can then re-apply your topcoat of paint. It’s often best to prime the entire surface again if bleed-through is widespread, ensuring a uniform seal.
For example, imagine you painted a bookshelf made of OSB a light blue. A few days later, you see yellow circles appearing where knots or resin pockets are. The fix is to gently scrape away any loose paint in that area, clean it, apply a stain-blocking primer directly onto the yellow spots, let it dry, and then repaint the area.
If the problem is extensive, you might need to prime the entire shelf again before repainting. Prevention is key, which is why using a high-quality primer from the start is so important.
Why Is My Paint Not Sticking To The OSB
If your paint isn’t sticking to the OSB, it usually comes down to one of a few issues: the surface wasn’t properly cleaned, it wasn’t primed, or the primer/paint isn’t compatible with OSB. OSB can have a slightly waxy or resinous surface from the manufacturing process. If this isn’t cleaned off or properly sealed, paint might peel or flake off.
First, ensure the OSB surface is completely free of dust, grease, or any residues before you paint. If you skipped the priming step, that’s likely the culprit. Most paints need a primed surface to adhere well, especially to materials like OSB.
If you did prime, make sure you used a primer suitable for OSB and that it was fully dry. Some primers are not designed for porous surfaces and may not create a strong bond. If you used an oil-based primer and are painting with a latex paint, ensure they are compatible, as this is usually not an issue.
To fix peeling paint, you’ll need to scrape away all the loose paint. Then, clean the surface thoroughly. If you didn’t prime, apply a good quality stain-blocking primer.
If you did prime and it’s still not adhering, you might need to lightly scuff sand the surface to give the new paint something to grip onto. Then, reapply your paint coats. Always read the paint and primer manufacturer’s instructions for best results and compatibility.
Addressing Patchy Or Uneven Paint Coverage
Patchy or uneven paint coverage on OSB often happens when the surface isn’t properly sealed or when paint is applied too thinly. OSB’s porous nature means it can absorb paint unevenly. If you applied paint too quickly or didn’t get it into the texture of the OSB, you’ll see blotchy areas where the OSB shows through.
The solution is usually to apply another coat of paint. Make sure to apply it evenly, ensuring good coverage in all the textured areas. Work the paint into the OSB using your roller or brush.
If the patchiness is severe, you might need to apply a primer again over the affected areas. This will help to create a more uniform surface for the paint. Once the primer is dry, apply your topcoat.
Another technique to improve coverage is to thin your paint slightly with water (for latex paints) or the appropriate thinner. This can help the paint flow more evenly and get into the texture better. However, be careful not to thin it too much, as this can compromise the paint’s durability and color.
Always test any thinning on a scrap piece of OSB first. Consistent, even application with good tools is your best bet for avoiding patchy coverage. Patience with multiple thin coats often yields better results than one thick, uneven coat.
Frequently Asked Questions
Question: What is the best type of paint to use on OSB
Answer: For interior OSB, a high-quality acrylic latex paint in a satin or semi-gloss finish is generally recommended. For exterior applications, use an exterior-grade acrylic latex paint that is weather-resistant. Always ensure you’ve properly primed the OSB first.
Question: Do I need to sand OSB before painting
Answer: Yes, light sanding with medium-grit sandpaper (around 100-120 grit) can help smooth out rough spots. After priming, a light sanding with fine-grit sandpaper (220 grit) is also recommended to create a smoother surface for the paint.
Question: Can I use a paint sprayer on OSB
Answer: Yes, a paint sprayer can be used on OSB. It can help achieve a very smooth and even finish, especially if you are trying to minimize the OSB’s natural texture. Ensure you use the correct nozzle size and pressure, and always apply thin, even coats.
Question: How many coats of paint do I need for OSB
Answer: Typically, two coats of paint are sufficient after proper priming. However, depending on the color and finish you desire, and how well the primer sealed the OSB, you might need a third coat for full opacity and even coverage.
Question: What should I do if the OSB is very rough
Answer: If the OSB is very rough, you may need to do some extra preparation. This includes more thorough sanding, using wood filler for gouges or cracks, and applying an extra coat of primer. Some specialized textured paints or multiple thin coats of regular paint can also help to create a smoother finish.
Final Thoughts
Painting OSB is entirely achievable with the right preparation and materials. By understanding the nature of OSB and following these steps for cleaning, priming, and painting, you can achieve excellent results. Don’t be afraid to tackle this project; it’s simpler than it may seem.
Your transformed OSB surfaces will look great and last for years. Enjoy your newly painted project!