Can You Stain Cedar Wood Dark Successfully? A Beginner’s Guide
Figuring out Can You Stain Cedar Wood Dark Successfully? is a common challenge for those new to woodworking. Cedar’s natural oils and unique grain can make it tricky to get a consistent, dark stain. Don’t worry, though! It’s totally achievable, and we’ll show you how. We’ll explore the best methods, materials, and steps to make sure your cedar project looks amazing. Next, we’ll begin the journey to a beautifully stained cedar project.
Preparation for Staining Cedar Wood
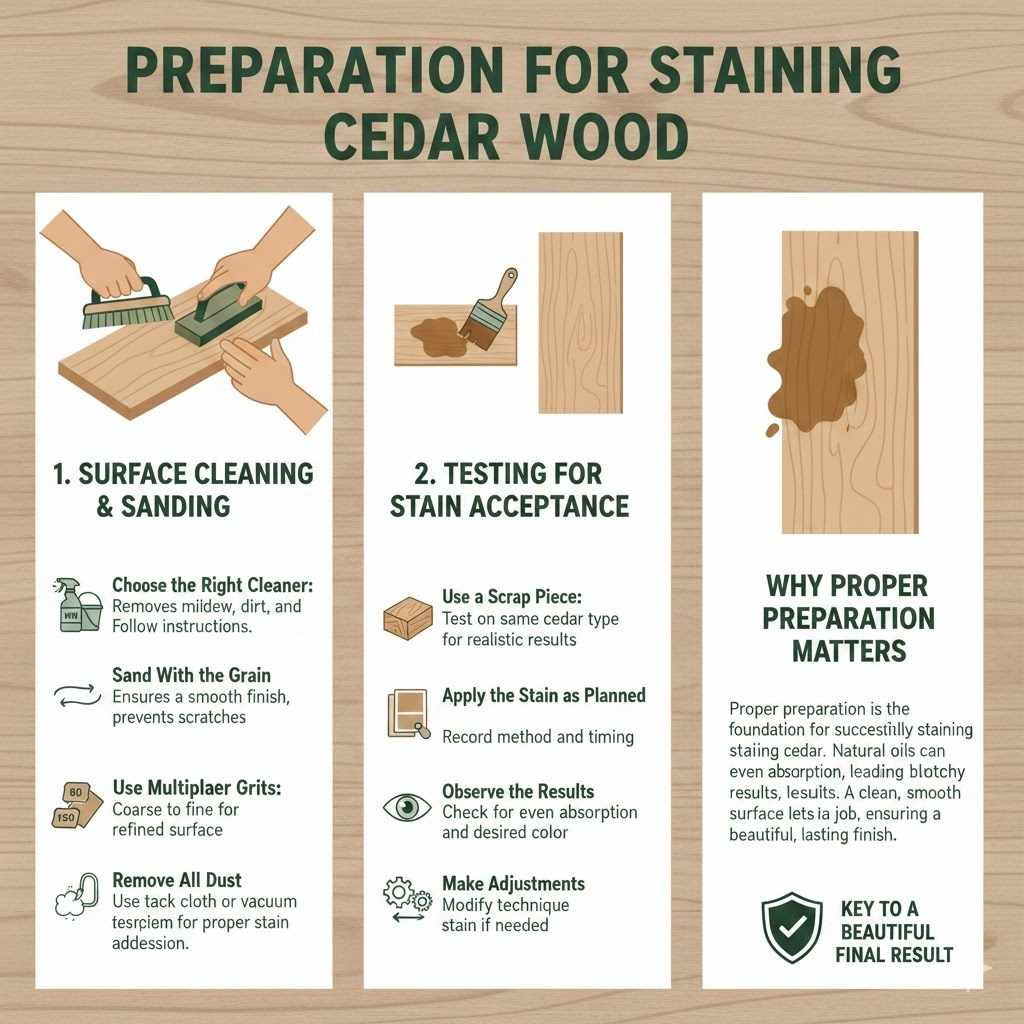
Proper preparation is the foundation for successfully staining cedar. It doesn’t matter how good your stain is if you skip this step. Cedar wood, while beautiful, has unique characteristics that affect how it accepts stain. It has natural oils that can prevent stains from absorbing evenly, leading to blotchy results. Getting the surface ready is like giving cedar a fresh start. It creates a smooth, clean surface that lets the stain do its job properly. This step is key to a beautiful final result.
Surface Cleaning and Sanding
Before any stain touches your cedar, cleaning and sanding are the key. First, thoroughly clean the cedar. Use a wood cleaner suitable for exterior surfaces or a mild soap and water solution. This removes dirt, dust, and any existing finishes. Rinse it well and allow it to dry completely. Next, sand the wood. Use sandpaper of different grits. Start with a coarser grit (like 80 or 100 grit) to remove imperfections. Then, move to a finer grit (150 or 180 grit) for a smoother surface. Remember to sand in the direction of the wood grain. This smooths out any rough spots and opens the pores, so the stain can penetrate better. Finally, remove all the sanding dust with a tack cloth or a vacuum cleaner. This dust can prevent the stain from adhering properly.
- Choose the Right Cleaner: Using a cleaner specifically designed for wood removes mildew, dirt, and previous finishes. Always follow the cleaner’s instructions carefully.
- Sand With the Grain: Sanding with the grain ensures a smooth finish and prevents scratches that might show through the stain. This simple action makes a huge difference in the final look.
- Use Multiple Sandpaper Grits: Starting coarse and working your way to finer grits is essential for a smooth surface. This progression gradually refines the wood’s surface, letting it be perfect for stain absorption.
- Remove All Dust: Dust is the enemy of a smooth finish. Use a tack cloth or vacuum to remove all dust particles. This ensures the stain can properly bind to the wood.
Testing Your Cedar for Stain Acceptance
Before staining your entire project, perform a test on a hidden area or a scrap piece of cedar. This will help you see how the cedar reacts to the stain. Cedar varies in density and oil content. A test lets you adjust the staining process before ruining the main project. Apply the stain and let it dry. Observe the color and coverage to ensure you are happy with the outcome. This preliminary step can help you to avoid disappointments later. If the stain doesn’t absorb evenly or the color is not what you wanted, try a wood conditioner or adjust the stain application process. This test run is your safety net, allowing adjustments to the staining technique.
- Use a Scrap Piece: Always test on a scrap of the same cedar wood. This ensures you’re seeing a realistic result.
- Apply the Stain as Planned: Apply the stain following your planned methods. Record the time and any special preparation that you used.
- Observe the Results: Observe the stain absorption and the color development. Does the stain apply evenly? Does the color meet your expectations?
- Make Adjustments: If you are not happy with the results, adjust your technique or stain type before moving to the complete project.
Choosing the Right Stain and Tools
Selecting the right stain is crucial to achieve a dark color on cedar. Different stain types have different properties. Some may absorb better than others and may interact with the natural oils in cedar. The tools you use will also impact how the stain applies. The right stain and tools ensure an even, beautiful finish. It creates a balance between the desired color and the natural characteristics of the wood. This section will help you select the stain type and tools.
Stain Types for Cedar
The stain type plays a vital role. Oil-based stains are known for their deep penetration and rich color. They tend to adhere well to cedar. However, they may take longer to dry. Water-based stains are easier to clean up. They dry quicker, but they may not penetrate as deeply as oil-based stains. Gel stains are ideal for cedar. They sit on the surface, preventing blotchiness. They are easy to control. Penetrating stains sink into the wood. Surface stains coat the wood. Consider the desired appearance and ease of application when choosing. For dark results on cedar, oil-based or gel stains are usually a good choice.
- Oil-Based Stains: These provide rich color and good penetration. They may take longer to dry and require mineral spirits for cleaning.
- Water-Based Stains: They offer easier cleanup and dry quicker, making them ideal for beginners. However, penetration might not be as deep.
- Gel Stains: Gel stains sit on the surface, reducing blotchiness. They provide excellent control during application.
- Penetrating vs. Surface Stains: Penetrating stains soak into the wood. Surface stains coat the wood’s surface. Choose based on your desired look and cedar properties.
Essential Tools for Staining
You’ll need specific tools for a smooth and even stain application. High-quality brushes or stain pads are key. They control stain application. For large surfaces, a sprayer can speed up the process. Protect your project and yourself with drop cloths, gloves, and eye protection. Consider these tools as helpers. They ensure your stain applies properly and safely. The right tools enhance the effectiveness of your stain, making the process smoother.
- High-Quality Brushes or Pads: Brushes ensure precise control. Stain pads offer even application on larger areas.
- Spray Equipment (Optional): Sprayers are helpful for covering large surfaces fast. This is great for decks or fences.
- Drop Cloths: Protect your work area from drips and spills. This prevents messes and helps with cleanup.
- Gloves and Eye Protection: These keep your hands and eyes safe from stain. This is a must for any staining job.
Applying Stain to Cedar: Step-by-Step Guide
The application process dictates the quality of your finish. It involves a systematic approach to get an even dark stain on cedar. This includes preparing the wood, applying the stain, and allowing it to dry correctly. Following each step correctly guarantees a beautiful finish. This guide makes this process easy to follow.
Applying Wood Conditioner
Using a wood conditioner is a helpful step, especially on cedar. Cedar’s natural oils can cause uneven stain absorption. The wood conditioner prepares the surface. It provides an even base for the stain. This decreases blotchiness and helps the stain absorb properly. Apply the wood conditioner following the instructions on the product label. It typically involves wiping it on, letting it sit, and then wiping off the excess. Let it dry completely. This pre-treatment step often leads to a more uniform final color.
- Follow Product Instructions: Each conditioner has specific instructions. Read and follow these carefully for optimal results.
- Apply Evenly: Apply the wood conditioner evenly across the surface of the cedar. This guarantees uniform absorption.
- Wipe Off Excess: Wipe off any excess conditioner. This prevents issues with the stain’s adhesion.
- Let It Dry Completely: Allow the conditioner to fully dry before applying the stain. This crucial step supports optimal stain absorption.
Staining Cedar Wood in Layers
Applying the stain in layers is a smart move. It allows you to control the color intensity. Apply the first thin layer using your chosen applicator. Let it sit for the recommended time, usually 5-15 minutes. Wipe off any excess stain. Let it dry thoroughly before you apply the second coat. Depending on the desired darkness, you might add multiple coats. Applying a clear protective topcoat is recommended after the final stain coat. This enhances the color and protects against weather and wear.
- Thin, Even Coats: Apply thin coats of stain. This reduces runs and drips. It also aids even absorption.
- Apply in the Direction of the Grain: Apply the stain along the wood grain. This helps with even coverage. It enhances the wood’s natural appearance.
- Wait Between Coats: Wait for the first coat to dry completely before applying the next one. This prevents problems and allows for the right depth of color.
- Use a Clear Topcoat: Apply a clear topcoat to add a layer of defense. It guards against the elements and any abrasion.
Addressing Common Problems During Staining
Challenges can arise, and knowing how to fix them ensures a good result. If the stain looks blotchy, it often means the wood didn’t absorb the stain evenly. If that happens, you can sand the stained surface lightly. Then, reapply the stain with a wood conditioner. If the color is not dark enough, add another layer of stain. Make sure the first layer is completely dry. If the stain is too dark, you can lighten it by applying a clear coat. Problems are common. You can fix them easily if you take action immediately.
- Blotchy Appearance: If blotches appear, sand the wood lightly and reapply the stain with a wood conditioner. This helps to achieve an even color.
- Insufficient Color: Apply another coat of stain. This deepens the color and helps the wood reach the desired level of darkness.
- Too Dark: If the color is too dark, apply a clear topcoat. This has a lightening effect.
- Runs or Drips: Wipe away the runs or drips immediately. Sand the area after it dries. Then, reapply the stain.
Maintenance and Long-Term Care of Stained Cedar
Caring for stained cedar ensures its beauty over time. Regular maintenance includes cleaning the surface and re-staining as needed. The frequency of care will depend on the weather conditions and where the cedar is placed. With proper care, your cedar can maintain its rich color and protect itself from the elements. This maintenance plan helps keep your cedar looking good for years.
Regular Cleaning of Stained Cedar
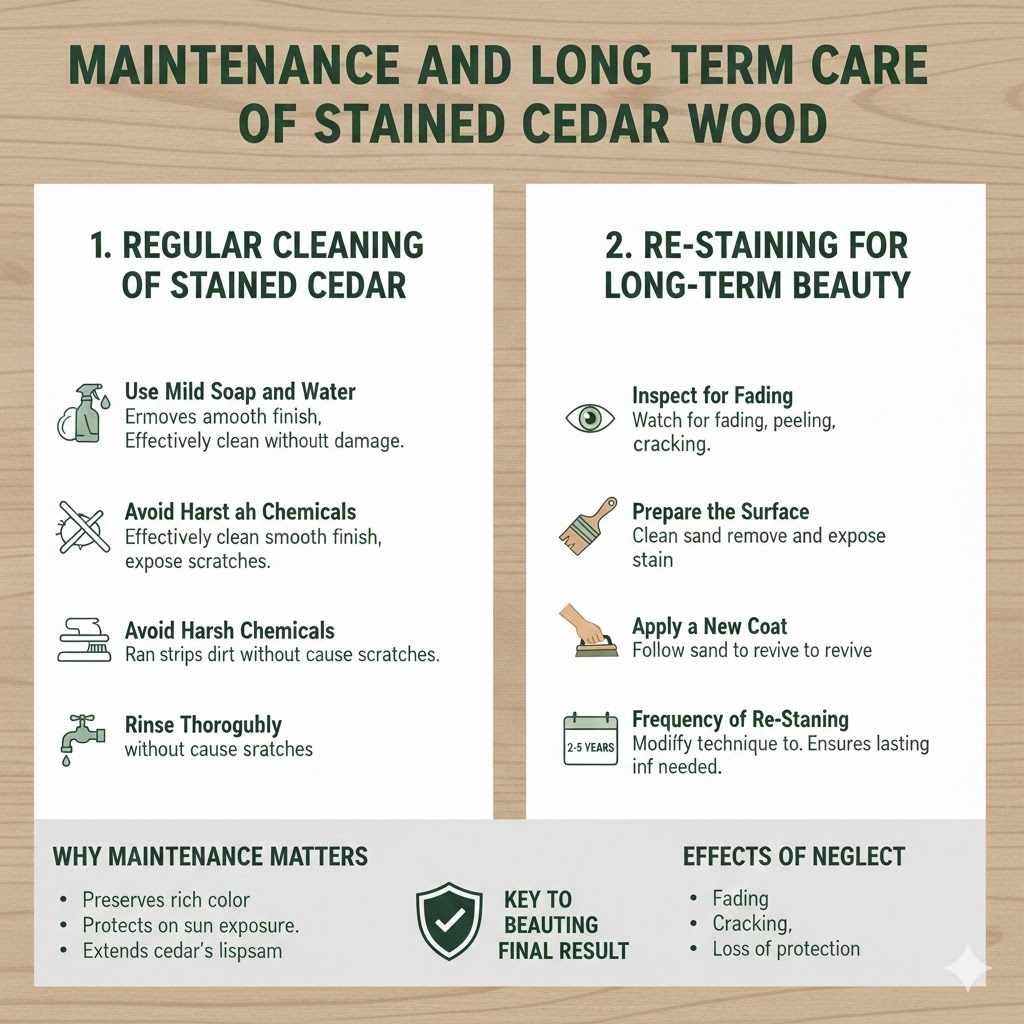
Cleaning regularly helps to keep your stained cedar in good condition. Dirt and grime can accumulate and affect the wood’s appearance. Use a gentle soap and water solution to clean the surface. Avoid using harsh chemicals or abrasive cleaners, which can damage the stain. Gently scrub the cedar with a soft brush. Then, rinse it thoroughly and allow it to dry. The frequency of cleaning depends on the cedar’s location. Cleaning every year or two can keep your stained cedar looking its best. Proper cleaning keeps your cedar clean and attractive.
- Use Mild Soap and Water: Mild soap and water are the best options for cleaning. They effectively clean the surface without damage.
- Avoid Harsh Chemicals: Harsh chemicals damage the stain and the cedar. These cleaners can strip away the finish and expose the wood.
- Gently Scrub: Use a soft brush to gently scrub the surface. This helps remove dirt without causing any scratches.
- Rinse Thoroughly: After washing, rinse the cedar thoroughly to remove all soap residue. This will help maintain the finish.
Re-Staining for Long-Term Beauty
Re-staining becomes necessary over time to maintain the rich color and protect the cedar. The sun’s UV rays and the elements cause the stain to fade. Inspect your cedar periodically for fading, peeling, or cracking. This tells you when it is time to re-stain. Prepare the wood by cleaning and sanding it. Apply a new coat of stain following the steps outlined earlier. How often you need to re-stain depends on the weather and the cedar’s exposure to the elements. Regular re-staining preserves the appearance and ensures long-lasting protection. Remember, if you neglect this step, your cedar may lose its beautiful, dark finish.
- Inspect for Fading: Inspect the cedar regularly. Watch for fading, peeling, or cracking of the stain.
- Prepare the Surface: Clean and sand the cedar before re-staining. This is necessary to remove any old stain.
- Apply a New Coat: Apply a new coat of stain, following the original application steps. This revives the color.
- Frequency of Re-Staining: The frequency depends on sun exposure. Generally, re-stain every 2-5 years. This ensures lasting protection.
Frequently Asked Questions
Question: Can I stain cedar a completely solid, opaque dark color?
Answer: Yes, you can. You’ll likely need to use a solid stain or paint designed for exterior use. These provide the most opaque coverage.
Question: How can I prevent the cedar stain from fading quickly?
Answer: Choose a stain with UV protection, and apply a clear topcoat with UV inhibitors. Also, keep the cedar out of direct sunlight as much as possible.
Question: Is there a specific type of cedar that stains better than others?
Answer: The quality and type of cedar can vary. Generally, higher-grade cedar that is free of knots and imperfections will take stain more evenly.
Question: What if the cedar is already painted?
Answer: You’ll need to remove the paint before you can stain the cedar. This typically involves sanding or using a paint remover.
Question: Should I apply a sealer after staining?
Answer: Yes, applying a sealer after staining is a great idea. A sealer adds an extra layer of protection against water damage and the elements.
Final Thoughts
Achieving a dark stain on cedar wood is completely within your reach with the right approach! We’ve reviewed the essential steps, from preparing the wood to picking the right stain and application techniques. By starting with thorough cleaning and sanding, you’re setting your project up for success. Selecting the right stain type, like an oil-based or gel stain, allows for rich, even color. Then, with careful application in thin layers and understanding how to address common issues, you’re well on your way to beautiful, dark cedar. Remember, regular care, like gentle cleaning and periodic re-staining, will keep your project looking its best for years. Now, get ready to transform your cedar projects!