Cedar vs Pressure Treated Wood Fence: Choose Smartly
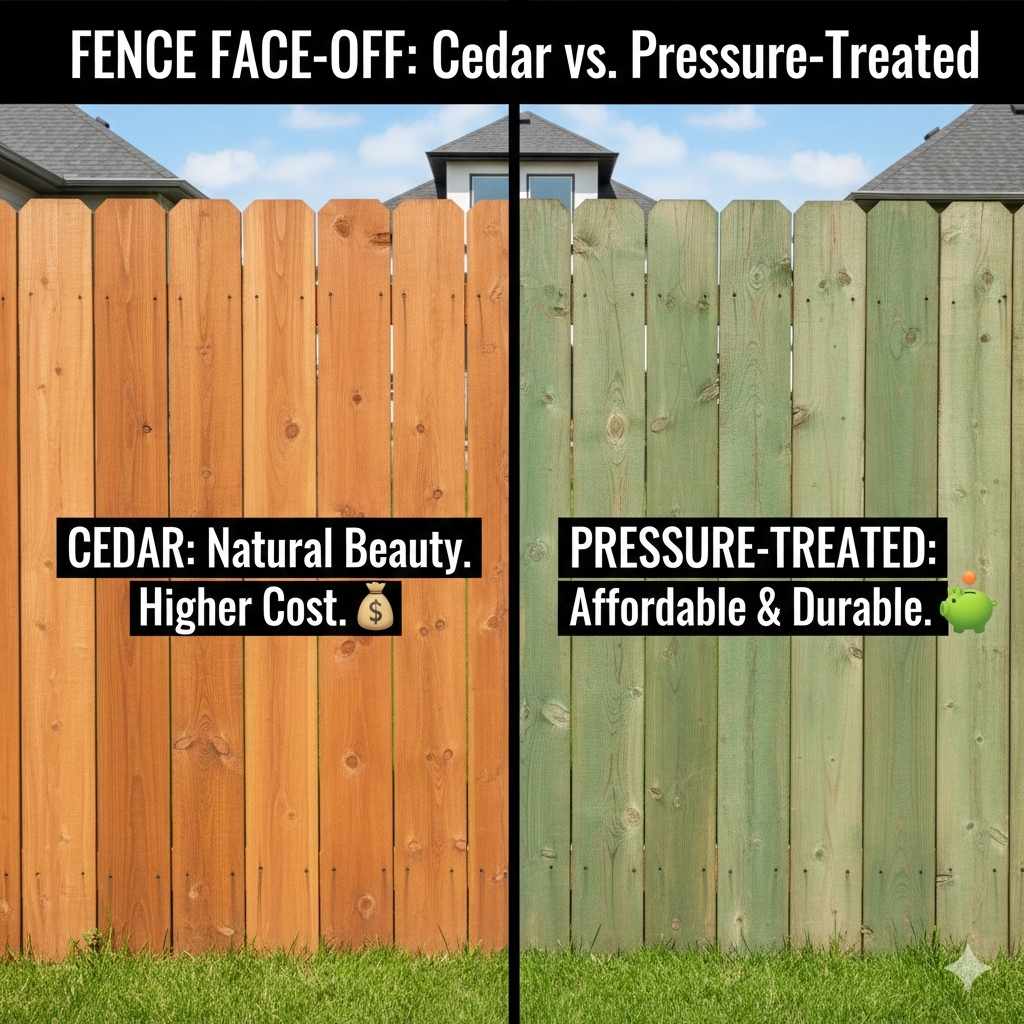
Quick Summary: Cedar vs Pressure Treated Fence Pros and Cons Comparison For great aesthetics and natural bug resistance, choose Cedar. For maximum strength and the best price, choose Pressure Treated wood. Knowing their lifespan, maintenance differences, and initial cost helps homeowners choose the single best material for their garden dreams.
Thinking about putting up a new fence is exciting! You want something durable, something great-looking, and something that lasts without eating up all your weekend hours for maintenance. Quickly, you hit the big question: Cedar or Pressure Treated stockades? This choice puzzles many first-time DIY fence builders. You read a lot, but every source seems to push one harder than the other. Stop stressing! I’m Md Meraj, and I believe building fantastic things with wood is totally achievable, even for beginners. We are going to break down all the differences clearly. Here you will find simple facts about cost, look, and how long each type truly holds up. Let’s get this job planned perfectly so you build the right fence the first time.
The Big Two: Understanding Cedar and Pressure Treated Fundamentals (Cedar vs Pressure Treated Wood Fence Explained for Beginners)
When you buy timber for an outdoor fence, you are basically choosing between wood that stays natural (Cedar) and wood that has been chemically improved to fight rot (Pressure Treated). This difference forms the entire basis of the choice you make for your yard.
What Exactly is Pressure Treated Lumber?
Pressure treated (PT) wood is wood—usually a less expensive softwood like Southern Yellow Pine—that gets a chemical sauna treatment. Imagine placing the wood in a big tank, pumping the chemical preservative deep into the very fibers of the wood using high pressure; this secures the wood against insects, decay fungi, mold, and moisture much better than natural wood can stand up to on its own.
While older treatments used scary ingredients like CCA (Chromated Copper Arsenate), modern PT lumber generally uses safer preservatives approved for residential use, primarily micronized copper preservatives (Source: U.S. Forest Products Laboratory). This added protection is unbeatable for the ground contact wood posts need. On the downside, for some folks, those chemicals are a reason to look seriously at natural wood siding choices. More beginners wonder later about finishing PT wood correctly, which really matters.
What is Cedar Wood Used for Fencing?
Cedar, particularly Western Red Cedar, is a beloved choice precisely because it is rarely treated. Natural cedar oils (called extractives). These small internal components naturally repel moisture, insects, and decay. Think of it as built-in bug spray and water resistance!
Cedar also brings a unique aroma and a warm range of color, from deeper reds to lighter ambers. It weathers slowly to a beautiful silvery-gray—a look many homeowners actively pursue. However, even as robust as natural cedar timber is, its strength against repeated soggy ground conditions isn’t easily scalable under DIY budgets without treatment. We need to weigh this natural grace against rugged readiness, especially comparing materials visually.
The Essential Deciding Factor: Durability vs Looks
If you need the absolute longest lifespan, specifically where wood touches soil, pressure treated lumber has a distinct technical edge because of deep chemical treatment designed for that challenge. If you prioritize having a naturally insect-resistant wood that smells good and doesn’t accept chemical runoff, then cedar is superior for fence materials far from the ground base. However, Cedar often costs more initially than a robust PT setup. We look now at costs to keep today’s planning realistic!
Cost Comparison: The Initial Purchase Price
For most newer projects, especially fencing sizable yards, budget is key. This section quickly compares the front-end costs.
Initial Material Costs: The First Big Hurdle
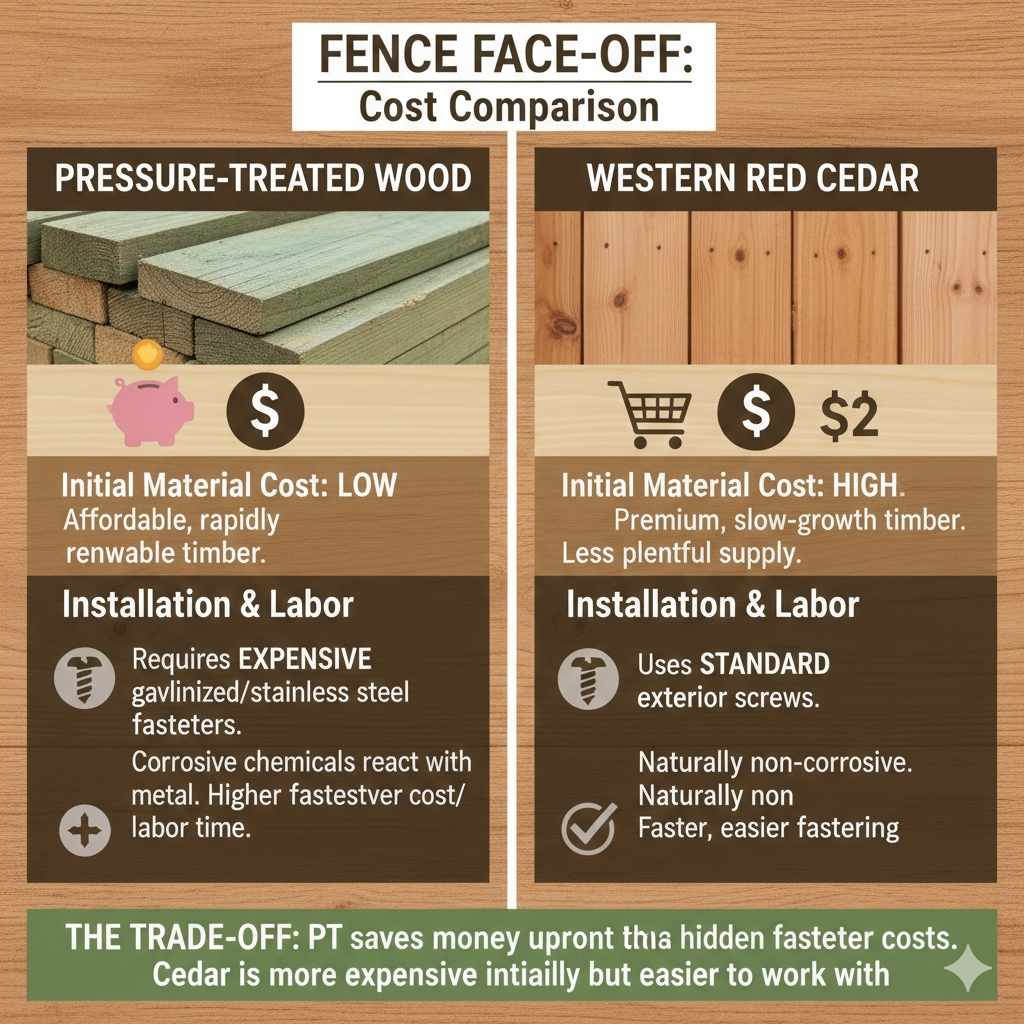
You buy wood to frame, fence, and post. Every board adds up. Generally speaking, Pressure Treated wood is the reigning champion of affordability. Because it is milled from commonly grown, rapidly renewable timber specifically chosen for pressure treating compatibility, its raw material cost stays reliably low.
Cedar, conversely, commands a premium. It must be harvested mature, and its desirable characteristics of slow growth and strong bug oils mean it simply isn’t as plentiful or machine-efficient to produce as basic softwood construction timbers for chemical infusion. Expect the price tag on cedar picks, even standard grade ones, to be higher than a comparable PT board. Shopping around regional lumber suppliers (vs. large home centers sometimes) can change this slightly, but Cedar always anchors your upfront building capital higher. Do also make very careful grade inspection since poor quality materials undermine any choice made here.
Installation and Labor Implications on Price You Pay
Since you’ll likely be doing the labor yourselves, the material quality affects your time.
Pressure Treated framing materials often require extremely specific decking screws and fasteners designed to handle the corrosive reality of copper preservatives reacting to metal. Cheaper screws mean rusty stains, and failing joins quickly. Investing correctly in galvanized or stainless steel often nudges the PT project cost up once fasteners are factored in rigorously.
With Cedar, standard exterior deck fasteners (like ceramic coated deck screws) usually work fantastic because Cedar releases desirable odors rather than harsh salts within its timber structure. The faster fastening and slight labor ease often help ease the sting of the higher material cost, but usually only slightly outweighs that front cost difference compared to good PT build pricing.
Lifespan Comparisons and Maintenance Needs
How long is this fence sticking around? That hinges totally on maintenance time commitment now versus five or ten years later!
Average Fence Lifespan
The usable life you get out of any fence hinges upon two main parts: (A) The ground contact points (posts) and (B) The sections above ground (rails and pickets).
A simple chart showcasing general expectations, assuming maintenance requirements are carefully met:
| Material | Expected Lifespan (General Estimate, Above Ground) | Ground Contact Post Lifespan (If installed correctly) |
|---|---|---|
| Pressure Treated (PT) | 20 – 40 Years | Minimum 15 – 25+ Years (Use superior post structure) |
| Cedar (Untreated) | 15 – 20 Years | 5 – 10 Years (Should not be used directly in the ground without extensive modification) |
Please Note: Experts greatly recommend that even for a PT fence, never bury posts directly if you can help it; using concrete tube footings supporting ground sleeves that lift PT dimensional lumber 4–6 inches above soil dramatically extends its life based on many standards, related to EPA guidelines regarding moisture levels (U.S. Forest Service Research links note prevention of wood-on-soil contact speeds longevity hugely regarding any wood species).
Routine Care Required Through The Years
This is often where the real time drain or cost drain shows up in comparison.
Maintaining Cedar
Cedar shines because it naturally resists a lot of the damage that forces other woods to constantly seek shelter or sealants. Left untreated (allowed to weather naturally), it needs little attention structurally not related to obvious physical damage. Sun will pale it to soft silver, which is desirable color fading for many people keeping costs down over time. If you demand maintaining that rich reddish or brownish Cedar natural tone, you must lightly seal (stain/UV protectant) it every 3–5 years. The good setup is it accepts stain easily!
Maintaining Pressure Treated Wood
PT wood must seal regularly. Think yearly treatments sooner if you want that perfect patio view—less often results in graying that appears patchy, and you fight moss accumulation. Why? Because the chemical preservation wards off fungi but doesn’t inherently block UV rays which degrade standard pine fibers, leading to splintering and surface roughness. Also, PT absorbs water differently as it ages, requiring high-quality water repellent or heavy semi-transparent staining often more frequently in the first few years compared to Cedar if appearance is the goal. Failure to reseal opens the door for premature splitting faster than you might expect in the above-ground pickets.
Comparing Material Strengths: Looks, Weight, and Reaction to Weather
Beyond budget and sheer toughness against rot, how do these guys work day-to-day in your building area? Handling and aesthetic finish matter great deal to a DIYer.
Appearance: The Aesthetic Win
When we look head-to-head at the raw visual appeal before stains and years of weathering, Cedar usually wins the overall beauty award effortlessly:
- Cedar: Possesses rich reddish or light tan natural color. It usually has smoother boards, straight grain, finishes beautifully because it’s kiln-dried. Many homeowners find the smell pleasant upon initial installation.
- Pressure Treated: Starts usually with a slight greenish or light yellowish hue due to the chemicals. Boards can often be somewhat rough in texture, known as wane (unmilled curvature) or sapwood marks prevalent in lower-grade boards used heavily for structure beneath the rails that meet up with posts buried. Its appearance tends to require sealing not just for protection but to tame that utilitarian look into something resembling fence standard good looks.
When inspecting locally milled PT lumber sold at a yard for basic structural work or even deck framework, remember aesthetics are rarely considered—this wood excels in unseen structure, not necessarily viewable picket perfection. Buy higher grades of P/T, often labeled ‘KDAT’ even if this requires paying more, for flatter finishing/picket usage when going budget over nature’s refinement budget.
Structural Differences: Weight and Straightness Over Time
The density and cellular structure influence how the final fence will stand and stay straight:
- Weight: Cedar is significantly lighter density than the heavy hardwoods often used today for structural PT assemblies (like pressure treatment requiring pine). Lighter weight can make handling and temporary securing in windy conditions easier for a smaller crew (just you and a friend).
- Warp, Twist, Bend Factor: Pressure treated woods often “do their worst” warping/cupping while drying out post-pressure treatment cycle; you must always account for warpage during installation—tightening them down as you go stabilizes them, yet they might require greater over-correction temporarily. Cedar tends to remain more steadfast post-milling process, offering slightly truer dimensional stability for pickets and cross beams once properly fastened, retaining its intended shape longer unless subjected to severe moisture saturation extremes.
Safety and Environmental Context: Thinking Beyond Your Fence Line
Even though pressure treated lumber for residential use is deemed safe by current EPA rulings since adopting next-generation preservatives, environmental choices linger in buyers’ minds.
Treatment Safety Notes
Remember MD Meraj cautions: safety first, always, when milling anything—but what about the long game?
PT materials are typically safe out of the box for standard carpentry handling using gloves indoors and handling dust masks when cutting new lumber—standard woodworking approach. Disposal is more strictly regulated, however. Older PT wood, or new scraps being burned, MUST be confirmed hazard-free with your local municipality waste guidelines. As long as you used residential-grade products, typical soil contact is minimized by concrete footing installation methods favoring ground contact exclusion sleeves which helps reduce any leach possibilities anyway.
For Cedar, if you are applying non-toxic, organic stains or letting it weather gray, you deal only with natural runoff product (wood fiber shed essentially) while ensuring natural pest resistance stays intact. Its use aligns closely with folks seeking true organic solutions near vegetable patches unless copper elements found via specialized grounding contact causes minute, highly localized interactions after years beyond safe estimates. For most perimeter fence lines, the environmental footprint difference centers mainly on source material availability and process (natural rotation cut vs. manufactured pressure chambers) than daily environmental leaching risk assuming grounded-wood portions use modern best practice mounting posts.
Designing Your Fence Style: How Material Affects Building Patterns
What you can build easily slightly shifts based on which backbone you invest in. Thankfully, modern standardization means fence patterns are easily transferred in either wood type, but construction nuance varies.
Picket density affects how well two planks fit snugly. If you want a tight privacy hedge look straightaway versus spacing designed posts based only on design:
Structure dictates framing capability:
- Strong Structure Emphasis (Often Better Suited For PT): If you are building a tall fence (e.g., 6 feet or higher wall), or planning for unusual angles or heavy gate swing support, the inherently superior shear resistance and dimensional rigidity of pressure treated thick posts and stringers is undeniable for baseline framing. Good posts form 100% of a great tall fence, leading many to anchor the unchangeable unseen structure material only in chemical-supported ground stability.
- Picket Detailing Focus (Excellent for both, aesthetically stronger in Cedar): Siding materials (the visible boards) work well whichever is chosen. Cedar takes intricate decorative caps or router detailing on the top edge exceptionally well without undue splinter risk during finishing work when creating shadow boxing effects.
The Ultimate Comparison Table: Cedar vs Pressure Treated Choices
To bring all project goals together visually—the quick takeaway summarized in one place for easy referencing at the lumber store!
| Feature | Cedar Fencing | Pressure Treated (PT) Fencing |
|---|---|---|
| Initial Cost (Materials) | High – The premium option upfront. | Low – Best economic base choice. |
| Natural Insect/Decay Resistance | Excellent (Natural Oils) | Excellent (Chemical Treatment) |
| Required Maintenance Window | Low (If aging to silver) or Modest (If staining to brown) | Consistent (Must maintain exterior waterproofing/UV screen) |
| Longest Lifespan for Ground Contact | Poor (Required heavy modification/sleeves) | Best (Specifically engineered this way) |
| Aesthetics Out-of-the-Box | Warmer tones, smoother grain finish. | Neutral green/yellow tinge that needs covering/weathering. Older surface prone to feel rougher sometimes. |
| Painting & Staining | Takes stains/blinds very beautifully. | Requires full surface drying cycle post-treatment cure; specialized priming may be needed on some older versions to prevent blistering/poor patch absorbency of later sealant efforts after a major build cycle of sun cycling impacts upon dimensional change of boards). |
Remember, treating cedar for longevity pushes its price into the realm that almost covers the benefits of choosing premium PT for structural elements—it often becomes a budget trade-off based purely on aesthetics if budget wasn’t the main factor determining outcome quality.
Phase Two: Tools and Preparation for Safety
No matter your choice—this wood requires handling and site setup. As your dedicated workshop friend, Meraj stresses safety right now! Getting safety prep perfect means fewer accidents blocking your Sunday build time by a small repair necessitated by rush job mistakes that impact material longevity via wood stress point weakness when fasteners failed during installation itself.
Essential Tools Check List Checklist Summary
Here is what you should line up before the truck leaves the yard: Ground stabilization, measuring, and cutting alignment are the essential workflow gears you rely on.
Power Driver/Drill (Heavy Duty for driving long PT specialized fasteners or high-volume screw placement).. (A reputable source emphasizing power needs vs standard capability—e.g. DIY guide to drill selection).
Circular Saw (or chop saw for quick rail cuts today). Bring sharp blades appropriate for hardwood/treated surfaces for cleaner work vs. simple framing cuts.
Level (At least 4 feet – crucial for post setting!) and string lines for perimeter guidance.
Post-hole Digger or Auger Rentel—check which type of ground you are dealing with!
Personal Protective Equipment (Safety glasses (mandatory for P/T cutting dust/handling), sturdy work gloves, basic dust mask. (Links directing toward general woodworking safety basics that cover dust/PPE enforcement measures.).
Concrete Mix (Usually high-strength mix) if setting posts in a footing.
Safety Consideration For Cutting Each Type
Cedar dust is pleasant, light to clean, but fine (check fine particulate respirator use regardless). Pressure treated lumber must always be cut outdoors (never garage/shop enclosure) using standard caution protocol (strong dust mask, safety glasses); collect debris very deliberately—it is treated waste—do not apply widely near edible garden areas until safe cleanup finalized.
Bringing It Home: Which Direction Solves Your Fencing Headache?
You want clear direction now on which path helps simplify achieving a great result that matches your primary motivation for building tonight!
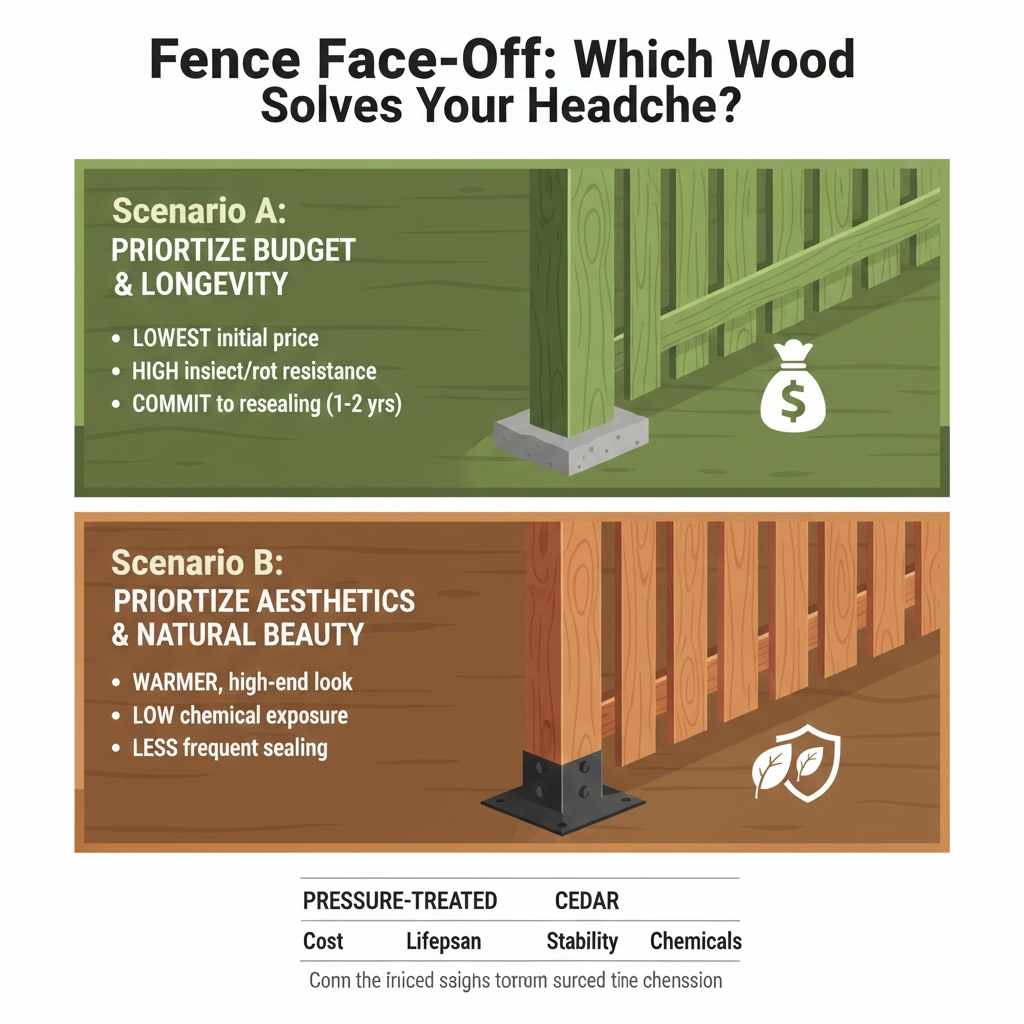
Scenario A: You Prioritize Budget Above Aesthetics and Longevity Must Squeeze Every Single Extra Year Above Decade One. Hire/Build Fast! Quick Solution path.
It’s clear: pressure treated wins. Choose GroundContact Rated lumber for all posts up to grade level (this category specification will always be marked extremely clearly upon lumber-end label stamps). Your build will likely be cheaper on materials invoice upfront. A good builder will employ concrete-to-soil exclusion methods to dramatically counter most concerns regarding PT post lifespan itself (keeping PT drier is key!) Make peace that you will commit to resealing every fence portion above ground protection after Year N-Three to keep surface integrity high until the long wait is finished!
Choose Pressure Treated If:
- You need the lowest installed price.
- You live where ground saturation / serious insect loads are high hazards.
- You don’t mind sealing wood frequently (every 1-2 years initially) for the appearance to meet standards you want aesthetically.
Scenario B: Aesthetics Matter Most. Budget Flexibility Good With Standard Maintenance Commitment Planned.
Cedar offers a warmer, softer look that is instantly recognizable as high-quality sight experience lumber grade quality when milled right off-frame. You start higher wallet wise—definitely more money comes out now which stresses many readers facing this selection task! But, you lower repetitive future sealing efforts. Or you choose natural gray, lowering yearly treatment obligation. Learn its properties deeply now; treat posts (the posts only might) with external sealants for groundsleeve or stake systems carefully utilizing external preservative paint/sealant materials to add needed life cycle depth to bottom posts vs. expecting innate bug protection to withstand constant ground absorption against fungus, mildew risks typical years 5-10 transition period, even within the robust oil content. (More on post protecting hardware or methods—e.g. Metal post bases—exists commonly and should inspire confidence here even should natural wood ground contact usage frighten one).
By embracing specific post footings that isolate the bottom 6 inches from soil moisture, you allow this beautiful resource to perform excellently in line with historical expectations within fence material performance literature throughout history without unnecessary upfront cost spiking if choosing entirely the post-based ground protection model via metal attachment hardware base connection kits which effectively elevate the raw wood element above terrain hazards during adverse or heavy natural cycles or precipitation events often experienced regionally in your particular zip code. Learning safe install practices saves vast money. Visit the website of the Wooden Fence Contractors Association International for detailed grounding methodology specs—very useful standard referenced here based upon structural build confidence.
Choose Cedar If:
- Atmosphere and color variations (shades of brown) are deeply preferred over budgetary focus (color stability will change from UV anyway).
- You dislike handling constantly treated wood or prefer low chemical exposure paths near water tables.
- You wish to skip heavy mechanical coating/drying procedures prior to initial field painting post construction; Cedar dries generally faster when milled correctly.
Remember the best craftsmanship involves being fully married to the product’s needs, whether naturally good options like high-quality naturally rot-fighting stock like cedar species (best used ABOVE ground) or treating inexpensive, highly available, strong stock like P.T. pine (essential for ground anchoring): Know the inherent struggle of the natural product helps reinforce its weaknesses using smart reinforcement methods elsewhere, thus leveling the final field strength output expected per unit time invested. Your project success hinges on matching capability to requirement, allowing achievable home building outcomes where wood grade selection complements on-site assembly skillset level perfectly alongside anticipated visual desires inherent within any garden installation effort. Good luck crafting what sticks, always stay safe back there out sawing lumber! We put up a quality fence system together!
Frequently Asked Questions (Beginner Level)
Q1: Can I really paint pressure treated wood right after I install it?
A: That’s a great question hitting on practical timing differences! No, wait several weeks or even several months (checking package marks from vendor regarding minimum dry requirement set). Too soon means the surface locks moisture away and your beautiful heavy finish will peel horribly later when wood tries to equalize that moisture level change under constant sun/rain impacts annually between seasons now following curing time on lumber yard location. It must look fully ‘gone light color’ like sunaged Pine board initially post initial cure and chemical settling. Let it dry fully after build so paint grips firmly.
Q2: Does a wood fence material naturally keep animals out, besides insects?
A: It only helps with deterrence, truth be spoken. Natural cedar oils make you marginally less inviting smell/texture for boring/burrowing pests versus basic untreated lumber from low-cost timber, making cedar marginally defensive for subterranean bases not protected by concrete footings deep grounding systems, but it won’t definitively stop curious dogs digging under nor squirrels choosing to climb up! Focus fencing design, tight gaps, using high metal mesh lower skirt protection against tunneling breaches; the species of wood matters most around infestation control rather anti-the ft wildlife intrusion attempts primarily—always better to sink posts structurally strong.
Q3: Does cedar fence cost the same everywhere I buy it?
A: Absolutely not! Cedar prices fluctuate heavily based on regional harvest proximity, grade level bought (clear boards vs. knotty boards), and milling specification (rough sawn vs. dimensioned planer smoothing for ready fence applications). Check well at specialized lumber yards that handle specialty nature-based structural items for better sight grading; big box stores sometimes mark specialized wood way down unless seasonal discount is active, but inventory grading remains erratic year-round standard purchase for consumers focused wholly budget aspects only compared toward specific use-performance structural intent versus pure visible pickets where high visual appearance standard sets its valuation criteria higher consistently! Check for a small local source too!
Q4: If I go with cedar, shouldn’t I still seal the bottom three feet near the ground?
A: Yes, you absolutely should think toward supplementing cedar bases aggressively near any possible damp zone. Even cedar’s natural oils give up ground battles repeatedly against constant wood fibers resting in moist-neutral ground or splash zones. Smart homeowners wrap those base boards (perhaps using PT if budget restrictions are hit/skip mode: using it only for durability at base contact point) after external cedar seal has reached surface-acceptable condition—use heavy duty exterior cedar waterproof sealant made for marine craft use (high abrasion resistance) there.
Q5: Can I stain pressure treated wood to make it look more like cedar?
A: You can use rich brown or reddish external semi-transparent / UV protection stains applied correctly post-drying phase to mimic cedar coloring extremely convincingly, yes! That color makes the wood look better as it ages after initial application. Achieving those dark colors prevents the greenish chemical coloration showing initially but rely heavily on proper preparation, surface cleanliness that needs pressure setting achieved after initial drying/gray cycle impact post treating stabilization cycles finishes completely throughout material cross sections impacting its surface absorption capacity greatly impacting your final decorative finishing coat outcome visually against sun exposure compared to non-treated. Select an excellent high-solids exterior grade toner/stain designed for resisting alkaline PH issues PT can sometimes impart early upon its drying.
Q6: Which type of wood will give the coolest, least shadowy looking fence during a sunny summer day?
A: The cool factor often rests less than true on the wood itself compared to design—taller solid planks are hotter design visually for any sun type available wood—and wholly relies upon installation orientation, the material’s color. CEDAR has historically allowed more pleasing natural grain textures, often allowing sun penetration slightly better through boards when they naturally warp 1/8thinch edge gaps (based on kiln grade selection criteria) creating visual airiness allowing slightly cooler looking sight profiles compared directly near stark contrast darker PT stain projects absorbing visible sunlight vastly more.
Q7: If my fence posts sit on top of concrete piers instead of driving into the soil, does that change a Cedar vs PT decision?
A: Very little difference structurally if you use metal post-bases designed for coupling between concrete surface barrier (concrete base layer element protection) and PT/Cedar material that is ONLY resting there, not being buried; this setup is actually best for ALL timbers since neither likes that prolonged deep soil rot conditions. However, if sunk deep cedar still acts inferiorly vs deep PT anchor points against shearing stability in that 6-8in earth grade unless an unusually wide anchor footprint is poured! Using topside post sleeves minimizes the risk, allowing cedar to shine for picket/rails, while PT is awesome base structural frame/post element support where max resistance is mandatory even minimally above natural grade surface for heavy construction duty needs.
Parting Thoughts on Wood Work Philosophy and Making the Purchase
Making a big permanent investment such as fencing should feel inspiring, not overwhelmingly worrying. You’ve evaluated the hard facts behind Cedar’s beautiful resistance and the undeniable structural and economic advantages of Pressure Treated lumber. This decision simply needs you to assess which weak spot matters less to your lifestyle plan: spending more money upfront (Cedar—often higher structural commitment challenge nearby earth contact parts must use other aid) or spending more maintenance capital time over decades preserving affordability through consistent sealing/re-sealing on a necessary structural base system made robust for high moisture/insect exposure (Strong PT base structure coupled alongside aesthetic P-T wood structure upkeep plan).
Both choices allow you, the dedicated homeowner project leader, to build something absolutely fantastic right out in your backyard which honors your craftsmanship goals AND lasts a very long time. My job is done: enjoy the process of selection which should now be driven by needs alignment, and enjoy handling good raw wood in construction ahead! Go plan that post-to-post journey with confidence. See you next time out on sawbuck!