How Long Does Maple Sap Last? Essential Proven Facts
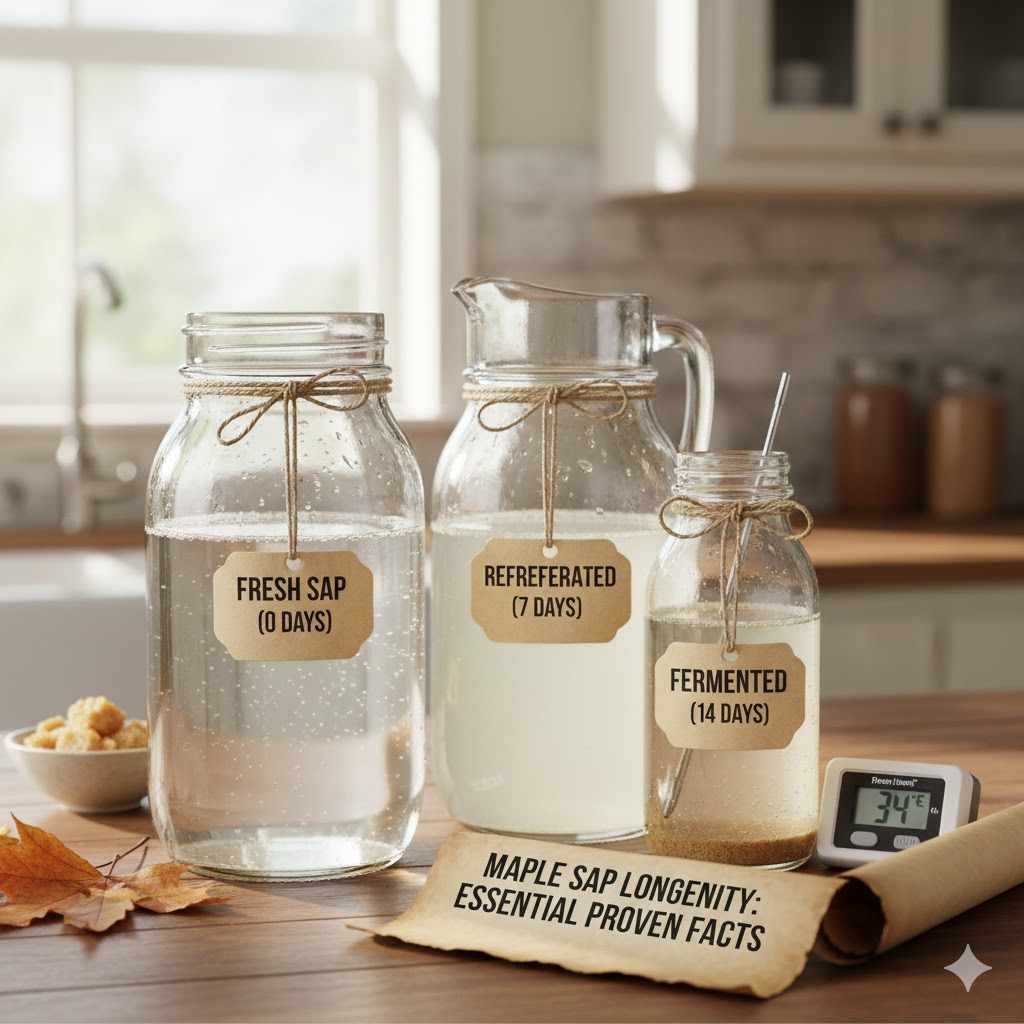
Fresh maple sap lasts for up to 7 days if kept cold (below 38°F or 3°C), but it’s best to boil it within 2–3 days for the highest quality syrup. Warmer temperatures can cause sap to spoil in less than a day, so keeping it chilled and clean is absolutely crucial for success.
Hello there! It’s Md Meraj, your friendly guide in the workshop. If you’ve taken the exciting step of tapping your own maple trees, you’ve probably asked yourself a very important question: “How long does this bucket of sap last before it goes bad?” It’s a great question, and one that every syrup maker faces.
You’ve done the hard work of tapping the trees and collecting that clear, sweet sap. The last thing you want is for it to spoil before you can turn it into delicious maple syrup. Don’t worry! Understanding how to handle your sap is simple. I’m here to walk you through everything you need to know to keep your sap fresh and ready for boiling. Let’s make sure all your effort leads to amazing results.
Understanding Maple Sap: Why Time Is of the Essence
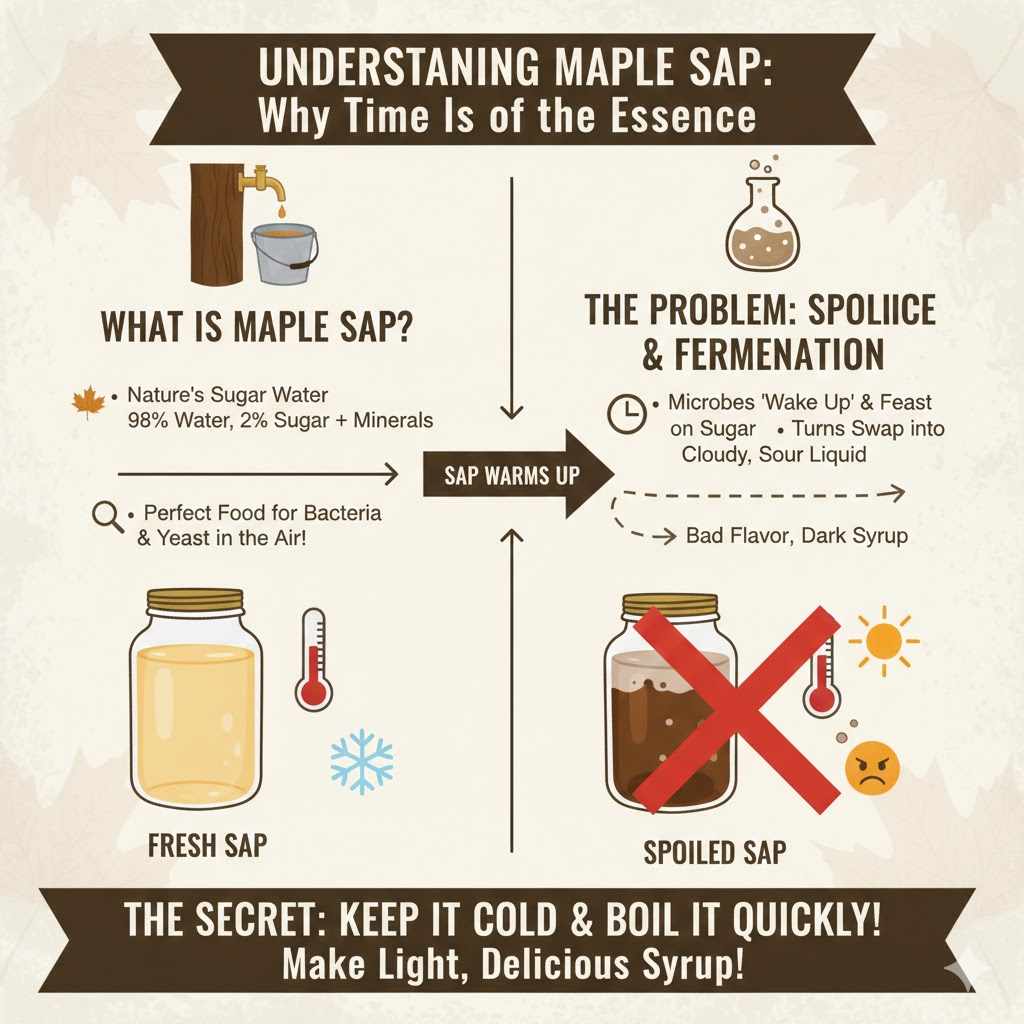
Before we talk about storage, let’s quickly cover what maple sap actually is. Think of it as sugar water made by nature. It’s about 98% water and only 2% sugar, along with some minerals and amino acids. While that doesn’t sound like much sugar, it’s the perfect food for naturally occurring bacteria and yeast that are floating in the air and on your equipment.
These tiny microorganisms are the reason sap spoils. When the sap warms up, they wake up and start feasting on the sugar. This process is called fermentation. It turns your clear, sweet-tasting sap into a cloudy, sour liquid. This not only ruins the flavor but also changes the chemical makeup, leading to dark, off-tasting syrup. That’s why keeping sap cold and boiling it quickly is the secret to making light, delicious maple syrup.
The Golden Rule: How Long Does Fresh Maple Sap Really Last?
The simplest answer is that you should treat maple sap like milk. You wouldn’t leave a gallon of milk on the counter for a day, and you shouldn’t do that with your sap either. The number one enemy of fresh sap is heat.
Your goal is to keep the sap at a temperature of 38°F (3°C) or lower, but not frozen solid (unless you’re storing it long-term). At this temperature, the bacteria that cause spoilage are mostly dormant. This gives you a window of about a week to collect enough sap to boil.
However, three main factors will determine your exact window of freshness:
- Temperature: This is the most critical factor. Cold sap is happy sap. The warmer it gets, the faster it will spoil.
- Container Cleanliness: Any dirt or old sap left in your collection buckets or storage tanks can introduce bacteria and speed up spoilage. Everything must be squeaky clean.
- Time Since Collection: The clock starts ticking the moment sap drips from the tree. The sooner you can cool it down and boil it, the better your syrup will be.
Ideal Storage Temperatures for Maple Sap
Let’s break down how temperature directly affects how long your maple sap will last. You can see a clear pattern: the colder, the better. If the outdoor temperatures are fluctuating, especially rising above freezing during the day, your sap’s shelf life decreases dramatically.
| Temperature Range | Estimated Shelf Life | What’s Happening to the Sap |
|---|---|---|
| Below 38°F (3°C) | 5 to 7 days | Bacteria growth is very slow. The sap stays fresh, clear, and sweet. This is the ideal storage condition. |
| 40°F to 50°F (4°C to 10°C) | 1 to 2 days | Bacteria become more active. The sap might start to get slightly cloudy and lose some of its sweetness as spoilage begins. |
| Above 50°F (10°C) | Less than 24 hours | Spoilage happens very quickly. The sap will become cloudy, sour, and may develop a ropy texture. It is not suitable for making good syrup. |
Proven Methods for Storing Maple Sap Safely
Now that you know how important it is to keep sap cold, let’s talk about how to do it. You don’t need fancy equipment to get this right. Here are three proven methods that beginners can use to store sap safely until they are ready to boil.
Method 1: The Natural Refrigerator (For Colder Climates)
If you live in a place where it stays cold, nature can be your best refrigerator. This is the old-school method and works wonderfully if the weather cooperates.
- Find a Shaded Area: Locate a spot on the north side of your house or under dense trees where the sun won’t reach.
- Build a Snow Bank: Pile up clean snow to create an insulated mound. You can pack it down firmly to create a solid base.
- Bury Your Containers: Place your sealed, food-grade storage containers into the snowbank. Bury them as deeply as you can, covering them completely with snow. The snow acts as a perfect insulator, keeping the sap at a consistent, near-freezing temperature.
Pros: It’s free and uses natural resources.
Cons: This method is entirely dependent on the weather. A sudden warm spell can ruin your entire batch of sap.
Method 2: Using a Refrigerator or Chest Freezer
For a more reliable storage solution, a dedicated refrigerator or chest freezer is an excellent choice. This gives you complete control over the temperature, no matter what the weather is doing outside.
- Designate a Space: If you have an old (but working) refrigerator in your garage or basement, it’s perfect for storing sap. A chest freezer set to its warmest setting can also work well to keep sap chilled but not frozen.
- Use Food-Grade Containers: Store the sap in clean, sealed, food-grade buckets or jugs. Make sure they fit comfortably in your fridge or freezer.
- Check the Temperature: Use a thermometer to ensure the internal temperature stays below 38°F (3°C). This is the most dependable way to keep your sap fresh for up to a week.
Method 3: Freezing Maple Sap for Long-Term Storage
What if you want to collect sap for more than a week before boiling? Freezing is your answer. When you freeze sap, you completely halt all bacterial activity, preserving it perfectly until you’re ready to use it.
- Choose Freezer-Safe Containers: Use containers that are designed for freezing. Food-grade plastic jugs or buckets work well.
- Leave Headspace: This is very important! Sap is mostly water, and water expands when it freezes. Leave at least 10% of the container empty to give the sap room to expand. If you don’t, the container could crack or burst.
- Thaw Safely: When you’re ready to boil, thaw the sap in a cool place, like a refrigerator or a cold room. Thawing it slowly helps maintain its quality.
Frozen sap can last for several months, allowing you to collect sap throughout the season and have one big boiling day at the end.
Recognizing Spoiled Maple Sap: The Telltale Signs
Sometimes, despite our best efforts, sap can begin to turn. Knowing the signs of spoilage can save you a lot of time and wasted fuel. The good news is that spoiled sap is usually very easy to spot. Just use your senses!
Visual Cues
Fresh sap should look just like water: crystal clear. If you notice any of these visual signs, your sap is likely spoiled.
- Cloudy or Milky Appearance: This is the first and most common sign of spoilage. As bacteria multiply, they turn the clear sap into a hazy, cloudy liquid.
- Ropy or Stringy Texture: If you dip a clean spoon into the sap and it comes out with slimy, stringy threads, the sap has definitely gone bad.
- Mold or Foam: Any signs of mold on the surface or excessive foam that doesn’t disappear are clear indicators that the sap is no longer good for making syrup.
Smell and Taste
Your nose is another great tool for checking sap quality.
- Smell: Fresh sap should smell fresh and slightly sweet, like clean water with a hint of wood. If it smells sour, vinegary, or fermented like beer, it has spoiled.
- Taste (With Caution): A tiny sip can tell you a lot. Fresh sap tastes like slightly sweet water. Spoiled sap will have a sour or “off” taste. However, if the sap looks or smells bad, trust those signs and don’t taste it.
According to experts at the University of New Hampshire Extension, boiling spoiled sap results in lower-grade syrup with undesirable flavors. It’s simply not worth the time, effort, and fuel to process sap that has already turned.
Tips from the Workshop: Best Practices for Handling Fresh Sap
Treating your sap with care from the moment it leaves the tree is the best way to ensure a delicious final product. Here are a few workshop-tested tips to keep in mind.
- Cleanliness is Key: Before the season starts, thoroughly wash and sanitize everything that will touch the sap. This includes your drill bit, taps, buckets, lids, storage tanks, and filters. A simple solution of one part bleach to 20 parts water works well for sanitizing, followed by a thorough rinse with clean water.
- Use Food-Grade Equipment: Make sure all your buckets and storage containers are made from food-grade plastic or stainless steel. Never use containers that previously held chemicals, paint, or other non-food materials.
- Filter, Filter, Filter: As you collect sap from your tree buckets, pour it through a preliminary filter to remove bits of bark, insects, and other debris. This initial cleaning step prevents that organic matter from sitting in your sap and accelerating spoilage. Filter it again before it goes into your large storage containers.
- Boil As Soon As You Can: While proper storage gives you a grace period, the best syrup is always made from the freshest sap. Try to plan your boiling days so you can process the sap within a couple of days of collecting it.
- Keep It Out of the Sun: Sunlight will warm up your sap quickly, even on a cold day. Always place collection buckets and storage tanks in the shade to help keep them cool.
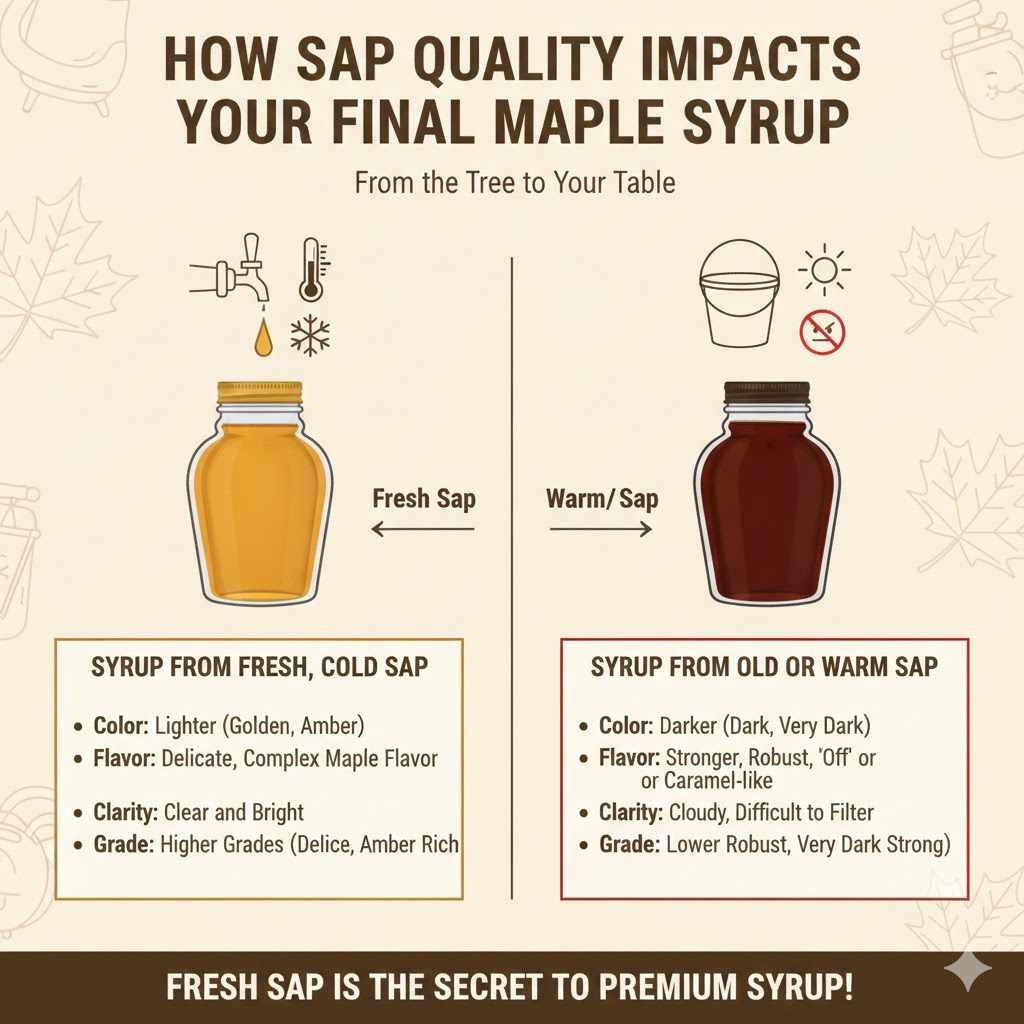
How Sap Quality Impacts Your Final Maple Syrup
The quality of your sap directly determines the quality of your syrup. You can’t make light, delicately flavored syrup from old, slightly spoiled sap. The changes that happen in the sap during spoilage carry right through the boiling process and end up in the final product. Here’s a simple table to show you the difference.
| Characteristic | Syrup from Fresh, Cold Sap | Syrup from Old or Warm Sap |
|---|---|---|
| Color | Lighter (Golden, Amber) | Darker (Dark, Very Dark) |
| Flavor | Delicate, complex maple flavor | Stronger, more robust, sometimes with “off” or caramel-like flavors |
| Clarity | Clear and bright | Can be cloudy or have “sugar sand” that is difficult to filter out |
| Grade | Typically higher grades (Golden Delicate, Amber Rich) | Typically lower grades (Dark Robust, Very Dark Strong) |
While dark syrup has its own wonderful uses, especially in cooking, most beginners are aiming for that classic, amber-colored syrup for pancakes and waffles. Using fresh sap is the only way to achieve it.
Frequently Asked Questions (FAQ)
Can I leave maple sap in collection buckets overnight?
Yes, but only if the temperature is expected to drop below freezing (32°F or 0°C) overnight. This will keep the sap cold and fresh. If temperatures stay warm, it’s best to collect the sap at the end of the day and move it to a colder storage location.
What’s the best container for storing maple sap?
The best containers are made from food-grade plastic or stainless steel. They should be easy to clean and have tight-fitting lids to keep out debris and insects. Many hobbyists use 5-gallon food-grade buckets, which are affordable and easy to handle.
Does maple sap need to be refrigerated?
Yes, absolutely. You should treat maple sap just like you would treat milk. Keeping it at or below 38°F (3°C) is essential to slow down bacterial growth and prevent spoilage. If you don’t have a refrigerator, you can use clean snow and ice to keep it cold.
How do you know if maple sap has gone bad?
You can tell sap has gone bad by its appearance and smell. Spoiled sap will look cloudy or milky instead of clear. It may also have a sour or fermented smell. In some cases, it can even become stringy or ropy in texture.
Can you still boil cloudy maple sap?
It’s not recommended. Cloudy sap is a sign that bacteria are already at work. Boiling it will result in a darker, lower-grade syrup that often has a sour or “off” flavor. You’ll spend a lot of time and fuel for a disappointing result.
What is “buddy sap”?
“Buddy sap” is a term for sap collected late in the season, just as the tree’s buds begin to swell. It has a different chemical composition that produces syrup with an unpleasant, almost cabbage-like flavor. It is unrelated to spoilage but is another reason to stop collecting sap once the weather warms and trees begin to bud.
Can I mix sap collected on different days?
Yes, you can mix sap from different days, but only if all the sap has been kept properly chilled. When you add fresh sap to your storage container, it will cool down quickly if the existing sap is already cold. Always make sure your oldest sap is used first by boiling your entire batch within a week of when the first drops were collected.
Conclusion: Your Path to Delicious, High-Quality Syrup
There you have it! The secret to making amazing maple syrup really comes down to three simple rules: keep it clean, keep it cold, and boil it fast. By understanding that maple sap is a perishable food, just like milk, you can take the right steps to protect its quality.
Remember to store your sap below 38°F (3°C), use clean and food-grade equipment, and try to boil it within a few days of collection. If you follow these guidelines, you’ll be well on your way to turning that clear, watery sap into beautiful, amber-colored maple syrup that you can be proud of. Happy sugaring, and enjoy every sweet moment!