How to Easily Change Blade on Ryobi Circular Saw: Step-by-Step Guide
To change the blade on a Ryobi Circular Saw, follow these steps:
1. Disconnect the saw from power.
2. Push the arbor lock button to secure the blade. Then, with the help of a wrench, loosen the arbor nut and remove the old blade. For safety purposes, always wear protective gloves during this process. Introducing a new blade to your Ryobi Circular Saw is a simple task that can be accomplished in just a few straightforward steps.
Whether you need to replace a worn-out blade or switch to a different type for specific projects, knowing how to change the blade is essential for any saw owner. This guide will provide you with an accurate, concise, and SEO-friendly explanation of the process, allowing you to quickly and easily swap out the blade on your Ryobi Circular Saw. By carefully following these steps, you’ll be back to making precise cuts in no time. So, let’s dive right in and get started!
Tools Needed For Blade Changing Process
When it comes to changing the blade on a Ryobi circular saw, having the right tools is essential for a smooth and efficient process. Using the correct tools not only ensures a safer operation but also helps to maintain the longevity of your circular saw. In this section, we will discuss the necessary tools needed to change the blade on a Ryobi circular saw.
List Of Necessary Tools For Changing The Blade On A Ryobi Circular Saw
- Wrench: A wrench is an indispensable tool needed to loosen and tighten the arbor nut that holds the blade in place.
- Hex Key: Depending on the model, some Ryobi circular saws may require a hex key to remove the blade. Make sure to check your specific model’s requirements.
- Safety Gloves: It is crucial to protect your hands during the blade changing process. Wear safety gloves to prevent any potential accidents or injuries.
- Safety Glasses: To safeguard your eyes, always wear safety glasses when working with power tools. Blade changing involves handling sharp objects, and safety glasses provide crucial eye protection.
- Workbench or Clamps: Having a stable work surface is essential for a safe blade changing process. Ensure you have a sturdy workbench or use clamps to secure the circular saw in place.
- New Blade: Of course, you will also need a new blade to replace the old one. Make sure to select a suitable blade size and type for your specific Ryobi circular saw.
Importance Of Having The Right Tools For The Job
Having the right tools for the blade changing process is of utmost importance for several reasons:
- Safety: Using the correct tools minimizes the risk of accidents and injuries. Safety gloves and glasses protect your hands and eyes from potential hazards.
- Efficiency: The proper tools allow for a smooth and efficient blade changing process. With the right wrench or hex key, you can easily loosen and tighten the arbor nut, saving time and effort.
- Longevity: By using the recommended tools, you help maintain the integrity of your Ryobi circular saw. Improper tools may damage the blade or other components, leading to decreased performance and a shorter lifespan.
By following the manufacturer’s guidelines and using the specified tools, you can ensure a successful blade changing process while keeping yourself and your circular saw safe. Now that we know the necessary tools, let’s move on to the step-by-step process of changing the blade on a Ryobi circular saw.
Understanding The Blade-Changing Process
Changing the blade on a Ryobi circular saw is a crucial maintenance task that every DIY enthusiast should know. Whether you’re a seasoned woodworker or a weekend hobbyist, understanding the blade-changing process is essential for ensuring the efficient and safe operation of your saw. In this section, we will provide an overview of the steps involved in changing the blade on a Ryobi circular saw, as well as emphasize the importance of following proper safety precautions before starting the process.
Overview Of The Steps Involved In Changing The Blade On A Ryobi Circular Saw
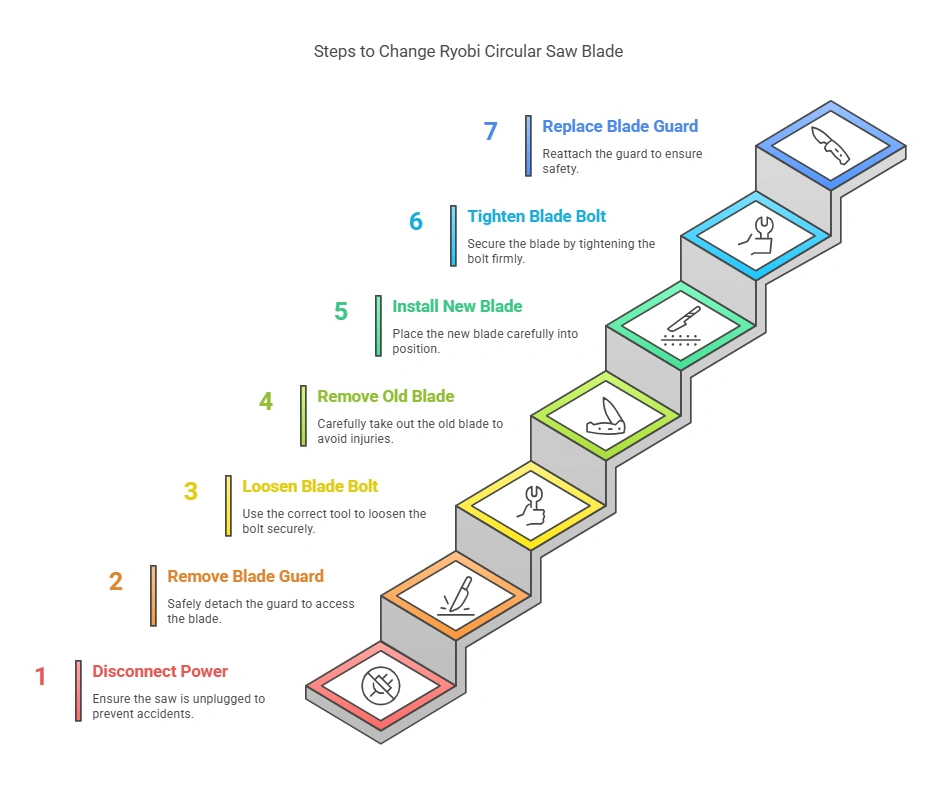
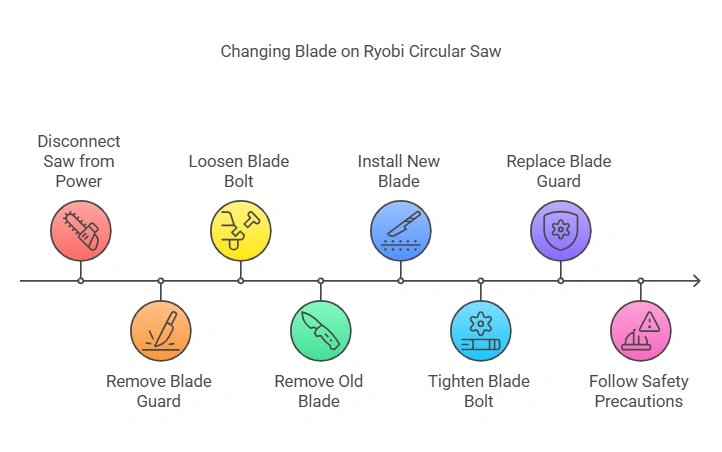
Changing the blade on a Ryobi circular saw may seem like a daunting task, but with the right instructions, it can be a straightforward process. Here is an overview of the steps:
- Power off and unplug the saw: Safety should always be your top priority when working with power tools. Before attempting to change the blade, make sure the saw is turned off and unplugged from the power source.
- Lock the spindle: Locate the spindle lock button on the saw and press it to engage the lock. This will prevent the blade from rotating while you loosen the arbor nut.
- Remove the arbor nut and outer blade washer: Using the wrench provided, carefully loosen and remove the arbor nut and outer blade washer. Keep them in a safe place.
- Remove the old blade: Take out the old blade by sliding it off the arbor. Be gentle and cautious while handling the blade to avoid any injuries.
- Insert the new blade: Carefully place the new blade onto the arbor, ensuring that the blade teeth are facing in the correct direction. Make sure the blade is properly seated on the arbor.
- Reassemble the arbor nut and outer blade washer: Put the outer blade washer back in place, followed by the arbor nut. Make sure they are tightened securely by using the wrench.
- Unlock the spindle and test the saw: Release the spindle lock button and rotate the blade manually to confirm that it is properly installed and secured.
Importance Of Following Proper Safety Precautions Before Starting The Process
Before you embark on changing the blade on your Ryobi circular saw, it is crucial to prioritize safety. By following proper safety precautions, you can prevent accidents and ensure a smooth blade changing process. Here are a few essential safety measures to keep in mind:
- Wear protective gear: Always wear safety goggles, gloves, and ear protection to shield yourself from any flying debris or loud noise.
- Disconnect the power: Before attempting to change the blade, make sure the saw is completely powered off and unplugged from the electrical outlet.
- Secure the blade: Engage the spindle lock to prevent the blade from moving while you work on it.
- Use the right tools: Utilize the wrench provided with your Ryobi circular saw to ensure a proper and secure removal and installation of the blade.
- Inspect the saw: Before beginning the process, carefully inspect the saw for any damages or defects that may affect its performance or safety.
By adhering to these safety precautions, you can protect yourself and others from potential accidents and ensure a successful blade changing experience on your Ryobi circular saw.
Step 1: Disconnect The Saw From Power Source
Before attempting to change the blade on your Ryobi Circular Saw, it is absolutely crucial to disconnect the saw from its power source. This simple yet important step ensures that you can safely work on the saw without the risk of accidental startup or electrical shock. In this section, we will discuss the reasons why disconnecting the saw is so important and the safety precautions you need to take.
Explanation Of The Importance Of Disconnecting The Saw From The Power Source
Disconnecting the saw from the power source is an essential safety measure when changing the blade on your Ryobi Circular Saw. By doing so, you eliminate the risk of the saw accidentally turning on while you are working on it. This is particularly important because the blade changing process often involves using tools and manipulating parts of the saw that can inadvertently trigger the power switch. By disconnecting the saw, you effectively remove power from the machine, reducing the chance of injury or accident.
Safety Precautions To Be Taken While Disconnecting The Saw
When disconnecting your Ryobi Circular Saw from the power source, it is vital to ensure your own safety. Here are some safety precautions to follow:
- Wear proper personal protective equipment (PPE) such as safety goggles, gloves, and ear protection before starting the process.
- Make sure the saw is turned off and the power cord is unplugged from the electrical outlet to completely disconnect it from the power source.
- Inspect the power cord for any signs of damage, such as fraying or exposed wires, and refrain from using it if any damage is detected.
- Take a moment to verify that the power switch on the saw is in the “off” position, ensuring an extra layer of safety.
- Consider tape or label the unplugged power cord to indicate that the saw is undergoing maintenance or inoperable.
- Avoid touching the blade or any moving parts of the saw during this process to prevent accidental injury.
- Store the saw in a secure and stable position, away from the edge of any surfaces, to avoid it from falling or tipping over.
- If you are working outdoors, avoid wet or damp conditions to minimize the risk of an electrical shock.
By adhering to these safety precautions, you can ensure that you are taking the necessary steps to protect yourself and work on your Ryobi Circular Saw with confidence and peace of mind.
Step 2: Remove The Blade Guard
To change the blade on your Ryobi circular saw, start by removing the blade guard. This step is crucial for a safe and successful blade replacement.
Importance Of Removing The Blade Guard Before Changing The Blade
Before you can change the blade on your Ryobi circular saw, it is essential to remove the blade guard. The blade guard is a safety feature designed to protect you from accidental contact with the blade while the saw is in use. Removing the blade guard ensures that you have clear access to the blade for a safer and more efficient blade replacement process.
Detailed Instructions On How To Safely Remove The Blade Guard
Follow the step-by-step instructions below to safely remove the blade guard on your Ryobi circular saw:
Step 1: Unplug The Circular Saw
For your safety, always unplug the circular saw from the power source before attempting any maintenance or blade-changing procedures. This will prevent any accidental starts during the process.
Step 2: Locate The Blade Guard Release Lever
Look for the blade guard release lever, typically located on the top or side of the saw near the blade housing. This lever is designed to allow you to easily release and pivot the blade guard out of the way.
Step 3: Engage The Blade Guard Release Lever
Using your thumb or finger, engage the blade guard release lever and push it in the direction indicated by the arrow or the word “release.” This action will disengage the blade guard, allowing you to move it away from the blade.
Step 4: Lift The Blade Guard
With the blade guard release lever engaged, lift the blade guard away from the blade. Ensure that it is fully pivoted and securely held in the open position, providing unobstructed access to the blade.
Step 5: Visually Confirm The Blade Guard Is Secured In The Open Position
Take a moment to visually confirm that the blade guard is securely held in the open position. This is an important safety check to ensure that the blade guard will not accidentally fall back into place while you are changing the blade.
Step 6: Proceed With Changing The Blade
Now that you have successfully removed the blade guard, you can proceed with changing the blade on your Ryobi circular saw. Refer to the manufacturer’s instructions or the user manual for detailed guidance on the blade replacement process.
Always remember to prioritize safety when working with power tools, especially when handling sharp objects like circular saw blades. By following these detailed instructions and taking the necessary precautions, you can ensure a smooth and secure blade guard removal process for your Ryobi circular saw.
Step 3: Loosen The Blade Bolt
To change the blade on your Ryobi circular saw, follow step 3 by carefully loosening the blade bolt.
Now that you have removed the blade guard and secured the saw, it’s time to loosen the blade bolt. The blade bolt is what keeps the blade securely in place, so it’s important to follow the correct procedure to avoid any accidents or damage to the saw.
Explanation Of How To Loosen The Blade Bolt On A Ryobi Circular Saw
- Identify the blade bolt. It is usually located in the center of the blade, securing it to the motor shaft.
- Use the correct tool. For most Ryobi circular saws, a wrench or a blade changing tool is required to loosen the blade bolt. Check your saw’s user manual to determine the appropriate tool.
- Insert the wrench or blade changing tool into the blade bolt. Make sure it is securely fitted onto the bolt.
- By turning the tool counterclockwise, apply force to loosen the blade bolt. Remember, clockwise tightens and counterclockwise loosens.
- If the blade bolt is too tight, you can use a wrench with a longer handle to provide more leverage. Just be careful not to apply too much force and strip the bolt.
Tips For Using The Correct Tool And Ensuring A Secure Grip
When loosening the blade bolt on your Ryobi circular saw, keep the following tips in mind:
- Use the correct tool: To prevent damage to the bolt or your saw, use the tool specified in your saw’s user manual.
- Ensure a secure grip: Make sure the tool is tightly fitted onto the bolt to avoid slipping or stripping the bolt.
- Apply steady force: While turning counterclockwise, apply consistent force to loosen the blade bolt gradually.
- Consider a lubricant: If the blade bolt is particularly stubborn, you can try applying a lubricant to help loosen it. Just make sure to wipe off any excess before reassembling the saw.
Following these steps and tips will help you successfully loosen the blade bolt on your Ryobi circular saw, allowing you to safely change the blade and continue your woodworking projects with ease.
Step 4: Remove The Old Blade
Now that you have gathered all the necessary tools and safety equipment, it’s time to remove the old blade from your Ryobi circular saw. Follow these instructions carefully to safely complete this step.
Instructions On How To Safely Remove The Old Blade From The Saw
To remove the old blade from your Ryobi circular saw, carefully follow these steps:
- Make sure that the saw is turned off and unplugged from the power source. Safety should always be your top priority.
- Locate the blade lock button on the side of the saw. This button is used to immobilize the blade and prevent it from rotating during the blade-changing process.
- Press and hold the blade lock button to engage the lock mechanism. This will keep the blade in place and prevent any movement.
- While holding the blade lock button, use a wrench to loosen the arbor nut that secures the blade to the saw. Turn the nut counterclockwise to loosen it.
- Once the arbor nut is loose enough, you can remove it by hand. Be careful as it may still be hot after use.
- Gently slide the old blade off the arbor and remove it from the saw.
Tips For Handling The Blade And Avoiding Injuries
Changing the blade on a circular saw requires careful handling to avoid any injuries. Keep these tips in mind:
- Wear safety gloves: Always wear safety gloves when handling the blade to protect your hands from sharp edges and potential accidents.
- Use caution when removing the blade: When removing the old blade, make sure to handle it by the edges or use a blade removal tool to avoid contact with the sharp cutting surface.
- Inspect the blade: Before installing a new blade, inspect the old one for any signs of damage or wear. Replace it if necessary to ensure optimal performance.
- Properly dispose of the old blade: Once the old blade has been removed, safely dispose of it in a designated container or follow local regulations for blade disposal.
By following these instructions and tips, you can safely remove the old blade from your Ryobi circular saw without any hassle or risk of injury. Remember, taking your time and prioritizing safety is key to a successful blade change.
Step 5: Install The New Blade
To change the blade on your Ryobi circular saw, follow Step 5: Install the New Blade. This important step ensures smooth operation and optimal cutting performance. Simply follow the manufacturer’s instructions to safely and securely replace the old blade with a new one.
Explanation Of How To Properly Install A New Blade On The Ryobi Circular Saw
Now that you have successfully removed the old blade in the previous step, it is time to install the new blade on your Ryobi circular saw. Properly installing the blade ensures smooth and efficient cutting, as well as your safety during operation. In this step, we will guide you through the process of installing the new blade correctly to ensure optimal performance.
Tips For Ensuring That The Blade Is Securely Attached
Installing a blade securely not only enhances cutting performance but also prevents accidents during operation. Here are some tips to help you ensure that the blade is securely attached to your Ryobi circular saw:
- Inspect the arbor and blade: Before installing the new blade, take a moment to inspect both the arbor and the new blade. Make sure there are no damages or irregularities that may affect the installation.
- Align the blade: Carefully align the center hole of the new blade with the arbor on your Ryobi circular saw. This ensures that the blade sits perfectly centered for accurate cutting.
- Use the arbor lock: Engage the arbor lock on your Ryobi circular saw to prevent the blade from rotating while you tighten it. This will make it much easier and safer to secure the blade properly.
- Tighten the blade: Use the wrench provided with your Ryobi circular saw to tighten the blade onto the arbor. Ensure that it is securely fastened, but be cautious not to overtighten, as this can damage the blade or the saw.
- Check for play or wobbling: After tightening the blade, gently give it a slight wiggle to check if there is any play or wobbling. If you notice any movement, stop using the saw immediately and recheck the tightness of the blade.
- Double-check the blade orientation: Before turning on the saw, visually confirm that the teeth of the blade are facing in the correct direction. The teeth should be pointing towards the front of the Ryobi circular saw to ensure proper cutting.
- Secure the blade guard: Finally, ensure that the blade guard is securely in place before operating your Ryobi circular saw. The guard protects you from any potential contact with the blade during use.
By following these tips, you can be confident that the new blade on your Ryobi circular saw is securely attached and ready for use. Take a moment to ensure everything is in order before moving on to our next step, where we will cover some essential safety precautions to keep in mind while using your circular saw.
Step 6: Tighten The Blade Bolt
Step 6 involves tightening the blade bolt on your Ryobi circular saw. This crucial step ensures that the blade is securely fastened, enhancing safety and performance during your cutting tasks.
Once you have successfully installed the new blade on your Ryobi Circular Saw, the next crucial step is to tighten the blade bolt securely. This step ensures that the blade stays in place during operation, preventing any accidents or mishaps. Follow the instructions below to properly tighten the blade bolt:
Instructions On How To Tighten The Blade Bolt To Secure The New Blade:
- Ensure the circular saw is powered off and unplugged for safety.
- Locate the blade lock on the backside of the circular saw near the blade.
- Engage the blade lock by pushing it in and holding it down. This will prevent the blade from rotating while you tighten the bolt.
- Take a wrench or the provided blade-changing tool and insert it into the blade bolt located at the center of the saw’s blade.
- Tighten the blade bolt by turning it clockwise. Apply firm pressure to ensure a snug fit.
Tips For Using The Correct Tool And Ensuring A Tight Fit:
- Use the appropriate sized wrench or tool recommended by the manufacturer to avoid damaging the blade bolt.
- Avoid overtightening the bolt as this may cause damage to the threads or make future blade changes difficult.
- Check the blade’s tightness periodically during use, especially when starting a new project.
- If you notice any looseness or vibration in the blade, stop using the saw immediately and recheck the bolt’s tightness.
- Remember to always follow the manufacturer’s guidelines and instructions for your specific Ryobi Circular Saw model.
By following these simple steps and tips, you can confidently tighten the blade bolt on your Ryobi Circular Saw, ensuring the new blade is securely in place for safe and effective cutting. Now you’re ready to tackle your next woodworking project with ease!
Step 7: Replace The Blade Guard
Replacing the blade guard is an essential step in ensuring the safe operation of your Ryobi Circular Saw. The blade guard acts as a protective barrier, preventing accidental contact with the sharp saw blade. By following the instructions below, you can securely reattach the blade guard and continue using your circular saw with confidence.
Importance Of Replacing The Blade Guard After Changing The Blade
When changing the blade on your Ryobi Circular Saw, it is crucial to replace the blade guard before using the tool. The blade guard serves as a safety mechanism, keeping the saw blade covered when not in use. By replacing the blade guard, you prevent any potential injuries that could result from accidental contact with the exposed blade. Safety should always be a top priority, and this simple step can greatly reduce the risk of accidents.
Instructions On How To Safely And Securely Reattach The Blade Guard
- Align the blade guard: Begin by aligning the blade guard with the saw’s housing. The guard should slide smoothly into position, covering the exposed blade.
- Insert the mounting screws: Locate the mounting screws that secure the blade guard to the housing. Insert the screws into the designated holes, ensuring they are properly aligned.
- Tighten the screws: Using a suitable screwdriver, tighten the mounting screws securely. Be careful not to overtighten, as this may cause damage to the guard or the housing.
- Test the guard’s movement: Once the blade guard is attached, gently push it up and down to ensure it moves freely. The guard should slide smoothly and automatically retract when the saw is in use.
- Inspect the guard: Take a moment to visually inspect the guard, making sure it is properly aligned and functioning correctly. Look for any signs of damage or wear that may require maintenance or replacement.
By following these instructions, you can safely and securely reattach the blade guard on your Ryobi Circular Saw. Remember, always prioritize safety when working with power tools, and never operate a saw without the blade guard properly in place.
Credit: www.shanty-2-chic.com
Safety Precautions And Additional Tips
When it comes to changing the blade on your Ryobi Circular Saw, it is crucial to prioritize safety precautions. Handling power tools requires utmost care and attention to minimize any risks or accidents. In this section, we will outline a list of important safety precautions to keep in mind while changing the blade. Additionally, we will provide you with some additional tips for maintaining and caring for your circular saw.
List Of Important Safety Precautions To Keep In Mind While Changing The Blade
- Power off and unplug the saw: Before attempting to change the blade, it is vital to turn off the power switch and unplug the circular saw. This prevents accidental start-ups and ensures your safety throughout the process.
- Use safety gear: Always wear appropriate safety gear such as safety goggles, gloves, and ear protection. These items provide essential protection against debris, sharp edges, and loud noises.
- Secure the blade guard: Make sure that the blade guard is properly secured in place before starting any blade replacement. The guard not only protects your hands from accidental contact with the blade but also keeps the blade securely in position.
- Keep the saw on a stable surface: When changing the blade, place the circular saw on a stable and level surface. This ensures stability and helps prevent accidental slips or falls.
- Avoid touching the blade: Never touch the blade directly with your hands, even when it is not spinning. Use the provided tools or mechanisms to handle and change the blade.
- Follow the manufacturer’s instructions: Each circular saw model may have specific instructions for changing the blade. Always refer to the manufacturer’s manual for guidance and follow the recommended steps accordingly.
- Inspect the blade: Before installing a new blade, carefully inspect it for any signs of damage or wear. A damaged blade should never be used as it may increase the risk of accidents or poor cutting performance.
- Secure the blade tightly: Ensure that the blade is securely tightened and locked in place before using the circular saw. A loose blade can cause vibration and compromise the saw’s cutting accuracy.
Additional Tips For Maintaining And Caring For The Circular Saw
- Regularly clean the saw: After each use, clean the circular saw thoroughly to remove dust, debris, and any built-up residue. This helps maintain optimal performance and prolongs the lifespan of the tool.
- Inspect the power cord: Routinely check the power cord for any signs of fraying or damage. If any issues are detected, replace the cord immediately to prevent electrical hazards.
- Keep the saw blades sharp: Dull blades not only affect the cutting quality but also increase the risk of kickbacks. Regularly sharpen or replace the blades to ensure efficient and safe cutting results.
- Store the circular saw properly: When not in use, store the circular saw in a dry and secure location. Protect it from moisture, extreme temperatures, and any potential damage that may occur from being mishandled or dropped.
- Perform regular maintenance: Follow the manufacturer’s recommended maintenance schedule to keep your circular saw in optimal condition. This may include lubricating moving parts, checking blade alignment, and inspecting the safety features.
Frequently Asked Questions Of How To Change Blade On Ryobi Circular Saw
How Do I Change The Blade On My Ryobi Circular Saw?
To change the blade on your Ryobi circular saw, first, unplug the saw and retract the blade guard. Use a wrench to loosen the arbor nut, then remove the old blade. Replace it with a new blade, making sure the teeth face forward.
Tighten the arbor nut securely before using the saw.
Can I Change The Blade On My Ryobi Circular Saw Myself?
Yes, changing the blade on a Ryobi circular saw is a simple task that you can do yourself. Just follow the proper safety precautions and make sure to unplug the saw before starting. With the right tools and a few simple steps, you can replace the blade and keep your saw in good working condition.
What Type Of Blade Should I Use For My Ryobi Circular Saw?
For your Ryobi circular saw, you should use a blade that is compatible with the saw’s specifications. Look for a blade with the correct diameter, arbor size, and tooth configuration for your specific model. Additionally, consider the material you will be cutting and choose a blade designed for that purpose.
How Often Should I Replace The Blade On My Ryobi Circular Saw?
The frequency of blade replacement for your Ryobi circular saw depends on several factors, such as how often you use the saw and the type of materials you cut. As a general guideline, it is recommended to replace the blade when it becomes dull, damaged, or if you notice a decrease in cutting performance.
Conclusion
To conclude, changing the blade on your Ryobi Circular Saw is a simple yet crucial task for maintaining its efficiency and safety. By following the step-by-step process outlined in this guide, you can easily replace the blade and continue with your woodworking projects without any hassle.
Remember to prioritize safety precautions and regularly inspect and clean your saw to ensure optimal performance. Happy sawing!