How to Master Precision: Cutting 45-Degree Angles With a Miter Saw
To cut 45-degree angles with a miter saw, accurately measure and mark the desired angle on the workpiece, set the miter saw to the corresponding angle, position the workpiece against the fence, and make the cut by slowly lowering the saw. Cutting precise 45-degree angles with a miter saw is essential for various woodworking projects, such as picture frames, trim work, and joinery.
Understanding The Importance Of A Miter Saw For Angled Cuts
Understanding the significance of a miter saw in achieving precise 45-degree angled cuts is crucial for DIY enthusiasts and professionals alike. Mastering the art of cutting 45-degree angles using a miter saw enables the creation of seamless joints and precise corner connections, making it an essential tool for carpentry and woodworking projects.
A miter saw is an essential tool for achieving precise angled cuts in woodworking projects. Whether you’re a professional carpenter or a DIY enthusiast, understanding the role and benefits of using a miter saw for 45-degree angles is crucial for ensuring accurate and professional-looking results.
Explaining The Role Of A Miter Saw In Achieving Precision Cuts
- Miter saws are specifically designed to make accurate crosscuts and miters at various angles, including 45 degrees.
- The miter saw’s rotating circular blade allows for precise cutting control, ensuring clean and smooth angled cuts every time.
- With the help of a miter saw, you can easily create perfect 45-degree angles for making picture frames, crown moldings, door frames, and other projects that require precise angled cuts.
Highlighting The Benefits Of Using A Miter Saw For 45-Degree Angles
- Accuracy: A miter saw offers exceptional accuracy when cutting 45-degree angles, thanks to its adjustable miter and bevel settings. This precision ensures tight-fitting joints and seamless finishes.
- Efficiency: Using a miter saw saves time and effort by providing quick and efficient angled cuts. The saw’s rotating blade enables you to make precise cuts with ease, reducing errors and minimizing the need for additional time-consuming adjustments.
- Versatility: Miter saws are highly versatile tools that allow you to make various angled cuts, not just 45 degrees. This flexibility makes them ideal for a wide range of projects and woodworking tasks, giving you the ability to tackle different angles and achieve diverse design options.
- Safety: Miter saws often come with safety features such as blade guards and protective fences, reducing the risk of accidents or injuries during operation. These safety measures offer peace of mind while working with sharp blades and powerful machinery.
- Professional Finishes: By using a miter saw for 45-degree angles, you can achieve professional-quality finishes that elevate the overall look and appeal of your woodworking projects. The precise cuts and tight joints contribute to the polished appearance of furniture, trim work, and other woodworking creations.
A miter saw plays a vital role in achieving precision and accuracy when cutting 45-degree angles. Its versatility, efficiency, and safety features make it an indispensable tool for both professionals and woodworking enthusiasts. By harnessing the power of a miter saw, you can elevate your craftsmanship and create stunning projects with ease.
Factors To Consider When Selecting A Miter Saw
Selecting the right miter saw involves considering factors like blade size, bevel range, and cutting capacity. For cutting 45-degree angles, a miter saw with an adjustable bevel and a reliable angle guide is essential.
When it comes to cutting precise 45-degree angles, a miter saw is an essential tool for any DIY enthusiast or professional carpenter. However, with the wide variety of miter saws available in the market, choosing the right one can be a daunting task.
To help you make an informed decision, here are some important factors to consider:
Evaluating The Different Types Of Miter Saws Available
- Compound Miter Saw: This type of miter saw can tilt in addition to rotating, allowing you to make bevel cuts along with miter cuts. It is perfect for cutting crown molding, as well as other angled cuts.
- Sliding Compound Miter Saw: This advanced miter saw not only provides the same functionalities as a compound miter saw but also allows the saw head to slide forward and backward. This feature enables you to cut wider workpieces effortlessly.
- Dual Bevel Miter Saw: With a dual bevel miter saw, you can tilt the saw head in two directions, both left and right, without needing to flip the workpiece. This makes it more convenient for precise and accurate cuts.
- Basic Miter Saw: If you are on a budget or have simpler cutting needs, a basic miter saw is a cost-effective option. It provides accurate miter cuts but lacks the ability to tilt for bevel cuts.
Comparing The Features And Capabilities Of Each Miter Saw Option
- Blade Size and Type: Different miter saws come with varying blade sizes and the ability to accommodate different blade types. Consider the size of the workpieces you will be cutting and choose a miter saw with a blade that suits your needs.
- Power and Speed: Miter saws come with different power ratings, often measured in amps. Higher power ratings offer more cutting capacity and better performance. Additionally, check the speed of the miter saw, as a higher RPM (revolutions per minute) allows for smoother and quicker cuts.
- Cutting Capacity: Assess the cutting capacity of the miter saw in terms of both depth and width. This will help determine if it can handle the size of your workpieces.
- Accuracy and Precision: Look for miter saws with features like laser guides or LED lights, as they enhance accuracy and make it easier to align the cutline.
- Ease of Use and Safety Features: Consider factors such as weight, portability, and safety features like blade guards and electric brakes. These features can significantly impact your overall experience and ensure your safety while operating the tool.
By evaluating the different types of miter saws available and comparing their features and capabilities, you can select the perfect miter saw that meets your specific cutting needs. As you weigh the various factors, remember to prioritize quality, durability, and user-friendliness to ensure a long-lasting and efficient tool that will help you achieve precise 45-degree angles effortlessly.

Properly Aligning The Miter Saw
To properly align the miter saw for cutting 45-degree angles, follow these steps: adjust the bevel angle, set the miter angle, secure the workpiece firmly, check the alignment using a square, make the cut with a steady hand, and double-check the accuracy before proceeding.
This ensures precise and clean cuts for your woodworking projects.
Aligning your miter saw correctly is crucial to achieving accurate and precise cuts, especially when working with 45-degree angles. Here’s a step-by-step guide on how to ensure your miter saw is properly aligned:
Ensuring The Miter Saw Is Set Up On A Stable Work Surface:
- Place the miter saw on a flat and stable work surface, such as a workbench or saw stand.
- Make sure the surface is level and free from any debris or obstructions.
- Use a spirit level to check the stability of the work surface and make any adjustments as needed.
- Securely clamp the miter saw to the work surface to prevent any movement during operation.
Adjusting The Miter Saw’S Bevel And Miter Angles For Accurate Cuts:
- Start by adjusting the bevel angle, which controls the tilt of the blade. Most miter saws have a bevel scale and a bevel locking lever.
- Loosen the bevel locking lever and set the bevel angle to 45 degrees. Use a protractor or a bevel square to ensure it’s accurately set.
- Once the bevel angle is set, tighten the bevel locking lever to secure the adjustment.
- Next, adjust the miter angle, which determines the horizontal positioning of the blade. Locate the miter angle adjustment and release mechanism.
- Rotate the miter angle adjustment to set it to 45 degrees. Use a miter gauge or a miter square to verify the accuracy.
- Ensure that the miter angle adjustment is securely locked in place after setting it to 45 degrees.
By following these steps and properly aligning your miter saw, you’ll be able to make precise 45-degree angle cuts with ease. Remember to always prioritize safety by wearing appropriate protective gear and following manufacturer guidelines. Happy cutting!
Choosing The Right Blade For Clean Cuts
Achieving precise 45-degree angles with a miter saw requires the right blade. Ensure clean cuts by selecting a blade specifically designed for angled cuts, allowing for accurate and professional results.
Understanding The Different Types Of Blades And Their Applications
To achieve clean and precise cuts when cutting 45-degree angles with a miter saw, it’s essential to choose the right blade for the job. Understanding the different types of blades available and their applications will ensure that you select a high-quality blade suitable for this specific task.
Here are the key points to keep in mind:
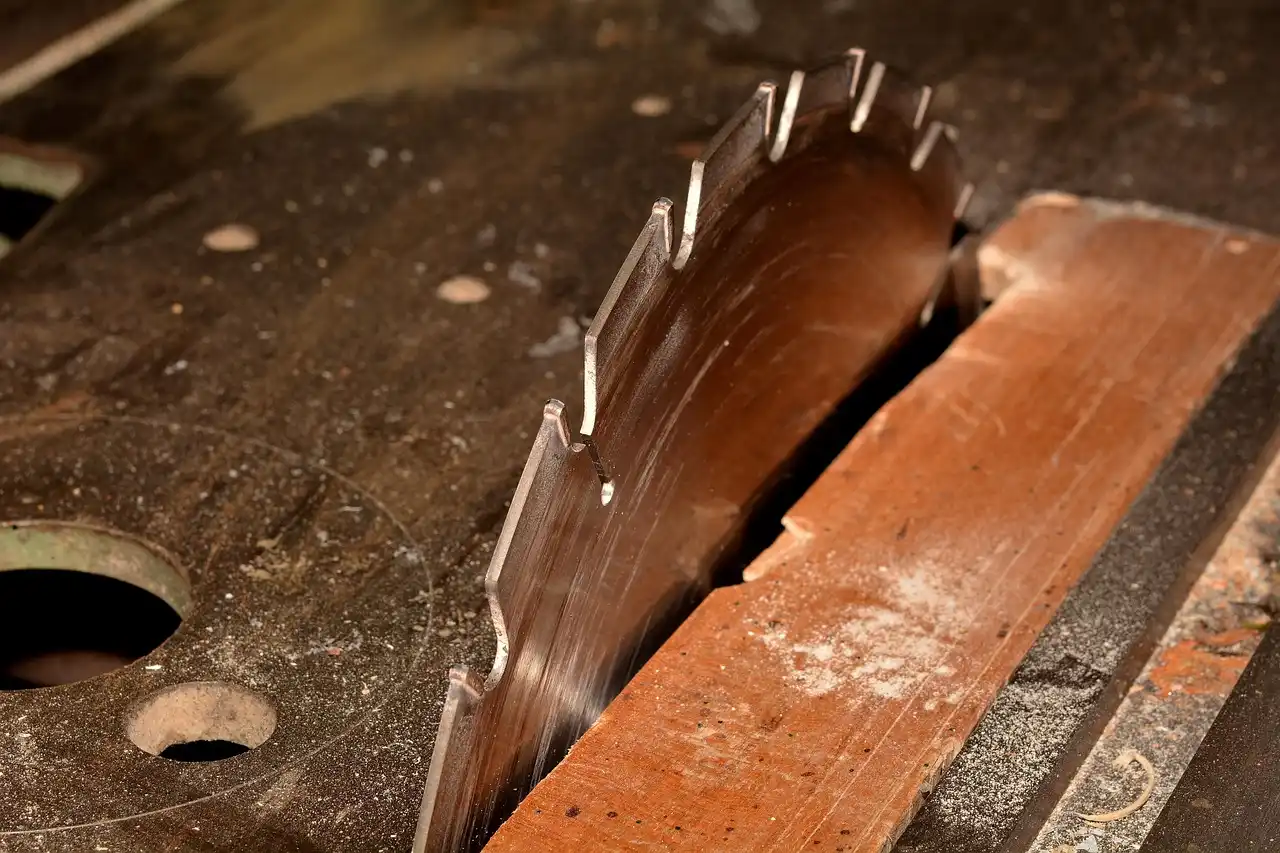
- Crosscut Blades: These blades are designed to cut across wood grain, giving a clean and smooth finish. They typically have a high tooth count and alternate bevel angles to ensure minimal tear-out on the wood’s surface.
- Rip Blades: Specially designed for cutting along the length of the wood grain, rip blades are optimized for efficient and fast material removal. They have fewer teeth compared to crosscut blades and are sharper, providing a more aggressive cut.
- Combination Blades: As the name suggests, these blades offer a combination of crosscut and rip capabilities. They have a balanced tooth count and tooth configuration, making them versatile for a variety of cutting tasks, including 45-degree angles.
- Fine-Finish Blades: When precision and smoothness are paramount, fine-finish blades are the ideal choice. They have a high tooth count, often with alternate top bevel (ATB) or triple-chip grind (TCG) teeth to minimize chip-out and deliver exceptional finish quality.
With an understanding of the different types of blades available, you can now focus on selecting a high-quality blade suitable for cutting 45-degree angles.
Selecting A High-Quality Blade Suitable For 45-Degree Angles
Achieving clean and accurate 45-degree angle cuts requires the use of a high-quality blade specifically designed for this purpose. Here are some key considerations to guide you in selecting the right blade:
- Tooth Count: Look for blades with a higher tooth count, preferably around 80-100 teeth. More teeth on the blade mean finer cuts with minimal tear-out.
- Tooth Configuration: Blades with alternate bevel or triple-chip grind teeth are ideal for 45-degree angle cuts. These tooth configurations reduce the chances of chipping and ensure clean and crisp cuts.
- Blade Material: Blades made from carbide-tipped or high-speed steel are preferred for their durability and longevity. They can withstand the demands of cutting at the 45-degree angle without losing sharpness quickly.
- Kerf Width: Consider the width of the blade’s kerf, which is the thickness of the cut it creates. A narrower kerf width results in less material waste and smoother cuts.
- Blade Diameter: Ensure that the blade’s diameter matches your miter saw’s specifications to ensure compatibility and optimize performance.
By selecting a high-quality blade suitable for 45-degree angles, you can achieve precise and clean cuts and enhance the overall outcome of your projects. Remember to take proper safety precautions and consult the manufacturer’s recommendations for your specific miter saw and blade combination.
TOP PICK FOR PRECISE 45-DEGREE CUTS
 SKIL 10-inch dual bevel sliding compound miter saw
SKIL 10″ Dual Bevel Sliding Compound Miter Saw
A reliable dual-bevel miter saw that locks in accurate 45-degree angles without drifting mid-cut.
- Best for: baseboards, trim, picture frames, and fence pickets
- Why we picked it: dual-bevel design cuts both directions without flipping the workpiece
- Main drawback: sliding rails need occasional cleaning to stay smooth
 Miter saw stop block flip stop for repeatable cuts Miter saw stop block flip stop for repeatable cutsMiter Saw Stop Block / Flip Stop Keeps repeat cuts (like fence pickets) exactly the same length Check on Amazon |
 IRWIN combination square for marking 45 and 90 degree angles IRWIN combination square for marking 45 and 90 degree anglesIRWIN Combination Square Marks and checks 45° and 90° angles before you cut Check on Amazon |
As an Amazon Associate, we earn from qualifying purchases.
Making Precise Measurements And Markings
Achieving precise measurements and markings is crucial when cutting 45-degree angles using a miter saw. By carefully following the steps and using a reliable measuring tool, you can ensure accurate cuts and a professional finish to your woodworking project.
Are you ready to tackle your next woodworking project that involves cutting 45-degree angles? One of the key steps in achieving accurate cuts with a miter saw is making precise measurements and markings. In this section, we will explore two essential tools for this task and provide some handy tips to ensure precise cuts every time.
Using A Combination Square Or Miter Gauge To Measure And Mark The Angle
A combination square is a versatile tool that is commonly used in woodworking to measure and mark angles. Here’s how you can use it to measure and mark 45-degree angles with a miter saw:
- Ensure the combination square is set at a 45-degree angle by adjusting the angle adjustment screw.
- Place the square’s blade against the edge of your workpiece, aligning it with the desired cutting line.
- Make a firm mark at the intersection of the blade and the workpiece, indicating the starting point of your cut.
If your miter saw is equipped with a miter gauge, you can utilize it to accurately measure and mark 45-degree angles:
- Set the miter gauge to a 45-degree angle by loosening the locking knob, aligning it with the 45-degree detent on the gauge, and tightening the knob to secure the angle.
- Position your workpiece against the miter gauge, ensuring that the edge to be cut is flush against the gauge’s face.
- Use a pencil or a marking knife to make a precise mark along the edge of the workpiece, indicating the cutting line.
Tips For Accurate Marking To Ensure Precise Cuts Every Time
Take these tips into consideration when marking your workpiece to achieve accurate and precise cuts with a miter saw:
- Use a sharp pencil or a marking knife to ensure clear and precise markings.
- Double-check your measurements before making any marks to avoid any errors.
- Apply light pressure when marking to avoid damaging or shifting the workpiece.
- For better visibility, consider using a contrasting color pencil or marking tool.
- Avoid using a thick marker or any tool with a wide tip, as it may result in inaccurate markings.
- Make your markings on the waste side of the cut line to prevent any visible marks on the finished piece.
- If you’re working with long or wide boards, use clamps or a helping hand to keep the workpiece stable and secure during marking.
By using a combination square or miter gauge and following these marking tips, you’ll be on your way to making precise 45-degree angle cuts with your miter saw. So go ahead, dive into your woodworking project with confidence, knowing that your measurements and markings are accurate, and your cuts will be spot on!
Making Straight And Clean Cuts
Learn the art of making straight and clean cuts with a miter saw by mastering 45-degree angles. Gain precision and accuracy in your woodworking projects with these expert tips and techniques.
Positioning The Workpiece Correctly On The Miter Saw’S Table:
- Align the edge of the workpiece against the fence of the miter saw to ensure stability.
- Place the workpiece flat on the table, ensuring it makes full contact with the fence and table surface.
- Adjust the workpiece so that the cut line aligns with the desired angle on the saw’s angle adjustment guide.
- Use clamps when working with larger or more cumbersome pieces to secure them in place.
- Hold the workpiece firmly throughout the cutting process to prevent any movement that could affect the accuracy of the cut.
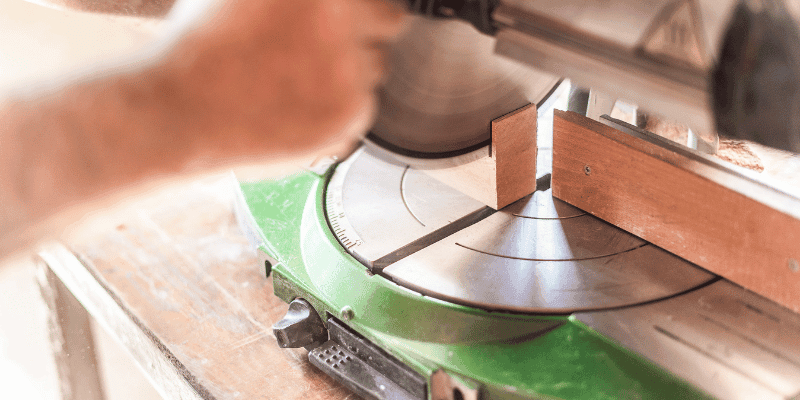
Executing The Cut In A Controlled And Consistent Manner:
- Activate the safety features of the miter saw, such as the blade guard and safety hold-down clamp.
- Align the blade with the cut line on the workpiece by adjusting the bevel and miter angles accordingly.
- Start the saw and allow it to reach full speed before making contact with the workpiece.
- Slowly lower the blade onto the workpiece using smooth and steady downward pressure.
- Maintain control of the saw throughout the cut, keeping a consistent pace to achieve a clean and precise 45-degree angle.
- After completing the cut, release pressure on the saw and allow it to come to a complete stop before lifting the blade.
Remember, when cutting 45-degree angles with a miter saw, it is crucial to position the workpiece correctly on the table and execute the cut in a controlled and consistent manner. Following these steps will result in straight and clean cuts, enhancing the overall quality of your woodworking projects.
Creating Perfect Miters For Seamless Joints
Achieve seamless joints by learning how to cut precise 45-degree angles with a miter saw. Master the art of creating perfect miters for a professional finishing touch on your woodworking projects.
Demonstrating The Process Of Cutting Miter Joints With A Miter Saw
Cutting perfect 45-degree angles with a miter saw is essential for creating smooth and seamless joints in woodworking projects. While it may seem daunting at first, the process is actually quite straightforward when you know the right techniques. In this section, we will walk you through the step-by-step process of cutting miters with a miter saw.
Tips For Achieving Tight And Gap-Free Miter Joints:
- Start by measuring and marking your workpiece accurately. Use a sharp pencil or a marking gauge to ensure precise measurements. This step is crucial to achieve tight-fitting angles.
- Set up your miter saw correctly. Check that the blade is squared to the miter detents on the saw and adjust if necessary. This ensures accurate and consistent cuts.
- Use a high-quality miter saw blade with a fine tooth count. A blade with more teeth will result in smoother cuts and help minimize tear-out on the wood.
- Secure your workpiece firmly in place. A loose or wobbly piece can lead to inaccurate cuts and misaligned miters. Use clamps or a workpiece holder to ensure stability.
- Take your time and make controlled cuts. Rushing through the process can lead to mistakes and imprecise angles. Use a slow, steady motion when lowering the saw blade onto the workpiece.
- Practice proper safety precautions. Always wear safety goggles and ear protection when operating a miter saw. Keep your fingers clear of the blade and employ a dust collection system to minimize airborne particles.
- Consider using a miter sled or a miter gauge extension to support long or wide workpieces. These accessories provide additional stability and control during the cutting process.
- Check for accuracy before proceeding. Take the time to measure and verify the angles on your freshly cut miters using a reliable square. This step helps ensure a seamless joint when assembling your project.
- Use sandpaper or a sharp chisel to fine-tune the joints if necessary. Sometimes, slight adjustments may be needed to achieve a perfect fit. Carefully remove any excess material to create a tight and gap-free miter joint.
By following these tips and practicing the techniques for cutting miters with a miter saw, you’ll be on your way to creating professional-looking woodworking projects with seamless joints. Remember, precision and attention to detail are key to achieving the perfect miter angles.
So take your time, double-check your measurements, and enjoy the satisfaction of beautifully executed miter joints in your woodworking endeavors.
Tackling Compound Angles For Complex Projects
Learn how to tackle compound angles and cut precise 45-degree angles with a miter saw for your complex projects. Mastering this technique will enable you to achieve accurate cuts and create impressive woodworking projects with ease.
Are you planning a woodworking project that involves intricate angles? If so, knowing how to cut compound angles with a miter saw is an essential skill to have. Compound angles are combinations of two different angles, making them more complex than single or straight cuts.
In this guide, we will explain the concept of compound angles and their applications, followed by a step-by-step walkthrough on cutting compound angles using a miter saw.
Explaining The Concept Of Compound Angles And Their Applications
- Compound angles: Compound angles are formed by combining two different angles, typically a bevel angle and a miter angle. They are commonly used in woodworking to achieve complex designs and fit various parts together accurately.
- Bevel angle: The bevel angle refers to the tilt or slant of the saw blade in relation to the workpiece’s surface. It is typically adjusted by rotating the miter saw’s blade tilting mechanism.
- Miter angle: The miter angle represents the horizontal rotation of the saw blade. It allows you to cut precise angles perpendicular or parallel to the workpiece’s edges.
- Applications: Compound angles are frequently utilized in projects such as creating decorative moldings, fitting crown molding corners, constructing picture frames with angled corners, and building furniture with intricate designs.
Step-By-Step Guide For Cutting Compound Angles With A Miter Saw
Here’s a simplified approach to cutting compound angles using a miter saw:
- Measure and mark: Determine the required bevel angle and miter angle for your specific project. Measure and mark these angles accurately on your workpiece using a protractor or angle finder tool.
- Adjust the bevel angle: Loosen the bevel angle adjustment on your miter saw and set it to the desired degree indicated by your marking. Tighten the adjustment securely to ensure stability during the cutting process.
- Set the miter angle: Loosen the miter angle adjustment on your miter saw and align the angle indicator or scale with your marked miter angle. Securely tighten the adjustment to lock the saw blade in the correct position.
- Safety precautions: Prioritize safety by wearing protective goggles and positioning your hands clear of the saw blade’s path. Double-check that the workpiece is secured firmly against the fence and the miter saw’s table.
- Make the cut: Position the workpiece against the fence of the miter saw, ensuring the marked angle aligns with the appropriate blade guide. Slowly lower the saw blade and make a controlled cut through the workpiece, maintaining a steady and even pressure.
- Test fit and adjust: Once the cut is complete, check the fit of the angled pieces together or against other components of your project. If necessary, make adjustments to the angles or recut the pieces until you achieve the desired fit.
Cutting compound angles with a miter saw may seem daunting at first, but with practice, it will become a valuable skill in your woodworking repertoire. By understanding the concept of compound angles and following our step-by-step guide, you’ll be able to tackle complex projects with precision and confidence.
Verifying And Adjusting The Saw’S Bevel And Miter Settings
Achieving accurate 45-degree angles with a miter saw involves verifying and adjusting the saw’s bevel and miter settings. Ensuring precision is crucial for achieving precise cuts.
Before you begin cutting 45-degree angles with your miter saw, it is vital to ensure the accuracy of its bevel and miter settings. This will help you achieve precise and clean angle cuts. Here are the steps to follow in order to verify and adjust your saw’s settings:
Checking The Accuracy Of The Miter Saw’S Settings Before Making Cuts:
- Start by inspecting the saw’s bevel gauge and miter gauge, located on the front and side of the saw respectively. Ensure that they are both properly calibrated and aligned.
- Examine the bevel scale, which indicates the angle at which the saw’s blade tilts. Use a protractor or an angle finder to verify if the scale matches the actual blade angle. Make any necessary adjustments to ensure accuracy.
- Check the miter gauge by setting it to a known angle (e.g. 45 degrees) and then measuring it with a protractor or an angle finder. Compare the measurement with the gauge’s markings. If there is a discrepancy, make the required adjustments to align the gauge properly.
- Inspect the miter lock mechanism to ensure that it securely holds the saw’s angle setting. If it feels loose or unreliable, tighten any loose screws or consult the saw’s manual for instructions on how to fix it.
- Verify the accuracy of the saw’s detents, which are preset stops at common angle measurements. Set the miter gauge to a detent angle, then use a square or a precision angle gauge to check if it is perfectly aligned. If not, adjust the detent mechanism to align with the desired angles.
Making Necessary Adjustments To Ensure Precise Angle Cuts:
- To adjust the bevel angle, loosen the bevel lock and tilt the saw’s blade until it aligns with the desired angle. Tighten the lock to secure the setting.
- If the miter gauge is not aligned properly, loosen the miter lock and adjust the gauge until it matches the desired angle. Once adjusted, lock the miter gauge securely in place.
- Test the accuracy of the saw’s bevel and miter settings by making test cuts on scrap wood. Check the resulting angles with a square or an angle gauge to verify their accuracy. Make any further adjustments if necessary.
- Lastly, always double-check the saw’s settings before making your actual cuts. This will ensure that your 45-degree angle cuts are precise and meet your requirements.
Remember, verifying and adjusting the bevel and miter settings of your miter saw is a crucial step in achieving accurate and clean 45-degree angle cuts. By following these steps, you can enjoy the confidence of knowing your saw is properly calibrated and ready for precise woodworking.

Enhancing Accuracy With Clamps And Jigs
Learn how to enhance accuracy when cutting 45-degree angles with a miter saw using clamps and jigs. These tools ensure precise and consistent cuts, resulting in professional-looking woodworking projects.
Utilizing Clamps And Jigs To Secure Workpieces And Prevent Movement
When it comes to cutting 45-degree angles with a miter saw, it is crucial to ensure accuracy and precision. Using clamps and jigs can significantly enhance the stability of your workpieces, preventing any unwanted movement during the cutting process. By securing the material firmly in place, you can maintain control and achieve clean, precise cuts.
Here are some reasons why utilizing clamps and jigs is beneficial:
- Increased stability: Clamps and jigs provide a secure hold on the workpiece, minimizing the risk of it shifting or moving while cutting. This stability is crucial for maintaining accuracy and achieving precise 45-degree angles.
- Reduced errors: By using clamps and jigs, you can eliminate the chances of material slipping or rotating during the cutting process. This reduces the likelihood of errors and ensures consistent and accurate cuts every time.
- Improved safety: Precise cuts require full control over the material being cut. Clamps and jigs help in keeping your hands away from the cutting area, reducing the risk of accidents and injuries. It is important to prioritize safety when using power tools like a miter saw.
- Repeatable cuts: If you are working on a project that requires the same 45-degree angle cuts multiple times, clamps and jigs can make the process more efficient. Once you have set up the clamps and jigs correctly, you can easily reproduce the same cut repeatedly, saving time and effort.
- Versatility: Clamps and jigs come in various shapes and sizes, suitable for different workpieces and cutting angles. Whether you are working with small or large materials, there are clamps and jigs available to accommodate your needs. Investing in a range of clamps and jigs can enhance your overall woodworking capabilities.
Remember to secure your workpieces using clamps and jigs before making any cuts with a miter saw. This additional precaution ensures accuracy, precision, and safety in your woodworking projects.
Troubleshooting Common Precision Issues
Learn how to troubleshoot common precision issues when cutting 45-degree angles with a miter saw. Gain insights and techniques to ensure accurate and clean cuts every time. Master the art of precision woodworking with these helpful tips.
Identifying Potential Problems And Errors In Angle Cutting:
- Uneven cuts: This occurs when the miter saw blade does not cut through the material evenly at the desired angle.
- Angle inconsistencies: Sometimes, the 45-degree angle may not be accurate and could result in varying angles.
- Rough edges: The cut edges might appear jagged or uneven if the saw blade does not make a clean cut.
- Alignment issues: The material may not align properly with the miter saw’s fence, leading to imprecise cuts.
Suggested Solutions For Fixing Inaccuracies And Achieving Precision:
- Check the blade alignment: Ensure that the miter saw blade is properly aligned and not tilted. Adjust the angle if necessary.
- Secure the material firmly: Use clamps or hold-downs to secure the material tightly against the fence and the miter saw’s table.
- Use a quality blade: Make sure to use a sharp and high-quality blade suitable for 45-degree angle cuts.
- Test cuts: Before making the final cut, it’s helpful to make test cuts on scrap material to ensure accuracy.
- Double-check measurements: Verify the measurements and angles before cutting to ensure precision.
- Use a reliable miter saw: Investing in a good quality miter saw with precise angle adjustment features can enhance accuracy.
- Clean and maintain the saw regularly: Dust and debris can affect the saw’s performance. Regularly clean and lubricate the miter saw to maintain optimal cutting precision.
Remember, troubleshooting precision issues in angle cutting with a miter saw requires attention to detail and patience. By identifying potential problems and implementing these suggested solutions, you can cut 45-degree angles accurately and achieve precise results.
Understanding The Potential Hazards
Cutting 45-degree angles with a miter saw requires caution and understanding of potential hazards. Proper safety precautions must be taken to ensure accurate and safe cutting.
Using a miter saw can be a practical choice for making accurate cuts at precise angles. However, it is crucial to be aware of the potential hazards involved and take the necessary precautions to ensure your safety. Before you begin using a miter saw, it is essential to understand the risks and the importance of wearing appropriate safety gear.
Highlighting The Risks Associated With Using A Miter Saw:
- Eye Injuries: Flying wood chips or debris can cause severe eye injuries. Always wear safety goggles or a face shield to protect your eyes from potential hazards.
- Finger Injuries: Miter saw blades are extremely sharp and can cause serious finger injuries if not handled with caution. Make sure to keep your hands at a safe distance from the blade and never reach across the cutting line.
- Kickback Accidents: Kickback occurs when the workpiece is forcefully thrown back towards the operator. This can happen if the workpiece is not properly secured or if the blade binds in the material. Maintain a firm grip on the workpiece and avoid placing your body directly in line with the saw blade.
- Hearing Damage: Miter saws can generate loud noise levels that may cause hearing damage over time. Consider wearing ear protection such as earmuffs or earplugs to reduce the risk of long-term hearing loss.
Importance Of Wearing Appropriate Safety Gear And Practicing Caution:
- Safety Goggles/Face Shield: Protect your eyes from flying debris by wearing safety goggles or a face shield that fully covers your face.
- Dust Mask: Use a dust mask to prevent inhaling sawdust, which can irritate your respiratory system.
- Ear Protection: Reduce the risk of hearing damage by wearing earmuffs or earplugs to dampen the noise produced by the saw.
- Protective Clothing: Wear long sleeves, pants, and closed-toe shoes to protect your skin from potential injuries.
- Clamps and Workpiece Supports: Use clamps or workpiece supports to secure the material properly and prevent kickback accidents.
- Pre-Operation Check: Before using a miter saw, ensure that it is in good working condition and the blade is sharp and properly aligned.
- Operate Mindfully: Always concentrate on your work and avoid distractions. Maintain a firm grip on the workpiece and use a steady, controlled cutting motion.
- Power Disconnect: Unplug the miter saw when making adjustments, changing the blade, or when it’s not in use.
Remember, understanding the potential hazards associated with using a miter saw and taking the appropriate safety precautions will help ensure a safe and productive cutting experience. Stay vigilant and prioritize safety at all times.
Operating The Miter Saw Safely
Operating a miter saw safely is crucial when cutting 45-degree angles. Follow these guidelines to ensure safety and accurate cuts with your saw.
Step-By-Step Guide For Safely Using A Miter Saw
If you’re new to woodworking or looking to improve your skills, knowing how to cut precise 45-degree angles with a miter saw is essential. However, safety should always be your top priority when operating any power tool. To ensure a safe and accident-free work environment, follow this step-by-step guide:
- Wear protective gear: Prioritize safety by wearing safety goggles, ear protection, and a dust mask to protect your eyes, ears, and lungs from potential hazards.
- Check your work area: Ensure that your work area is clean, well-ventilated, and free from clutter to minimize the risk of accidents. Make sure there is enough space to maneuver around the miter saw.
- Secure the workpiece: Before starting, secure the workpiece firmly to prevent any unexpected movement while cutting. You can use clamps or a vise to hold it securely in place.
- Adjust the miter saw: Set the miter saw at a 45-degree angle by loosening the bevel angle and rotating the base. Consult the manufacturer’s instructions for your specific model.
- Check the blade: Examine the miter saw’s blade for any signs of damage or dullness. Replace it if necessary to ensure clean, precise cuts.
- Mark the cut: Use a pencil or a marking gauge to draw a straight line on the workpiece, indicating the desired 45-degree angle cut.
- Position the workpiece: Place the workpiece against the miter saw’s fence, aligning the marked line with the blade. Hold it securely against the fence and keep your hands clear of the cut line.
- Activate the miter saw: Start the miter saw and allow the blade to reach maximum speed before making the cut. Keep a firm grip on the handle and maintain a stable stance throughout.
- Make the cut: Gently lower the blade onto the workpiece, allowing it to cut smoothly and steadily through the material. Maintain control of the saw while applying slight pressure to guide the blade along the cut line.
- Wait for the blade to stop: Once the cut is complete, release the trigger and wait for the blade to come to a complete stop before raising it and removing the workpiece.
Tips For Avoiding Accidents And Maintaining A Safe Work Environment
To ensure the safety of yourself and others while operating a miter saw, consider these helpful tips:
- Clear the cut line: Remove any debris or obstructions from the cut line to ensure a smooth and uninterrupted cut.
- Double-check alignments: Before making any cuts, verify that the blade is properly aligned with the cut line and the miter saw’s settings are accurate.
- Maintain focus: Avoid distractions and remain fully focused on the task at hand. Accidents can happen quickly, so concentration is paramount.
- Never remove safety features: Never disable or remove any safety features of the miter saw, as they are designed to protect you during operation.
- Use push sticks: When cutting smaller pieces or maintaining a safe distance from the blade, employ push sticks or blocks to guide the workpiece through the cut.
- Keep fingers away from the blade: Ensure that your hands and fingers are a safe distance away from the blade at all times. Never attempt to reach under the blade while it is spinning.
- Practice proper body positioning: Stand to the side of the blade, maintaining a stance that provides stability and balance throughout the cutting process.
By following these safety guidelines and best practices, you can operate a miter saw with confidence and reduce the risk of accidents in your woodworking projects. Remember, safety always comes first.
Frequently Asked Questions On How To Cut 45-Degree Angles With A Miter Saw
How To Cut A 45 Degree Angle With A Miter Saw For Baseboards?
To cut a 45-degree angle with a miter saw for baseboards, follow these steps:
1. Measure and mark the desired length on the baseboard.
2. Set the miter saw at a 45-degree angle.
3. Place the baseboard against the fence of the miter saw.
4. Align the mark with the saw’s cutting line.
5. Hold the baseboard firmly and activate the saw to make the cut. Remember to use safety precautions and always wear protective gear while operating the miter saw.
How Do You Cut A Perfect 45 Degree Angle?
To cut a perfect 45 degree angle, measure and mark the desired angle on the material. Use a miter saw or a miter box, align the marking with the saw’s cutting guide, and carefully cut through the material.
How Do You Cut A 45 Degree Angle On A 4X4 Post?
To cut a 45 degree angle on a 4×4 post, measure and mark the desired angle, then carefully cut along the marked line using a saw.
How Do You Cut 45-Degree Angles With A Miter Saw?
To cut 45-degree angles with a miter saw, adjust the angle of the saw to 45 degrees and lock it in place. Measure and mark the material, then carefully align it with the saw blade. Make the cut slowly and steadily, using a firm grip on the material.
How Do You Cut 45-Degree Dog Ears On Fence Pickets?
To cut dog-ear points on fence pickets, set the miter saw to 45 degrees, cut one angle from the top corner toward the center of the picket, then flip the picket end-for-end (keeping the same 45-degree setting) and cut the second angle to meet it. Stacking a few pickets together and clamping them lets you cut several at once for consistent results. A stop block clamped to the fence keeps every picket the exact same length before cutting the angles.
Conclusion
Cutting 45-degree angles with a miter saw may seem intimidating at first, but with the right technique and practice, it can become a simple task. By following these step-by-step instructions, you’ll be able to achieve precise and clean cuts for your woodworking projects.
Remember to mark your materials accurately, secure them firmly, and use a miter saw with a sharp blade. Take your time and maintain a steady hand, ensuring your safety throughout the process. Whether you’re making picture frames, crown molding, or any other project that requires the use of 45-degree angles, mastering this skill will elevate the quality and professionalism of your work.
So don’t hesitate to grab your miter saw and start cutting those perfect angles today. With practice, you’ll become more confident and efficient, allowing you to tackle more intricate projects with ease. Happy woodworking!