How to Finish Edge of Penny Tile: Expert Tips & Tricks
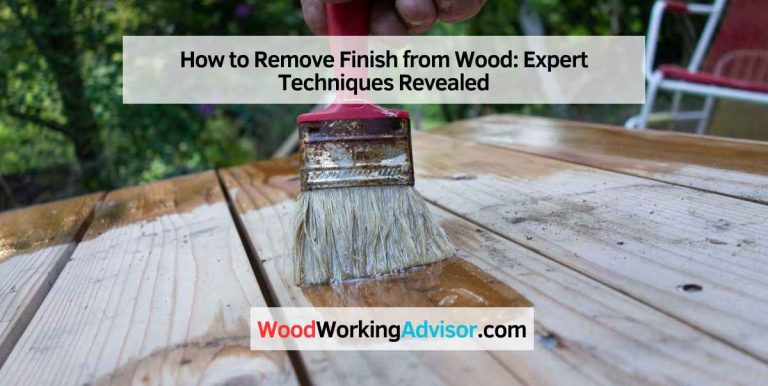
To finish the edge of penny tile, use a trim piece or bullnose tile for a clean look. Caulk along the edges for a smooth transition.
Penny tile adds a unique charm to any space, making it a popular choice for backsplashes and bathroom floors. Its small, round design provides a vintage aesthetic while offering modern durability. Finishing the edges properly is crucial for achieving a polished appearance.
Without the right edge treatment, your installation may look unfinished or messy. Various methods exist to complete the edges, including using trim pieces or caulk. Each approach can enhance the overall look of your tile work. Understanding these options will help you achieve a professional finish that showcases the beauty of your penny tile installation.
Introduction To Finishing Penny Tile Edges
Finishing penny tile edges gives a polished look to your space. Proper finishing enhances the beauty of the tile. It also protects the edges from damage. This guide covers key aspects to finish penny tile edges effectively.
Why Proper Finishing Matters
Proper finishing is essential for several reasons:
- Aesthetics: Neat edges enhance the overall design.
- Durability: Well-finished edges resist chips and cracks.
- Safety: Smooth edges prevent injuries.
- Maintenance: Finished edges make cleaning easier.
Common Challenges
Finishing penny tile edges can present challenges. Here are some common issues:
| Challenge | Solution |
|---|---|
| Uneven Edges | Use a tile cutter for precise cuts. |
| Grout Gaps | Fill gaps with matching grout. |
| Color Mismatch | Choose grout that complements the tile. |
| Sharp Edges | Use a tile file to smooth edges. |
Addressing these challenges leads to a more professional finish.
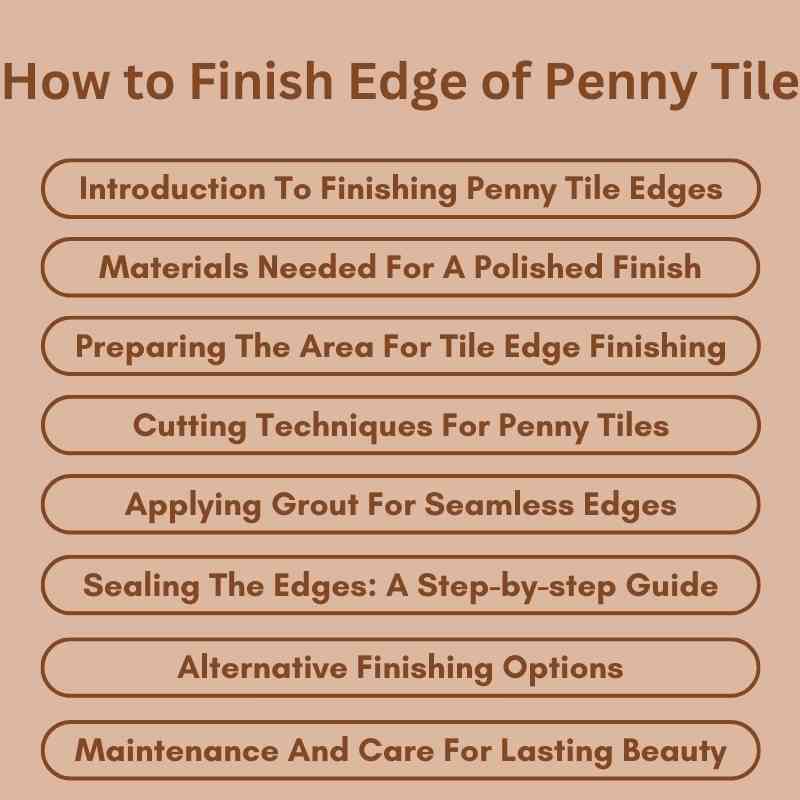
Materials Needed For A Polished Finish
Achieving a polished finish on penny tile requires the right materials. Quality tools and supplies make the process smoother. Here’s what you need to ensure a clean, professional look.
Essential Tools
- Tile Cutter: For precise cuts on penny tiles.
- Notched Trowel: Helps apply grout evenly.
- Grout Float: Ideal for spreading grout smoothly.
- Sponge: Useful for cleaning excess grout.
- Bucket: Needed for mixing grout and cleaning tools.
- Level: Ensures even tile placement.
- Caulk Gun: For applying caulk in corners.
Selecting The Right Grout
Choosing the right grout is crucial for a polished finish. Different types offer various benefits.
| Grout Type | Description | Best Use |
|---|---|---|
| Cement-based Grout | Traditional, durable option. | High-traffic areas. |
| Epoxy Grout | Stain-resistant and waterproof. | Wet areas like bathrooms. |
| Pre-mixed Grout | Convenient and easy to use. | Small projects or DIY tasks. |
Consider the tile size and spacing. Ensure the grout complements your tile color. A well-chosen grout enhances the beauty of penny tiles.
Preparing The Area For Tile Edge Finishing
Finishing the edge of penny tile requires careful preparation. Proper preparation ensures a clean and smooth finish. Follow these steps for optimal results.
Surface Cleaning Tips
Clean the area where you will work. Removing dirt and debris helps the adhesive stick better. Here are some effective cleaning methods:
- Vacuum: Use a vacuum to remove loose dirt.
- Wipe: Use a damp cloth to wipe the surface.
- Scrub: For stubborn stains, use a mild cleaner.
Always let the surface dry completely before applying tiles. This prevents moisture problems later.
Measuring And Planning
Accurate measurements help create a perfect finish. Follow these steps:
- Measure: Use a tape measure to find the length of the edges.
- Mark: Use a pencil to mark where the tiles will go.
- Plan: Decide the pattern and layout for the tiles.
Consider using a level to ensure everything is straight. Planning saves time and material during installation.
| Step | Description |
|---|---|
| 1 | Measure the edges carefully. |
| 2 | Mark your measurements clearly. |
| 3 | Decide on the tile layout. |
Cutting Techniques For Penny Tiles
Cutting penny tiles requires precision and the right tools. Different methods suit various projects. Here are two effective cutting techniques for penny tiles.
Using A Wet Saw
A wet saw is ideal for cutting penny tiles. It provides clean cuts and reduces dust. Here’s how to use it:
- Set up the wet saw on a stable surface.
- Adjust the blade for the tile thickness.
- Mark the cut line on your tile.
- Turn on the saw and let the water flow.
- Slowly guide the tile through the blade.
Benefits of using a wet saw:
- Produces smooth edges.
- Minimizes chip damage.
- Effective for larger projects.
Manual Cutting Methods
Manual cutting methods are simple and cost-effective. Use these tools for effective cuts:
| Tool | Use |
|---|---|
| Tile Nippers | Great for small adjustments and curves. |
| Tile Cutter | Ideal for straight cuts on smaller tiles. |
Steps for using manual cutting methods:
- Score the tile with a tile cutter.
- Snap the tile along the scored line.
- Use tile nippers for intricate shapes.
Consider these tips:
- Wear safety goggles.
- Practice on scrap tiles first.
- Take your time for accurate cuts.
Applying Grout For Seamless Edges
Applying grout to penny tiles creates a smooth, polished look. Seamless edges enhance the overall appearance. This process requires precision and the right techniques.
Mixing Grout To The Right Consistency
Correct grout consistency is key. Follow these steps for perfect mixing:
- Use a clean bucket for mixing.
- Measure the grout powder and water.
- Follow the manufacturer’s instructions for ratios.
Stir until you achieve a smooth, lump-free paste. It should be thick but spreadable. Test the consistency by lifting some with a trowel.
Grouting Tips For Tight Spaces
Grouting tight spaces can be tricky. Use these tips for better results:
- Use a sponge float for even application.
- Work in small sections to avoid drying out.
- Apply grout at a 45-degree angle for better filling.
- Wipe excess grout off the tiles promptly.
For corners and edges, a small artist brush works well. Clean the grout lines with a damp sponge. This will keep them sharp and clear.
Sealing The Edges: A Step-by-step Guide
Sealing the edges of penny tile is crucial. It protects the tile and enhances its appearance. Follow this guide to achieve the best results.
Choosing The Right Sealant
Selecting the correct sealant is essential for durability. Here are some common types:
| Sealant Type | Best For | Application Method |
|---|---|---|
| Penetrating Sealant | Natural stone tiles | Brush or sponge |
| Acrylic Sealant | Vinyl and ceramic tiles | Spray or roll |
| Epoxy Sealant | High-traffic areas | Spread with a trowel |
Choose a sealant based on your tile type. Read product labels for specific instructions.
Application Techniques
Proper application ensures a strong seal. Follow these steps:
- Clean the tile edges. Remove dust and debris.
- Apply the chosen sealant. Use a brush, sponge, or spray.
- Work in small sections. This prevents the sealant from drying too quickly.
- Ensure even coverage. Avoid puddles and excess sealant.
- Allow to dry as per manufacturer instructions.
- Apply a second coat if needed. This adds extra protection.
Always use protective gear. Wear gloves and a mask for safety. Follow these tips for a long-lasting finish.
Alternative Finishing Options
Finishing the edges of penny tile can enhance its overall look. Several options exist to achieve a polished finish. Explore these alternatives to find the best fit for your project.
Metal Edging
Metal edging adds a modern touch to penny tile installations. It provides durability and a sleek appearance. Here are some benefits:
- Durability: Metal withstands wear and tear.
- Variety: Available in different colors and finishes.
- Easy Installation: Simple to cut and fit during tiling.
Common metal edging options include:
| Type | Description |
|---|---|
| Aluminum | Lightweight and rust-resistant. |
| Stainless Steel | Highly durable and stylish. |
| Brass | Offers a vintage look and feels. |
Caulking For Smooth Transitions
Caulking provides a seamless finish for penny tile edges. It fills gaps and creates a clean look. Follow these steps for effective caulking:
- Choose a color that matches your tiles.
- Clean the edges thoroughly.
- Apply a bead of caulk along the edge.
- Use a caulk smoothing tool for an even finish.
- Allow to dry completely before use.
Benefits of using caulk include:
- Flexibility: Accommodates movement and expansion.
- Waterproof: Protects against moisture damage.
- Easy to Maintain: Simple to clean and repair.
Maintenance And Care For Lasting Beauty
Keeping your penny tile looking fresh requires regular maintenance. Simple care habits ensure durability and beauty. Follow these tips for the best results.
Regular Cleaning Practices
Regular cleaning keeps your penny tile sparkling. Here are some effective cleaning tips:
- Dust regularly: Use a soft broom or vacuum.
- Wipe spills immediately: Prevent stains by cleaning up messes.
- Use a mild cleaner: Mix warm water with a gentle soap.
- Scrub gently: Use a soft cloth or sponge.
For deeper cleaning, consider these steps:
- Mix vinegar with warm water.
- Mop the floor with the solution.
- Rinse with clean water.
- Dry with a soft towel.
Dealing With Wear And Tear
Penny tiles can show wear over time. Address these issues promptly:
| Issue | Solution |
|---|---|
| Scratches | Use a tile repair kit to fill in scratches. |
| Stains | Apply a baking soda paste to lift stains. |
| Loose tiles | Reattach with tile adhesive. |
Regular maintenance prevents larger issues. Always check for cracks or discoloration. Early action saves time and money.
Common Mistakes To Avoid
Finishing the edge of penny tile can be tricky. Many make mistakes that affect the final look. Avoiding these errors is essential for a great finish.
Overlooking Expansion Gaps
Expansion gaps are crucial for tile installation. They allow tiles to expand and contract without cracking. Here are common pitfalls:
- Skipping the gaps: Not leaving space leads to cracking.
- Inconsistent spacing: Uneven gaps create an unprofessional look.
- Ignoring room temperature: Tiles expand in heat and contract in cold.
Follow these tips to avoid mistakes:
- Leave a gap of at least 1/8 inch.
- Use caulk for flexibility in corners.
- Check for temperature changes before installation.
Neglecting Water Resistance
Water resistance is vital for tile edges. Water can cause damage over time. Here are common mistakes:
- Using low-quality grout: Cheap grout can deteriorate quickly.
- Skipping sealant: Sealant protects against moisture.
- Not checking for leaks: Leaks can lead to mold growth.
To ensure water resistance:
| Action | Description |
|---|---|
| Choose high-quality grout | It provides better durability and water resistance. |
| Apply sealant | Sealant keeps moisture out and prolongs tile life. |
| Regularly inspect | Check for leaks and mold growth regularly. |
Conclusion: Achieving Professional Results
Finishing the edge of penny tile enhances your project’s beauty. Follow these steps to achieve a clean and polished look. Your hard work deserves to shine.
Recap Of Key Techniques
Here’s a summary of essential techniques for finishing penny tile edges:
- Choose the right trim: Use bullnose or quarter-round trims for smooth edges.
- Measure accurately: Ensure cuts are precise for a seamless fit.
- Use quality adhesive: Strong adhesive keeps tiles securely in place.
- Grout carefully: Fill gaps evenly for a professional finish.
- Seal edges: Use a sealant to protect against moisture and stains.
Encouragement To Try
Don’t hesitate to tackle this project. Achieving professional results is possible with practice. Here are some tips to motivate you:
- Start with a small area to build confidence.
- Seek help from friends or family for support.
- Watch online tutorials for visual guidance.
- Celebrate each step completed towards your goal.
Remember, every expert was once a beginner. Your efforts will lead to beautiful results.
Frequently Asked Questions
How Do I Finish The Edge Of Penny Tile?
To finish the edge of penny tile, use a trim piece or bullnose tile. This creates a clean transition. You can also use caulk for a seamless look. Ensure the edges are properly sealed to prevent water damage. This approach enhances both aesthetics and durability.
What Tools Are Needed For Penny Tile Installation?
Essential tools for penny tile installation include a tile cutter, trowel, and grout float. A level is crucial for ensuring even placement. Additionally, have spacers on hand for consistent grout lines. Safety goggles and a bucket for mixing mortar or grout are also recommended for a smooth process.
Can I Use Penny Tile In Wet Areas?
Yes, penny tile is suitable for wet areas like bathrooms. Its small size offers better grip and drainage. However, ensure proper sealing and waterproofing is applied. Choosing the right grout is vital for preventing mold and water damage. Always follow manufacturer recommendations for best results.
How Do I Clean Penny Tile Edges?
To clean penny tile edges, use a soft brush or cloth. Avoid abrasive cleaners that can scratch the surface. Regularly wipe down with a mild detergent and warm water. For tougher stains, a mixture of vinegar and water can be effective.
Rinse thoroughly to maintain shine and integrity.
Conclusion
Finishing the edge of penny tile adds a polished look to your project. Proper techniques ensure durability and aesthetics. Take your time to choose the right materials and methods. A well-finished edge enhances the overall appeal. With these tips, you’ll achieve a professional finish that stands out in any space.