How to Make MDF at Home: DIY Guide to Crafting Success
Imagine transforming your home workshop into a mini factory where you can create your own materials. Sounds intriguing, right?
If you’ve ever been curious about crafting Medium Density Fiberboard (MDF) at home, you’re in the right place. You might think that making MDF is a task for industrial machines, but with the right guidance, you can achieve it in your own space.
Why settle for off-the-shelf options when you can tailor your MDF to your specific needs and preferences? Not only does making MDF at home give you a unique creative control, but it also provides the satisfaction of crafting something from scratch. Plus, understanding the process can ignite your creativity, offering endless possibilities for your DIY projects. In this guide, you’ll discover the step-by-step process to make MDF at home, using accessible tools and materials. Get ready to unlock a new level of craftsmanship and innovation. Are you excited to dive in and learn how to make MDF right from the comfort of your home? Let’s get started!
Materials Needed
Wood fibers are tiny pieces of wood. They are the main part of MDF. You can get wood fibers from sawdust or wood shavings. Collecting these fibers is easy. Just gather them when you cut wood. Make sure they are clean and dry. Wet fibers don’t work well.
Adhesives help the fibers stick together. There are different types. White glue is one option. It is cheap and easy to find. Epoxy glue is strong but costs more. Choose an adhesive that suits your needs. Make sure it is safe and non-toxic.
Basic tools are needed to make MDF. A blender or grinder is useful. It helps to break down the wood fibers. You will need a mold or frame. This helps in shaping the MDF. A press or heavy weight is useful too. It helps to compact the fibers tightly.
Safety Precautions
Creating MDF at home requires essential safety measures. Wear protective gear like goggles and masks to shield against dust. Ensure proper ventilation to minimize inhaling harmful particles during the process.
Protective Gear
Making MDF involves working with dust and chemicals. Wearing a mask is important. It keeps dust out of your lungs. Gloves protect your hands. Safety glasses shield your eyes from splinters. Always wear a long sleeve shirt. It covers your arms from chemical spills. Closed-toe shoes are a must. They keep your feet safe from heavy objects.
Ventilation Requirements
Good ventilation is vital in your workspace. It prevents dust build-up. Open all windows and doors. Use a fan to move air around. This helps clear chemical fumes. Avoid small rooms for MDF work. Large spaces are better. Fresh air keeps you safe. Air filters are helpful too. They catch tiny particles in the air.

Preparing The Wood Fibers
Choose wood that is dry and free from pests. Pine and fir are great options. These woods are soft and easy to break down. Avoid using wood with knots. Knots make the process difficult. The wood should be clean and smooth. This ensures the best MDF quality.
Start by cutting the wood into small pieces. Use a saw for precise cuts. The pieces should be thin. Thin pieces are easier to process. Then, use a grinder to create wood fibers. Ensure fibers are even and consistent. This results in better MDF boards. Collect the fibers in a container. Keep them dry until use. This prevents moisture damage.
Mixing The Adhesive
Choosing an adhesive is important. It holds the MDF together. PVA glue is a good choice. It’s strong and easy to find. Another option is urea-formaldehyde. It’s used in many factories. But, it can be more difficult to handle. Always check for safety instructions. Some glues have strong smells. Make sure to work in a well-ventilated area. This will keep you safe.
Use a large bowl or bucket. Pour the adhesive into it. Add water slowly. Stir it with a stick. Keep mixing until smooth. It should look like thick cream. Be careful not to add too much water. This makes the glue weak. If it’s too thin, add more glue. Mix until just right.
Forming The MDF Board
Crafting MDF boards at home involves combining wood fibers with resin under pressure. Start by gathering wood chips and breaking them down. Mix the fibers with adhesive resin, then press and heat them to form a sturdy board.
Layering The Mixture
Start by gathering wood fibers and resin. Mix them well. The mixture should be smooth and even. Spread the mixture on a flat surface. Make sure it is thin and uniform. This is important for the board’s strength. Use a roller to flatten the mixture.
Pressing And Shaping
Place the layered mixture in a press machine. The press must be strong. Apply pressure evenly. This helps the board become compact. Heat the mixture while pressing. Heat makes the resin harden. This gives the board its shape. Let the board cool down. Cooling makes it ready for use.

Credit: www.walmart.com
Curing Process
Set the time for curing carefully. Usually, it takes several hours. Check the instructions for your materials. This helps to know how long it should be. Plan ahead so you have enough time.
Keep an eye on the temperature. It should be steady and not too hot. Use a thermometer to track the heat. Changes in temperature can cause problems. Make sure it stays right.
Finishing Touches
Creating MDF at home involves mixing wood fibers with resin. Press the mixture into a mold. Dry the mold completely for a smooth finish. These steps ensure durable and polished MDF sheets.
Sanding The Surface
Smooth the MDF surface using fine-grit sandpaper. This makes the surface even. Use a sanding block for better control. Sand in a circular motion. This helps remove any bumps or marks. Wipe away dust with a damp cloth. Ensure the surface is clean and dust-free before proceeding.
Applying Sealant
Use a brush to apply a thin layer of sealant. This protects the MDF from moisture. Let the sealant dry completely. Check the instructions for drying time. Once dry, lightly sand the surface again. This gives a smooth finish. Apply another coat if needed. Sealant helps in preserving the MDF for a longer time.

Credit: m.youtube.com
Troubleshooting Common Issues
The surface of MDF might not be smooth. This issue happens often. Check if the sanding process was done well. Proper sanding helps achieve a smooth surface. Use a fine-grit sandpaper. Sand in circular motions. This helps the surface stay even. Clean the board after sanding. Dust particles can cause unevenness. If the problem persists, repeat the sanding process. Ensure you apply even pressure. This avoids dips or bumps.
MDF should stick well together. Sometimes it does not. Ensure the glue is of good quality. Poor glue makes MDF weak. Apply glue evenly across surfaces. Uneven glue causes weak spots. Press the pieces firmly together. Pressure helps glue stick better. Let the glue dry completely. Rushing the drying process leads to weak adhesion. Double-check the assembly process. Correct mistakes early to avoid bigger issues.
Tips For Success
To make MDF last longer, mix glue and wood fibers well. Pressing them tightly helps too. This makes the board strong. Use a good sealant to stop water damage. Keep the board dry and away from damp places. Dry spaces keep the MDF strong. Handle the boards carefully to avoid cracks or breaks. Strong boards can hold more weight.
Paint or varnish the MDF for a nice look. Bright colors make it stand out. Use smooth sandpaper before painting. This gives a nice finish. Add a layer of primer to help the paint stick. Choose a glossy finish for shiny surfaces. Or use a matte finish for a soft look. Apply two coats for best results. Let each layer dry well.

Credit: fromevijawithlove.com
Frequently Asked Questions
How Do You Make MDF?
MDF is made by breaking down wood fibers, combining them with wax and resin, then compressing under high temperature and pressure. This process creates a dense, smooth board ideal for furniture and cabinetry. Its consistent texture makes it easy to cut and shape for various applications.
What Is The Biggest Drawback Of Using MDF?
The biggest drawback of using MDF is its vulnerability to moisture. MDF can swell or warp when exposed to water. It lacks the natural beauty of real wood and may release formaldehyde, a harmful chemical. MDF is less durable compared to solid wood, affecting long-term performance.
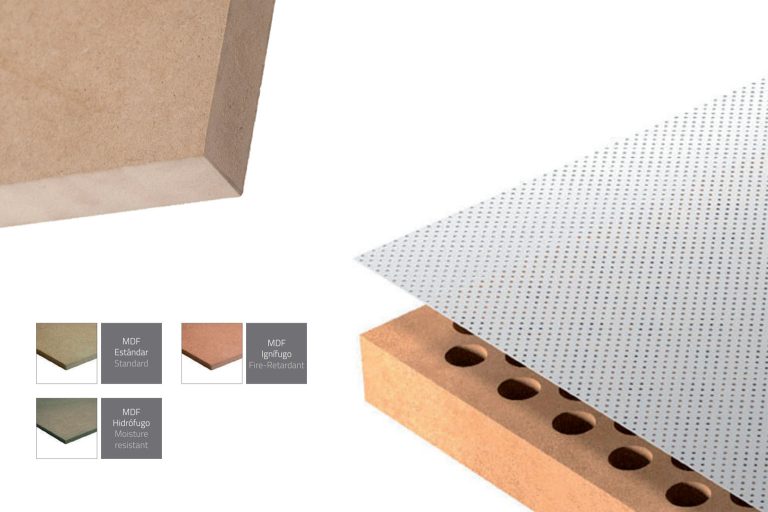
What Are The Ingredients In MDF?
MDF consists of wood fibers, wax, and resin. These ingredients are bonded under heat and pressure. The wood fibers are often sourced from hardwood or softwood. The resin, typically urea-formaldehyde, acts as a binding agent. Wax adds moisture resistance and smoothness to the surface.
Is MDF Tougher Than Plywood?
MDF is generally less tough than plywood. Plywood offers better strength and durability due to its layered construction. MDF is denser but can chip or crack easily. Plywood is ideal for structural projects, while MDF suits smooth, painted surfaces. Choose based on project requirements.
Conclusion
Creating MDF at home is a rewarding project. You’ve learned the basic steps. Gather materials, mix them, and press into shape. Always prioritize safety. Wear protective gear during the process. Remember, patience is key. The results can be satisfying. Use your homemade MDF for small projects.
Experiment and improve with practice. Share your creations with friends and family. Inspire others to try this DIY method. Enjoy the process, and keep learning. Your skills will grow with time. Happy crafting!