How to Take off Popcorn Ceiling That Has Been Painted Safely
Are you tired of staring at that outdated popcorn ceiling in your home, especially when it’s been painted over and seems even harder to remove? You’re not alone.
Many homeowners like you face this same challenge, and it can feel like an overwhelming task. But what if I told you there’s a straightforward way to tackle this home improvement project? Imagine transforming your ceiling from an eyesore into a sleek, modern surface without the hassle and frustration.
In this guide, we’ll walk you through the simple steps to successfully remove a painted popcorn ceiling. You’ll discover techniques that make the process easier than you ever thought possible. Stay with us, and by the end, you’ll be ready to roll up your sleeves and start turning your home into the space you’ve always dreamed of.

Credit: www.youtube.com
Preparation For Ceiling Removal
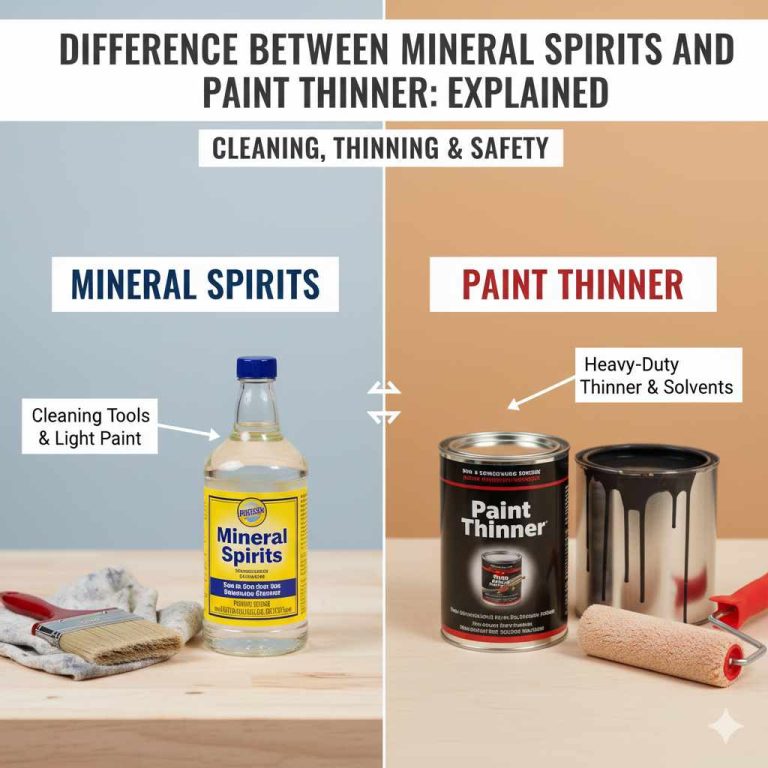
Removing painted popcorn ceilings requires careful preparation and tools. Start by protecting floors and furniture with plastic sheets. Lightly spray water to soften the paint, then gently scrape with a putty knife.
Gathering Necessary Tools
Removing a popcorn ceiling needs the right tools. Start with a sturdy ladder. Make sure it is tall enough to reach the ceiling. You will need a putty knifeor a scraper. These help scrape off the popcorn texture. A spray bottle is also important. Fill it with water to dampen the ceiling. This makes scraping easier. Don’t forget safety goggles and a dust mask. They protect your eyes and lungs. A drop cloth is useful too. Cover floors and furniture to keep them clean. A bucket for waste is handy. Gather all tools before starting.
Safety Precautions
Safety is very important. Wear goggles to protect your eyes. Dust masks protect your lungs. Popcorn ceilings can create a lot of dust. Make sure the room is well-ventilated. Open windows for fresh air. Keep kids and pets away from the area. Use a ladder safely. Have someone hold it if needed. Avoid standing on top steps. Make sure the ladder is stable. Use gloves for hand protection. This keeps your hands safe from scratches.

Credit: www.youtube.com
Assessing The Ceiling Condition
Asbestos can be dangerous. It is important to check for asbestos first. Hire a professional to test the ceiling. They have the right tools. If asbestos is present, do not remove the ceiling yourself. Asbestos can cause health problems. Safety is very important.
Painted popcorn ceilings are harder to remove. Thick paint makes it tougher. Look closely at the ceiling. Count the layers of paint. More layers mean more work. Use a small tool to test it. See how hard it is to scrape. This helps plan the work better.
Softening The Painted Surface
Chemical solutions help soften the painted surface. This makes it easier to scrape off. Choose a solution that is safe and effective. Apply it carefully using a soft brush or sponge. Cover the entire area to ensure even softening. Allow it to sit for the recommended time. This helps the solution penetrate the paint. Check a small area to see if the paint is soft. If needed, apply more solution. Safety is important. Wear gloves and goggles to protect your skin and eyes. Follow instructions on the bottle for best results.
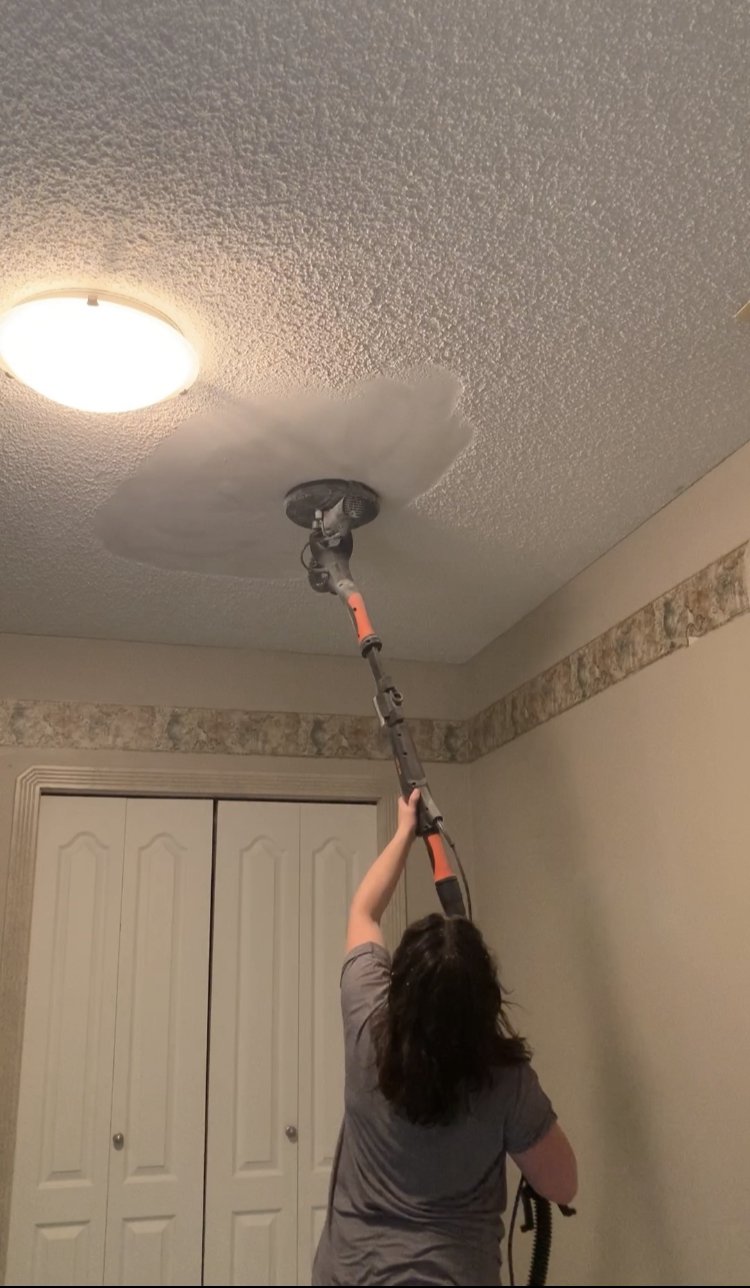
Alternative methods offer other ways to remove popcorn ceiling. Steam is a popular choice. It softens paint using heat and moisture. Use a steamer designed for home use. Hold it close to the ceiling but not too close. Scraping is another option. Use a putty knife or scraper. Work slowly to avoid damage. Sanding can help too. Use a fine-grit sandpaper. This smooths the surface after scraping. Experiment with different methods to find what works best.
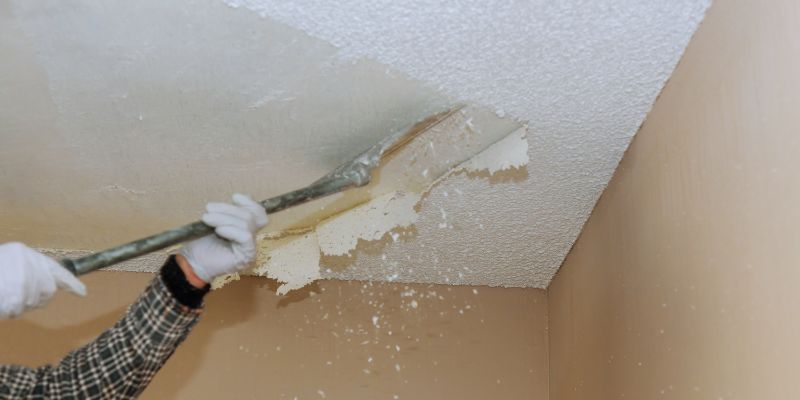
Scraping The Popcorn Texture
Start by wetting the ceiling surface using a spray bottle filled with water. This helps loosen the painted texture. Use a scraper with a wide blade for better coverage. Hold it at a low angle. Push gently to avoid gouging the drywall. Scraping in sections makes it easier. Use slow and smooth strokes. Switch to a smaller scraper for tight spots.
Corners and edges need extra care. Use a narrow scraper for these areas. Be patient and work slowly. Paint sometimes bonds too hard. In such cases, try a chemical paint remover. Apply with a brush. Wait for it to soften the paint. Then scrape gently. Always wear safety goggles. Protect your eyes from dust and debris.
Repairing And Smoothing The Ceiling
First, you must find all the holes and crackson the ceiling. Use a flashlight to see them clearly. Fill these spots with spackle or a patching compound. Use a putty knife to make it smooth. Let it dry for a few hours. Sand the area with fine sandpaper. This makes it even.
Apply a thin layer of joint compoundon the patched areas. Use a taping knife for this. Make sure it is smooth and covers all patches. Wait for the compound to dry. Sand it gently to make it smooth. Repeat this process if needed. Your ceiling will be ready for the next step.
Credit: erinzubotdesign.com
Finishing Touches
Removing painted popcorn ceiling requires careful preparation. Start by wetting the surface to loosen the paint. Use a putty knife or scraper to gently peel away the texture, working in small sections for best results.
Priming The Surface
Priming ensures the surface is ready for the next step. It’s important to choose a high-quality primer. This helps the paint or texture stick better. Make sure the primer is evenly spread. Let it dry completely before moving on. This step prevents peeling or uneven surfaces later.
Painting Or Texturing Options
There are various ways to finish the ceiling. You can choose to paint it. Use a color that matches your room. Or you can add texture for a unique look. Texturing adds depth and style. Options include smooth, patterned, or popcorn again. Each option has a different effect. Consider what fits best with your room’s theme.
Cleaning And Disposal
Removing painted popcorn ceilings involves careful steps to avoid mess. Start by testing a small area for asbestos. If safe, dampen the ceiling and gently scrape off the texture. Use protective gear and cover floors for easy cleanup. Dispose of debris properly to ensure a clean finish.
Proper Waste Disposal
Dispose of debris carefullyto avoid mess. Use heavy-duty trash bags. Seal them tightly. Keep waste away from pets and children. Contact local waste management for disposal rules. Some areas have special recycling for construction waste. Follow local guidelines strictly.
Post-removal Cleanup
Cleaning after removal is crucial. Dust settles everywhere. Use a vacuum with a HEPA filter. It traps small particles effectively. Wipe surfaces with damp cloths. Check corners and crevices for residue. Dispose of used cleaning materials in sealed bags. This prevents contamination.
Frequently Asked Questions
How Do You Remove Painted Popcorn Ceiling?
Removing painted popcorn ceiling involves scraping and sanding. First, lightly dampen the surface. Use a scraper to carefully remove the texture. Sand the ceiling smooth after scraping. Ensure proper ventilation and safety gear. Painted ceilings are harder to remove, so patience is key.
Can I Remove Popcorn Ceiling Myself?
Yes, you can remove popcorn ceiling yourself. Gather necessary tools like a scraper, sander, and safety gear. Follow safety precautions and work in a ventilated area. It’s labor-intensive, but DIY removal is possible with proper preparation and patience.
What Tools Are Needed For Removal?
Essential tools include a scraper, sander, spray bottle, and safety gear. A ladder and drop cloths are also needed. The scraper helps remove texture, while the sander smooths the surface. Safety gear, like goggles and masks, protects from dust and debris.
Is It Safe To Remove Popcorn Ceiling?
Removing popcorn ceiling is safe if done properly. Ensure the ceiling contains no asbestos. Use safety gear like goggles and masks. Work in a ventilated area. Proper precautions minimize health risks during removal. Consult a professional if unsure about asbestos presence.
Conclusion
Removing a painted popcorn ceiling can be simple with the right steps. Start by gathering essential tools and materials. Prepare the room carefully to keep it clean. Test a small section before starting the whole process. Wet the ceiling to soften the texture.
Scrape gently to avoid damaging the drywall. Safety is key, so wear goggles and a mask. Once removed, you can enjoy a smoother surface. Consider repainting or finishing the ceiling for a fresh look. With patience and care, your ceiling can transform beautifully.
Enjoy the new, clean space in your home!