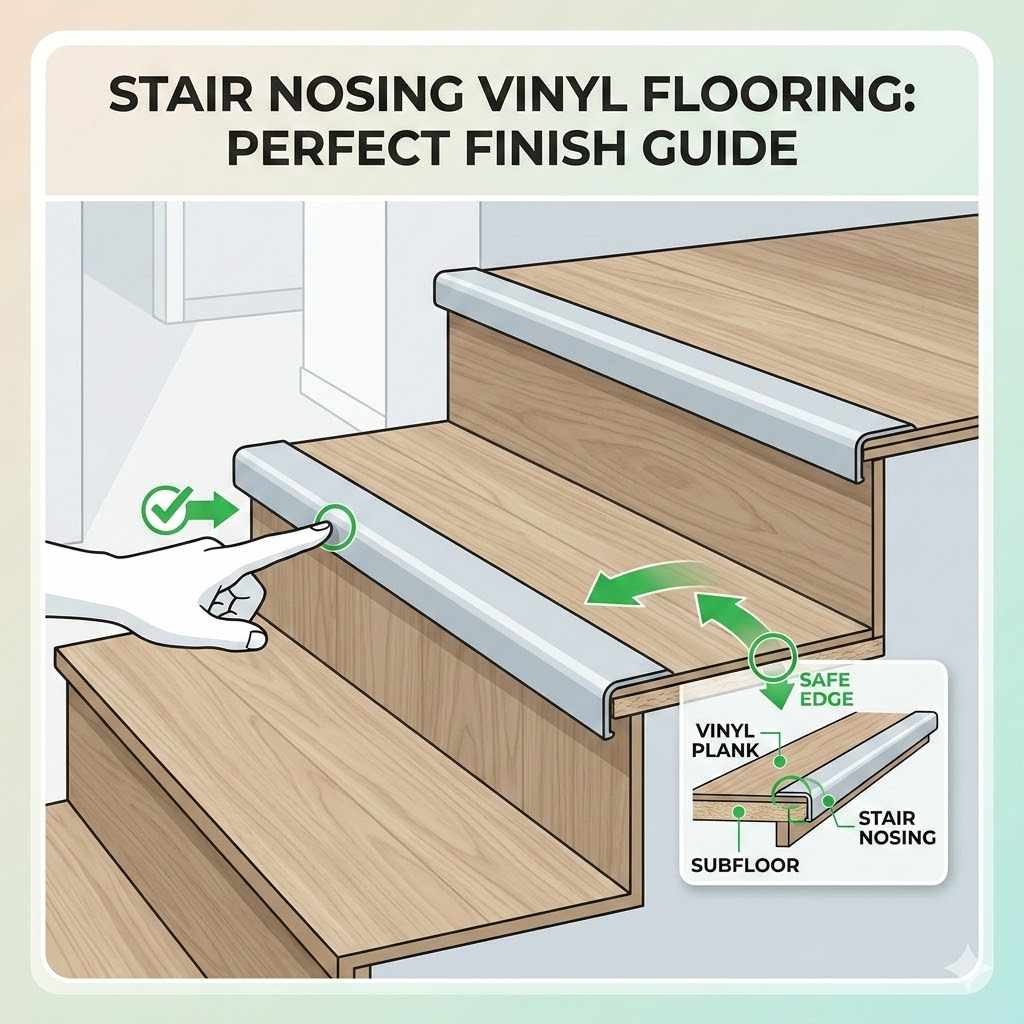
Stair Nosing Vinyl Flooring: Perfect Finish Guide
Getting your vinyl flooring to look just right on stairs can seem tricky, especially when you’re new to it. You want that clean, finished edge, but it’s easy to worry about making mistakes. This guide is here to help.
We’ll walk you through each step simply so you can achieve a beautiful look for your stairs with Stair Nosing Vinyl Flooring: Perfect Finish Guide. You’ll see how straightforward it can be to get professional results at home.
Why Stair Nosing Vinyl Flooring Matters
Stair nosing is a really important part of finishing your vinyl flooring project on stairs. It’s the part that covers the edge of each step. Good stair nosing not only makes your stairs look neat and complete but also makes them safer.
It helps prevent wear and tear on the vinyl at the most used part of the step. Without it, your floor can look unfinished and the edges might lift or get damaged easily. This section explains why choosing the right nosing and installing it correctly is key for both looks and safety.
The Role of Stair Nosing
Stair nosing acts as a protective cap for the edge of each stair tread. Vinyl flooring, while durable, can be susceptible to chipping or peeling at sharp edges. The nosing profile provides a rounded or square edge that is more resistant to impact and daily wear.
This extends the life of your flooring.
- Protecting Edges From WearThe front edge of a stair tread is where most foot traffic occurs. Vinyl flooring on its own can start to fray or wear down quickly in this area. Stair nosing covers this vulnerable edge, acting as a shield.
- This means the main part of your flooring stays looking good for much longer. It’s like putting a bumper guard on a car to prevent dents.
- Enhancing Safety FeaturesA well-installed stair nosing creates a smooth transition from the tread to the riser. This reduces the risk of tripping, especially for children and the elderly. It can also provide a slightly better grip than a sharp vinyl edge.
- Many nosing profiles have a subtle texture or a different material that helps feet find their place securely.
- Achieving A Finished LookFlooring simply looks unfinished without proper stair nosing. It ties the entire floor together, giving your staircase a polished and professional appearance. The right nosing complements the vinyl color and style, making the whole staircase a feature of your home rather than just a functional pathway.
Types of Stair Nosing Profiles
There are a few common shapes and materials for stair nosing. The choice depends on your vinyl flooring type, your style preferences, and the specific needs of your stairs. Understanding these options will help you pick the best fit.
- Overlap NosingThis is a very common type. It’s designed to overlap the front edge of the stair tread, covering the cut edge of the vinyl flooring. It then curves down to meet the riser.
- This creates a rounded edge that feels comfortable underfoot and looks smooth. It’s a good all-around choice for most vinyl installations.
- Flush-Mount NosingFlush-mount nosing sits directly on top of the stair tread. It creates a clean, straight edge that matches the profile of your vinyl flooring. This option is often used when the vinyl is installed with a separate underlayment or when a very modern, minimalist look is desired.
- It requires precise cutting of the vinyl.
- Recessed NosingThis type is installed into a groove or channel cut into the stair tread. It creates a very flush and streamlined appearance. Recessed nosing is often seen in commercial settings where durability and a sleek look are paramount.
- It typically requires more advanced installation techniques.
- Carpet Nosing vs. Vinyl NosingWhile the concept is the same, the profiles and materials can differ. Vinyl nosing is specifically designed to work with vinyl flooring. It often has a thicker profile or a specific adhesive channel to ensure a strong bond.
- Carpet nosing is designed for carpet edges and may have a different shape to hold the carpet fibers. Ensure you select nosing made for vinyl.

Preparing Your Stairs for Vinyl Nosing
Before you can install your stair nosing, the stairs themselves need to be in good condition. Proper preparation ensures the nosing will fit correctly and stay in place securely. This means cleaning thoroughly, making sure the surface is even, and having the right tools ready.
A little effort here saves a lot of trouble later.
Assessing the Staircase Structure
Start by looking closely at each step. Are there any loose boards? Any significant cracks or holes?
These need to be fixed.
- Checking for StabilityWalk on each stair. Do any feel bouncy or wobbly? If so, you’ll need to secure any loose treads or risers from underneath or by using screws and wood glue.
- A stable base is vital for both the flooring and the nosing to last. Unstable stairs can lead to flooring failure and safety hazards.
- Identifying Surface ImperfectionsLook for bumps, dips, or unevenness on the tread surface. These can affect how the vinyl and the nosing lay flat. Even small imperfections can become noticeable over time.
Cleaning and Repairing
Once you know what needs fixing, it’s time to do the work.
- Removing Old Flooring and AdhesivesIf you have old carpet or flooring, remove it completely. Scrape away any old glue or adhesive residue. A strong scraper or a floor scraper can be helpful.
- For stubborn adhesives, you might need a solvent, but always test in an inconspicuous area first and ensure good ventilation. A clean, smooth surface is essential for new flooring to adhere well.
- Filling Gaps and CracksUse a good quality wood filler or epoxy filler to fill any holes, cracks, or significant gouges on the treads. Let the filler dry completely according to the manufacturer’s instructions. Once dry, sand the filled areas smooth so they are level with the rest of the tread.
- This creates a uniform surface.
- Sanding the SurfaceLightly sand the entire surface of each stair tread. This helps to create a slightly rough texture that new adhesives can grip onto. It also removes any lingering debris or uneven spots.
After sanding, vacuum up all the dust.
Measuring and Cutting Vinyl
Accurate measurements are critical for a good fit.
- Measuring Each TreadMeasure the width and depth of each stair tread carefully. You’ll need to cut your vinyl flooring to fit each step precisely. It’s a good idea to measure each stair individually, as steps can vary slightly.
- Cutting Vinyl PiecesUse a sharp utility knife and a straight edge to cut the vinyl flooring pieces for each tread. Make sure the cuts are clean and straight. Leave a small overlap at the back of the tread that will go up the riser.
Installing Stair Nosing Vinyl Flooring
This is where it all comes together. Installing the stair nosing is the final step to making your vinyl flooring look great and be safe. It requires patience and precision, but following these steps will ensure a professional finish.
Adhering the Vinyl to Treads
Before attaching the nosing, the vinyl needs to be securely on the treads.
- Applying AdhesiveApply a strong vinyl flooring adhesive to the back of the vinyl piece for the tread. Use a notched trowel to spread it evenly, as recommended by the adhesive manufacturer. Ensure full coverage without being excessive.
- Placing the VinylCarefully place the cut vinyl piece onto the stair tread, pressing it down firmly. Start from the back and smooth it forward to push out any air bubbles. Use a hand roller or a heavy object to ensure good contact with the adhesive.
- Let it set according to the adhesive instructions.
- Attaching Vinyl to RisersFor the risers, cut vinyl pieces to fit. You can adhere these directly to the riser board. Some people prefer to install the tread vinyl first, then the riser vinyl, and then apply the nosing to cover the joint.
- Others do the riser first, then the tread, and finally the nosing. The method depends on the nosing profile. For most overlap nosing, you’ll attach vinyl to the tread, then attach nosing that covers the tread edge and meets the riser.
Fitting the Stair Nosing
Once the vinyl is in place, it’s time for the nosing.
- Dry Fitting the NosingBefore applying any adhesive, place the stair nosing piece along the edge of a tread. This allows you to see how it fits and where you might need to make adjustments. Check that it sits flush where it should and that the overlap is correct.
- Cutting Nosing to SizeMost stair nosing comes in long strips. You’ll need to cut these to the exact width of your stairs. Use a fine-tooth saw and a miter box for clean, straight cuts.
- If your stairs have quarter-round trim or baseboards on the sides, you’ll need to cut the nosing to fit around these.
- Applying Adhesive to NosingApply a strong, compatible adhesive to the underside of the stair nosing. For some profiles, adhesive also goes on the edge of the tread. Follow the specific instructions for your chosen nosing product.
- Some nosing also requires mechanical fasteners like small nails or screws, especially in high-traffic areas.
- Securing the NosingPress the nosing firmly into place, ensuring it makes good contact with the vinyl and the stair tread. If using fasteners, drive them carefully through the designated holes or channels. Wipe away any excess adhesive immediately with a damp cloth.
- Working Step by StepInstall the nosing one step at a time. This prevents you from having to work around wet adhesive on multiple steps. It’s a good practice to start from the bottom step and work your way up.
Finishing Touches and Curing
The final steps ensure a long-lasting and perfect finish.
- Allowing Adhesive to CureLet the adhesive on the vinyl and nosing cure completely. This usually takes at least 24 to 48 hours, depending on the product and environmental conditions. Avoid heavy foot traffic on the stairs during this period.
- The longer you can keep them clear, the stronger the bond will be.
- Sealing Edges (Optional)For extra protection and a cleaner look, some people choose to apply a bead of caulk or sealant along the seam where the nosing meets the riser or the wall. Use a sealant color that matches your nosing or paint. This helps prevent moisture from getting underneath.
- Cleaning UpOnce everything is cured, do a final clean-up of the area. Remove any tools, scrap materials, and dust.
Maintaining Your Vinyl Stair Nosing
Keeping your stair nosing in good shape is simple with a little regular care. Just like the rest of your vinyl flooring, it needs to be cleaned to look its best and last a long time.
Regular Cleaning Practices
Routine cleaning prevents dirt from grinding into the material.
- Sweeping or VacuumingRegularly sweep or vacuum your stairs. This removes dust, dirt, and small debris that can scratch the surface over time. Use a soft brush attachment on your vacuum cleaner to avoid damaging the nosing.
- Wiping DownDampen a soft cloth with mild soap and water. Wipe down the stair nosing and the vinyl treads. This removes surface grime and leaves them looking fresh.
- Avoid using harsh chemicals or abrasive cleaners, as they can damage the finish.
Dealing With Spills and Stains
Accidents happen, and it’s good to know how to handle them.
- Immediate CleanupWipe up any spills immediately with a clean, dry cloth. The longer a spill sits, the harder it is to remove and the more likely it is to stain. For sticky spills, a slightly damp cloth is usually enough.
- Tackling Stubborn StainsFor tougher stains, try a mild solution of water and vinegar. Apply it with a cloth and let it sit for a few minutes before gently wiping it away. Always test any cleaning solution in an inconspicuous spot first to make sure it doesn’t harm the vinyl or the nosing material.
Preventing Damage
A few simple habits can extend the life of your stair nosing.
- Using DoormatsPlace doormats at the entrances to your home. This traps dirt and moisture before it gets tracked onto your stairs. Keeping grit off the stairs significantly reduces wear and tear.
- Protective FootwearConsider asking household members to avoid wearing shoes with sharp heels or very rough soles on the stairs, especially if they are very hard or have metal pieces. This can help prevent scratches and dents.
Troubleshooting Common Issues
Even with the best efforts, you might run into small problems. Knowing how to fix them quickly makes a big difference.
Nosing Not Sticking
If your stair nosing starts to lift, it’s usually due to adhesive failure.
- Reapplying AdhesiveCarefully lift the loose section of the nosing. Scrape away any old, dried adhesive from both the nosing and the stair tread. Apply a fresh bead of strong flooring adhesive.
- Press the nosing back into place firmly and hold it down with painter’s tape or heavy objects while the adhesive cures.
Vinyl Edge Lifting
If the edge of the vinyl flooring itself starts to lift away from the tread before the nosing, this indicates an issue with the vinyl adhesion.
- Addressing Vinyl AdhesionYou may need to lift the nosing carefully to access the vinyl edge. Clean the area where the vinyl is lifting and reapply vinyl flooring adhesive. Press the vinyl down firmly and reattach the nosing once the vinyl has set.
Scratches and Dents
Minor damage can sometimes be repaired.
- Minor Scratch RepairFor very light scratches on vinyl or some types of nosing, you might be able to use a repair kit designed for vinyl flooring. These often involve a color-matching compound. For deeper scratches or dents, it might be impossible to completely hide the damage without replacing the section.

Frequently Asked Questions
Question: What is the best adhesive for stair nosing vinyl flooring
Answer: A strong, flexible vinyl flooring adhesive that is specifically designed for stair applications is usually best. Look for products labeled for use on stairs, as they are formulated to withstand the pressure and movement of foot traffic. Always check the manufacturer’s recommendations for both your vinyl flooring and the stair nosing.
Question: Can I install stair nosing myself
Answer: Yes, many homeowners can successfully install stair nosing themselves. It requires careful measuring, precise cutting, and attention to detail. Having the right tools and following step-by-step instructions, like those in this guide, will greatly improve your chances of a successful DIY project.
Question: How do I cut stair nosing for corners
Answer: For outside corners, you will typically need to make a miter cut. For inside corners, it is usually a combination of a miter and an angle cut to make them fit together neatly. A miter saw is very helpful for achieving clean angle cuts.
Practice on scrap pieces first.
Question: How often should I clean my vinyl stair nosing
Answer: You should sweep or vacuum your vinyl stair nosing regularly, at least weekly, to remove dust and debris. A damp cloth wipe-down can be done as needed, perhaps every two weeks, or whenever you notice dirt or spills. Consistent cleaning prevents wear and keeps them looking good.
Question: Will vinyl stair nosing work with laminate flooring
Answer: While the concept is similar, vinyl stair nosing is designed specifically for vinyl flooring. Laminate flooring has different expansion and contraction properties. You would typically need to use stair nosing specifically made for laminate flooring to ensure proper adhesion and durability.
Summary
Installing stair nosing on your vinyl flooring provides a safe, attractive, and durable finish. By preparing your stairs well, measuring carefully, and following the installation steps, you can achieve professional-looking results. Regular cleaning will keep your stairs looking great for years to come.