Ash Burl Wood: Essential Guide
Ash burl wood is a highly sought-after, visually unique hardwood known for its distinctive swirling grain patterns and rich character. It’s perfect for decorative items, furniture accents, and stunning statement pieces, offering excellent workability for crafters of all levels when handled properly.
Ever stumbled upon a piece of wood that just stops you in your tracks? That’s often the magic of burl wood, and ash burl is a prime example! Many beginners shy away from unique woods, thinking they’re too difficult to handle. But let me tell you, with a little know-how, ash burl can be an incredibly rewarding material to work with. It brings an artistic flair to any project that plain wood just can’t match. Don’t worry if you’ve never worked with burl before; we’re going to walk through everything you need to know, step by step, to unleash its beauty in your workshop.
What is Ash Burl Wood?
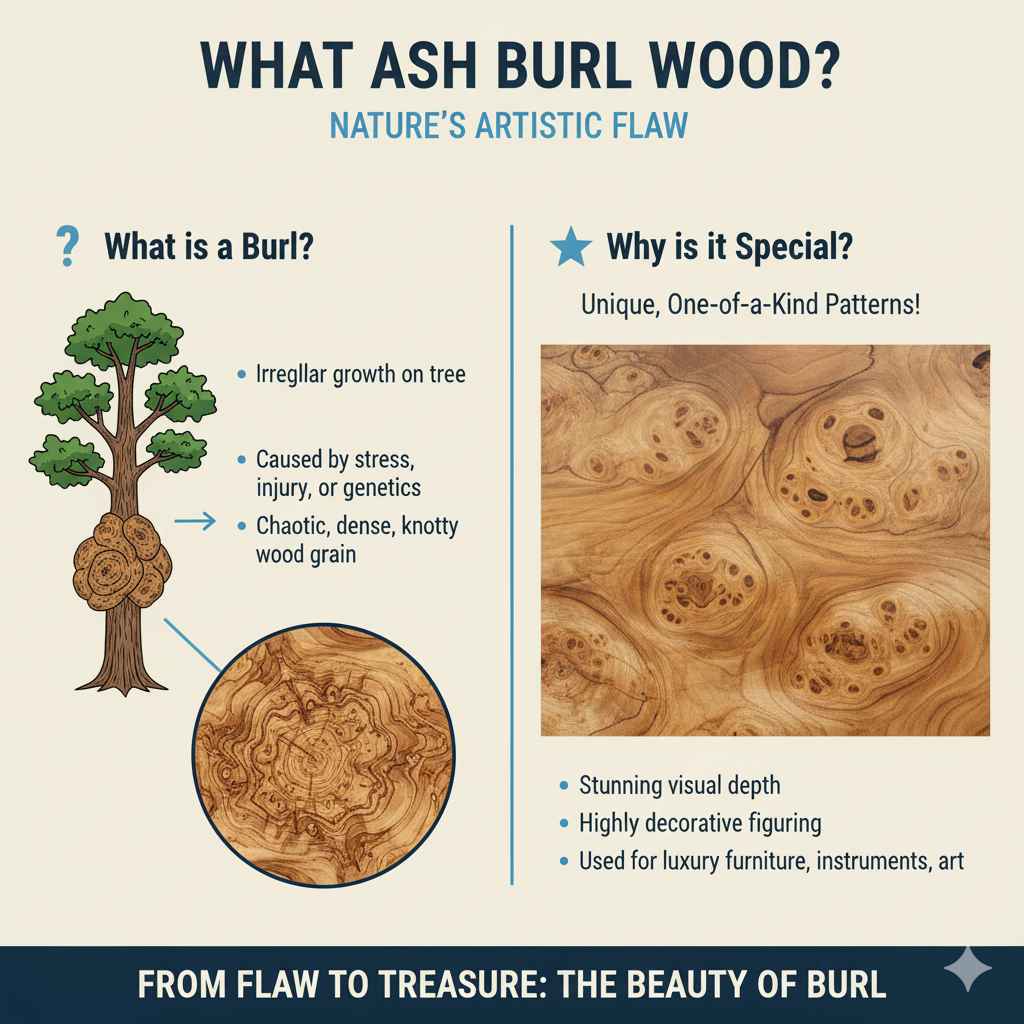
So, what exactly is ash burl wood? When we talk about burl, we’re referring to a growth on a tree, typically a hardwood like ash, oak, or walnut. It looks like a rounded, irregular lump that grows outward from the trunk or a major limb. These burls are caused by various factors, including stress, injury, fungi, or even genetic mutations. Instead of growing normally, the tree forms these dense, knotty growths.
Inside this unusual growth, the wood grain is anything but ordinary. It’s characterized by a chaotic, swirling, and often tightly packed pattern of “eyes” or swirls, with unique figuring that you won’t find in the straight-grained wood of the same tree. This makes each piece of ash burl completely one-of-a-kind. It’s this natural, artistic patterning that makes ash burl so desirable for furniture, cabinetry, decorative objects, and musical instruments.
Why Choose Ash Burl Wood?
If you’re looking to add a touch of natural artistry and uniqueness to your woodworking projects, ash burl is an excellent choice. Here’s why it stands out:
- Unmatched Visual Appeal: The swirling, often mesmerizing grain patterns are its biggest draw. No two pieces are alike, ensuring your project will be truly original.
- Rich Character: Unlike the uniform grain of standard lumber, ash burl offers a dynamic and captivating look that can turn simple pieces into works of art.
- Versatility: While it’s often used for accent pieces, tabletops, or decorative veneers, its workable nature means it can be incorporated into various projects.
- Durability: Ash itself is a strong hardwood, and while burl can be dense and sometimes brittle in certain areas, it generally holds up well for indoor applications.
Understanding Ash Burl Characteristics
Working with ash burl is a bit different from working with regular ash lumber. Understanding these characteristics will help you achieve the best results and avoid common pitfalls.
Grain and Figure
The defining feature of ash burl is its wild, chaotic grain. Instead of straight, parallel lines, you’ll see swirls, clusters of eyes (rondel shapes), and flowing, irregular patterns. This figure can range from subtle waves to incredibly tight, intricate designs. The color can vary too, from creamy whites and light tans to deeper browns, often with darker mineral streaks that add to its natural beauty.
Density and Hardness
Ash burl tends to be quite dense, often even more so than regular ash. This density contributes to its durability. However, the chaotic grain can sometimes lead to uneven hardness within a single piece. Some areas might be harder and more prone to chipping, while others might be softer. Understanding this helps in selecting the right tools and techniques.
Stability
Like many hardwoods, ash burl can expand and contract with changes in humidity. Burls, especially, can be less stable than standard lumber due to the irregular grain structure. This means proper drying and finishing are crucial to prevent warping or cracking, especially in larger pieces or those exposed to fluctuating moisture levels.
Workability
Ash burl can be challenging to machine due to its irregular grain. Tools can catch and tear the wood if not used carefully. However, it sands and finishes beautifully once you get past the initial machining stages. Hand tools can often provide more control for intricate shaping.
Where Does Ash Burl Come From?
Ash burl wood comes from ash trees (Fraxinus genus). The most common species that produce desirable burls include:
- White Ash (Fraxinus americana): Native to eastern North America, this is a strong and popular hardwood.
- Green Ash (Fraxinus pennsylvanica): Also found across North America, it shares many similar characteristics with white ash.
- European Ash (Fraxinus excelsior): Common throughout Europe, known for its toughness and elasticity.
Burls can form on any part of the tree, but they are often found on the trunk, near the base, or on large branches. Harvesting burls requires careful consideration of the tree’s health and the sustainability of the practice. Many burl suppliers source wood from fallen trees or from carefully managed forestry operations to ensure minimal impact.
Ash Burl vs. Other Burl Woods
Ash burl shares similarities with other burl woods, but it also has its unique traits. Here’s a quick comparison:
| Feature | Ash Burl | Walnut Burl | Maple Burl |
|---|---|---|---|
| Color Palette | Light tan to brown, can have mineral streaks | Rich brown, often with dark, contrasting streaks | Creamy white to light brown, sometimes with pinkish hues |
| Grain Pattern | Swirling eyes and chaotic figure, good contrast | Very dark, dense swirls and “eyes” against lighter brown | Tight curls, wavy grain, often with a subtle shimmer (lacewood effect) |
| Hardness/Density | Hard and dense, can be uneven | Moderately hard to hard | Hard and dense |
| Workability | Can be prone to tear-out due to wild grain, but sands well | Generally good, though dense areas can be challenging | Excellent, sands and finishes beautifully |
| Typical Uses | Veneers, decorative furniture, turning, small objects | High-end furniture, gunstocks, decorative items | Musical instruments, furniture,”bird’s-eye” veneer, bowls |
While walnut burl boasts dramatic dark-and-light contrasts, and maple burl is famous for its often subtle, shimmery figure, ash burl offers its own distinct character with a beautiful interplay of swirling patterns. All are prized for their unique beauty!
Sourcing Ash Burl Wood
Finding quality ash burl can be an adventure, but it’s well worth the effort. Here are the best places to look:
- Specialty Wood Suppliers: These businesses focus on unique and exotic hardwoods. They often have a good selection of burl wood, sold as slabs, turning blocks, or veneer.
- Online Marketplaces: Websites like Etsy, eBay, and dedicated woodworking forums can be great sources, especially for smaller pieces or unique finds from independent sellers. Be sure to check seller reviews and descriptions carefully.
- Local Sawmills: Sometimes, local sawmills might have burl sections or know where to source it. It’s worth asking around if you have a good relationship with a local mill.
- Woodworking Shows: These events are fantastic for seeing wood in person and talking directly to suppliers. You can often find unique burl pieces from various vendors.
When buying, look for pieces that are well-dried to minimize the risk of cracking. Check for any signs of active rot or insect damage. For turning or carving, blocks are usually best, while for furniture, slabs or veneer sheets are more common.
Working with Ash Burl Wood: A Beginner’s Guide
Now for the exciting part – turning that beautiful burl into something tangible! Here’s how to approach working with ash burl safely and effectively.
Safety First!
Working with any wood, especially unconventional cuts like burls, requires a strong focus on safety. Always:
- Wear safety glasses to protect your eyes from dust and debris.
- Use hearing protection when operating loud machinery.
- Wear a dust mask or respirator to avoid inhaling fine wood dust, which can be harmful.
- Ensure your tools are sharp. Dull tools are more dangerous as they require more force and can slip.
- Understand your tools and their functions before you start. If you’re new to a tool, check out manufacturer guides or reputable online resources. For example, learning the safe operation of a table saw is critical for working with any lumber, and the same principles apply to burl. You can find excellent safety guides from organizations like Wood Magazine that cover fundamental practices.
Tools You’ll Need
For ash burl, you might need a slightly different approach than with standard lumber:
- Hand Tools: Sharp chisels, gouges, hand planes, and spokeshaves are excellent for controlling cuts in irregular grain.
- Power Saws: A table saw for breaking down larger pieces (use a high-tooth-count blade for smoother cuts), a bandsaw for curves, and a jigsaw for intricate details.
- Sanders: Random orbital sanders are a must for large surfaces, while detail sanders and sandpaper of various grits (from 80 to 220 and beyond) are essential for smoothing.
- Carving Tools: If you plan on carving, specialized carving knives and sets will be invaluable.
- Router: Useful for flattening surfaces or creating decorative edges, but move cautiously.
Step-by-Step Guide to Working Ash Burl
Here’s a general approach. Specific steps will vary based on your project.
- Design and Planning: Decide what you want to make. Consider that burls often have irregular shapes, so design with the wood’s natural form in mind. Sketch out your ideas and how you can best utilize the unique grain.
- Milling and Flattening: If you have a slab, the first step is often flattening one or both sides. This can be done with a router sled, a jointer (with caution on uneven edges), or a planer. For irregular pieces, a router sled is often the safest and most effective method for beginners.
- Cutting to Size: Use your chosen saws to cut the wood to the desired dimensions. For very intricate patterns, a bandsaw or jigsaw allows for more controlled shaping. Work slowly, especially around knots or where grain changes direction.
- Shaping and Carving: Use hand tools or power tools to shape your piece. Gouges and chisels work well for carving details. For a smoother finish on curved surfaces, a spokeshave or drum sander can be very effective.
- Sanding: This is where the burl really comes to life! Start with a coarser grit sandpaper (around 80-100 grit) to remove tool marks. Gradually work your way up through finer grits (120, 150, 180, 220). For a truly smooth finish, consider going to 320 or even 400 grit. Always sand with the grain where possible, even though the grain is irregular. Wiping with a damp cloth between grits can raise the grain for an even smoother final finish.
- Finishing: Ash burl takes finishes beautifully.
- Oil Finishes: Tung oil, linseed oil, or Danish oil soak into the wood, enhancing the grain and providing a natural, matte look. They are easy to apply and repair.
- Lacquer or Varnish: These create a more durable protective layer and can be applied with sprayers or brushes. Multiple thin coats are better than one thick one.
- Polyurethane: A very durable option, offering excellent protection against moisture and wear.
Tips for Success
- Sharp Tools are Key: I can’t stress this enough! Sharp tools make all the difference in getting clean cuts and avoiding tear-out.
- Go Slow: Don’t rush the process. Take your time, especially when cutting or shaping. Let the tool do the work.
- Understand Grain Direction: Even in a burl, there’s a general flow. Try to cut and sand with that flow as much as possible to minimize ragged edges.
- Embrace Imperfection: The beauty of burl is its natural, wild character. Don’t strive for perfect straightness; work with the wood’s natural twists and turns.
- Fill Small Checks: If you encounter small cracks (checks), you can often fill them with a wood filler or a mixture of wood glue and sawdust. For a more dramatic effect, you can intentionally fill them with epoxy, perhaps tinted to match or contrast the wood.
Projects for Ash Burl Wood
Ash burl is fantastic for projects that showcase its unique beauty. Here are some ideas for beginners:
- Small Bowls and Lidded Boxes: Perfect for woodturning, these projects highlight the swirling patterns.
- Pen Blanks: Turning a pen from ash burl makes for a unique and eye-catching writing instrument.
- Coasters: Simple and effective; sliced burl discs make beautiful, natural coasters.
- Decorative Inlays: Small pieces of burl can be used as accents or inlays in larger furniture pieces or cutting boards.
- Knife Handles or Small Tool Grips: The density and unique look make for comfortable and attractive handles.
- Ornamental Carvings: Small decorative items like wooden birds, abstract shapes, or Christmas ornaments can really pop with burl wood.
- Tabletop Accents: Even a small section of burl as the centerpiece of a tabletop can be stunning.
Maintenance and Care
Caring for ash burl items is much like caring for any fine hardwood furniture.
- Dust Regularly: Use a soft, dry cloth or a feather duster.
- Clean Spills Immediately: Wipe up any liquid spills with a slightly damp cloth and dry thoroughly.
- Avoid Harsh Chemicals: Stick to mild soap and water if necessary. Avoid abrasive cleaners or solvents.
- Protect from Heat and Moisture: Don’t place hot items directly on the surface. Avoid prolonged exposure to direct sunlight or extreme humidity changes, which can cause cracking or fading.
- Reapply Finish if Needed: Oil finishes may require occasional reapplication to maintain their luster and protection.

Frequently Asked Questions (FAQ)
Q1: Is ash burl wood hard to work with for beginners?
Ash burl can be more challenging than straight-grained wood due to its wild patterns, which can cause tear-out. However, with sharp tools, patience, and slower speeds, beginners can absolutely achieve beautiful results, especially on smaller projects like turnings or carvings.
Q2: How do I prevent ash burl from cracking?
Ensure the wood is properly dried before working with it. Store finished pieces in a stable environment, away from extreme temperature fluctuations or high humidity. For large projects, consider using strong glues and joinery, or even reinforcing with metal rods for stability.
Q3: What’s the best finish for ash burl?
Oil finishes like tung oil or Danish oil are excellent for highlighting the intricate grain and providing a natural look. However, durable finishes like polyurethane or lacquer offer more protection for high-use items. Always test your finish on a scrap piece first.
Q4: Why is ash burl so expensive?
Burls are a natural anomaly and not always abundant. They require careful harvesting, and the unique, often highly figured wood is scarce compared to regular lumber. The extra labor involved in milling and preparing burl wood also contributes to its higher cost.
Q5: Can I use ash burl for outdoor projects?
Generally, ash burl is best suited for indoor projects. While ash is a durable wood, the irregular grain in burls can be more susceptible to moisture damage, UV rays, and temperature fluctuations when exposed to the elements over time, leading to quicker degradation.
Q6: How do I identify ash burl wood?
Visually, ash burl is characterized by its dense, swirling, and often knotted grain patterns. It typically has a medium brown color, sometimes with lighter or darker streaks. It’s harder and denser than regular ash. You can also compare its visual characteristics to known samples of ash burl, as seen in pictures online or from reputable wood suppliers.