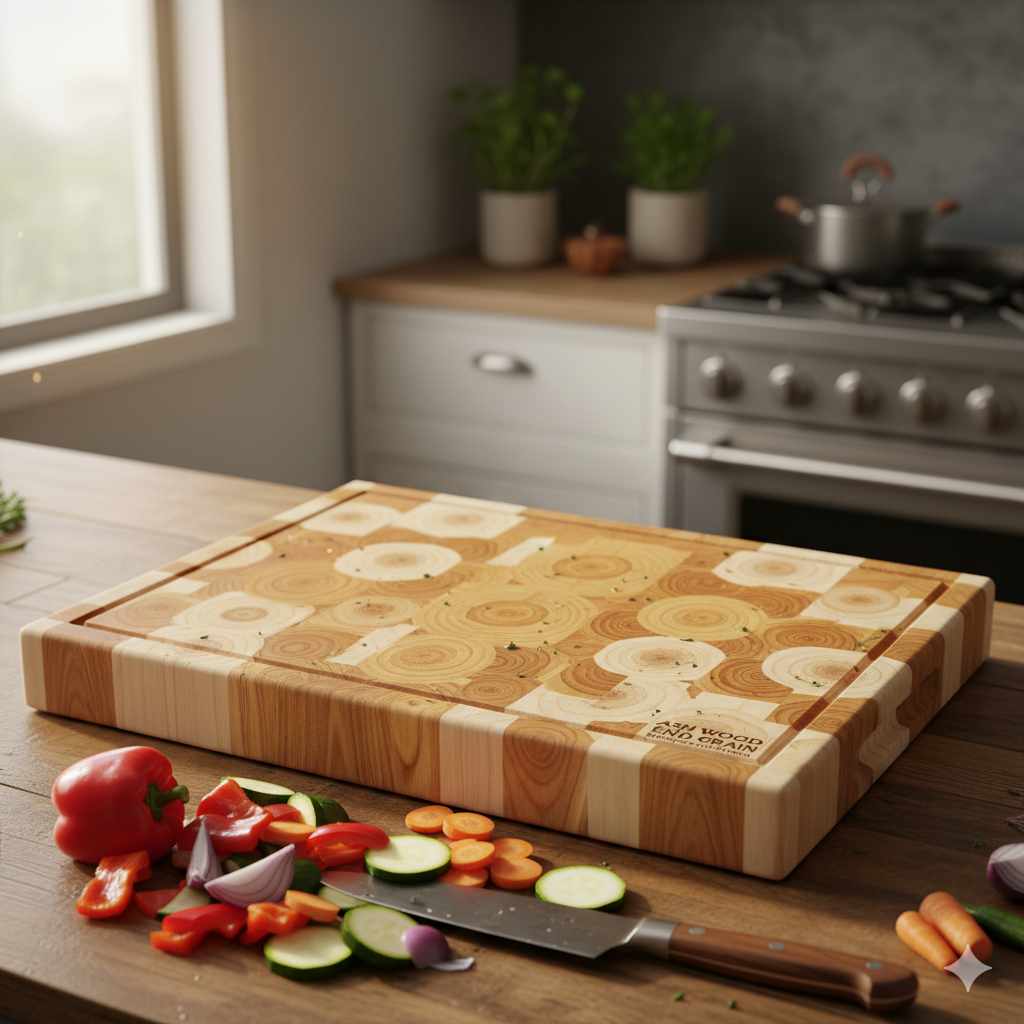
Ash Wood End Grain: Genius Cutting Board Essential
Ash wood end grain cutting boards offer superior durability and knife edge preservation due to their unique construction, making them a brilliant choice for any kitchen. This guide explains why and how to care for them.
Are you tired of cutting boards that dull your knives way too fast? Or maybe you’re just starting out in woodworking and want to build something useful and beautiful. You’ve probably seen those gorgeous cutting boards with the cool blocky patterns. They aren’t just for looks; they’re often made with end grain wood, and ash is a fantastic choice for this! It can seem a bit daunting, but understanding why these boards are so special is the first step. We’ll break down exactly what makes ash wood end grain cutting boards so brilliant and how you can keep yours inTip-top shape for years. Get ready to chop like a pro!
Why Ash Wood End Grain is a Cutting Board Superstar
When you think about a cutting board, you probably imagine a flat piece of wood. But there’s a special way to build them – the “end grain” method. This is where the magic happens, especially with a wood like ash. Let’s dive into why this combination is so sought after by home cooks and chefs alike.
Understanding End Grain Construction
Imagine a tree trunk. The grain runs up and down the trunk. When you cut a slice like a regular pancake, that’s “edge grain.” But for an end grain cutting board, we take pieces of wood and glue them together so the cut surfaces are facing upwards. Think of it like a checkerboard or a butcher block, but made from the ends of the wood grain. This creates thousands of tiny wood fibers on the surface. When you cut into it, your knife doesn’t slice through these fibers; instead, it gently parts them. These fibers then spring back into place once the knife is lifted. This self-healing property is what makes end grain boards so special and gentle on your knives.
The Marvels of Ash Wood
Ash wood is a hardwood known for its strength and resilience. It’s often used in everything from baseball bats to furniture because it can take a beating and last a long time. For cutting boards, ash offers:
- Durability: Ash is tough and can withstand the rigors of daily chopping without easily denting or scratching.
- Hardness: It has a good balance of hardness. It’s not so hard that it will instantly dull your knives (which can happen with extremely dense woods like jati or some exotic hardwoods), but it’s hard enough to be durable.
- Appearance: Ash typically has a beautiful, light-colored grain pattern that can range from creamy white to light brown, often with striking figure like “ray flecks” that add visual interest. This makes for a stunning cutting board.
- Workability: While strong, ash is generally manageable for woodworkers to cut, shape, and sand.
- Availability: Ash is a relatively common and accessible wood, which can make ash cutting boards more affordable compared to some exotic hardwoods.
The Synergy: Ash + End Grain = Cutting Board Perfection
When you combine the inherent strength and aesthetic appeal of ash with the knife-friendly, self-healing properties of end grain construction, you get a cutting board that is incredibly functional and beautiful. Here’s a quick look at the advantages:
| Feature | Benefit for Cutting Boards |
|---|---|
| End Grain Construction | Gentle on knife edges, self-healing surface, reduces visible scarring. |
| Ash Wood Properties | Durable, strong, attractive grain, good hardness balance for knives. |
| Combined Effect | A long-lasting, beautiful cutting board that preserves your knives and looks great in any kitchen. |
Benefits of an Ash Wood End Grain Cutting Board
Choosing an ash wood end grain cutting board isn’t just about having a good-looking kitchen accessory; it’s about investing in a tool that will serve you well for years. There are several key benefits that set these boards apart from their edge grain counterparts.
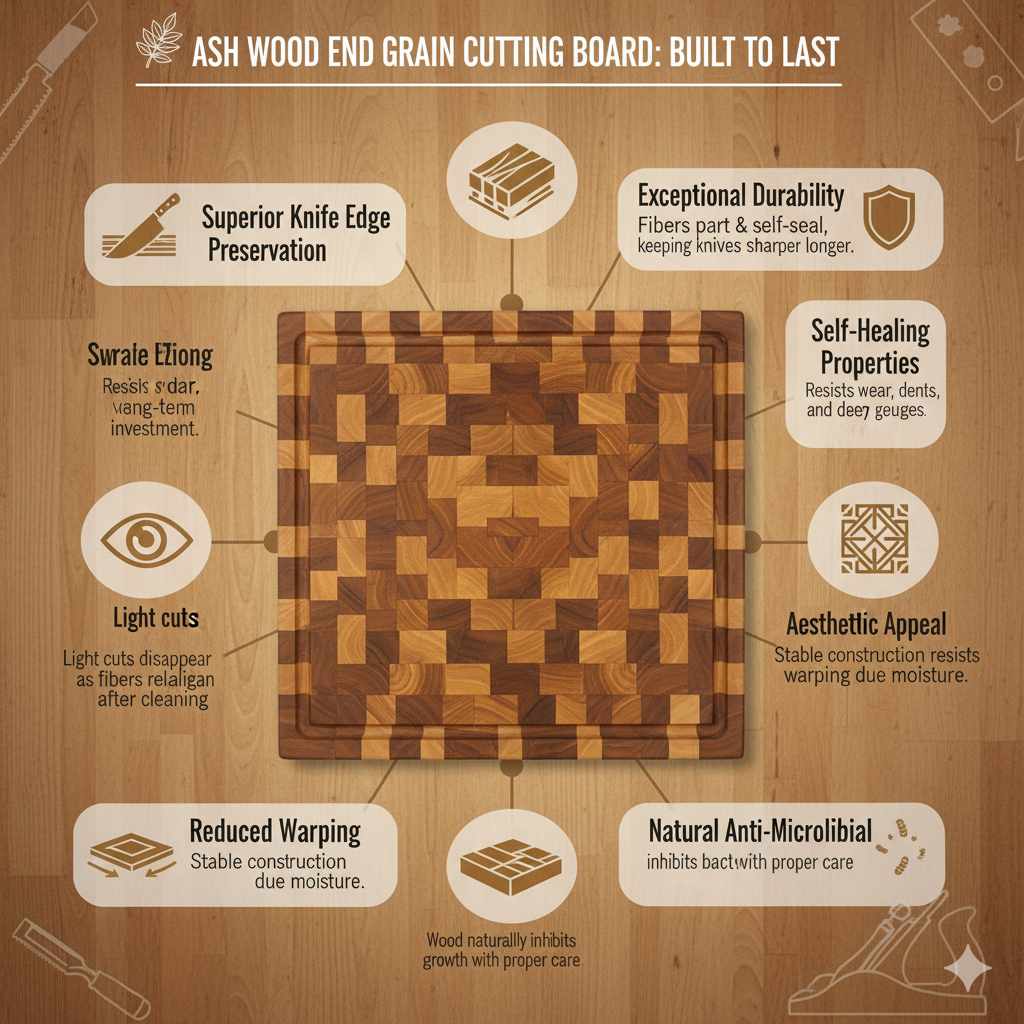
1. Superior Knife Edge Preservation
This is perhaps the most significant advantage of an end grain cutting board. As mentioned, the surface is comprised of thousands of wood fibers standing on end. When you slice an ingredient, your knife’s edge glides between these fibers. The fibers then momentarily separate and close back up around the blade. In contrast, an edge grain board has fibers running parallel to the cutting surface. Slicing on an edge grain board is more like cutting across bristles, which can dull your knife’s edge much faster. An ash end grain board will help keep your knives sharper for longer, meaning you’ll spend less time sharpening and more time enjoying your cooking.
2. Exceptional Durability and Longevity
Ash is a robust hardwood, making it naturally resistant to wear and tear. When used in an end grain configuration, this durability is amplified. While all wood cutting boards will show some signs of use over time, the end grain construction means that scratches and cuts are less likely to become permanent gouges. The fibers have a greater capacity to “absorb” the impact of the knife, and their ability to spring back helps to minimize visible marks. This makes an ash end grain board a true long-term investment for your kitchen.
3. Self-Healing Properties
The “self-healing” aspect of end grain boards is a fascinating benefit. While it doesn’t mean the board will magically erase deep knife cuts, it does mean that light to moderate scoring will largely disappear as the wood fibers realign themselves after washing and drying. This keeps the board looking cleaner and more pristine for longer, enhancing its aesthetic appeal and functionality.
4. Aesthetic Appeal
Ash wood has a lovely natural color and grain pattern. When you see an end grain cutting board made from ash, you typically see a beautiful mosaic of light and dark tones, often with repeating squares or patterns depending on how the wood was laid out during construction. This visually appealing design makes the board a statement piece that can enhance the look of any kitchen countertop. It’s a functional item that equally serves as a piece of art.
5. Reduced Risk of Warping and Cracking
Properly constructed end grain cutting boards, especially those made from well-seasoned wood following good woodworking practices like those outlined by the Woodworking Handbook’s safety tips, tend to be more stable than edge grain boards. The way the wood pieces are glued together in an end grain pattern, with alternating grain directions across different blocks, helps to distribute moisture movement more evenly. This inherent stability means they are less prone to warping, cupping, or cracking over time, provided they are cared for correctly.
6. Anti-Microbial Properties (with proper care)
Wood, in general, has natural anti-microbial properties. Studies have shown that bacteria placed on a wood surface tend to die off over time as they get trapped in the wood pores and die. While an ash end grain cutting board is still porous and requires proper cleaning and maintenance, its natural properties, combined with good hygiene practices, contribute to a safer food preparation surface than plastics, which can develop deep scratches that harbor bacteria.
Making Your Own Ash Wood End Grain Cutting Board (Beginner’s Overview)
If you’re feeling inspired and want to try your hand at making one, building an end grain cutting board is a rewarding project! While it requires some basic woodworking skills and tools, it’s absolutely achievable for a beginner. Here’s a simplified look at the process.
Essential Tools and Materials:
Before you begin, gather your supplies. Precision is key in end grain construction, so having the right tools makes all the difference!
- Ash Wood: You’ll need several pieces of kiln-dried ash lumber. Thickness can vary, but aim for at least 3/4 inch for each strip.
- Table Saw: For precise, straight cuts. A good quality blade is essential for clean cuts.
- Jointer (Optional but Recommended): For creating perfectly flat edges on your wood strips before gluing.
- Planer (Optional but Recommended): To ensure all strips are the exact same thickness.
- Clamps: Plenty of sturdy bar clamps or pipe clamps to hold the pieces securely while the glue dries.
- Wood Glue: A high-quality, waterproof wood glue like Titebond III is recommended for cutting boards.
- Sandpaper: A range of grits from 80 up to 220 or even 320.
- Orbital Sander or Sanding Block: For efficient sanding.
- Router (Optional): For rounding edges or cutting a juice groove.
- Mineral Oil or Food-Grade Cutting Board Conditioner: For finishing.
- Safety Gear: Safety glasses are a must. Dust mask and hearing protection are also highly recommended.
Step-by-Step Process (Simplified):
This is a high-level overview. Each step involves careful execution and attention to detail.
- Prepare the Wood Strips: Cut your ash lumber into uniform strips. For a typical end grain pattern, you’ll be gluing these strips together on their long edges to create a panel, and then cutting that panel into new strips to glue together on their ends. The critical part is ensuring all strips are identical in width and thickness. If you don’t have a jointer and planer, you’ll rely heavily on a sharp table saw blade.
- First Glue-Up: Arrange your strips side-by-side to form your desired width. Apply a generous amount of wood glue to the mating edges. Use your clamps to tightly press all the strips together. Ensure the top and bottom surfaces are as flat as possible. Let the glue cure completely (usually 24 hours).
- Flatten and Cut: Once the glue is dry, you’ll have a solid panel. The goal now is to make this panel perfectly flat and square. If you have a planer, run the panel through it. If not, you’ll need to do a lot of careful sanding or use a router with a jig to flatten it. Once flat, you’ll send it back through the table saw to cut thin strips from this panel. You are now cutting across the grain of the glued strips.
- Second Glue-Up: Take these new, thinner strips and arrange them side-by-side again, but this time the cut ends are facing UP. Apply glue to their long edges and clamp them tightly together. Ensure the surface is flat. This is where your end grain board begins to take shape!
- Final Flattening and Sanding: After the glue cures, the board will likely be uneven. Carefully flatten the surface using a planer, router jig, or extensive sanding. Transition through increasingly finer grits of sandpaper (e.g., 80, 120, 180, 220) to achieve a smooth finish.
- Edge Finishing (Optional): You can use a router with a roundover bit to soften the edges and corners, making the board more comfortable to handle and less prone to chipping. You can also add a juice groove with a router if desired.
- Conditioning and Finishing: The final step is to “condition” the wood. Apply a generous coat of food-grade mineral oil. Let it soak in, then wipe off any excess. Reapply oil multiple times until the wood no longer absorbs it. You can then apply a cutting board conditioner (often a blend of mineral oil and beeswax) for extra protection and a nice sheen.
Building an end grain board is a project that truly teaches precision and patience. For more detailed plans and techniques, resources like This Old House offer excellent step-by-step guides designed for homeowners.
Caring for Your Ash Wood End Grain Cutting Board
You’ve invested in a beautiful and functional ash wood end grain cutting board, whether you made it yourself or bought a high-quality one. To ensure it serves you well for decades, proper care is essential. Think of it as nurturing a loyal kitchen companion!
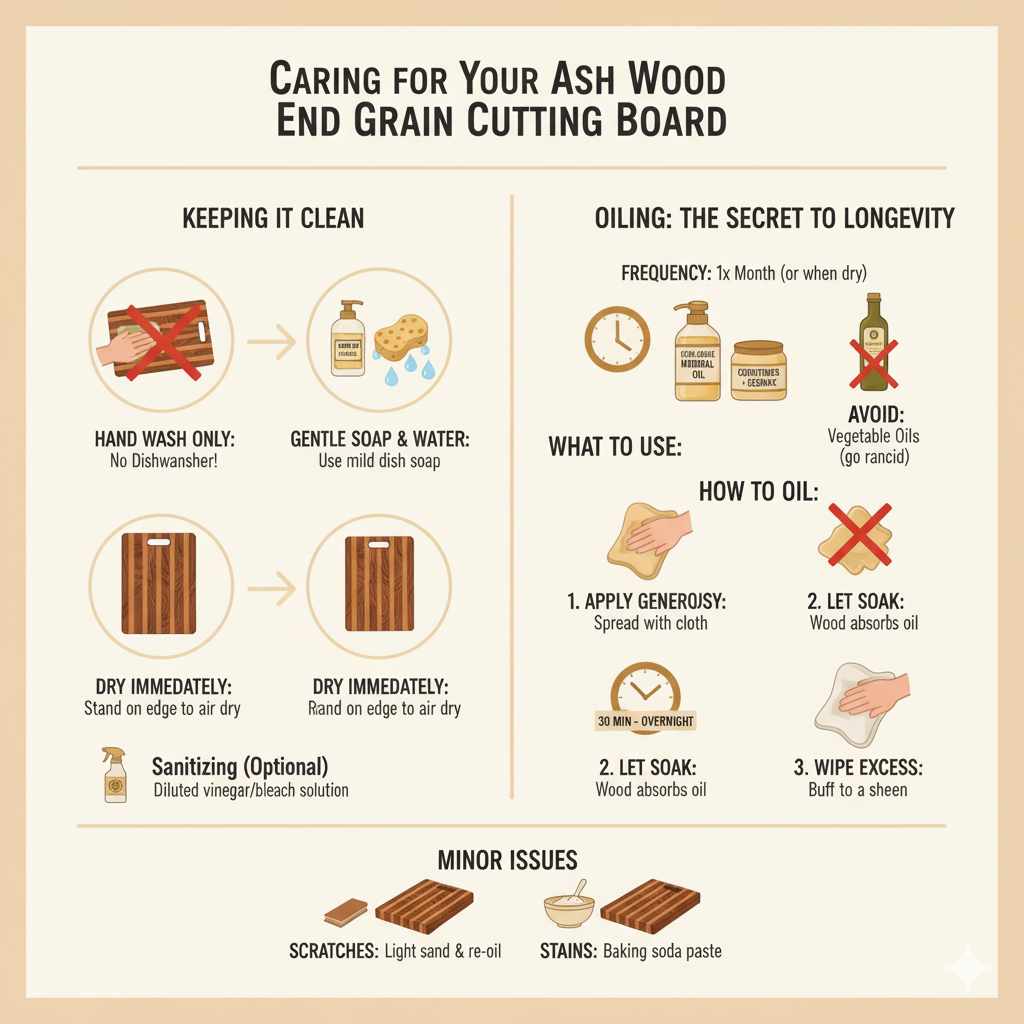
Keeping it Clean:
Cleaning your cutting board is simple but needs to be done with care. Always remember:
- Hand Wash Only: Never put your wood cutting board in the dishwasher. The intense heat and prolonged exposure to water will cause it to warp, crack, and split.
- Gentle Soap and Water: Use warm water and a mild dish soap. Wipe the board clean with a soft sponge or cloth.
- Rinse Thoroughly: Make sure to rinse off all soap residue.
- Dry Immediately: This is crucial! After washing, use a clean, dry towel to wipe off as much moisture as possible. Stand the board on its edge to allow air to circulate around all sides. Avoid laying it flat, as this can trap moisture and lead to warping.
- Sanitizing (Optional): For extra sanitization, especially after cutting raw meat, you can wipe the board down with a diluted vinegar solution (50/50 white vinegar and water) or a mild bleach solution (1 teaspoon bleach per quart of water), then rinse and dry thoroughly. Always follow up with a good oiling.
Oiling: The Secret to Longevity
Oiling is the most important part of maintaining your wood cutting board. It replenishes the wood’s natural oils, keeps it from drying out and cracking, and helps to repel water and stains.
- Frequency: You should oil your board at least once a month, or more often if it looks dry, feels rough, or after deep cleaning/sanitizing. Areas with low humidity or frequent washing will require more frequent oiling.
- What to Use:
- Food-Grade Mineral Oil: This is readily available at drugstores and supermarkets. It’s inexpensive, food-safe, and won’t go rancid. This is your best bet for regular maintenance.
- Cutting Board Conditioner: Many brands offer a mix of mineral oil and beeswax. The beeswax adds an extra layer of water protection and a smoother feel.
- Avoid: Do NOT use vegetable oils like olive oil, canola oil, or corn oil. These can go rancid over time, leaving your board smelling unpleasant and potentially fostering bacteria. Also, avoid tung oil or linseed oil unless they are specifically labeled as “food grade” and polymerized, as raw forms can be toxic.
- How to Oil:
- Ensure the board is clean and completely dry.
- Apply a generous amount of oil directly to the surface of the board.
- Use a clean cloth or paper towel to spread the oil evenly over all surfaces – top, bottom, and sides. Don’t forget the edges!
- Let the oil soak into the wood for at least 30 minutes, or ideally, overnight. You’ll see the wood absorb the oil; reapply if it looks dry in spots.
- Wipe off any excess oil with a clean cloth. Buff lightly to a nice sheen.
Dealing with Minor Issues:
- Minor Scratches: For light scratches, vigorous oiling can sometimes help them disappear. If they persist, you can try a very light sanding with 220-grit sandpaper, followed by re-oiling.
- Stains: For stubborn stains, a paste of baking soda and water can sometimes help lift them. Apply the paste, let it sit for a few minutes, then rinse and dry thoroughly before oiling.
By following these simple steps, you’ll keep your ash wood end grain cutting board looking and performing beautifully, ready for countless culinary adventures. Proper care preserves the wood’s integrity and its knife-friendly surface, making it a joy to use day after day.
Ash Wood End Grain Cutting Board: A Wise Kitchen Investment
In the world of kitchen tools, a cutting board is fundamental. When considering materials and construction, the ash wood end grain cutting board stands out as an exceptional choice for both the novice home cook and the seasoned chef. Its unique properties offer a blend of durability, knife-friendliness, and aesthetic beauty that is hard to match.
The end grain construction is the key to its superior performance. By orienting the wood fibers vertically, the board can “give” slightly when a knife passes through it, allowing the fibers to close back up. This gentle action minimizes dulling and scoring, keeping your knives sharp and your board looking better for longer. Combined with the natural resilience and attractive grain of ash, you get a cutting surface that is both highly functional and a pleasure to look at. This makes it a significant upgrade from basic edge grain or plastic boards, which can quickly damage knife edges and show wear.
For those who love woodworking or are looking for a challenging yet rewarding project, building your own ash end grain cutting board is a fantastic endeavor. It hones skills in precision cutting, gluing, and finishing, and results in a highly personalized, heirloom-quality piece. While it requires dedication and specific tools, the satisfaction of creating such a robust and useful item is immense.