Best Exterior Wood Glue for Cedar Projects
Finding the Best Exterior Wood Glue for Cedar Projects can feel tricky, especially when you’re just starting out. Cedar is a beautiful wood, but it can be a little bit different to work with than other types. You want a glue that holds strong outside, no matter the weather.
Don’t worry, we’ll make it simple. We’ll walk through exactly what you need to know so your cedar projects last.
Choosing the Best Exterior Wood Glue for Cedar
Selecting the right adhesive is vital for any outdoor woodworking project, especially those using cedar. Cedar, known for its natural beauty and resistance to decay, requires specific glues that can withstand the elements while providing a strong, lasting bond. This section explores the key factors that make a wood glue ideal for cedar and outdoor use.
We’ll look at what properties to seek and why certain glues perform better than others in damp or exposed conditions.
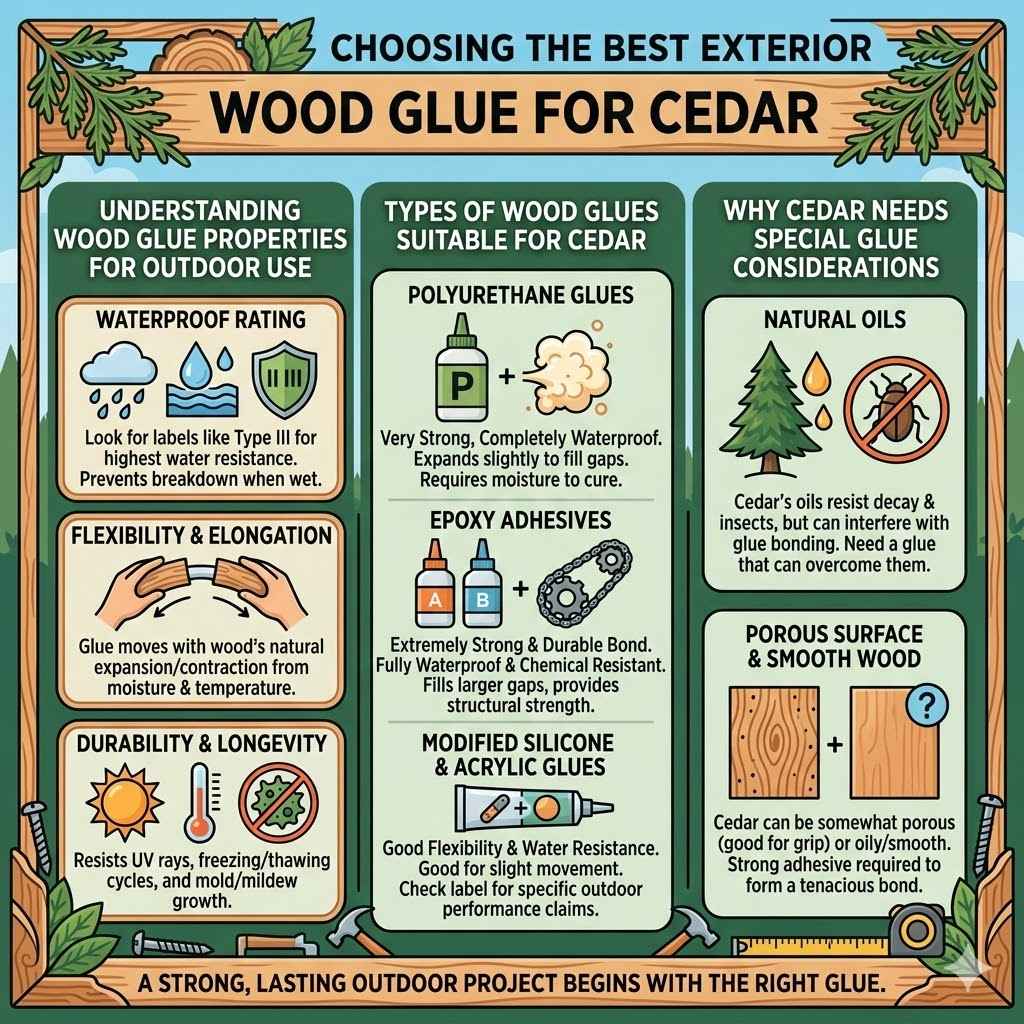
Understanding Wood Glue Properties for Outdoor Use
Wood glues come in many types, but for outdoor projects, water resistance is the most important feature. This means the glue won’t break down when it gets wet from rain or dew. It needs to keep holding your project together, even when the weather changes.
Temperature changes also play a role. A good outdoor glue can handle freezing and thawing cycles without becoming brittle or losing its grip. The wood itself expands and contracts with moisture and temperature.
The glue needs to be flexible enough to move with the wood, rather than crack or pull apart.
- Waterproof Rating: Look for glues labeled as waterproof or water-resistant. These are designed to hold up to direct water exposure. Some might have ratings like Type II or Type III. Type III glues offer the highest level of water resistance. They are ideal for items that will be completely exposed to the weather.
- Flexibility and Elongation: The best glues can stretch a bit. This is important because wood expands and contracts. A flexible glue moves with the wood instead of breaking. This prevents joints from failing over time due to these natural movements.
- Durability and Longevity: Outdoor glues must last for many years. They should resist UV rays from the sun, which can degrade some glues. They also need to resist mold and mildew growth. A durable bond ensures your project stays strong.
Types of Wood Glues Suitable for Cedar
When it comes to outdoor woodworking with cedar, a few types of glues stand out for their performance and reliability. These adhesives are formulated to handle moisture, temperature swings, and the general rigors of outdoor exposure. Understanding their characteristics helps you pick the perfect one for your needs.
- Polyurethane Glues: These glues are very strong and completely waterproof. They work well on many wood types, including cedar. Polyurethane glues expand slightly as they cure, which helps fill small gaps. This can be helpful if your wood isn’t perfectly joined. They require moisture to cure, so lightly dampening the wood can speed up the process.
- Epoxy Adhesives: Epoxies are a two-part system that creates an extremely strong and durable bond. They are fully waterproof and resistant to chemicals. Epoxies can also fill larger gaps and provide structural strength. They are a great choice for high-stress joints or repairs.
- Modified Silicone and Acrylic Glues: Some newer glues combine properties of different materials to offer good flexibility and water resistance. These can be a good option for projects where slight movement is expected. Always check the product label for specific outdoor performance claims.
Why Cedar Needs Special Glue Considerations
Cedar is a softwood, but it has natural oils that can sometimes affect how glues bond. These oils make cedar resistant to insects and rot. However, they can also make it harder for some adhesives to get a good grip.
This means you need a glue that can penetrate or adhere well despite these natural oils.
Also, cedar often has a somewhat porous surface, especially if it’s been planed. This can be good for glue adhesion, as it gives the glue something to grip. But if the wood is very smooth or oily, a stronger adhesive is necessary.
The best glues for cedar are those that can overcome the natural oils and form a tenacious bond. They also need to be tough enough to handle the expansion and contraction of the wood.
Popular and Effective Wood Glues for Cedar Projects
Several excellent wood glues are widely recognized for their superior performance on cedar and in outdoor settings. These products have earned the trust of woodworkers due to their strength, durability, and water resistance. We will explore some of the top contenders, highlighting why they are a good choice for your next cedar project.
This overview aims to simplify your decision-making process by presenting reliable options.
Titebond III Ultimate Wood Glue
Titebond III is a very popular choice for outdoor projects. It is a waterproof glue, meaning it can handle rain and moisture without failing. This makes it perfect for cedar fence posts, garden benches, or anything else that lives outside.
It creates a strong bond that can withstand temperature changes.
One of the best things about Titebond III is that it’s easy to use. It cleans up with water when wet, which is a big plus. It also has a longer open time than some other glues, meaning you have more time to put your pieces together correctly.
This is great for beginners who might need a little extra time.
- Waterproof Performance: This glue is rated as waterproof, meaning it can endure direct water contact for extended periods. It is a Type I waterproof glue, offering the highest level of water resistance available in wood glues. This ensures your cedar projects will remain structurally sound even when exposed to heavy rain or damp conditions.
- Strong Bonding: Titebond III creates a very strong bond that resists yellowing and is sandable once dry. It offers excellent strength for structural joints and is suitable for use on a wide range of wood types. Its strong adhesion properties are particularly beneficial for cedar.
- Ease of Use and Cleanup: The glue is non-toxic and cleans up with water while wet. This simplifies the building process and makes maintenance much easier. Its longer open time provides flexibility for assembly, reducing the risk of errors for novice builders.
Gorilla Glue Original
Gorilla Glue is known for its incredible strength and versatility. The original formula is a polyurethane glue that is completely waterproof. It expands as it dries, filling in small gaps and creating a super strong bond.
This is great for outdoor projects where a perfect fit might not always be possible.
This glue works on wood, stone, metal, ceramic, and more. For wood, it’s excellent for cedar. It’s important to note that it needs a little moisture to activate, so you might want to lightly mist the wood surfaces before applying it.
It can be a bit messy if not used carefully, but its holding power is unmatched.
- 100% Waterproof and Weatherproof: Gorilla Glue Original is designed to withstand extreme conditions. It is unaffected by rain, snow, heat, and cold, making it ideal for any outdoor cedar application. Its performance is trusted in harsh environments.
- Gap Filling Properties: The glue expands to fill gaps and irregularities in the wood surface. This characteristic ensures a robust bond even if the mating surfaces are not perfectly flat or aligned. It compensates for slight imperfections in woodworking.
- Long-Lasting Bond: Once cured, Gorilla Glue forms a very strong and durable bond that resists cracking and degradation. Its tenacity means your cedar projects will stand up to the test of time and weather. This makes it a reliable choice for critical joints.
Loctite PL Premium Polyurethane Adhesive
Loctite PL Premium is another strong contender for outdoor wood projects. It’s a high-performance polyurethane adhesive that is completely waterproof. It bonds very well to wood, including cedar, and creates a flexible yet durable bond.
This flexibility is key for outdoor projects that experience temperature changes and wood movement.
This adhesive is known for its strength and long-term performance. It’s often used in construction for its reliability. For cedar projects, it provides a secure bond that will last for years, resisting the elements and keeping your project together.
It’s a professional-grade adhesive that delivers professional results.
- Exceptional Strength and Durability: This adhesive is formulated for heavy-duty applications and provides a bond that is stronger than many wood glues. It is designed to withstand significant stress and shear forces. This makes it ideal for structural connections in outdoor cedar work.
- Waterproof and Weather Resistant: Loctite PL Premium is completely waterproof and formulated to withstand extreme temperatures, humidity, and UV exposure. It maintains its integrity and bonding power in challenging outdoor environments, ensuring lasting results for your projects.
- Versatile Application: While excellent for wood, this adhesive also bonds to many other construction materials like concrete, brick, and metal. This versatility can be advantageous if your cedar project involves integrating different materials. It simplifies the need for multiple adhesives.
| Glue Brand | Type | Waterproof | Flexibility | Gap Filling | Ease of Use |
|---|---|---|---|---|---|
| Titebond III | Waterproof PVA | Yes | Moderate | Minor | High (Water cleanup) |
| Gorilla Glue Original | Polyurethane | Yes | High | Good | Moderate (Requires moisture) |
| Loctite PL Premium | Polyurethane | Yes | High | Excellent | Moderate |
How to Properly Apply Wood Glue to Cedar for Outdoor Projects
Getting the application right is just as important as choosing the best glue. Proper technique ensures a strong, lasting bond that will withstand the weather. We’ll cover everything from preparing the wood to clamping the joints for a secure hold.
Following these steps will help make your cedar projects durable and beautiful for years to come.
Preparing the Cedar Surfaces
Before you apply any glue, it’s crucial to prepare the cedar surfaces properly. This ensures the glue can create the strongest possible bond. Cleanliness is key here.
Any dirt, dust, or old finish can prevent the glue from sticking well.
For new cedar, it’s usually best to lightly sand the surfaces that will be glued. A medium-grit sandpaper, like 120 or 150 grit, is usually sufficient. This roughens the surface just enough to give the glue something to grip onto.
Avoid overly smooth surfaces. After sanding, wipe away all dust with a clean cloth. A tack cloth works very well for this.
- Cleanliness is Paramount: Always start with clean surfaces. Remove any sawdust, dirt, grease, or old finishes. For new cedar, a thorough wipe-down with a damp cloth (followed by drying) is often enough. For older projects, more aggressive cleaning might be needed.
- Light Sanding: Lightly sand the areas to be glued with medium-grit sandpaper (120-150 grit). This creates a better surface for the adhesive to adhere to. It breaks down any natural oils on the surface. Make sure to sand with the grain of the wood.
- Proper Surface Texture: Avoid making the surface too smooth. Cedar can be oily, and a slight texture helps the glue penetrate and bond securely. The goal is a surface that the glue can easily grab.
- Moisture Check: Some polyurethane glues require a slightly damp surface to cure properly. Check the glue manufacturer’s instructions. If needed, lightly mist the surfaces with water before applying the glue. For PVA glues like Titebond III, this is generally not necessary.
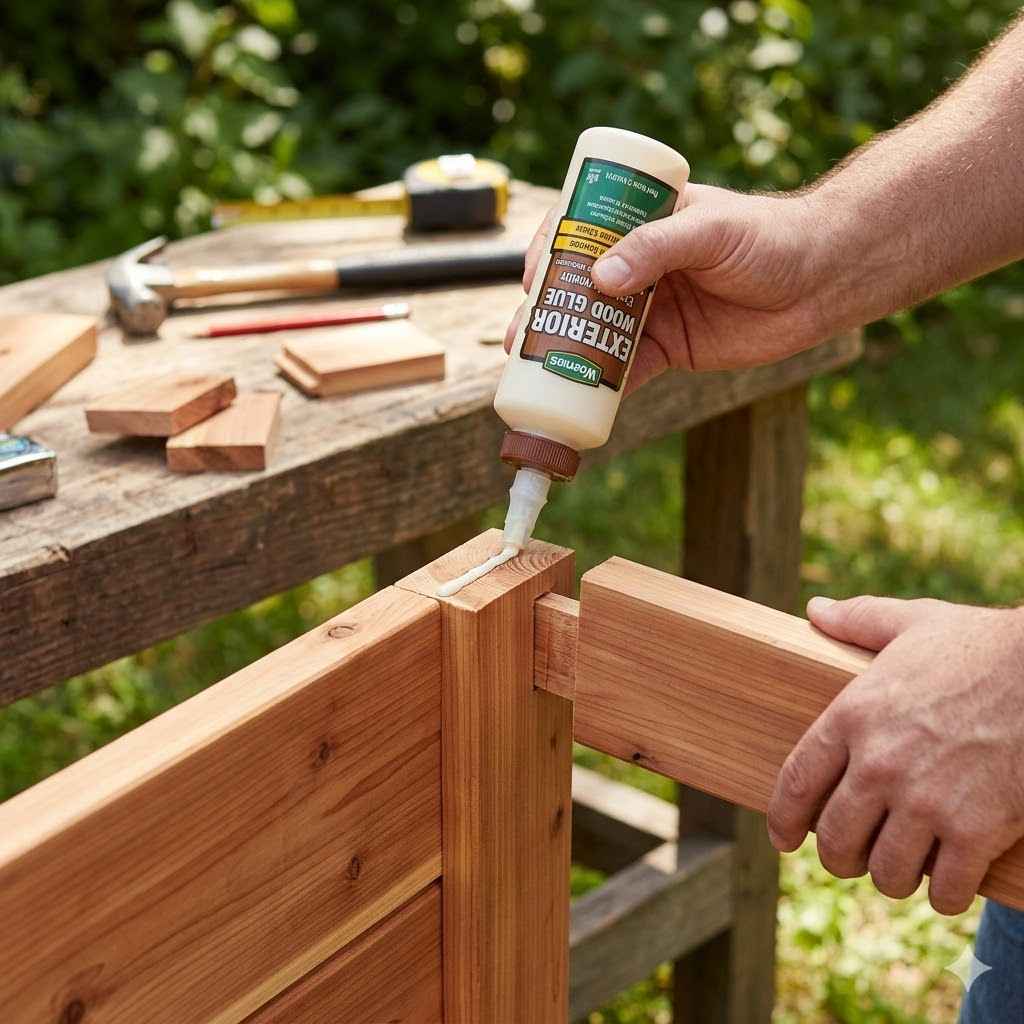
Applying the Adhesive
When applying the glue, a little goes a long way. You want an even coat, not too thick and not too thin. Too much glue can squeeze out and make a mess.
Too little glue means weak spots and a bond that might fail.
For most glues, applying a bead about the thickness of a pencil lead along the edge is usually about right. If you are joining two large surfaces, you might spread it with a small roller or brush. Make sure the glue covers the entire surface where the pieces will meet.
- Even Application: Apply a consistent bead of glue along the mating surfaces. The thickness of the bead should be around 1/16 to 1/8 inch. Aim to cover about 80-90% of the surface area.
- Spreading the Glue: For larger surface areas, use a small brush, roller, or a notched trowel to spread the glue evenly. This ensures uniform contact and a strong bond across the entire joint.
- Avoid Overtly Thick Coats: Applying too much glue can cause excessive squeeze-out, which can be difficult to clean up and may even weaken the bond in some cases. It also wastes product.
- Work Quickly but Carefully: Most glues have an “open time,” which is the window during which you can join the pieces. Work efficiently to get the joint assembled within this time frame.
Clamping Techniques for Strong Joints
Clamping is absolutely essential for a strong glue joint. Clamps hold the pieces tightly together while the glue dries. This ensures maximum contact between the wood surfaces and prevents movement.
Without proper clamping, your glue bond will be weak, no matter how good the glue is.
You need enough clamps to apply even pressure along the entire length of the joint. The goal is to press the wood pieces together firmly, but not so hard that you crush the wood fibers. You should see a small amount of glue squeeze out along the joint.
This is a good sign that you have used enough glue and have applied enough pressure.
- Sufficient Clamping Pressure: Apply enough clamps to distribute pressure evenly along the entire length of the joint. The wood should be held firmly together, but not so tight that you crush the wood fibers. A good indicator is seeing a small bead of glue squeeze out along the seam.
- Use Appropriate Clamps: C-clamps, bar clamps, or pipe clamps are common choices. For larger projects, consider using straps or band clamps to ensure even pressure around curved or irregular shapes.
- Protect the Wood Surface: Place scrap wood pieces between the clamp jaws and the project surface. This prevents the clamps from denting or marring the cedar.
- Drying Time: Leave the clamps on for the full recommended drying time specified by the glue manufacturer. This is typically at least 30 minutes for Titebond III, but can be longer for other glues, especially in cooler temperatures. For full strength, allow 24 hours.
Dealing with Squeeze-Out
When you clamp the pieces together, some glue will likely squeeze out of the joint. This is a good thing, as it means you have enough glue and have clamped them tightly. The trick is to deal with this squeeze-out properly.
If you leave it to dry completely, it can be very hard to remove.
If you are using a water-based glue like Titebond III, you can simply wipe away the fresh squeeze-out with a damp cloth. For polyurethane glues like Gorilla Glue, you often need to let the squeeze-out dry a bit. Once it’s partially cured and rubbery, you can often peel or cut it away cleanly.
- Water-Based Glue Squeeze-Out: For glues like Titebond III, gently wipe away fresh squeeze-out with a damp cloth. Avoid smearing it. A slightly damp cloth works best to remove the excess without pushing it into the wood grain.
- Polyurethane Glue Squeeze-Out: For polyurethane glues, let the squeeze-out become rubbery and semi-hardened. You can then carefully trim it away with a sharp chisel or utility knife. Sometimes it can be peeled off with your fingers.
- Leave It Alone Sometimes: In some cases, if the squeeze-out is minimal and not in a highly visible area, you might choose to leave it. Once fully cured, it can often be scraped or sanded away. However, prompt cleanup usually yields the best results.
- Don’t Force It: If the squeeze-out is difficult to remove, don’t force it. You could damage the wood. It’s better to wait for it to dry further or carefully scrape it.
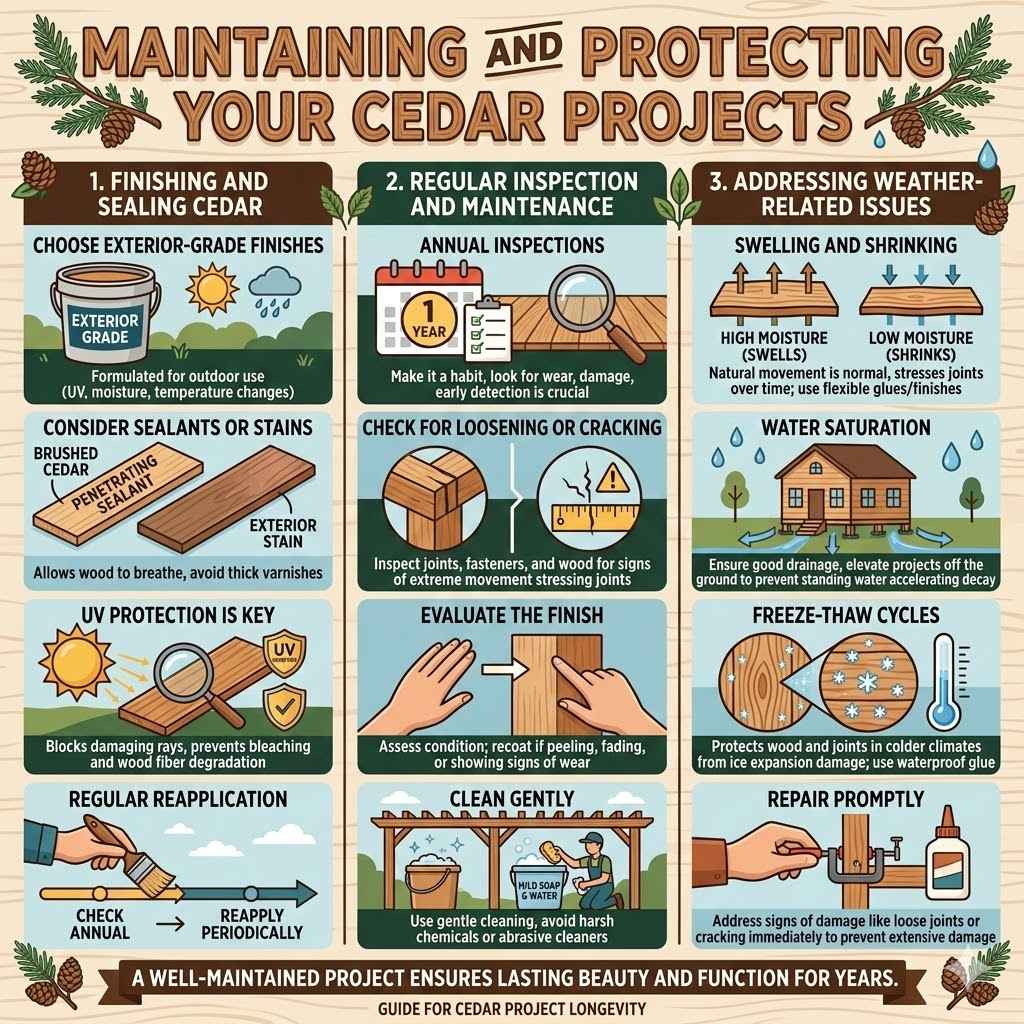
Maintaining and Protecting Your Cedar Projects
Once your cedar project is built with a strong glue bond, taking steps to protect it will ensure it lasts even longer. Outdoor projects face constant challenges from the sun, rain, and temperature changes. Proper maintenance will keep your project looking good and functioning well for many years.
Finishing and Sealing Cedar
Cedar has natural oils that make it resistant to rot and insects. However, these oils can also react with some finishes. It’s important to choose a finish that works well with cedar and provides good protection against UV rays and moisture.
A good finish will also help the glue joints remain strong by protecting the wood from excessive drying and cracking.
For outdoor projects, a good quality exterior-grade sealant or stain is usually recommended. These products penetrate the wood and offer protection from the elements. Look for products that are specifically recommended for cedar.
Some finishes might require specific application methods due to the natural oils in cedar.
- Choose Exterior-Grade Finishes: Always use finishes specifically designed for outdoor use. These products are formulated to withstand UV radiation, moisture, and temperature fluctuations. They will help protect the wood and the glue joints.
- Consider Sealants or Stains: Penetrating sealants or exterior stains are often a good choice for cedar. They allow the wood to breathe while providing protection. Avoid film-forming finishes like thick varnishes, which can sometimes peel or crack on outdoor wood.
- UV Protection is Key: Look for finishes that contain UV inhibitors. These chemicals help block the sun’s damaging rays, which can bleach the cedar and degrade the wood fibers over time.
- Regular Reapplication: Exterior finishes need to be reapplied periodically. The frequency depends on the product used and the exposure the project receives. Checking the finish annually is a good practice.
Regular Inspection and Maintenance
Even with the best glue and finishes, regular checks are a good idea. Look for any signs of wear, damage, or loosening. Catching small problems early can prevent them from becoming big issues.
This is especially true for structural elements like decks, fences, or pergolas.
Periodically inspect all the joints and connections. Check for any visible gaps, cracks, or signs of the glue failing. Also, look at the finish.
If it appears faded, chipped, or worn, it’s time to reapply. Cleaning your project regularly will also help prevent mildew and dirt buildup, which can eventually damage the wood.
- Annual Inspections: Make it a habit to inspect your cedar projects at least once a year. Look closely at all the glued joints, fasteners, and the condition of the finish. Early detection of issues is crucial.
- Check for Loosening or Cracking: Pay attention to any joints that seem loose or any wood that appears to be cracking. While the glue should be strong, extreme wood movement can sometimes stress joints.
- Evaluate the Finish: Assess the condition of the protective finish. If it’s peeling, fading, or showing signs of wear, it’s time to recoat. A fresh coat of finish can significantly extend the life of your project.
- Clean Gently: Clean your cedar projects gently with mild soap and water. Avoid harsh chemicals or abrasive cleaners that could damage the wood or the finish. Keeping it clean prevents long-term damage.
Addressing Weather-Related Issues
Cedar is naturally durable, but extreme weather can still take a toll. Heavy rain can saturate the wood, causing it to swell. Prolonged dry spells can cause it to shrink and crack.
These changes can put stress on glue joints.
If you notice any issues related to weather, address them promptly. For example, if a joint shows signs of loosening, you might need to re-glue it. If the wood is cracking, a good sealant can help prevent further damage.
Proper maintenance helps the project adapt to changing weather conditions.
- Swelling and Shrinking: Cedar will absorb moisture and swell, and then dry out and shrink. This natural movement is normal, but it can stress joints over time. Using flexible glues and finishes can help mitigate this.
- Water Saturation: If your project is frequently saturated with water, ensure good drainage. Standing water can accelerate wood decay and stress glue bonds. Consider elevating projects off the ground.
- Freeze-Thaw Cycles: In colder climates, the expansion and contraction of ice within wood fibers can cause damage. A waterproof glue and a good finish help protect against this.
- Repair Promptly: If you see any signs of weather damage, such as loose joints or significant cracking, repair them as soon as possible. Prompt action can prevent more extensive damage later.
Frequently Asked Questions
Question: What is the best wood glue for outdoor cedar furniture
Answer: For outdoor cedar furniture, Titebond III Ultimate Wood Glue, Gorilla Glue Original, and Loctite PL Premium Polyurethane Adhesive are excellent choices because they are waterproof and create very strong, durable bonds that can withstand outdoor conditions.
Question: Do I need special glue for cedar decks
Answer: Yes, for cedar decks, you need a waterproof exterior wood glue. This ensures the glue can withstand rain, moisture, and temperature changes without breaking down, keeping the deck boards securely attached.
Question: Can I use regular wood glue for exterior cedar projects
Answer: No, regular indoor wood glue is not suitable for exterior cedar projects. It is not designed to be waterproof and will break down when exposed to moisture, leading to joint failure.
Question: How long does exterior wood glue take to cure on cedar
Answer: The curing time varies by glue type. Titebond III typically requires about 30 minutes of clamping time and 24 hours for full cure. Polyurethane glues like Gorilla Glue also need about 24 hours for full strength, though clamping time might be similar or slightly longer.
Question: Will the natural oils in cedar affect the glue
Answer: Yes, the natural oils in cedar can sometimes affect glue adhesion. It’s important to use glues formulated for exterior use that can bond well with oily woods, and to ensure surfaces are clean and lightly prepped for best results.
Summary
Choosing the Best Exterior Wood Glue for Cedar Projects requires looking for waterproof and durable options. We covered top glues like Titebond III, Gorilla Glue Original, and Loctite PL Premium, explaining their strengths. Proper surface preparation, careful application, and secure clamping are key to a lasting bond.
Protecting your finished cedar projects with appropriate finishes and regular checks will ensure they stand up to the elements beautifully.