Best Sherwin-Williams Wood Stain Colors Guide
Choosing the right wood stain can feel like a puzzle, especially when there are so many beautiful Sherwin-Williams options. It’s easy to get overwhelmed trying to find the perfect shade for your project. This guide is here to make that simple and fun.
We’ll walk you through everything step-by-step, showing you how to pick the Best Sherwin-Williams Wood Stain Colors Guide for your home. Get ready to see your wood projects shine!
Finding Your Perfect Sherwin-Williams Wood Stain
Selecting the ideal wood stain color can transform a plain piece of wood into a stunning focal point. Sherwin-Williams offers a wide array of stains, each with its own character and appeal. This section helps you understand the different types of stains and how to match them to your home’s style and existing decor.
We’ll explore the nuances of light, medium, and dark tones, and how they affect the overall look and feel of your space. Think about the mood you want to create, whether it’s cozy and warm or bright and airy.
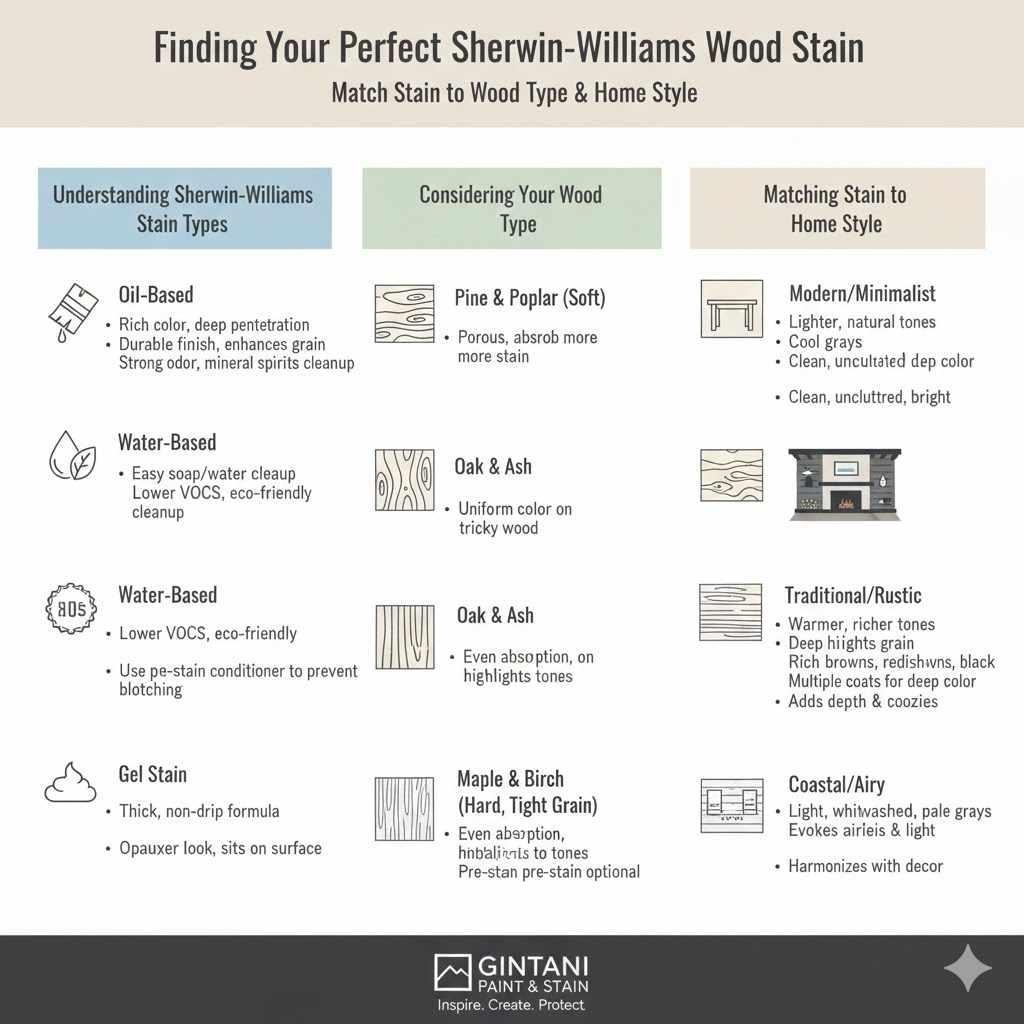
Understanding Sherwin-Williams Stain Types
Sherwin-Williams offers a variety of wood stain formulations, each designed for specific applications and aesthetic outcomes. Oil-based stains are known for their deep penetration and rich color, providing a durable finish that enhances the natural grain of the wood. They often require mineral spirits for cleanup and can have a strong odor.
Water-based stains, on the other hand, are easier to clean up with soap and water and generally have lower VOCs (Volatile Organic Compounds), making them a more environmentally friendly option. Gel stains offer a thicker consistency, which makes them excellent for achieving a more uniform color on challenging wood surfaces or for creating a more opaque look. They sit more on the surface of the wood rather than soaking deep into the grain.
The choice between these types often depends on the wood species, the desired level of coverage, and your personal preference for application and cleanup. For instance, if you’re working with a soft wood that might blotch, a gel stain might be a safer bet to control the saturation. If you want to highlight the intricate patterns within a hardwood like oak or walnut, a penetrating oil-based stain might be your best choice.
Considering Your Wood Type
Different wood species absorb stain differently, which can significantly alter the final color. Porous woods like pine and poplar tend to absorb more stain, resulting in a darker, richer hue. This can be great if you’re aiming for a deep, dramatic look, but it can also lead to blotchiness if not prepared correctly.
Hardwoods such as oak, maple, and cherry have a tighter grain structure. They absorb stain more evenly, but the final color might appear lighter than on a porous wood.
To achieve consistent color on softer or more absorbent woods, many professionals use a pre-stain wood conditioner. This product evens out the porosity of the wood, allowing the stain to penetrate more uniformly. Without it, you might end up with dark patches on one part of the wood and light spots on another, which can be difficult to fix.
- Pine and Poplar
These softwoods are known for their prominent grain patterns and open pores. They readily soak up stain, which means colors will appear darker and more intense. Be cautious with dark stains as they can easily become too dark.
A pre-stain conditioner is almost always recommended to prevent uneven absorption and blotching. For a natural look, a light to medium tone might be best.
- Oak and Ash
Oak and ash are hardwoods with distinct, open grain patterns. They accept stain relatively evenly, allowing the natural character of the wood to show through. Medium to dark stains work wonderfully on oak and ash, highlighting their prominent grain.
They are forgiving and don’t typically require a pre-stain conditioner, although it can still help achieve a more consistent color if you’re using a very dark or opaque stain.
- Maple and Birch
These hardwoods have very dense, tight grain structures. They absorb stain sparingly, which can lead to a lighter, more subdued color. If you want a deep, rich color on maple or birch, you might need multiple coats or a stain with more pigment.
A pre-stain conditioner can help open the pores slightly for better stain uptake. Light to medium tones often look elegant on these woods, preserving their natural brightness.
Matching Stain to Your Home’s Style
The stain color you choose should complement your home’s overall aesthetic. For a modern or minimalist look, consider lighter, natural wood tones or cool grays that offer a clean, uncluttered feel. These can make spaces feel larger and brighter.
If your home features a more traditional or rustic design, warmer, richer tones like deep browns, reddish-browns, or even black can add depth and coziness.
Think about the existing elements in the room. What are the colors of your furniture, walls, and flooring? A stain that harmonizes with these elements will create a cohesive and inviting atmosphere.
For example, if you have warm-toned furniture, a warm brown stain on your wood accents will create a unified look. If you’re aiming for a coastal vibe, consider light, whitewashed, or pale gray stains that evoke a sense of airiness and light.
Popular Sherwin-Williams Wood Stain Color Families
Sherwin-Williams offers a diverse palette of wood stain colors, broadly categorized into several popular families. Each family brings a unique mood and aesthetic to your woodworking projects. Understanding these groups helps narrow down your choices based on the desired outcome and style.
Warm Wood Tones
Warm wood tones are a perennial favorite, bringing a sense of comfort, tradition, and natural beauty to any space. These stains often feature reddish, yellowish, or brownish undertones that evoke the look of aged wood or rich hardwoods. They are versatile and can complement a wide range of decor styles, from rustic farmhouse to classic traditional and even modern eclectic.
Honey Oak
This classic shade offers a light, warm, and inviting feel. It has a subtle golden hue that highlights the natural grain of the wood without overpowering it. Honey Oak is perfect for creating a bright and airy atmosphere, making it a great choice for furniture, cabinets, and flooring, especially in kitchens and living areas where a welcoming ambiance is desired.
It pairs well with neutral paint colors and natural textiles.
Early American
A timeless choice, Early American stain provides a medium-brown tone with subtle reddish undertones. It’s a balanced color that feels grounded and traditional, reminiscent of antique furniture. This stain works wonderfully on a variety of wood types and projects, from dining tables and chairs to mantels and trim.
It offers warmth without being too dark, making it a safe and appealing option for many homes.
Cherry Stain
Sherwin-Williams cherry stains aim to replicate the rich, warm, reddish-brown hue of natural cherry wood. These stains offer a sophisticated and elegant look, often with a slight translucency that allows the wood grain to show beautifully. They are ideal for furniture, cabinetry, and accent pieces where a touch of luxury and depth is desired.
Cherry tones can add a sense of warmth and character to any room.
Cool and Neutral Wood Tones
Cool and neutral wood tones are increasingly popular for their ability to lend a modern, sophisticated, and serene atmosphere to interiors. These stains often feature gray, beige, or off-white undertones, providing a clean and understated backdrop that allows other design elements to shine. They are particularly well-suited for contemporary, minimalist, and Scandinavian-inspired decor.
Driftwood Gray
This popular stain captures the weathered, muted look of wood that has been exposed to the elements. Driftwood Gray typically has cool, subtle undertones and a light to medium depth, offering a contemporary and relaxed feel. It’s excellent for creating a beachy or modern farmhouse aesthetic.
This color is versatile and works well on a variety of projects, from accent walls and shelving to outdoor furniture.
Weathered Oak
Similar to driftwood but often with slightly more brown or beige undertones, Weathered Oak provides a soft, aged appearance. It’s a neutral choice that can add subtle texture and character without being overwhelming. This stain is ideal for furniture and cabinetry where you want a relaxed, lived-in look.
It complements a wide range of color palettes, making it easy to integrate into existing decor.
Ash Gray
Ash Gray offers a more pronounced gray tone, often with a cooler, slightly bluer undertone than driftwood or weathered oak. It provides a distinctly modern and sophisticated finish. This stain is perfect for high-contrast designs or for creating a monochromatic look.
It pairs exceptionally well with crisp whites, blacks, and metallics, making it a favorite for contemporary furniture and statement pieces.
Dark and Dramatic Wood Tones
Dark wood stains command attention and add a sense of depth, richness, and classic elegance to any space. These deep hues can create a dramatic focal point and lend a sophisticated, luxurious feel. They are particularly effective in larger rooms or spaces where you want to add a cozy, enveloping atmosphere.
Dark stains also work well to highlight architectural details or create a bold contrast.
Espresso
Espresso stain delivers a deep, rich, and luxurious dark brown color, reminiscent of freshly roasted coffee beans. It offers a sophisticated and timeless appeal, perfect for creating a high-end look. This stain works exceptionally well on furniture, cabinetry, and flooring, adding warmth and depth to a room.
It provides a beautiful contrast against lighter decor and can make a space feel more intimate and grounded.
Jacobean
Jacobean is a deep, dark brown stain with warm undertones, often leaning slightly towards a reddish-brown. It’s a classic choice that provides a sense of historical richness and character. This stain is highly versatile, popular for furniture, trim, and flooring.
It offers a beautiful balance of darkness and warmth, making it a favorite for creating cozy libraries or traditional living spaces.
Ebony
For the most dramatic effect, Ebony stain offers a deep, near-black finish that can transform wood into a striking centerpiece. It provides a modern, sophisticated, and bold statement. This color is ideal for contemporary designs or for creating a strong contrast with lighter surroundings.
It can make painted furniture look like dark stained wood or provide a striking finish for accent pieces.
Applying Sherwin-Williams Wood Stain Like a Pro
Achieving a beautiful, even finish with Sherwin-Williams wood stains involves more than just brushing on color. Proper preparation, application techniques, and finishing steps are key to a professional-looking result. Understanding these processes will help you avoid common pitfalls and ensure your project turns out just the way you envisioned.
Surface Preparation is Key
Before you even open a can of stain, the most critical step is preparing your wood surface. This involves sanding to remove any old finishes, dirt, or imperfections. Start with a coarser grit sandpaper (like 80 or 100 grit) to remove material quickly, then move to finer grits (150 and then 220 grit) to create a smooth surface.
The smoother the surface, the better the stain will adhere and look. Always sand in the direction of the wood grain.
After sanding, it’s essential to remove all dust. A shop vacuum with a brush attachment is a good start, followed by wiping the surface with a tack cloth. Tack cloths are slightly sticky and pick up even the finest dust particles that vacuums might miss.
Skipping this step can lead to a grainy, uneven finish because the dust gets trapped in the wet stain.
Sanding Grit Progression
The progression of sandpaper grits is vital for creating a perfectly smooth surface. Beginning with a coarser grit is necessary for removing rough spots or old finishes. However, it’s important not to stop there.
Moving to medium grits refines the surface, and finishing with a fine grit (like 220) ensures that the wood is polished smooth. Each step of sanding removes the scratches left by the previous grit. For very rough wood, you might even start with a 60-grit sandpaper before moving to 80-grit.
For a super smooth finish on hardwoods, some may go up to 320-grit, but 220 is generally sufficient for staining.
Dust Removal Techniques
Dust is the enemy of a good stain job. After sanding, use a compressed air blower if available to blast dust out of crevices and off the surface. Then, a shop vacuum with a brush attachment can pick up larger particles.
The most crucial final step is using a tack cloth. These specially treated cloths are designed to be slightly sticky, effectively lifting and trapping fine dust particles that remain on the surface. Wipe in one direction, using light pressure, and fold the cloth frequently to expose a clean section.
Ensure you work quickly between tack-clothing and staining, as dust can settle again.
Using a Pre-Stain Wood Conditioner
For softwoods like pine or woods with uneven grain like maple, a pre-stain wood conditioner is a game-changer. It contains sealants that help to equalize the wood’s porosity. This means the stain will penetrate more evenly across the entire surface, preventing blotchy dark spots and achieving a more uniform color.
Apply the conditioner according to the manufacturer’s instructions, typically letting it soak in for a specified time before wiping off any excess. It’s important not to let it dry completely on the surface, as it can act as a resist, preventing stain from absorbing at all.
Application Methods
Sherwin-Williams wood stains can be applied using several methods, each offering slightly different results and application experiences. The most common methods include using a brush, a rag, or a foam applicator. Your choice might depend on the project size, the type of stain, and your personal preference for achieving a particular look.
For large surfaces like tabletops or floors, a brush can provide good coverage. However, be sure to use a high-quality natural bristle brush for oil-based stains or a synthetic bristle brush for water-based stains. For a more hands-on approach and to achieve a deeper, more rubbed-in look, using a clean, lint-free rag is ideal.
This method allows you to control the amount of stain applied and to work it into the grain effectively. Foam applicators can offer a smooth, even coat, especially on flat surfaces, but they may not be as effective at working the stain into textured grain patterns.
Using a Brush
A high-quality brush is essential for a smooth, even stain application. For oil-based stains, opt for natural bristles (like badger or hog hair) which hold more stain and spread it smoothly. For water-based stains, synthetic bristles (nylon or polyester) are best as they don’t absorb water and swell.
Apply the stain generously but evenly, following the direction of the wood grain. Work in manageable sections, ensuring you maintain a wet edge to avoid lap marks. After applying, let the stain penetrate for the recommended time (usually 5-15 minutes, depending on the product and desired color depth) before wiping off the excess with a clean cloth.
Rag Application
Applying stain with a rag is a popular method for achieving a more natural, hand-rubbed look. It allows for great control over the color depth and is particularly effective for highlighting wood grain. Use a clean, lint-free cloth, such as an old cotton t-shirt or an applicator pad.
Dip the rag into the stain (or pour a small amount onto the surface) and apply it liberally to the wood, working it into the grain. Immediately after applying to a section, use a clean part of the rag to wipe off the excess stain. This “wiping off” is crucial for preventing a splotchy finish and achieving the desired color intensity.
Foam Applicators
Foam applicators can provide a very smooth and even coat of stain, especially on larger, flat surfaces like tabletops or cabinet doors. They are less likely to leave brush strokes than traditional brushes. Ensure you use a foam applicator designed for stains, as some craft foam can break down.
Apply the stain in thin, even coats, working in the direction of the wood grain. As with other methods, allow the stain to penetrate for the recommended time before wiping off any excess. Foam applicators are generally easier to clean than brushes.
Allowing for Proper Penetration and Wiping
The magic of wood stain lies in its ability to penetrate the wood fibers and impart color. Sherwin-Williams stains are designed to soak in, and how long you allow them to penetrate directly impacts the final color depth. For a lighter shade, you’ll wipe off the excess stain relatively quickly.
For a deeper, richer color, you’ll let the stain sit on the surface for a longer period before wiping.
The key is to wipe off all excess stain. If you leave too much stain on the surface, it can dry to a waxy or gummy finish that is difficult to sand and can prevent topcoats from adhering properly. Always use a clean, lint-free cloth for wiping.
As you wipe, you’ll see the color deepen. Continue wiping until you achieve your desired look. It’s often better to apply a second, lighter coat if you want a deeper color than to leave too much stain on the first time.
Sample Scenario: Staining a Pine Coffee Table
Let’s say you have a simple pine coffee table and you want to give it a warm, inviting look using Sherwin-Williams Early American stain. First, sand the table thoroughly, starting with 100-grit sandpaper, then moving to 150-grit, and finally 220-grit. Wipe away all dust with a shop vacuum and then a tack cloth.
Apply a pre-stain wood conditioner evenly across the entire surface and let it penetrate for about 10 minutes, then wipe off the excess.
Once the conditioner is dry, apply a liberal coat of Early American stain with a rag, working with the wood grain. Let it penetrate for about 10 minutes to achieve a medium brown tone. Use a clean rag to wipe off all excess stain, working in the direction of the grain.
Inspect the surface; if you desire a slightly darker color, you can apply a second thin coat of stain after allowing the first coat to dry for at least 4 hours and lightly sanding with 220-grit sandpaper. Once satisfied, allow the final coat of stain to dry completely (usually 24-48 hours) before applying a protective topcoat.
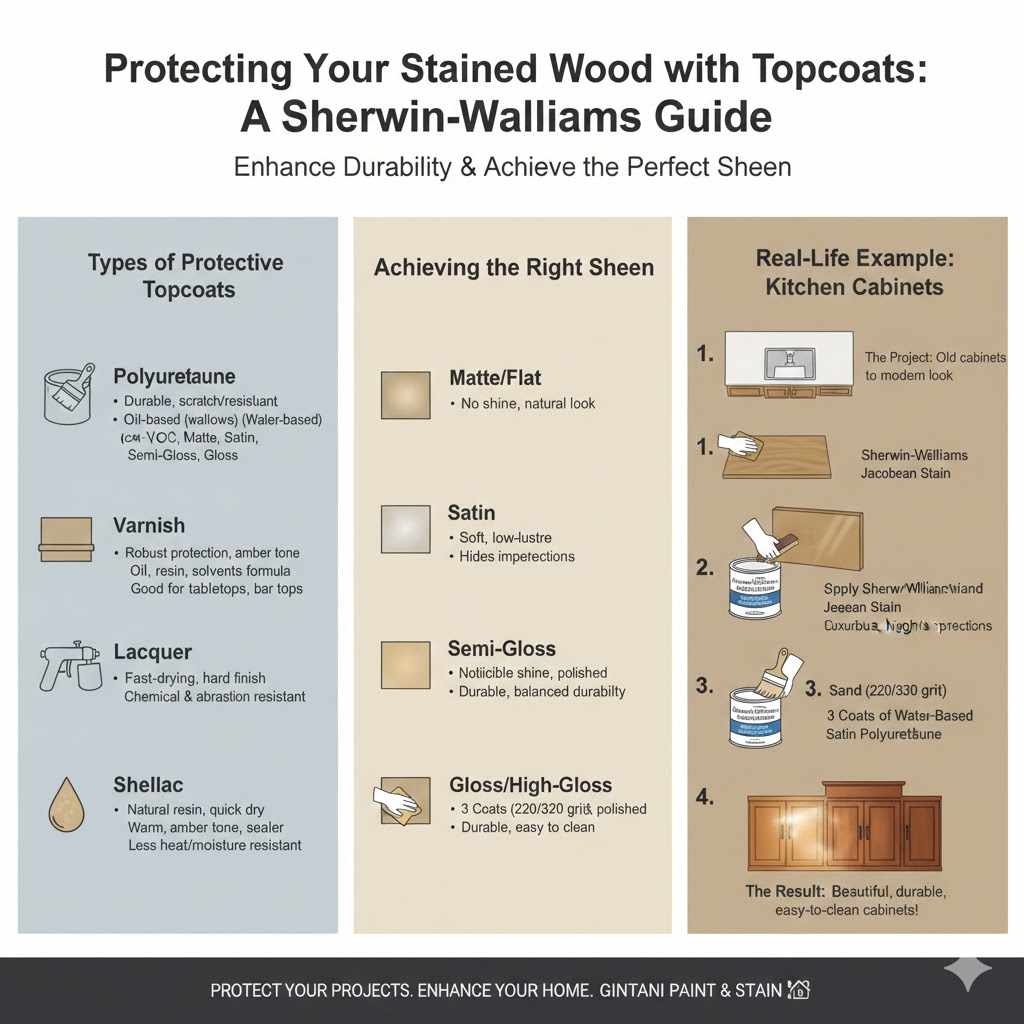
Protecting Your Stained Wood with Topcoats
Once your wood has been stained and you’re happy with the color, it’s crucial to protect that beautiful finish. A topcoat acts as a barrier against moisture, scratches, and wear, ensuring your project looks great for years to come. Sherwin-Williams offers a range of protective finishes, from clear coats to more durable varnishes, each providing different levels of protection and sheen.
Types of Protective Topcoats
Choosing the right topcoat depends on the project’s use and the desired sheen. For furniture that will see a lot of use, like a dining table or coffee table, a more durable finish is essential. Polyurethane, varnish, and lacquer are common choices, each with its own set of properties.
Polyurethane
Polyurethane is a popular choice for its durability and resistance to scratches and moisture. It’s available in both oil-based and water-based formulas. Oil-based polyurethane offers a warmer tone and is generally more durable, but it can yellow over time.
Water-based polyurethane dries clear, is easier to clean up, and has lower VOCs. It’s available in various sheens: matte, satin, semi-gloss, and gloss. For high-traffic areas, a satin or semi-gloss finish is often recommended.
Varnish
Varnish is another durable option, often providing excellent protection against wear and moisture. It’s typically made with oil, resin, and solvents. Like polyurethane, it can be found in different sheens.
Varnish can impart a slightly amber tone, which can enhance the warmth of wood stains. It’s a good choice for tabletops, bar tops, and other surfaces that need robust protection.
Lacquer
Lacquer dries very quickly and provides a hard, durable finish. It’s often used in factory finishes for furniture and cabinets because of its fast drying time and smooth appearance. Lacquer is typically sprayed on, making it less common for DIY projects unless you have spray equipment.
It offers good resistance to chemicals and abrasion.
Shellac
Shellac is a natural resin derived from the lac beetle. It dries very quickly and can be used as a sealer or a topcoat. It offers a warm, amber tone and is often used as a barrier coat to prevent bleed-through from knots or certain wood species.
While it provides a beautiful finish, it is less resistant to heat and moisture than polyurethane or varnish.
Achieving the Right Sheen
The sheen of your topcoat dramatically impacts the final look of your stained wood. Sheens range from matte (no shine) to high gloss (highly reflective). Sherwin-Williams topcoats are available in these variations:
- Matte/Flat
- This finish has very little to no reflection, providing a very natural, non-glossy look. It can help hide minor surface imperfections and gives a sophisticated, subtle appearance. Matte finishes are ideal for pieces where you want the wood grain to be the star and avoid any glare.
- Satin
- Satin offers a soft, low-lustre sheen that is very popular for furniture and cabinets. It provides a bit more depth and durability than matte without being overly shiny. Satin finishes are versatile and work well with most decor styles, offering a balance between natural and noticeable sheen.
- Semi-Gloss
- This sheen has a noticeable shine and reflectivity. Semi-gloss finishes are more durable and easier to clean than lower sheens, making them a good choice for high-traffic surfaces like tabletops or kitchen cabinets. They offer a brighter, more polished look compared to satin.
- Gloss/High-Gloss
- High-gloss finishes are very reflective, creating a mirror-like surface that enhances the wood’s color and grain. While they offer excellent durability and a luxurious look, they also highlight every imperfection and can be prone to showing fingerprints and scratches. These are often used for statement pieces or modern designs.
Applying the Topcoat
Just like with stain, proper application is key for a smooth, durable topcoat. Always ensure your stained wood is completely dry before applying any protective finish. Depending on the product, this could take anywhere from 24 to 72 hours after the final stain coat.
Start by lightly sanding the stained surface with very fine-grit sandpaper (220 or 320 grit) and wiping away the dust with a tack cloth. This creates a smooth surface for the topcoat to adhere to. Apply thin, even coats of your chosen topcoat, following the direction of the wood grain.
For polyurethane and varnish, brushing is common. Allow each coat to dry completely according to the manufacturer’s instructions before applying the next. Lightly sanding between coats (again, with very fine sandpaper and a tack cloth wipe-down) will ensure a smooth, professional finish.
Real-Life Example: Kitchen Cabinet Refinishing
A homeowner decided to update their kitchen cabinets, which were originally a light, nondescript wood. They chose a Sherwin-Williams Jacobean stain to give them a warmer, more traditional look. After cleaning and lightly sanding the cabinets, they applied the Jacobean stain using a rag, wiping off the excess to achieve a rich, deep brown color.
They let the stain dry for 48 hours.
For protection, they opted for Sherwin-Williams’ water-based satin polyurethane. They applied three thin coats, sanding lightly between each coat with 320-grit sandpaper and wiping with a tack cloth. The result was beautiful, durable cabinets that completely transformed the kitchen’s aesthetic.
The satin finish provided a soft sheen that was easy to clean and complemented the new countertop and backsplash.
Frequently Asked Questions
Question: How do I choose the best Sherwin-Williams wood stain color for my furniture?
Answer: Consider the room’s existing colors, the wood type, and the overall style you want to achieve. Look at samples in different lighting conditions. Warm tones work well for cozy spaces, while cool tones suit modern looks.
Darker stains add drama, and lighter ones keep it airy.
Question: Can I mix Sherwin-Williams wood stains to create a custom color?
Answer: Yes, you can often mix Sherwin-Williams oil-based stains to create custom shades. Always test your mixture on scrap wood first to ensure you get the desired result. Water-based stains can also be mixed, but check the product compatibility.
Question: How many coats of Sherwin-Williams stain should I apply?
Answer: Usually, one coat is enough for a desired color if applied correctly. If you want a deeper color, you can apply a second coat after the first has dried for at least 4 hours and the surface has been lightly sanded. Always wipe off excess stain.
Question: What is the difference between Sherwin-Williams stain and paint?
Answer: Stain penetrates the wood to color it while allowing the grain to show through. Paint covers the wood surface, obscuring the grain. Stains enhance the natural beauty of wood, while paint offers opacity and a wider range of color choices.
Question: How long does Sherwin-Williams wood stain need to dry before I can seal it?
Answer: Most Sherwin-Williams wood stains need to dry for at least 24 to 72 hours before applying a topcoat. Always check the specific product’s instructions, as drying times can vary based on humidity and temperature.
Wrap Up
Finding the perfect Sherwin-Williams wood stain color is achievable with this guide. You now know how to prepare your wood, understand different stain types, and choose colors that match your home. Applying these steps will lead to beautiful, lasting results for your projects.
Start exploring the rich options available and enjoy bringing your woodworking vision to life.