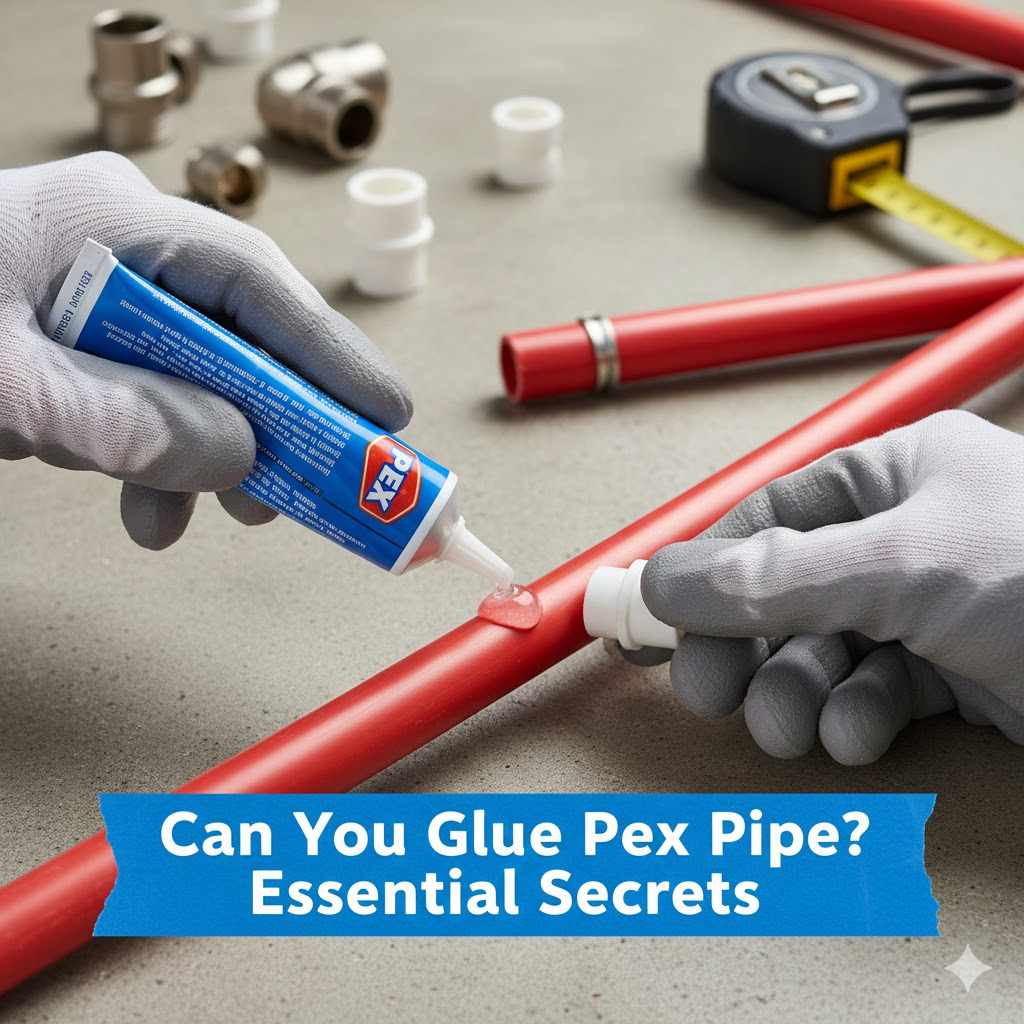
Can You Glue Pex Pipe? Essential Secrets
No, you cannot use standard solvent cement (glue) on PEX pipe because PEX plastic is not designed to melt and fuse with glue like PVC or ABS. PEX connections require specific mechanical fittings and crimp rings, expansion tools, or press tools for a secure, leak-free seal.
Are you looking to repair a PEX line or connect a new section and wondering if you can save time by just grabbing that tube of strong plumbing glue you have under the sink? It’s a common thought! Many materials in our homes—like wood or certain plastics—bond easily with glue. However, PEX (cross-linked polyethylene) pipe behaves differently.
Trying to glue PEX is a frustrating path that almost always leads to leaks. But don’t worry! As your DIY mentor, I’m here to clear up this confusion. We will walk through exactly why glue doesn’t work and show you the right, easy ways to make permanent, professional connections. Let’s dive into the secrets that make PEX reliable.
Understanding PEX: Why Standard Glue Fails
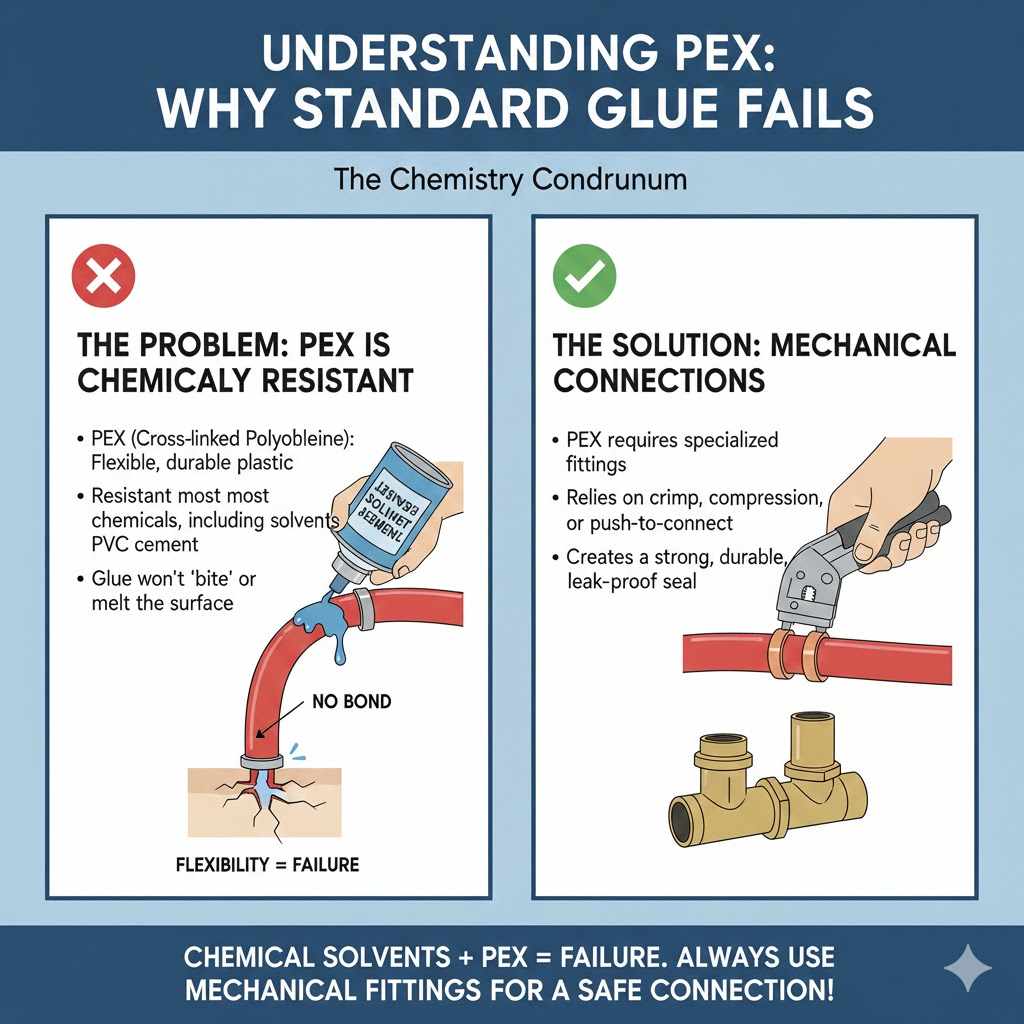
When we talk about plumbing materials, we often think of joining them with glue. For rigid plastic pipes like PVC (used for drainage) or CPVC (used for hot water), we use solvent cement. This “glue” isn’t really an adhesive; it’s a chemical solvent that temporarily melts the plastic surfaces, allowing them to fuse together as the solvent evaporates.
PEX pipe, however, is a flexible, durable plastic known as cross-linked polyethylene. This cross-linking process makes the material incredibly resistant to heat, corrosion, and pressure.
The Chemistry Conundrum
This cross-linking is precisely why standard solvent glues won’t work:
- Chemical Resistance: PEX is engineered to resist most common chemicals, including the harsh solvents found in standard plastic pipe cement. The glue simply won’t “bite” or melt the surface enough to create a fused bond.
- Flexibility: Because PEX is flexible, even if you managed a very weak surface bond, the natural flexing and movement of the pipe under water pressure would cause the weak bond to crack and fail almost immediately.
- Safety Factor: Plumbing systems operate under pressure. A failed connection is more than an annoyance; it’s a flood risk. Because glue fails so reliably on PEX, plumbing codes universally prohibit its use for joining these pipes.
Think of it this way: PVC is like wax, which melts easily when touched by solvent. PEX is more like high-quality, durable rubber or vinyl—it resists the chemical changes needed for that fusing action. For this material, we must rely on mechanical joining systems.
The Right Way to Connect PEX Pipe: Mechanical Fittings
If you can’t use glue, how do you make the joint strong? You use methods that clamp or compress the PEX material onto a fitting. These methods create a seal that is physically locked into place, handling pressure and temperature fluctuations without issue.
There are three primary methods used by professionals and DIYers alike. The choice often depends on the specific tools you own or are willing to invest in, and the size of the pipe you are working with.
1. Crimp Connections (The Classic Method)
Crimp systems are one of the oldest and most straightforward methods for PEX. They use metal rings that compress tightly around the pipe when secured over a brass or plastic fitting barb.
Tools Needed for Crimp Connections:
- PEX Tubing Cutter (A smooth, clean cut is vital!)
- Crimp Tool (Often called a Go/No-Go gauge tool)
- Crimp Rings (Copper or Stainless Steel)
- PEX Fittings (Barb fittings, usually brass or approved plastic)
The Step-by-Step Crimp Process:
- Cut Cleanly: Use your PEX cutter to make a straight, 90-degree cut across the pipe. Any burrs or jagged edges will compromise the seal.
- Prep the Ring: Slide a crimp ring onto the end of the PEX pipe. Make sure it is on the side opposite the cut end.
- Insert the Fitting: Push the PEX pipe fully over the barb of your fitting until it stops. The pipe edge should slightly show through the end of the crimp ring.
- Position the Ring: Slide the crimp ring up against the pipe’s edge, positioning it so it covers the stop on the barb fitting inside.
- Crimp Securely: Place the jaws of the crimp tool over the ring. Squeeze the handles completely shut until the tool releases (this ensures proper pressure).
- Check the Seal: Many quality crimp tools include a visual gauge slot. A correctly applied crimp ring will often have indentations, showing a “good” connection.
2. Clamp Connections (Also known as Cinch or Clamp Rings)
Clamp connections are very similar to crimp connections but use a stainless steel “clamp” instead of a solid ring. These clamps have an ear that the clamping tool deforms to secure the joint. This method is sometimes preferred because the clamps are visible, offering an easy visual check of connection quality.
Comparison: Crimp vs. Clamp Rings
The main difference between these two mechanical methods often comes down to local code preferences or the user’s familiarity with the tool.
| Feature | Crimp Ring (Copper/Stainless Steel) | Clamp Ring (Stainless Steel) |
|---|---|---|
| Ring Shape | Solid, smooth ring | Ring with a prominent “ear” |
| Tool Needed | Swaging or single-press crimp tool | Unique clamping/cinching tool |
| Appearance of Finish | Smooth, uniform compression | Distinctive crushed ear mark |
| Difficulty for Beginner | Slightly less forgiving on placement | Very easy visual confirmation |
3. Expansion Connections (F1960)
The expansion method is favored by many new installers, particularly in regions using the PEX-A variety of pipe (the most flexible type). This technique relies on the memory of the PEX material itself.
To make this joint, you use a special tool to physically expand the pipe outward slightly, insert the fitting, and then the pipe naturally shrinks back, creating an incredibly tight seal around the fitting—no metal ring is needed if you use an expansion sleeve system, though often an expansion ring is used for structural support.
Why Expansion is Highly Regarded
- Incredible Strength: Because the pipe plastic attempts to return to its original size while being clamped over the fitting, the joint strength is exceptional.
- Good for Cold Climates: This method works very well because the PEX material can better handle the minor stresses caused by thermal expansion and contraction in the home.
- Tool Requirement: This method requires the most specialized tool—an expansion head that matches your pipe size.
For most homeowners tackling small repairs or simple routing, the crimp or clamp systems offer a lower initial tool cost and are very forgiving when you get the hang of them.
Specialized Fittings: ProPEX, Push-to-Connect, and Transition Couplings
While mechanical methods are standard, modern plumbing offers solutions that eliminate the need for crimping or expansion tools in certain situations. These specialty fittings offer speed and convenience, making DIY projects much faster.
Push-to-Connect Fittings (SharkBite Style)
You may have seen “Push-to-Connect” fittings (often associated with brands like SharkBite) used to connect copper, CPVC, or PEX.
Crucially, these fittings use internal teeth or grab rings to physically bite onto the outside of the PEX pipe and a rubber O-ring seal.
Can you use these on PEX? Absolutely. They are perhaps the easiest method for beginners because they truly require no specialized crimping tools, just a clean cut and a deburring tool (to smooth the inside edge).
Pros and Cons of Push-to-Connect on PEX
| Pro | Con |
|---|---|
| Extremely fast connection; instant seal. | Fittings are significantly more expensive than crimp fittings. |
| No specialized tools needed beyond a pipe cutter. | Some codes or HOAs discourage permanent use behind walls. |
| Can join dissimilar pipes (e.g., PEX to copper). | Connection takes up slightly more space than a traditional fitting. |
Always verify that the specific Push-to-Connect fitting you purchase is rated for PEX installation according to the manufacturer’s guidelines and local plumbing codes. Resources like the International Association of Plumbing and Mechanical Officials (IAPMO) provide extensive testing criteria for these modern fittings.
Transition Fittings
If your goal is to connect PEX to another type of pipe—like an old copper water line or PVC drain line—you need a transition fitting. These fittings will have a PEX barb end (which requires crimping/clamping) on one side, and a threaded or slip end for the other pipe material on the other side. This is necessary because you cannot mechanically secure PEX to copper threads; you need a system that seals both materials appropriately.
Deburring and Chamfering: The Secret to Every Successful PEX Connection
Regardless of whether you choose to crimp, clamp, or use expansion fittings, your success hinges on preparing the end of the pipe. This step is often skipped by beginners, leading to leaks and frustration. We must address both the inside and the outside edge of the cut.
The Importance of Deburring (Inside Edge)
When you cut PEX with standard cutters, you often leave a small, rough ridge or “burr” on the inside edge of the pipe opening.
If you try to push the pipe onto a fitting, this burr acts like a blockage, preventing the pipe from sliding all the way over the barb for a full seal.
Even worse, this ridge can create turbulence or restrict water flow unnecessarily.
Use a dedicated PEX deburring tool (a simple cone-shaped tool) or the edge of a utility knife very carefully to smooth this inside ridge until the interior surface flows smoothly from the cut edge up onto the fitting barb.
The Necessity of Chamfering (Outside Edge)
Chamfering means lightly rounding off the outside edge of the pipe.
When using crimp or expansion methods, the sharp 90-degree outer edge can actually cut into the crimp ring or cause stress on the pipe as it compresses onto the fitting, leading to premature failure.
A slight bevel on the outside edge allows the pipe to slide easily over the fitting and helps the compression ring seat evenly during the joining process.
A good quality PEX cutter usually has a built-in reamer or deburring feature specifically designed to perform both actions quickly.
Tool Investment vs. Project Scope
For a dedicated homeowner, the decision of how to join PEX often comes down to which tool system makes the most sense for your budget and how much work you plan to do.
Tool Costs Snapshot
For beginners, the most accessible routes are often Push-to-Connect (lowest tool cost) or the Crimp/Clamp systems (if you find a good deal on a tool kit).
| Method | Primary Tool | General Beginner Cost Range (Tool Only) | Notes |
|---|---|---|---|
| Crimp/Clamp | Manual Crimp Tool | $30–$60 | Reliable, standard industry method |
| Expansion (F1960) | Electric/Manual Expander | $150–$400+ | Highest quality seal; best for large jobs |
| Push-to-Connect | None (Just cutter/reamer) | $0 (Tool required for PEX) | Highest fitting cost, but fastest connection time |
If you are only making one or two small repairs, buying an entire crimping tool kit might feel expensive. In that case, investing in high-quality Push-to-Connect fittings might be the most practical solution, even if the fittings themselves cost more per unit. Remember, durability matters when water is involved, so always choose products approved by recognized standards bodies, like those compliant with ASTM F1807 or F2098 standards, depending on the fitting type.
Can I Use Thread Tape or Sealant with PEX Mechanical Fittings?
This is another very common question that leads back to the core principle: Mechanical fittings rely on compression, not chemical adhesion.
For standard PEX crimp, clamp, or expansion fittings that join PEX pipe directly to a matching PEX barb fitting:
- DO NOT use PTFE tape (Teflon tape) or pipe dope. These sealants are intended for the tapered threads (NPT) on metal or rigid plastic fittings. PEX fittings use straight barbs that rely solely on the ring compressing the pipe over the barb for the seal. Adding tape adds bulk that interferes with the compression, potentially causing a leak instead of preventing one.
However, if you are using a transition fitting—for example, connecting a PEX barb fitting to a metal male pipe thread (MPT) connector—then yes, you must treat the metal thread connection traditionally:
- Apply 3 to 5 wraps of PTFE tape clockwise around the male threads.
- Or, use pipe dope designed for potable water systems.
In short: Tape seals the threads; the crimp ring seals the pipe over the barb. Do not tape the barb end.
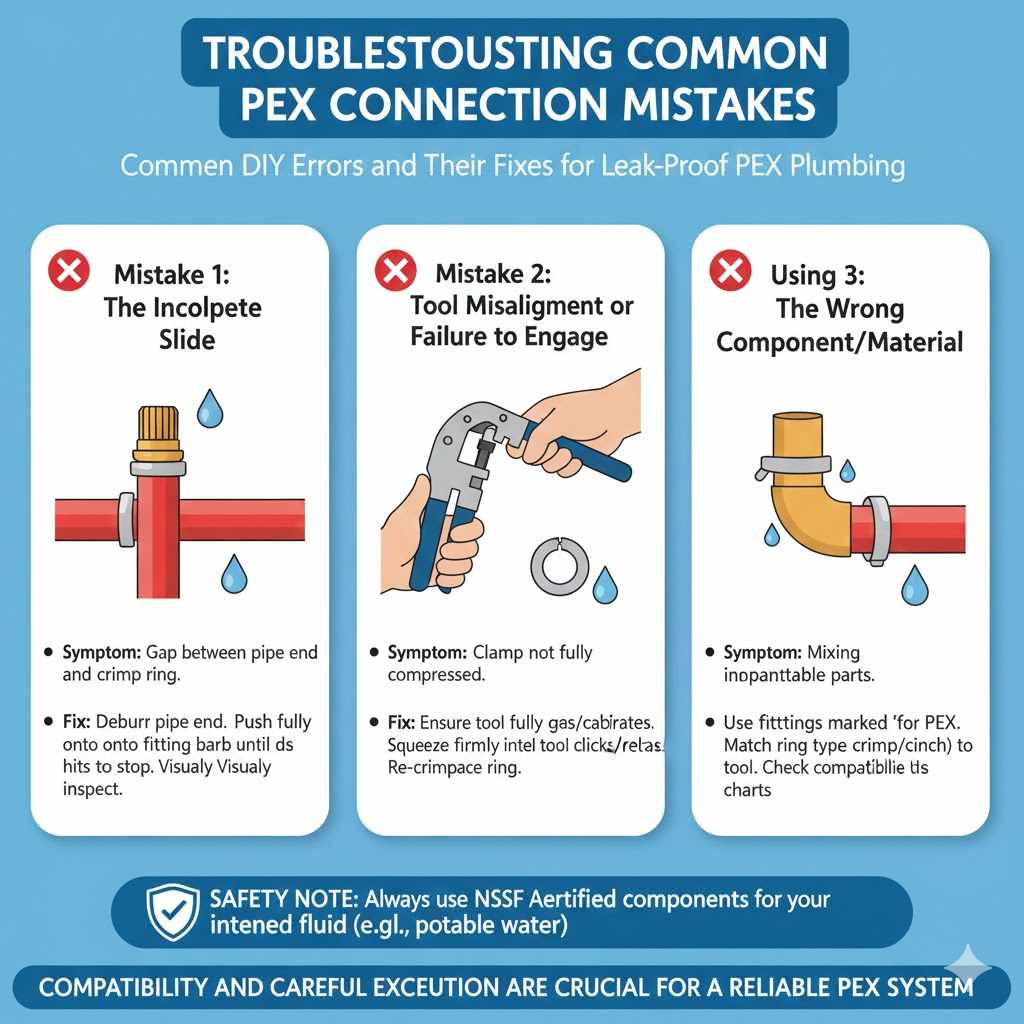
Troubleshooting Common PEX Connection Mistakes
If you have attempted a PEX connection and it’s not holding water, it’s almost never because the pipe material itself is faulty; it’s usually a minor setup error. Here are the three biggest culprits:
Mistake 1: The Incomplete Slide
The PEX pipe must slide fully over the fitting barb until it hits the stop. If there is any gap between the end of the pipe and the compression ring, the seal will fail under pressure.
The Fix: Always deburr first, and visually inspect that the pipe extends fully past the ring before you begin compressing.
Mistake 2: Tool Misalignment or Failure to Engage
If you are crimping or clamping, you must ensure the tool fully compresses the ring. Many manual crimpers require you to squeeze firmly until the tool mechanically springs open or clicks. If you stop short, the compression will be too light.
The Fix: If your tool has a calibration port or gauge, use it regularly. On manual tools, always assume you need to exert maximum force until the tool confirms the completion of the crimp cycle.
Mistake 3: Using the Wrong Component/Material
Using a brass fitting meant for copper pipe on PEX, or using the wrong type of ring for the wrong tool (e.g., trying to use a crimp tool on a cinch ring), will result in a compromised connection. PEX systems require compatibility.
The Fix: When buying parts, look for markings like “for PEX” or system-specific branding. If you are mixing PEX brands, check compatibility charts provided by the fitting manufacturer. Not all PEX systems are interchangeable.
Frequently Asked Questions (FAQ) for the DIY Plumber
Q1: Can I use Super Glue (Cyanoacrylate) on PEX pipe?
A: No. Standard “Super Glue” is an adhesive, not a chemical solvent designed for melting PEX. It will offer zero structural integrity for pressurized plumbing and will fail quickly, causing leaks.
Q2: Can I use CPVC or PVC cement on PEX?
A: Absolutely not. This is one of the most dangerous things you can try. PEX resists these solvents, and attempting to join them results in a connection that looks dry but is weak and guaranteed to leak under typical water pressure.
Q3: Do I have to drain the system completely to repair a PEX line?
A: Yes. Even slight residual water pressure or standing water in the line can compromise the sealing process for any mechanical fitting, as water will push its way into the gap before the mechanical lock sets. Turn off the main water supply and open the lowest faucet to relieve all pressure before starting any repair.
Q4: Are plastic PEX fittings as strong as brass fittings?
A: High-quality, code-approved plastic (poly-alloy) PEX fittings are generally just as strong and reliable as brass fittings when used with the correct mechanical connection (crimp, clamp, or expansion). They resist corrosion better than some cheaper brass alloys. Always confirm they are rated for the highest temperature and pressure your system requires.
Q5: How long does a PEX fitting connection take to set?
A: With mechanical connections (crimp, clamp, expansion), the connection is effectively set and pressure-tested the moment the tool releases. Unlike glue, which requires curing time, you can often re-pressurize the line immediately after making the joint, provided your cuts and assembly were precise.
Q6: What is the difference between PEX-A, PEX-B, and PEX-C?
A: These refer to the method used during manufacturing to cross-link the polyethylene. PEX-A is the most flexible (best for expansion joints). PEX-B is the most common in North America (usually used with crimp/clamp rings). PEX-C has slightly higher resistance to long-term degradation but is less common. Always ensure your fittings match the PEX type you are installing.
Conclusion: Building Confidence Through the Right Method
When you first start learning about plumbing repairs, especially involving flexible plastic like PEX, the temptation to use a simple glue is strong. As we’ve covered, that shortcut simply doesn’t work with this modern material. PEX demands respect for its unique chemistry, relying instead on precise, robust mechanical engagement—crimp rings, expansion, or specialized push fittings.
My hope is that by understanding why glue fails and learning the straightforward steps for mechanical joining, you feel much more confident about tackling your next PEX repair or installation. Remember the golden rules: Cut clean, deburr sharp, and compress fully. Stick to these proven methods, and you will build durable, leak-free plumbing connections that will last for decades. Grab your crimp tool, measure twice, and enjoy the satisfaction of a professional result you achieved yourself!