Can You Make Slime with Wood Glue Easy Guide
Lots of people wonder about making slime with different household items. When it comes to wood glue, it can seem a bit tricky for beginners because it’s not your typical slime ingredient. But don’t worry!
This guide is here to make things super simple. We’ll walk you through exactly how to create slime using wood glue step-by-step. Get ready for some fun slime-making adventures!
Can You Make Slime with Wood Glue Easy Guide
The question of whether you can make slime with wood glue is a common one for DIY enthusiasts and parents looking for creative projects. While traditional slime recipes often call for white school glue, wood glue offers a different chemical composition that can yield unique slime textures and properties. This section will explore the science behind wood glue and why it’s a viable, albeit less common, ingredient for slime making.
Understanding the basic components of wood glue helps demystify the process and prepare you for the steps ahead.
What Is Wood Glue and How Does It Work
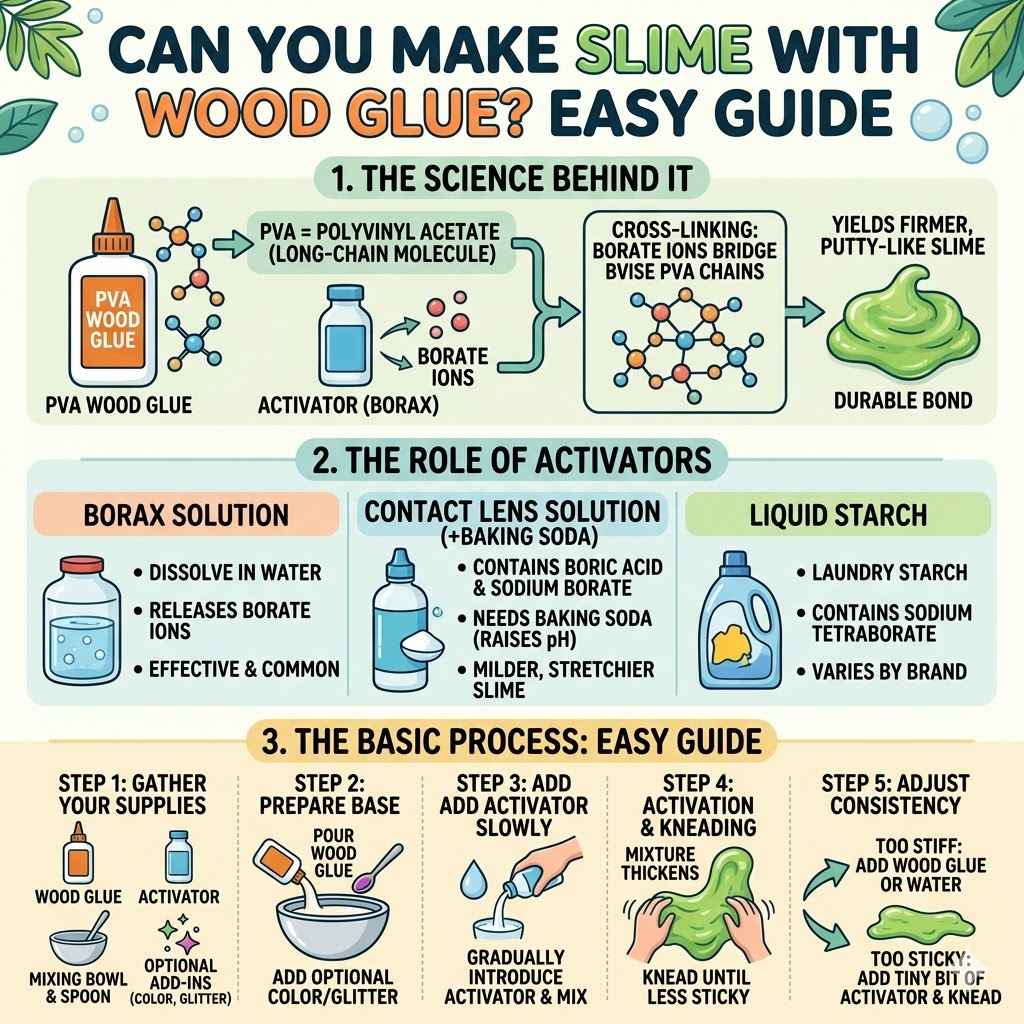
Wood glue, primarily polyvinyl acetate (PVA) based, is designed to bond porous materials like wood. Its adhesive properties stem from its polymer chains that form strong bonds as the water content evaporates or is absorbed. This drying process is what allows it to create a solid, durable bond.
When thinking about slime, this same polymer structure is key.
The polyvinyl acetate in wood glue is a long-chain molecule. When a cross-linking agent, like borax, is introduced, it connects these long chains. This creates a flexible, stretchy network that we recognize as slime.
The concentration and type of PVA in wood glue can affect the final slime’s consistency and feel, often resulting in a firmer, less sticky slime compared to school glue.
Wood glue typically contains a higher solid content than school glue. This means there’s more polymer and less water. This can lead to a slime that is less stretchy and might break more easily if not formulated correctly.
However, it also means you might achieve a more durable, putty-like slime.
The Role of Activators in Slime Making
Activators are essential for transforming liquid glue into slime. They provide the chemical reaction needed to cross-link the polymer chains in the glue. Without an activator, you would just have sticky glue.
- Borax Solution: This is one of the most common and effective activators. Borax, when dissolved in water, releases borate ions. These ions can then bridge the polymer chains of the PVA in the wood glue, causing them to link together and form the slime structure. The concentration of your borax solution is important; too much can make the slime brittle, while too little won’t activate it properly.
- Contact Lens Solution: Many contact lens solutions contain boric acid and sodium borate, which act as activators. These solutions often need to be combined with baking soda. The baking soda raises the pH of the mixture, making the borate ions more reactive and effective at cross-linking the glue polymers. This is a milder activator and can result in a stretchier slime.
- Liquid Starch: Laundry starch, particularly those containing sodium tetraborate (borax), can also be used as an activator. The borate ions in the starch solution perform the same function as in a borax solution, linking the PVA molecules to create slime. The consistency of the slime can vary depending on the specific brand of liquid starch used.
The choice of activator and its concentration directly influences the texture of the slime. Experimentation is often key to finding the perfect balance. For wood glue, which can be a bit more viscous, a carefully measured activator is crucial for achieving the desired consistency.
Can You Make Slime with Wood Glue Easy Guide: The Basic Process
Making slime with wood glue follows a similar core principle to using school glue: combining the glue with an activator. However, the specific ratios and the nature of wood glue may require slight adjustments. This section outlines the fundamental steps for a successful wood glue slime creation.
The general idea is to start with your wood glue and then gradually introduce your chosen activator while mixing. The process is less about precise measurements and more about observing the consistency change. It’s important to mix thoroughly to ensure the activator is evenly distributed throughout the glue.
Adding the activator too quickly can result in a tough or rubbery slime that is difficult to work with. A slow, steady addition allows the cross-linking process to occur more controllably, leading to a more pliable and enjoyable slime. Patience is a virtue in slime making!
Gathering Your Supplies
Before you begin, ensure you have all the necessary items. This makes the process smoother and prevents interruptions.
- Wood Glue: Use a PVA-based wood glue. Not all wood glues are suitable; look for standard PVA wood glues.
- Activator: Choose one from the options discussed earlier, such as a borax solution, contact lens solution with baking soda, or liquid starch.
- Mixing Bowl: A medium-sized bowl is ideal.
- Stirring Utensil: A spoon, craft stick, or spatula will work.
- Measuring Tools: Cups and spoons for precise measurements if needed, though estimation is often part of the fun.
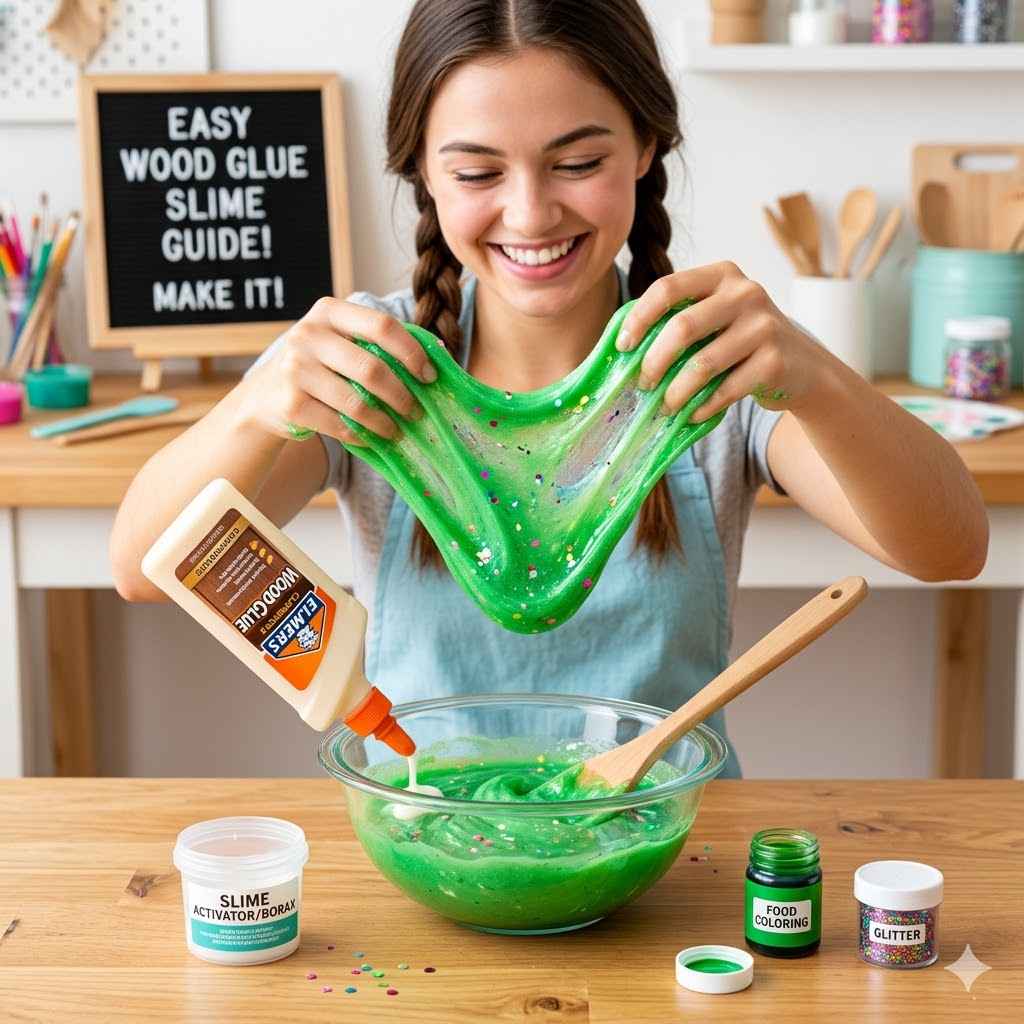
- Optional Add-ins: Food coloring, glitter, or scents can personalize your slime.
Having these items ready means you can jump right into the fun of making slime without searching for supplies. It’s always good to have a clean workspace to avoid making a mess.
Step-by-Step Wood Glue Slime Recipe
This recipe focuses on simplicity and effectiveness, using common household items to achieve a fun slime texture. Follow these steps carefully for the best results.
- Pour the Wood Glue: Start by pouring your desired amount of wood glue into the mixing bowl. For a basic batch, about half a cup is a good starting point.
- Add Optional Color/Glitter: If you want colored or glittery slime, add a few drops of food coloring or a sprinkle of glitter now. Mix it in thoroughly until evenly distributed.
- Prepare Your Activator:
- For Borax Solution: Mix 1 teaspoon of borax powder with 1 cup of warm water. Stir until the borax is dissolved.
- For Contact Lens Solution: Pour about 1/4 cup of wood glue into the bowl. Add about 1/2 teaspoon of baking soda and mix well. Then, slowly add contact lens solution (containing boric acid and sodium borate) a teaspoon at a time.
- For Liquid Starch: Pour the wood glue into the bowl. Gradually add liquid starch, about 1 tablespoon at a time, stirring continuously.
- Mix and Activate: Begin stirring the glue and activator together. You will notice the mixture starting to thicken and pull away from the sides of the bowl.
- Knead the Slime: Once the slime is too thick to stir easily, take it out of the bowl and begin kneading it with your hands. It may be sticky at first, but keep kneading. The warmth and oils from your hands will help it become less sticky. If it remains too sticky, add a tiny bit more activator.
- Adjust Consistency: If the slime is too stiff, it might have too much activator. You can try adding a little more wood glue or a drop of water to soften it. If it’s too sticky, add a very small amount of activator and knead again.
The key is to add the activator gradually. It’s much easier to add more activator than to fix slime that has become too stiff. This careful addition helps ensure your slime has the right stretch and playability.
Benefits of Using Wood Glue for Slime
While school glue is the go-to for many slime makers, wood glue offers some distinct advantages and can produce a slime with a different feel and durability. Exploring these benefits can inspire new ways to enjoy DIY slime projects.
One of the primary benefits of using wood glue is the potential for a firmer, more putty-like slime. This can be desirable for certain types of play or for creating slime that holds its shape better. The higher solid content in wood glue contributes to this unique texture.
Furthermore, wood glue slime can sometimes be less sticky than slime made with standard school glue. This can make it easier to handle and play with, especially for younger children. The less sticky nature means less frustration with slime getting stuck on hands or surfaces.
Unique Textures and Playability
Wood glue slime often has a satisfyingly dense and smooth texture. It can feel less “gooey” than traditional slime and might have a more rubbery or putty-like quality. This difference in texture provides a new sensory experience for slime enthusiasts.
- Firmness: The slime tends to be more firm, making it excellent for molding and shaping. It can hold intricate designs and is less likely to collapse under its own weight.
- Stretch: While sometimes less stretchy than school glue slime, wood glue slime can still offer a good amount of stretch, especially when formulated correctly. The stretch might be a bit more resistant, giving it a different playful pull.
- Less Stickiness: As mentioned, a common benefit is its reduced stickiness. This makes it ideal for little hands or for use in environments where excessive stickiness is a concern. It’s easier to get off clothes and furniture if accidents happen.
The playability is enhanced by these unique characteristics. Instead of just stretching and squishing, this slime can be rolled into balls, flattened into pancakes, or used to create simple sculptures. The firmer consistency opens up a new dimension of tactile exploration.
Durability and Longevity
Slime made with wood glue can sometimes exhibit greater durability than its school glue counterparts. This means it might last longer before it starts to break down or lose its desirable qualities. The stronger bonding properties inherent in wood glue can contribute to this extended lifespan.
- Resilience: The cross-linked structure formed with wood glue can be very resilient. It might withstand more vigorous play without tearing or disintegrating as quickly as some softer slimes.
- Reduced Drying Out: Some users report that wood glue slime retains its moisture and elasticity for longer periods compared to other types. This means you can enjoy playing with it for more sessions before it becomes hard and unusable.
- Storage: Properly stored, wood glue slime can maintain its texture for weeks. Keeping it in an airtight container is key to preventing it from drying out, just like any other slime.
The longevity of wood glue slime makes it a cost-effective option for prolonged play. You get more enjoyment out of a single batch, reducing the need for frequent re-making. This is a significant advantage for busy households or for crafting projects that require a stable slime.
A Different Kind of Crafting Experience
For those who enjoy experimenting with different materials and textures, wood glue offers a novel crafting experience. It pushes the boundaries of what is typically considered slime-making material, leading to creative outcomes.
- Experimentation Potential: Wood glue’s unique properties invite experimentation. You can explore different activator ratios, add-ins, and techniques to see how they affect the final slime. This can be a fun way to learn about chemistry in a hands-on manner.
- Therapeutic Properties: The firm, less sticky nature of wood glue slime can be particularly beneficial for sensory play. It provides a satisfying tactile experience that can be calming and grounding for some individuals. The solid feel is different from the gooeyness of other slimes.
- Educational Value: Making slime with wood glue can be an educational activity, illustrating principles of polymers, cross-linking, and chemical reactions in a tangible way. It makes abstract scientific concepts easy to grasp.
This different crafting experience can be a refreshing change for experienced slime makers and an intriguing starting point for newcomers who are curious about alternative ingredients. It broadens the scope of what is possible with simple household items.
Troubleshooting Your Wood Glue Slime
Even with a straightforward recipe, slime making can sometimes lead to unexpected results. This section addresses common issues encountered when making slime with wood glue and provides solutions to get your slime back on track.
The most frequent problems involve the slime being too sticky, too stiff, or not forming at all. These issues usually stem from incorrect activator amounts or improper mixing. Fortunately, most slime problems can be fixed with a few simple adjustments.
It’s important to remember that temperature and humidity can also play a role in how slime turns out. On a humid day, you might need a bit more activator, while a dry day might require slightly less. Understanding these variables can help you troubleshoot more effectively.
Slime Is Too Sticky
A sticky slime is one of the most common frustrations in slime making. It can feel impossible to handle. The good news is that this is usually an easy fix.
Stickiness in slime is typically caused by not enough activator being used, or not mixing the activator in thoroughly enough.
- Insufficient Activator: The primary reason for stickiness is that the polymer chains in the wood glue haven’t been sufficiently cross-linked. This means the activator needs to be increased.
- How to Fix: Slowly add more activator, just a few drops or a tiny splash at a time. Continue to knead the slime thoroughly after each addition. Be patient; it can take a few minutes of kneading for the activator to fully incorporate and reduce the stickiness.
- Warm Hands: Sometimes, the warmth and natural oils from your hands can help reduce stickiness as you knead. Keep kneading; the slime will likely become less sticky over time.
- Check Activator Strength: If using a borax solution, ensure it was mixed correctly. If using contact lens solution, make sure it contains boric acid and sodium borate.
Avoid the temptation to add a large amount of activator at once, as this can quickly lead to the opposite problem: stiff slime. Gradual additions are key to achieving the perfect consistency.
Slime Is Too Stiff or Rubbery
If your slime feels too hard, breaks easily, or is not stretchy at all, it likely has too much activator. This means the polymer chains are over-linked, making the slime brittle.
- Excessive Activator: This is the most common cause of stiff, unmanageable slime. The cross-linking has gone too far.
- How to Fix: You can try to salvage stiff slime by adding a small amount of warm water, a little bit of lotion, or a tiny bit more wood glue. Mix these in slowly and knead thoroughly. The added moisture or extra glue can help to loosen the over-linked structure.
- Warm Water Method: For very stiff slime, you can try adding a tablespoon of warm water and kneading it in. The water can help to loosen the polymer bonds.
- Patience is Key: Sometimes, letting the slime rest for a bit can also help it become more pliable.
It’s always better to start with less activator and add more as needed. It’s much easier to fix sticky slime than to un-stiffen slime that has been over-activated.
Slime Is Not Forming
If you mix the glue and activator, and nothing seems to be happening – the mixture remains liquid – there are a few possible reasons.
- Inactive or Incorrect Activator: Ensure your activator is correct and properly prepared. For contact lens solution, it must contain boric acid and sodium borate. For liquid starch, check the ingredients. If making a borax solution, ensure the borax is fully dissolved.
- Wrong Type of Glue: While wood glue is generally suitable, ensure you are using a PVA-based wood glue. Some industrial adhesives may not react the same way.
- Insufficient Mixing: Make sure you are mixing thoroughly. Sometimes, the activator needs time to penetrate and react with all the glue molecules.
- Expired Ingredients: While less common, expired ingredients could potentially lose their effectiveness.
Double-check your ingredients and the preparation of your activator. Sometimes, a few more minutes of vigorous stirring can make all the difference.
Example Scenario: Sticky Slime Rescue
Let’s say you’ve made a batch of wood glue slime, and it’s incredibly sticky. It clings to everything and won’t come off your hands. You’ve already added about half a cup of wood glue and a tablespoon of a borax solution.
- Assess the Stickiness: The slime is so sticky you can barely touch it.
- Add More Activator Slowly: You add another teaspoon of your borax solution to the bowl.
- Knead Vigorously: You take the sticky blob and start kneading it. It’s still sticky, but you notice a slight change.
- Repeat and Knead: You add another half teaspoon of activator and continue kneading for several minutes. The slime is gradually starting to pull away from your hands.
- Achieve Playable Consistency: After about five minutes of consistent kneading, the slime is no longer sticking to your hands and has a nice, firm stretch.
This scenario highlights the importance of patience and gradual additions of activator. What seems like a failed batch can often be rescued with a little persistence.
Safety and Tips for Wood Glue Slime
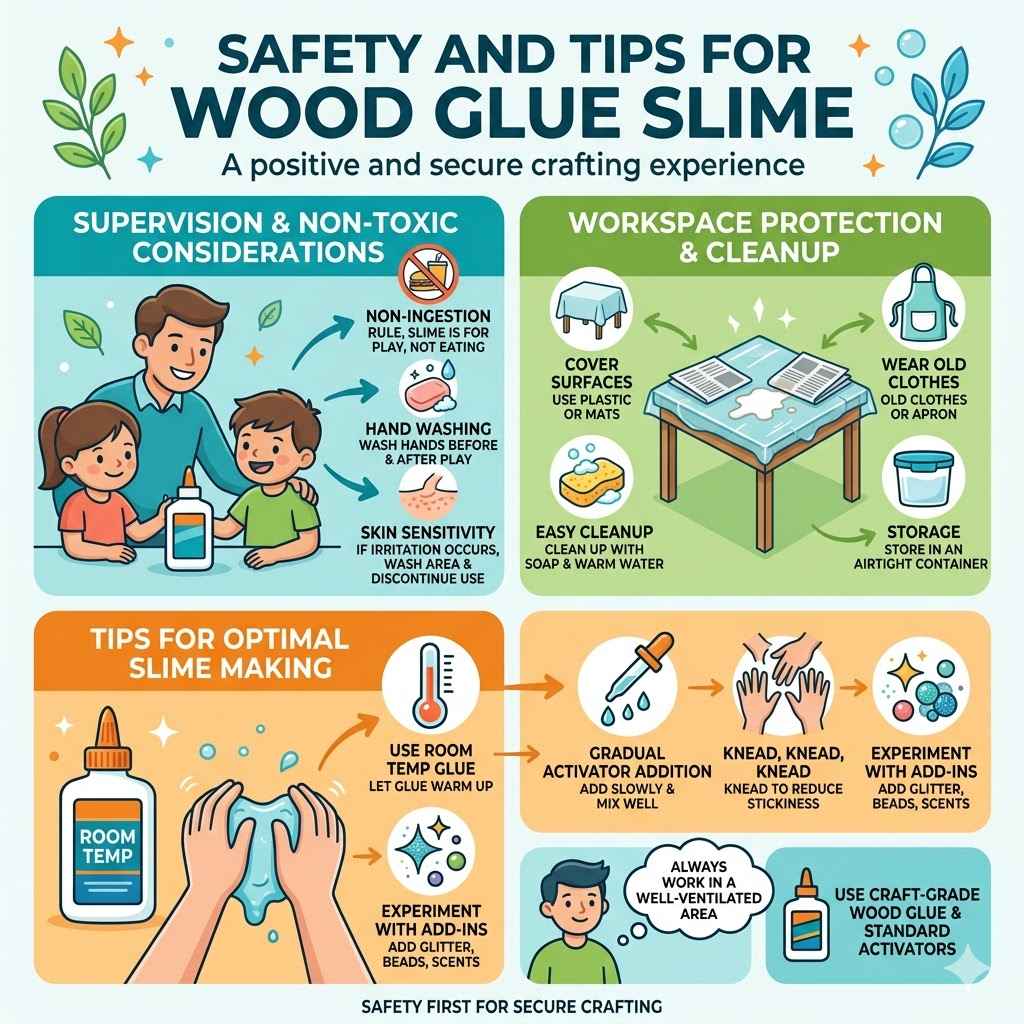
Making slime is a fun activity, but it’s important to do it safely, especially when using materials like wood glue. Following these guidelines ensures a positive and secure crafting experience for everyone involved.
Wood glue is generally safe for craft purposes when used as directed. However, it is not meant to be ingested. Supervise children closely to ensure they do not consume the slime or any of its components.
Proper cleanup is also crucial to maintain a hygienic crafting area.
Always work in a well-ventilated area, as some components, like glue or activators, can have fumes. While these are usually mild for household products, it’s good practice. Also, be mindful of surfaces; wood glue can be sticky and might adhere to certain materials, so protect your workspace.
Supervision and Non-Toxic Considerations
When children are involved in making or playing with slime, adult supervision is essential. This is particularly true for younger children who might be more prone to putting things in their mouths.
- Non-Ingestion Rule: Emphasize that slime is for playing, not for eating. Wood glue, even when turned into slime, is not food and can cause stomach upset if swallowed.
- Hand Washing: Ensure everyone washes their hands thoroughly before and after making and playing with slime. This removes any residue and prevents the spread of germs.
- Skin Sensitivity: While rare, some individuals might have sensitive skin. If irritation occurs, discontinue use and wash the affected area with soap and water. If symptoms persist, consult a doctor.
- Ventilation: Work in a well-ventilated area when mixing glue and activators to avoid inhaling any fumes, although these are typically minimal with common household craft supplies.
Using readily available craft-grade wood glue and standard activators like borax solution or contact lens solution makes this a safe activity when precautions are taken. These ingredients are designed for craft use.
Workspace Protection and Cleanup
Protecting your workspace is key to a mess-free slime-making experience. Wood glue can be very sticky and difficult to remove from certain surfaces if left to dry.
- Cover Surfaces: Use a plastic tablecloth, old newspapers, or a craft mat to cover your table or work area. This protects the surface from glue drips and sticky residue.
- Wear Old Clothes: Slime can sometimes stick to clothing. It’s a good idea to wear old clothes or an apron that you don’t mind getting messy.
- Easy Cleanup: Most wood glue and slime residues can be cleaned up with warm water and soap. For stubborn spots, a damp cloth or sponge usually does the trick.
- Storage: Store your finished slime in an airtight container, such as a plastic food container or a resealable bag. This prevents it from drying out and keeps it fresh for your next play session.
Proper cleanup not only makes your home look tidy but also ensures that the slime remains in good condition for future enjoyment. A clean workspace is a happy workspace!
Tips for Optimal Slime Making
Beyond the basic recipe, a few extra tips can help ensure your wood glue slime turns out perfectly every time. These small adjustments can make a big difference in the final texture and playability.
- Use Room Temperature Glue: Cold glue can sometimes react differently with activators. Letting your wood glue come to room temperature before starting can help ensure a more consistent reaction.
- Gradual Activator Addition is Crucial: We can’t stress this enough. Adding activator slowly, a little at a time, and mixing well after each addition is the most important step for achieving the desired consistency. This allows the polymers to cross-link properly without becoming over-activated.
- Knead, Knead, Knead: Don’t give up if the slime is sticky at first. Kneading is essential for working out the stickiness and developing the slime’s structure. Use the oils and warmth from your hands to help the slime become smooth and pliable.
- Experiment with Add-ins: Once you’ve mastered the basic recipe, feel free to get creative. Add glitter for sparkle, beads for texture, or even a drop of essential oil for a pleasant scent. Be aware that some add-ins might slightly alter the slime’s texture.
These tips, combined with the step-by-step guide, should set you up for slime-making success. Enjoy the process and the fantastic slime you create!
Frequently Asked Questions
Question: Can any type of wood glue be used to make slime?
Answer: It’s best to use a standard PVA-based wood glue. Some specialized wood glues might have different chemical compositions that won’t react well with slime activators. Always check that your wood glue is water-based and contains PVA for the best results.
Question: How long does wood glue slime last?
Answer: When stored properly in an airtight container, wood glue slime can last for several weeks. Exposure to air will cause it to dry out, reducing its playtime. Keeping it sealed is key to its longevity.
Question: Is it safe for kids to play with wood glue slime?
Answer: Yes, with adult supervision. Wood glue is generally safe for craft use, but it should not be ingested. Ensure children wash their hands before and after playing, and avoid contact with eyes or broken skin.
Question: What makes wood glue slime different from school glue slime?
Answer: Wood glue slime tends to be firmer, less sticky, and can have a more putty-like texture. This is due to the higher solid content and different polymer structure of wood glue compared to school glue.
Question: My slime is really stiff. How can I fix it?
Answer: If your slime is too stiff, it likely has too much activator. You can try to soften it by adding a little warm water, a small amount of lotion, or a tiny bit more wood glue and kneading it in thoroughly. This can help loosen the over-linked polymer structure.
Summary
You absolutely can make slime with wood glue using this easy guide. The process involves combining PVA-based wood glue with a suitable activator like borax solution or contact lens solution. This yields a unique, often firmer and less sticky slime than traditional school glue versions.
Remember to add activators gradually and knead well for the best texture. Safety and proper cleanup are simple steps to ensure fun for everyone.