Can You Use Hot Glue on Felt? Simple Guide
Many crafters wonder about hot glue and felt. It seems like a good idea, right? Hot glue is fast and easy for many projects.
But felt can be a bit tricky sometimes. Will the glue stick well? Will it melt the felt?
Don’t worry! This guide will show you exactly how to do it. We’ll make sure your projects turn out great.
Get ready to learn how Can You Use Hot Glue on Felt? Simple Guide is easier than you think.
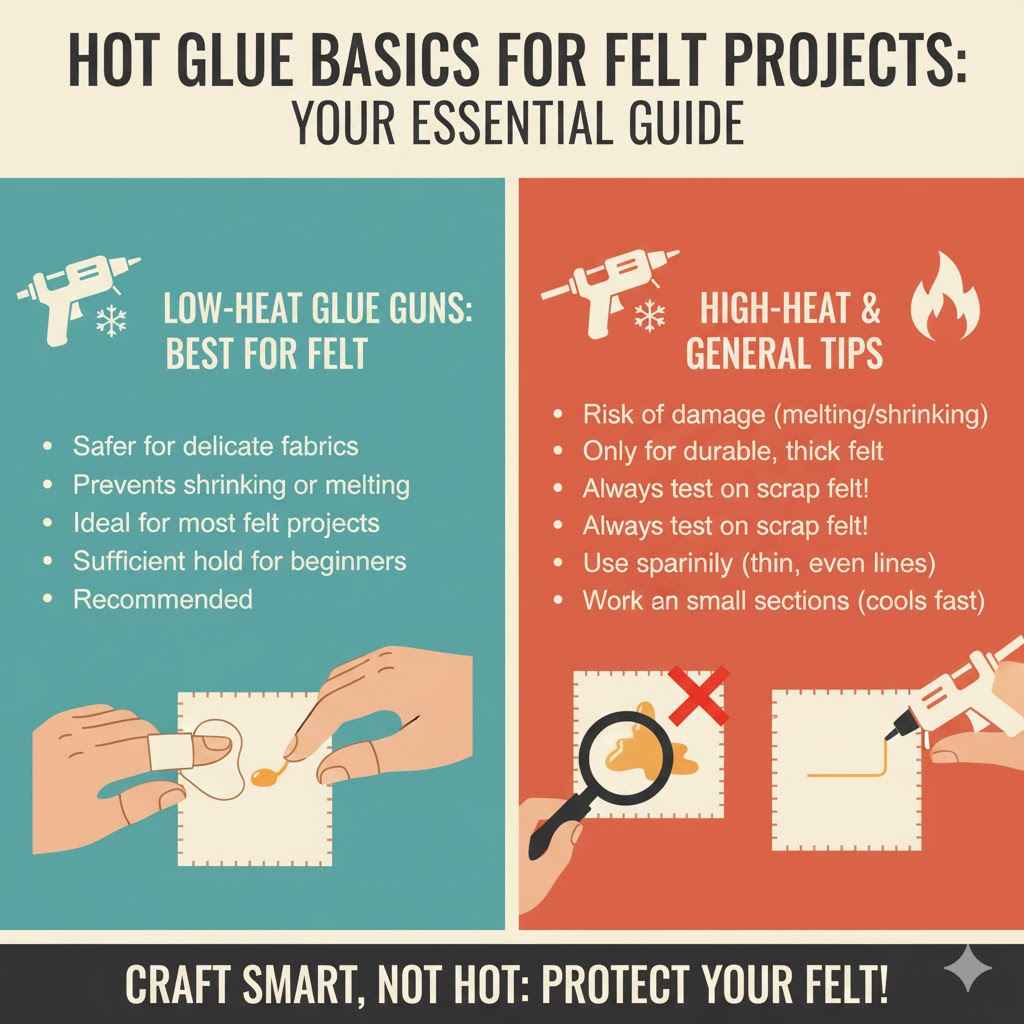
Hot Glue Basics For Felt Projects
Hot glue guns use heat to melt a glue stick. This melted glue is then applied to surfaces. It cools down very fast, creating a strong bond.
This makes it a popular choice for quick crafts. When working with felt, the low-heat setting is usually best. High heat can sometimes damage delicate fabrics like felt.
It might cause the felt to shrink or melt slightly.
Understanding your hot glue gun is key. Most guns have two heat settings: low and high. For most felt projects, the low-heat option is safer and more effective.
This setting melts the glue at a lower temperature. It is less likely to harm the felt fibers. The high-heat setting is better for tougher materials like wood or metal.
The type of felt also matters. Craft felt, which is often made of acrylic or polyester, is quite durable. It can handle a bit more heat than natural wool felt.
Wool felt is softer and more delicate. Always test your glue on a scrap piece of felt first. This helps you see how the glue behaves.
It also lets you check for any unwanted effects on the felt.
The amount of glue you use is important too. Applying too much hot glue can make a mess. It can also soak through thinner felt.
Try to apply a thin, even line of glue. This gives you a clean finish and a strong hold. You want enough glue to create a bond, but not so much that it oozes out.
Another tip is to work in small sections. Hot glue cools quickly. If you apply glue to a large area at once, it might start to harden before you can attach the felt.
Work on a small part, press the felt down, and then move to the next section. This ensures a continuous and secure connection.
Using a glue gun with a fine tip can also be helpful. This allows for more precise application. You can draw thin lines of glue exactly where you need them.
This is especially useful for detailed work or small felt pieces. A wider tip might spread too much glue for delicate projects.
The temperature of the glue gun is the main factor. Low-heat guns are perfect for most felt crafts. They prevent damage to the felt.
High-heat guns can be used, but with extreme caution. Always test first on a scrap. This simple step can save your project from damage.
Types of Felt and Glue Compatibility
Felt comes in different varieties. Each type reacts differently to heat and adhesives. Knowing your felt will help you choose the best gluing method.
This section will explore common felt types and how they interact with hot glue. It will also touch on other glues that work well with felt.
Craft felt, also known as acrylic or polyester felt, is the most common type. It’s budget-friendly and widely available. This felt is generally quite resilient.
It can withstand the heat from a hot glue gun, especially on the low-heat setting. High-heat glue can sometimes make it stiff or slightly shiny.
Wool felt is made from natural wool fibers. It’s softer, more pliable, and more expensive than craft felt. Wool felt is more sensitive to heat.
High-heat glue can easily melt or damage its delicate fibers. It might become brittle. Using a low-heat glue gun is strongly recommended for wool felt.
Even then, testing on a small piece is a wise move.
Blended felts combine wool and synthetic fibers. They offer a balance of durability and softness. Their reaction to hot glue can vary depending on the fiber blend.
It’s always best to test a small, hidden area. This shows you how the specific blend will behave.
Felt sheets vary in thickness. Thin felt is more prone to glue seeping through. Thick felt can handle more glue without it showing on the other side.
When using thin felt, apply glue very sparingly. A fine-tip glue gun helps with this. You want to avoid the glue soaking through and creating unsightly blobs.
Other adhesives can also be used for felt. Fabric glue is designed for textiles. It remains flexible when dry.
White craft glue (like Elmer’s) works too, but it takes longer to dry. It’s good for projects where speed isn’t an issue. For a quick and strong bond on most felts, hot glue is still a top choice when used correctly.
When choosing a hot glue gun, look for one with dual temperature settings. This gives you the flexibility to work with different felt types. A low-heat setting is a must for delicate felt.
A high-heat setting can be useful for attaching felt to rougher surfaces.
Consider the finish you want. Some hot glues dry clear, while others might be slightly opaque. For projects where the glue will be visible, a clear-drying glue is best.
This is especially true for lighter colored felts. It helps maintain the aesthetic of your creation.
Understanding Felt Types
Craft Felt (Synthetic)
Craft felt is made from synthetic fibers, typically acrylic or polyester. It’s the most affordable and widely used felt for general crafting. This type of felt is quite durable and holds its shape well.
It doesn’t fray easily, making it forgiving for beginners.
The synthetic nature of craft felt makes it somewhat resistant to heat. It can generally withstand the temperatures from a low-heat glue gun without significant damage. Even a high-heat setting might be usable on some denser craft felts, but always test first.
The glue might make the felt a bit stiff in that area.
Its texture is often a bit stiffer and less smooth than natural felts. This can be an advantage when gluing, as it provides a more stable surface. However, it can sometimes look less refined for high-end projects.
Wool Felt (Natural)
Wool felt is crafted from 100% natural wool fibers. It is known for its softness, beautiful drape, and luxurious feel. Wool felt is also more breathable and biodegradable than synthetic felt.
It’s often used for higher-quality crafts, toys, and decorations.
Wool felt is much more sensitive to heat. High temperatures can cause wool fibers to shrink, melt, or become brittle. This means that using a high-heat glue gun on wool felt is generally not recommended.
It can permanently damage the material.
When using hot glue on wool felt, always opt for a low-heat glue gun. Even with low heat, it’s wise to test on a scrap piece. The glue should adhere without causing the wool fibers to degrade or change texture.
Blended Felt
Blended felt combines wool fibers with synthetic fibers like rayon or polyester. This type of felt offers a middle ground, aiming for the softness of wool with the durability and affordability of synthetics. The exact ratio of wool to synthetic can vary.
The heat sensitivity of blended felt depends heavily on its composition. A blend with a higher synthetic content will likely be more heat-resistant. A blend with more wool will be more delicate.
Always test hot glue on a scrap piece before committing to your project.
The feel and appearance of blended felt can also vary. Some are quite soft, while others are firmer. This can affect how the glue adheres and how the finished product looks.
Hot Glue Gun Settings and Felt
Low-Heat Glue Guns
Low-heat glue guns are specifically designed to melt glue sticks at a lower temperature. This is crucial for crafting with delicate materials. For felt, especially natural wool felt or very thin synthetic felt, a low-heat setting is the safest bet.
The lower temperature reduces the risk of melting, scorching, or deforming the felt fibers. This helps preserve the texture, color, and overall integrity of the felt. Low-heat glue also provides a slightly more pliable bond once cooled, which can be beneficial for fabric projects.
When using a low-heat gun on felt, you’ll typically get a good adhesion without worrying about damaging the material. It’s an excellent choice for beginners who want to avoid potential mistakes. The cooling time is still fast, making it great for quick assembly.
High-Heat Glue Guns
High-heat glue guns melt glue sticks at a significantly higher temperature. They are best suited for bonding sturdier materials like wood, plastic, metal, or thick cardboard. Using a high-heat gun on felt carries a greater risk of damage.
The intense heat can cause synthetic fibers in craft felt to melt or become shiny. It can shrink or scorch natural wool felt. If you must use a high-heat gun on felt, it is absolutely essential to test it on a scrap piece first.
Look for any signs of discoloration, melting, or stiffening.
If you do use high heat on felt, apply the glue quickly and press the felt into place immediately. This minimizes the duration of heat exposure. However, for most felt crafts, a low-heat option is strongly preferred.
Dual-Temperature Glue Guns
Dual-temperature glue guns offer the best of both worlds. They come with a switch or setting that allows you to choose between low and high heat. This versatility makes them ideal for crafters who work with a variety of materials.
For felt projects, you would simply select the low-heat setting. This ensures safety and quality for your felt pieces. If you decide to use the same glue gun for other, more robust crafts, you can switch to the high-heat setting.
This makes a dual-temperature gun a worthwhile investment for any serious crafter.
Having both options means you don’t need multiple glue guns. You can adapt to different fabric types and project needs seamlessly. It’s about having control over the heat output to protect your materials.
Applying Hot Glue to Felt Effectively
Applying hot glue to felt requires a gentle touch and good technique. The goal is to create a strong bond without making a mess or damaging the felt. This section covers the practical steps for successful hot glue application on felt.
Start with a clean workspace. Make sure your felt pieces and the area you’ll be working on are free from dust and debris. This helps ensure the glue adheres properly.
Dust can weaken the bond.
Heat up your glue gun on the appropriate setting. For most felt, this will be the low-heat setting. Allow the gun to reach its working temperature.
Test the glue on a scrap piece of felt before applying it to your project. Look for how it spreads and dries.
Apply the glue in a thin, even line. Avoid applying too much at once. Over-applying can lead to the glue oozing out the sides.
It can also soak through thinner felt, making the project look messy. Use a fine-tip nozzle if you have one for better control.
Work in small sections. Hot glue cools down rapidly. If you cover a large area with glue, it might start to harden before you can press the felt onto it.
Apply glue to a small section, then immediately press the felt into place.
Press the felt firmly onto the glued area. Hold it in place for about 10-20 seconds. This allows the glue to cool and set properly.
Gentle pressure is usually sufficient. Too much pressure might squeeze out the glue.
If any excess glue does ooze out, let it cool completely. Then, you can carefully trim it away with small, sharp scissors. For stubborn bits, you can try gently peeling it off once fully cooled.
Clean your glue gun nozzle after each use. This prevents dried glue from clogging it. It ensures your glue gun is ready for your next project.
A quick wipe with a soft cloth while the nozzle is still warm is usually enough.
Some crafters suggest using parchment paper or a silicone mat under their project. This protects your work surface from stray glue drips. It also makes it easier to lift projects that might stick slightly.
Preparation Steps
Gather Your Supplies
Before you start gluing, make sure you have everything you need. This includes your felt pieces, your hot glue gun, and glue sticks. Have scissors ready for any trimming.
A small cutting mat can protect your table.
Having all your materials within easy reach prevents interruptions. It ensures a smooth crafting flow. This preparation step saves time and reduces frustration.
It helps you focus on the creative part of your project.
Prepare the Felt
Ensure your felt pieces are clean and dry. Any dust, lint, or moisture can affect how well the glue adheres. If the felt is wrinkled, you can try ironing it on a low setting with no steam.
Be sure to test on a scrap piece first to avoid damage.
Cut out your felt shapes precisely before you begin gluing. It’s much harder to make precise cuts once the glue is applied. Accurate cutting ensures that your pieces fit together well.
Applying The Glue
Test on a Scrap Piece
This is a crucial step for any new material or technique. Take a small scrap of the same felt you are using for your project. Apply a small amount of hot glue to it.
Let it cool and check how the felt looks and feels. See if there’s any discoloration, shrinking, or stiffening.
This test will tell you if your glue gun setting is appropriate. It also shows you how much glue to use. It’s a quick way to avoid ruining your main project.
A few seconds of testing can save a lot of disappointment.
Apply Glue Sparingly
When applying glue to your felt, use a thin, even bead. Avoid laying down thick globs of glue. Too much glue can seep through the felt, creating an unsightly texture.
It can also make the felt stiff and less flexible in that area.
Consider using a fine-tip glue gun if possible. This allows for more precise application, especially for small or detailed areas. If you don’t have a fine tip, try to control the flow from your standard nozzle by pressing the trigger only briefly.
Work in Small Sections
Hot glue cools and hardens very quickly, usually within 15-30 seconds. If you apply glue to a large area all at once, parts of it might start to harden before you can attach your felt. This results in a weak bond.
Instead, apply glue to a small section of your felt or surface. Then, immediately press the corresponding piece of felt onto the glued area. Hold it firmly for a few seconds until the glue sets.
Then move on to the next small section.
Bonding and Finishing
Press and Hold
Once you have applied the glue and positioned the felt, press down gently but firmly. Hold the pieces together for about 10 to 20 seconds. This gives the hot glue enough time to cool and create a solid bond.
You should feel the felt sticking securely.
Avoid applying excessive pressure, as this can squeeze the glue out from the edges. It can also push the felt too deeply into the glue, creating a less aesthetic finish. The goal is to fuse the surfaces together.
Cooling Time
Allow the glued area to cool completely before handling the project roughly. While hot glue sets quickly, it achieves its maximum bond strength as it cools fully. For most crafts, this takes a few minutes.
Avoid pulling or stretching the glued areas until they are fully cooled.
The cooling time also helps to ensure that the glue doesn’t transfer to your hands or work surface. Patience during this stage is key to a durable and neat finish for your felt creation.
Trimming Excess Glue
Sometimes, a small amount of glue might squeeze out from the edges of the felt. Once the glue has cooled completely, you can carefully trim away any excess. Use small, sharp scissors for this.
Be cautious not to cut the felt itself.
For stubborn, hardened glue strings, you might be able to gently pick them off with your fingers or tweezers. In some cases, a gentle scrape with a craft knife might work, but this requires extreme care to avoid damaging the felt.
Common Mistakes and How to Avoid Them
Even with simple crafts, mistakes can happen. Knowing common pitfalls can help you avoid them. This section addresses frequent errors when using hot glue on felt.
It provides tips to ensure your projects turn out perfectly every time.
One of the most common mistakes is using too much heat. This can lead to melting or damaging the felt. Always start with the low-heat setting on your glue gun.
If you don’t have a low-heat option, be very careful with application. Test on scrap felt first.
Another frequent error is applying too much glue. This results in excess glue oozing out. It makes the project look messy.
It can also make the felt stiff. Apply glue in a thin, even line. Work in small sections to control the amount of glue used.
Rushing the process is also a common mistake. Hot glue cools quickly, but it still needs time to set. Pressing the felt and letting it hold for a moment is vital.
Don’t try to attach pieces too quickly. Patience is key for a strong bond.
Not preparing the workspace is another oversight. Hot glue can be sticky. Drips can land on tables or work surfaces.
Protecting your area with parchment paper or a silicone mat is a good idea. This makes cleanup much easier.
Using the wrong type of glue is also an issue. While hot glue is generally good, some highly specialized felts might react better to fabric glue. Always consider the specific felt you are using and test if you are unsure.
Forgetting to test the glue on a scrap piece of felt is a significant mistake. This simple step can prevent major project damage. It allows you to see how the glue will interact with the felt before committing.
Finally, not cleaning your glue gun can lead to problems. Dried glue can clog the nozzle. This affects the glue flow.
Clean the nozzle after each use to keep your tool in good working order. Regular maintenance ensures consistent performance.
Using Too Much Glue
A very common mistake is applying an excessive amount of hot glue. This can lead to several problems. The glue might seep through the felt, creating unsightly bumps and lines.
This is especially true for thinner types of felt. It can also make the glued area stiff and less flexible.
To avoid this, aim for a thin, even bead of glue. If you have a glue gun with a fine-tip nozzle, use it for more precise application. If you only have a standard nozzle, learn to control the trigger to release just enough glue.
Work in small sections so you don’t have too much glue applied at one time.
Applying Glue Too Slowly
Hot glue cools down very quickly. If you take too long to apply the glue or to press the felt into place, the glue will start to harden. This results in a weak bond.
The two pieces of felt won’t stick together properly.
The solution is to work in small sections. Apply glue to a small area, then immediately place the felt piece on top. Hold it firmly for about 10-20 seconds to allow the glue to set.
Then, move to the next small section. This ensures continuous adhesion.
Not Pressing Firmly Enough
Once the glue is applied and the felt is in place, you need to apply gentle pressure. If you don’t press down firmly enough, the glue won’t make full contact with both surfaces. This leads to a weak bond that can easily come apart.
Hold the felt in place for at least 10-20 seconds after applying the glue. This allows the glue to cool and adhere properly. The pressure ensures good contact between the glue and the felt fibers.
Don’t press so hard that you squeeze all the glue out the sides.
Ignoring Felt Type
Different types of felt react differently to heat and adhesives. Using a high-heat setting on delicate wool felt can cause it to melt or shrink. On the other hand, a low-heat setting might not be strong enough for bonding thick craft felt to a very rough surface.
Always identify your felt type. For synthetic craft felt, a low-heat setting is generally safe. For wool or blended felt, low-heat is essential, and testing is highly recommended.
If unsure, always test on a scrap piece. This prevents unexpected damage to your project.
Not Testing First
Perhaps the biggest mistake is jumping straight into gluing without testing. Felt can be sensitive to heat. The glue itself can affect the texture or color.
Testing on a small, inconspicuous scrap piece is vital.
This simple step allows you to observe how the glue and felt interact. You can determine the correct glue gun temperature, the right amount of glue, and the best application technique. It’s a small effort that can prevent major project failure.
It’s like a dress rehearsal for your craft.
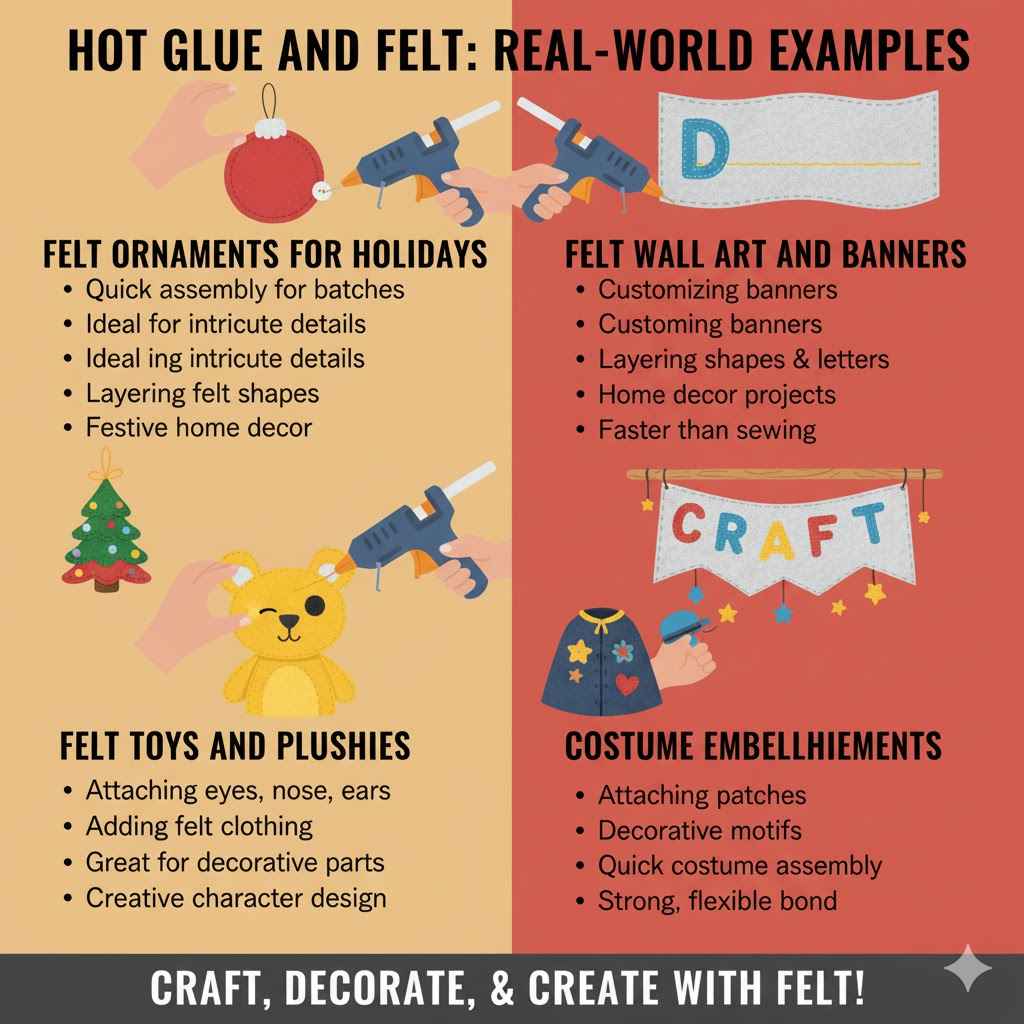
Hot Glue and Felt: Real-World Examples
Seeing how hot glue and felt are used in real projects can inspire you. It also shows the practical results of applying these techniques. Here are a few examples of successful projects.
One common use is in creating felt ornaments for holidays. Crafters often cut out shapes like stars, hearts, or gingerbread men from felt. They then use hot glue to attach smaller felt details, such as buttons, glitter, or embroidered elements.
The quick-drying nature of hot glue is perfect for this. It allows for rapid assembly, especially when making many ornaments.
Another example is in making felt toys or plushies. Seams on these items are often glued together with hot glue, especially for decorative purposes or when a sewing machine isn’t available. For instance, attaching felt eyes, noses, or clothing to a stuffed animal is easily done with hot glue.
It ensures the pieces stay put and add character to the toy.
In costume making, hot glue is frequently used to attach felt embellishments to fabric. Think of felt patches, decorative motifs, or even elements of a felt mask. The glue provides a strong bond that can withstand movement.
It’s a faster alternative to sewing for attaching these decorative pieces.
Consider a felt flower bouquet. Individual felt petals are cut out. Hot glue is used to join the center of the petals, forming a bloom.
Then, the base of the flowers can be glued onto stems or a backing. This method allows for a quick and effective way to assemble intricate floral designs.
Even in home decor, hot glue on felt has its place. Crafters might create felt banners or wall hangings. They use hot glue to attach letters, shapes, or borders to a larger felt background.
This adds dimension and detail efficiently.
One crafter, Sarah, made felt pumpkins for autumn decor. She cut out pumpkin shapes and smaller felt pieces for stems and leaves. Using a low-heat glue gun, she attached the stems and leaves securely.
She also added small felt buttons for decoration. The project took less than an hour, and the pumpkins looked professionally made. She noted that using a fine-tip glue gun made it easy to apply glue just where she needed it.
Another crafter, Mark, was making a felt superhero mask for his child. He cut out the mask shape from stiff craft felt. He then used hot glue to attach smaller felt pieces for eye details and decorative patterns.
He used a low-heat setting to ensure the felt didn’t melt. The mask was ready to wear in under 15 minutes, and the glue held up through energetic play.
Felt Ornaments for Holidays
Creating festive felt ornaments is a popular craft activity, especially around holidays like Christmas. Crafters often cut out various shapes from felt, such as stars, snowflakes, trees, or simple circles. They then use hot glue to attach smaller decorative elements.
These elements can include glitter, beads, sequins, or even smaller pieces of contrasting felt. For example, a red felt circle can become a Christmas ornament by gluing on small white felt dots to resemble peppermint candy. Or, felt shapes can be layered to create a more dimensional design.
Hot glue is ideal here because it dries quickly, allowing for rapid assembly, which is great when making a large batch of ornaments.
The quick bonding of hot glue means you can assemble multiple ornaments in a single session. This makes it efficient for seasonal crafting. The low-heat setting is important for finer felt details to avoid any damage.
Felt Toys and Plushies
Felt is a fantastic material for making handmade toys and plushies. Its soft texture and vibrant colors make them appealing to children. Hot glue offers a way to assemble these toys, especially for decorative elements or when sewing is not desired or feasible.
For instance, when creating a felt animal, you might use hot glue to attach its eyes, nose, mouth, or ears. You can also use it to add felt clothing or accessories to the toy. For example, gluing a felt cape onto a felt superhero figure or attaching a small felt hat to a felt bear.
The glue provides a strong hold, ensuring these smaller parts stay attached during play. For plushies intended for very young children, sewing seams is generally safer. However, for decorative additions or toys for older children, hot glue is a convenient and effective choice.
Always ensure the glue is fully cooled and secure before giving the toy to a child.
Felt Wall Art and Banners
Hot glue is also useful for creating decorative felt items for home decor. Felt wall art and banners are popular projects that allow for a lot of creativity.
Crafters can cut out letters from felt to spell out a word or name for a banner. They can then use hot glue to attach these letters to a larger felt background. They might also cut out shapes like hearts, stars, or leaves to add visual interest.
For example, a felt wall hanging could feature a scene with glued-on felt trees and a sun.
The ability to quickly adhere multiple pieces makes it easy to build up layers and complex designs. This method is much faster than sewing individual pieces. The result is a vibrant, textured piece of art.
For a clean look, it’s best to apply glue to the back of the felt shapes being attached.
Frequently Asked Questions
Question: Can I use a high-heat glue gun on craft felt?
Answer: Yes, you can often use a high-heat glue gun on craft felt, which is usually synthetic. However, it is strongly recommended to test it on a scrap piece first. High heat can sometimes make craft felt a bit stiff or slightly shiny.
For delicate or natural wool felt, a low-heat setting is much safer.
Question: Will hot glue soak through thin felt?
Answer: Yes, hot glue can soak through thin felt, especially if too much is applied. To prevent this, use a thin bead of glue, work in small sections, and consider using a fine-tip glue gun for better control. Pressing the felt gently can also help manage the glue spread.
Question: How long does hot glue take to dry on felt?
Answer: Hot glue cools and sets very quickly, usually within 15-30 seconds. However, it achieves its strongest bond after cooling completely, which might take a few minutes. Avoid putting stress on the glued area until it has cooled down fully.
Question: Is hot glue permanent on felt?
Answer: Hot glue creates a strong bond, but it is not always permanent, especially under stress or heat. While difficult to remove cleanly, it can sometimes be peeled or cut away. For a truly permanent bond that remains flexible, a fabric glue might be a better option for some projects.
Question: Can I wash a project made with hot glue and felt?
Answer: Washing projects made with hot glue and felt can be tricky. The heat from a washing machine or dryer can weaken or melt the glue. Hand washing in cool water and air drying is generally the safest method.
However, it’s best to check specific crafting advice for the project type.
Summary
Yes, you can use hot glue on felt, and it’s a popular method for crafts. The key is to match your glue gun setting to the type of felt. Use low heat for delicate wool felt and craft felt.
Apply glue in thin lines and work in small sections. Always test first on a scrap piece. This guide shows you how to get strong, neat bonds for all your felt projects.