DIY Cordless Drill Holder: Easy, Space-Saving Workshop Solution
Are you tired of misplacing your cordless drill or struggling to find a safe spot to keep it while you work? Imagine having a simple, handy holder that keeps your drill within reach and neatly organized.
Creating your own DIY cordless drill holder is easier than you think, and it can save you time, protect your tool, and keep your workspace tidy. You’ll discover step-by-step instructions to build a custom holder that fits your needs perfectly.
Ready to make your work smoother and your drill easier to find? Let’s dive in!
Benefits Of A Cordless Drill Holder
A cordless drill holder offers many benefits for your workshop. It keeps your drill safe and easy to find. This small tool can improve your work area and save time. Using a holder is a simple way to organize your space. It also helps protect your drill from damage. Below are the main benefits of having a cordless drill holder.
Maximizing Workshop Space
A cordless drill holder helps clear up your workbench. It stores your drill in one spot, saving room. This frees space for other tools and projects. The holder can be mounted on walls or shelves. It keeps your workshop tidy and less crowded. More space means you can work more comfortably.
Protecting Your Drill
Keeping your drill in a holder stops it from falling. It reduces the risk of scratches and dents. The holder keeps the drill stable and secure. This protection helps your drill last longer. A safe drill means fewer repairs and replacements. It also keeps the battery and parts in good shape.
Improving Accessibility
A cordless drill holder keeps your drill within reach. You save time searching for your tool. Quick access means you can start work faster. It also helps keep your hands free and safe. The drill stays ready for use anytime you need it. This ease of use improves your workflow and focus.
Materials Needed
Gathering the right materials is the first step for a DIY cordless drill holder. You need simple items that you can easily find at home or buy at a local store. Choosing the correct tools and safety gear helps you build your holder quickly and safely.
Common Household Items
Wood scraps or old wooden boards work well as the base. Screws or nails hold the parts together. A small piece of foam or rubber helps protect the drill from scratches. Hooks or brackets can be used to hang the holder on the wall. Sandpaper smooths rough edges for a clean finish.
Recommended Tools
A cordless drill makes the job easier and faster. A screwdriver or drill bits are needed to insert screws. A measuring tape ensures accurate cuts and placements. A saw is useful for cutting wood pieces to size. A pencil helps mark measurements on the wood.
Safety Gear
Wear safety glasses to protect your eyes from dust and debris. Gloves keep your hands safe from splinters and sharp tools. A dust mask prevents inhaling sawdust. Use ear protection if using loud power tools. Always work in a well-lit and ventilated area.
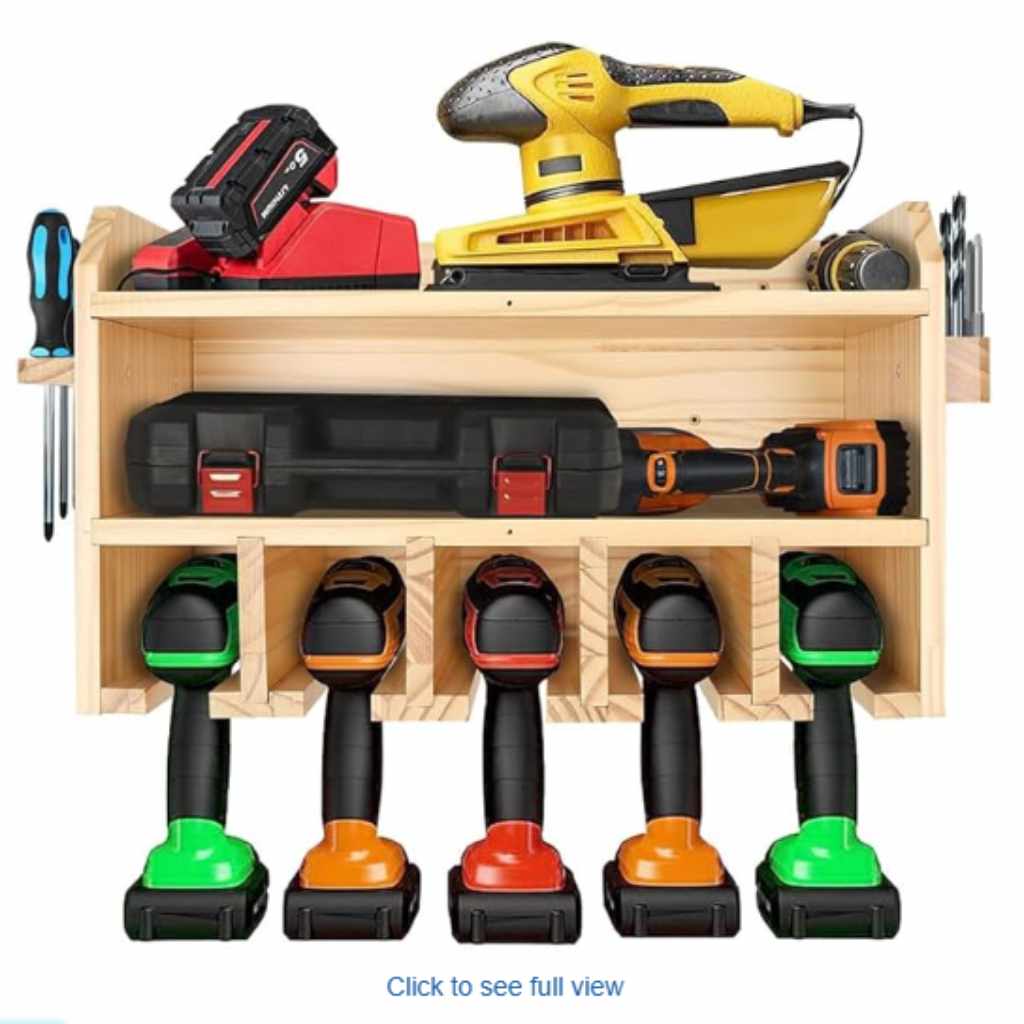
Choosing The Right Design
Choosing the right design for a DIY cordless drill holder is key to keeping your workspace neat. The design affects how easy it is to store and grab your drill. It also influences how much space you save. Picking the right type helps protect your drill from damage. It makes your work faster and more organized.
Wall-mounted Options
Wall-mounted holders save floor and bench space. They keep your drill visible and easy to reach. These holders often use hooks or slots to hold the drill securely. They work well in small workshops or garages. Installation is simple, using screws or adhesive strips. You can place them near your workbench for quick access.
Portable Holders
Portable holders offer flexibility and mobility. They let you carry your drill around the workspace. These holders often come with clips or straps to attach to belts or bags. They keep your drill safe while moving from place to place. Portable designs are great for outdoor jobs or large areas. They reduce the chance of dropping or losing your drill.
Customizable Features
Customizable holders adapt to your specific needs. You can add compartments for drill bits and accessories. Some designs allow size adjustments for different drill models. Custom holders fit your workspace perfectly. They help keep all tools organized in one place. This feature saves time and prevents clutter during projects.
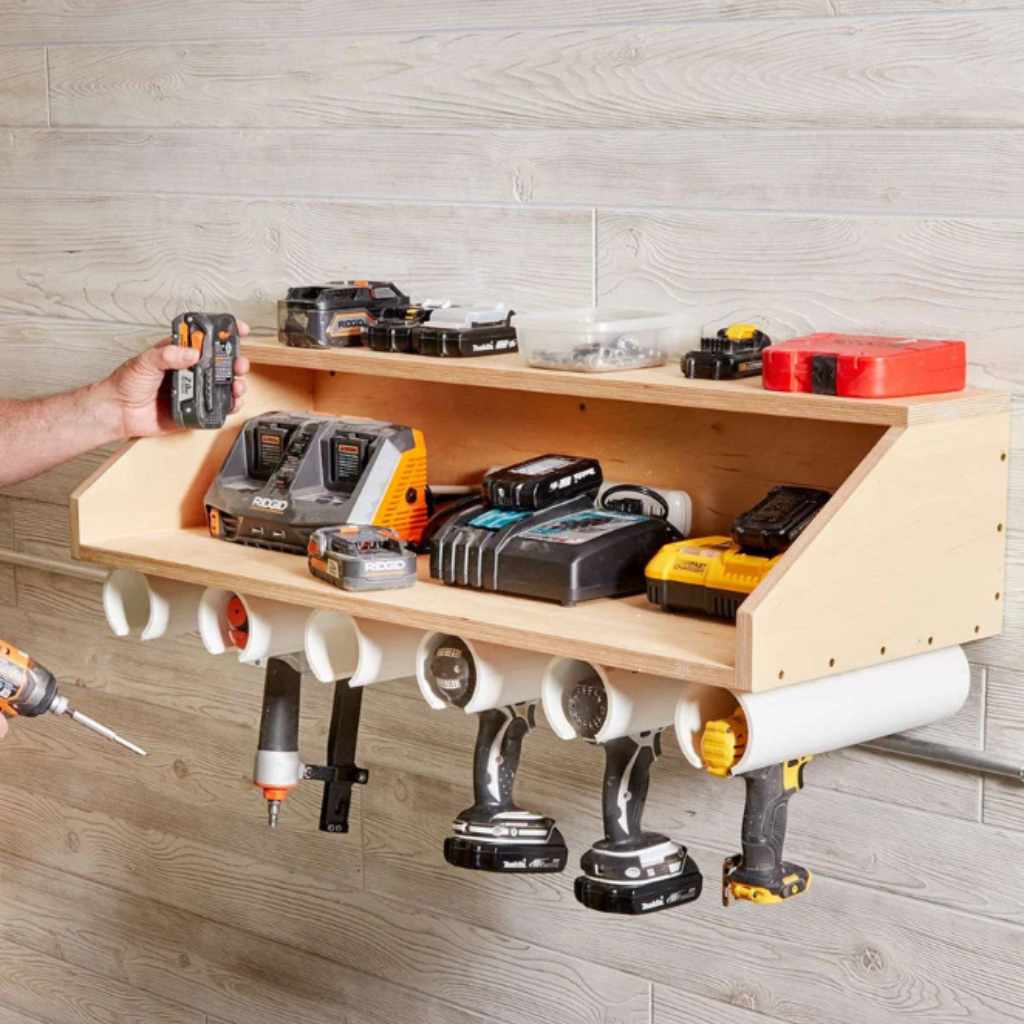
Step-by-step Assembly
Building your own cordless drill holder is simple. Follow clear steps to create a sturdy and useful storage piece. This guide breaks down the process into easy parts.
Preparing The Base
Start with a flat wooden board for the base. Sand the surface to avoid splinters. Choose a size that fits your workspace and drill size. Mark spots where the holders will attach. This ensures even spacing and balance.
Attaching Holders
Use wooden blocks or PVC pipes as holders. Cut them to fit your drill’s shape and size. Drill holes in the base to fix the holders. Secure each holder with screws or strong glue. Check that holders are stable and upright.
Securing The Drill
Place the drill into the holders to test fit. Adjust the size if the drill feels loose or tight. Add foam or rubber padding inside holders for a snug fit. Ensure the drill stays in place but is easy to remove. Your drill holder is now ready to use.
Tips For Installation
Installing a DIY cordless drill holder needs care and attention. Proper installation keeps the holder strong and easy to use. Follow these tips to make the process smooth and efficient.
Optimal Placement
Choose a spot near your workbench or tool area. Keep the holder at a height that feels natural. This reduces bending or stretching when reaching for the drill. Make sure the location has enough space around it. Avoid crowded or tight spots to allow easy access.
Ensuring Stability
Use strong screws or wall anchors for mounting. Test the holder by gently pulling it after installation. The holder must not wobble or shift under weight. Attach it to a solid surface like wood or studs. This prevents the holder from falling or damaging walls.
Avoiding Common Mistakes
Do not mount the holder too high or too low. Avoid weak surfaces such as drywall without anchors. Skip using small or short screws that can’t hold weight. Don’t ignore the drill’s size when making the holder. Ensure the drill fits snugly without being too tight or loose.
Maintenance And Upkeep
Maintaining your DIY cordless drill holder keeps it safe and useful. Regular care extends its life and keeps it working well. Simple steps help avoid damage and problems.
Regular Cleaning
Dust and dirt can build up on the holder. Clean it often with a soft cloth. Avoid using water on wooden parts. Use a dry brush for tight spots. This keeps the holder free from grime.
Checking For Wear
Look at the holder for cracks or weak spots. Check screws and joints for tightness. Worn parts can cause the holder to fail. Replace or fix any damaged sections quickly. This keeps your drill safe and secure.
Adjusting Fit Over Time
Materials may change shape after use. Check how the drill fits in the holder. Tighten or loosen screws if needed. Adjust the holder to keep the drill stable. This stops the drill from falling or slipping.
Creative Variations
Creative variations make your DIY cordless drill holder more useful and fun. They let you customize the holder to fit your needs and space. You can add features that keep tools organized and ready to use.
Try different ideas to match your style and workshop setup. Small changes can improve how you store and access your drill. This section shows ideas for making your holder smarter and greener.
Incorporating Charging Stations
Add a charging station to keep your drill powered up. Build a spot to hold the charger and battery together. This saves space and keeps cords neat. Your drill stays charged and ready without extra effort.
Adding Storage For Accessories
Create compartments or hooks for drill bits and other tools. This keeps all parts in one place. No more searching for small pieces. It helps you work faster and stay organized.
Using Recycled Materials
Use old wood, plastic, or metal to build your holder. Recycling materials saves money and helps the environment. It adds character to your project. Plus, it makes your holder unique and eco-friendly.
Frequently Asked Questions
What Materials Are Needed For A Diy Cordless Drill Holder?
You need wood, screws, a drill, sandpaper, and paint. Choose sturdy wood like plywood or hardwood for durability. These materials are affordable and easy to find in hardware stores or online.
How Do I Mount A Cordless Drill Holder On The Wall?
Use screws and wall anchors to secure the holder. First, mark the drilling spots, then drill pilot holes. Finally, attach the holder firmly to support the drill’s weight safely.
Can I Customize My Cordless Drill Holder Design?
Yes, customize size, shape, and color to fit your workspace. Add compartments for drill bits or batteries. Personalizing improves organization and matches your workshop style.
How Does A Cordless Drill Holder Improve Workspace Efficiency?
It keeps your drill accessible and organized, reducing search time. A holder prevents damage by securing the tool properly. This setup enhances productivity and safety during projects.
Conclusion
Building a cordless drill holder saves space and keeps tools ready. You can make it with simple materials and basic skills. It helps keep your workspace clean and organized. Having your drill handy makes any project easier and faster. Try this DIY project to improve your workshop today.
Small changes like this make a big difference in work flow. Enjoy a neat, safe, and efficient workspace with your new holder.