DIY Maple Tree Tap: Your Genius, Essential Method
Making a DIY maple tree tap is simple: cut a 4-inch hardwood dowel or branch, drill a 1/4-inch hole lengthwise through the center for sap flow, and carefully whittle one end into a slight taper. This creates a functional, all-natural spile that you can gently tap into a pre-drilled hole in a maple tree.
Hello there, fellow maker! Md Meraj here, your guide in the workshop. Have you ever tasted real, homemade maple syrup? It’s a game-changer. That golden sweetness is a world away from the stuff in the store. Many people think making it is complicated or expensive. They see special metal taps and tubing and figure it’s a pro-level project. But I’m here to show you a simpler, more connected way. We are going to craft our own maple tree tap—a spile—using basic tools and a piece of wood. This guide will walk you through every step, making it easy and fun. Let’s get started and bring that incredible flavor from the forest to your breakfast table.
Why Make Your Own Maple Tree Tap?
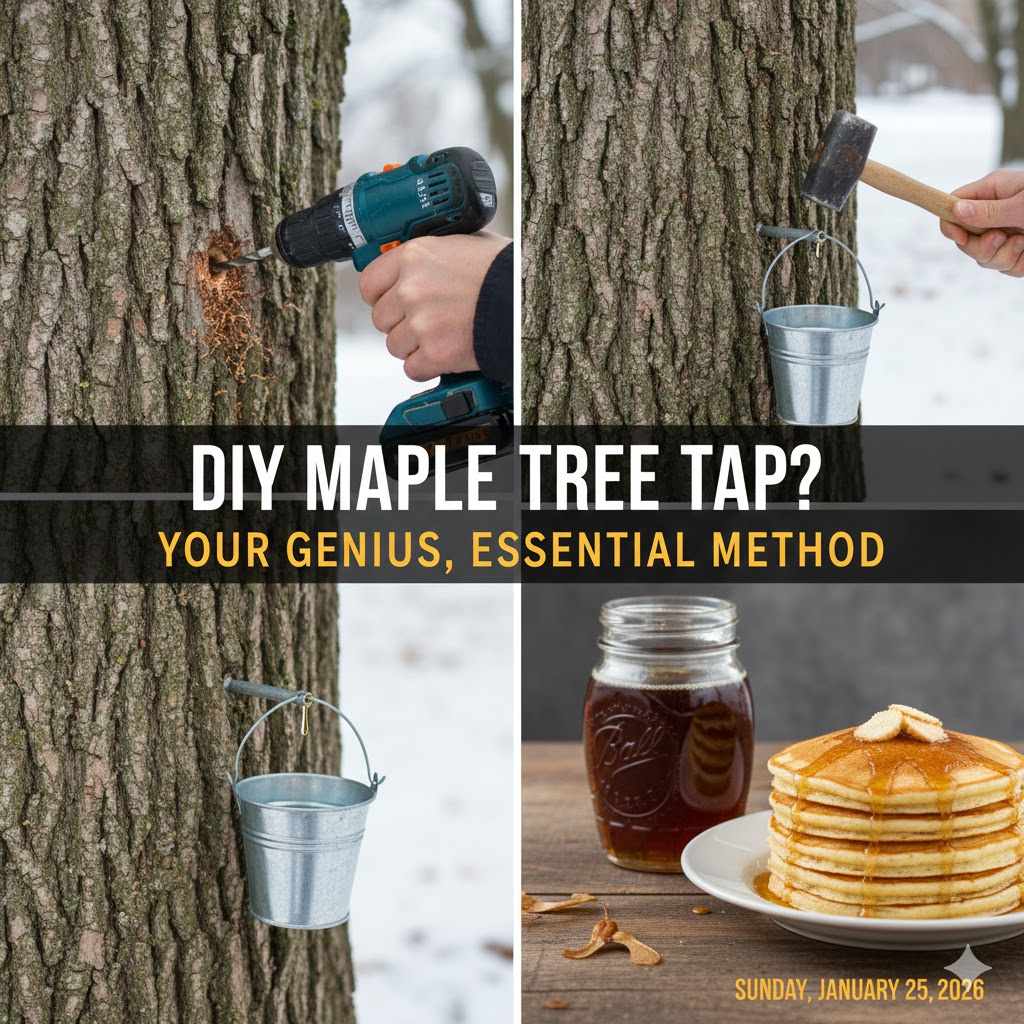
Before we pick up our tools, let’s talk about why this project is so special. Creating your own tap, or spile, isn’t just about saving a few dollars. It’s about connecting with an age-old tradition in a hands-on way. When you craft the tool that gathers the sap, you become part of the entire process from start to finish. It’s incredibly rewarding.
Here are a few reasons why a DIY maple tree tap is a genius move for any enthusiast:
- It’s Incredibly Affordable: You can make a tap from a fallen branch or an inexpensive hardwood dowel. There’s no need to buy shiny metal spiles when a simple piece of wood works just as well.
- You Learn a New Skill: This project combines basic woodworking with a bit of nature knowledge. You’ll practice simple shaping and drilling, building your confidence for bigger projects down the road.
- It Connects You to Nature: Using a natural material to gather sap from a tree feels right. It deepens your appreciation for the resources around you and the magic of the changing seasons.
- It’s Sustainable: Finding a fallen branch in your own backyard is the ultimate in sustainability. You’re using a natural, biodegradable material to create something useful.
Understanding the Magic: How Maple Tapping Works
So, how does a tree give us sap? It’s a beautiful, natural process. During the late winter and early spring, maple trees act like a perfect pump system. The magic happens with the right weather: freezing nights (below 32°F) followed by warmer, sunny days (above 40°F).
At night, when it’s cold, the tree pulls water up through its roots. During the day, as the sun warms the tree, pressure builds up inside. This pressure pushes the watery, sugary sap throughout the tree to feed the buds that will soon become leaves. By drilling a small hole and inserting a tap, we are simply redirecting a tiny bit of that upward flow into our buckets. The tree has plenty of sap to spare, and when done correctly, tapping causes no harm.
Safety First: Tapping Trees the Right Way
Our top priority is always the health of the tree. We are partners with nature in this project, not just takers. A healthy tree will provide sap for many years to come, so let’s treat it with respect. Following these simple rules ensures you tap safely and responsibly.
- Choose Healthy Trees: Only tap trees that look strong and healthy. Avoid trees with large dead branches, fungus, or damaged bark.
- Measure the Tree: A maple tree should be at least 10 inches in diameter (about 31 inches around) before you put one tap in it. You can use a flexible measuring tape to check the circumference.
- Don’t Over-Tap: A tree’s size determines how many taps it can support. Stick to this simple guide to be safe.
| Tree Diameter | Maximum Number of Taps |
|---|---|
| 10 to 17 inches | 1 tap |
| 18 to 24 inches | 2 taps |
| 25 inches or more | 3 taps |
Remember, never put more than three taps in any single tree, no matter how large it is. It’s always better to be conservative to protect the tree’s health for future seasons.
Gathering Your Tools and Materials
You’ll be happy to see how simple the list of supplies is. You likely have most of these items in your workshop or garage already. No fancy equipment is needed here, just the basics to get the job done right.
| Tool or Material | Description | Why You Need It |
|---|---|---|
| Hardwood Branch or Dowel | A straight piece of non-toxic hardwood, about 3/4 to 1 inch thick. Maple, ash, or oak work well. | This will become your tap (spile). |
| Drill and Drill Bits | A cordless or corded drill. You’ll need a long bit for the channel (1/4-inch) and another bit for the tree (e.g., 5/16 or 7/16-inch). | To drill the sap channel in the tap and the taphole in the tree. |
| Hand Saw | A simple crosscut saw is perfect. | To cut your branch or dowel to the right length. |
| Whittling Knife or Utility Knife | A sharp knife for carving and shaping wood. | To taper one end of the tap so it fits snugly in the tree. |
| Sandpaper | Medium-grit sandpaper (around 120-grit). | To smooth out your finished tap. |
| Sap Collection Container | A clean, food-grade bucket, plastic jug, or glass jar. | To collect the sap as it drips from the tap. |
| Hammer or Mallet | A rubber mallet is ideal, but a hammer will work. | To gently set the tap into the tree. |
Choosing the Perfect Maple Tree
The next step is to find the right tree. While many types of maple trees produce sap, the Sugar Maple (Acer saccharum) is the star of the show. Its sap has the highest sugar content, which means you’ll need to boil less sap to get syrup. But don’t worry if you don’t have sugar maples! Red Maples and Silver Maples also work; you’ll just need to collect a bit more sap.
Key Identification Features
Identifying maple trees in the winter without their leaves can feel tricky, but you can do it by looking at the bark and branches. Here’s what to look for:
- Opposite Branching: This is the biggest clue. On a maple tree, branches and buds grow directly across from each other. Stand back and look at the shape of the smaller branches. Many other trees have alternating branching patterns.
- Bark: On young maple trees, the bark is smooth and grey. As Sugar Maples mature, the bark becomes thick, grey-brown, and develops deep furrows and shaggy-looking vertical ridges. Red maple bark tends to have tighter ridges.
- Buds: Sugar Maple buds are very sharp, pointed, and brown. Red Maple buds are rounded and, you guessed it, red.
For extra help, your local university extension service is a fantastic resource. This guide from the Michigan State University Extension has excellent photos and tips for identifying maples.
The Genius Method: Crafting Your DIY Maple Tree Tap (Step-by-Step)
Alright, let’s get to the fun part—making your tap! This process is straightforward. Take your time and enjoy the feeling of creating something useful with your own hands. We are essentially making a small wooden spout.
- Select Your Wood: Find a straight, solid piece of hardwood. A fallen branch from a maple or oak tree is perfect. If you don’t have a branch, a hardwood dowel from the hardware store works great too. Your piece should be about 3/4 to 1 inch in diameter. Avoid softwoods like pine, as they can flavor the sap.
- Cut to Length: Use your hand saw to cut the wood to a length of about 4 inches. This gives you enough length to securely fit into the tree with plenty left sticking out to hang a bucket.
- Drill the Sap Channel: This is the most important step. You need to drill a hole through the center of the wood, from one end to the other. Clamp the wood securely in a vise or to your workbench. Choose a long drill bit, about 1/4-inch in diameter. Drill slowly and steadily to keep the hole straight. This channel is where the sap will flow.
- Taper the End: Now, pick one end to be the “tree side.” Using your whittling knife, carefully shave down this end to create a gentle taper. Don’t make it too sharp like a pencil point. You just want to narrow it enough so it will wedge snugly into the taphole you’ll drill in the tree. The taper should be about 1 to 1.5 inches long.
- Carve a Lip or Notch: On the other end (the “drip end”), you need a way to hang your collection bucket. The easiest way is to carve a simple notch on the top side, about half an inch from the end. This will catch the handle of a bucket or a wire bail.
- Sand and Sanitize: Use your sandpaper to smooth any rough spots on the tap, especially around the tapered end and the sap channel opening. Once it’s smooth, it’s a good idea to sanitize it. Simply boil the finished tap in water for about 10-15 minutes to kill any bacteria, then let it air dry completely.
Congratulations! You’ve just crafted a beautiful, functional maple tap. It’s a tool that people have been making for centuries, and now you have one of your own.
Tapping the Tree: Putting Your DIY Spile to Work
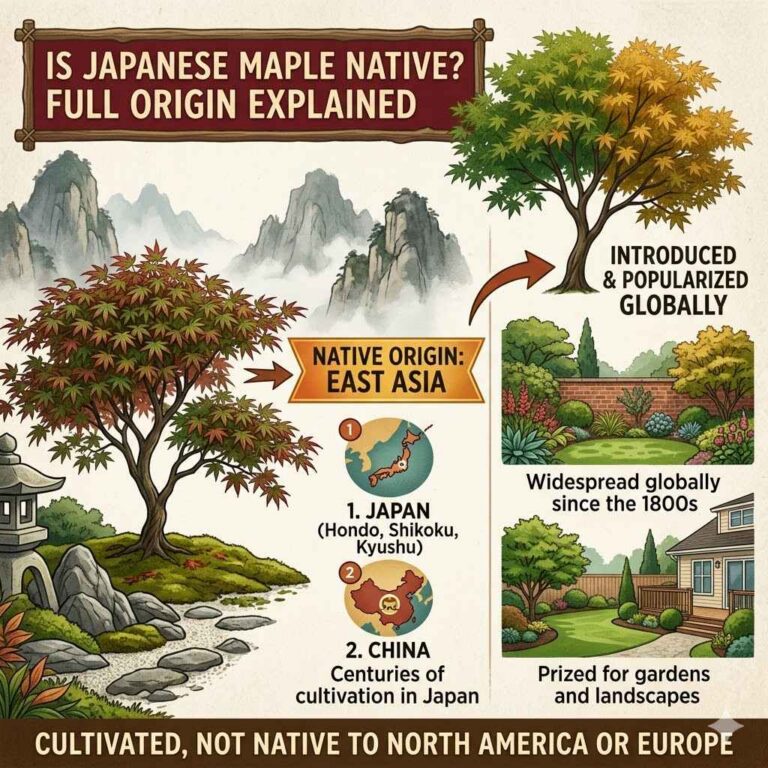
With your handmade tap ready to go, it’s time for the most exciting moment: tapping the tree. Pick a warm, sunny day when the sap is likely to be flowing.
- Find the Right Spot: Look for a spot on the trunk on the south or southwest side of the tree, as this side warms up first in the sun. Choose a section of healthy-looking bark, away from any old tapholes or injuries. The best height is usually around 2 to 4 feet off the ground—whatever is a comfortable working height for you.
- Drill the Taphole: Choose a drill bit that is the same size or just slightly smaller than the tapered end of your tap. You want a tight fit. Drill into the tree at a slight upward angle. This helps the sap flow out easily. The hole should be about 1.5 to 2 inches deep. You’ll know you’ve gone deep enough when the wood shavings change from light-colored sapwood to darker heartwood.
- Clear the Hole: Gently blow into the hole or use a small twig to clear out any wood shavings. A clean hole allows the sap to flow freely.
- Insert Your Tap: Place the tapered end of your DIY tap into the hole. Using your mallet or hammer, give it a few gentle taps. You don’t need to drive it in hard! Just tap until it is snug and secure. You might see sap start to drip immediately, which is a wonderful sign.
- Hang Your Collector: Hang your bucket or jug from the notch you carved. If your container doesn’t have a handle, you can rig one with a piece of wire. Now, listen for that magical sound—the first “plink, plink” of sap hitting the bottom of the bucket.
From Sap to Syrup: The Basics
Collecting the sap is only half the fun. The next step is turning that clear, watery liquid into rich, thick syrup. The basic process is simple: you boil the sap to evaporate the excess water, leaving behind the concentrated sugar. Just be aware, you need to boil a LOT of sap.
Key Ratios and Temperatures
Boiling sap is more of an art than a science, but a few key numbers will help guide you. It’s crucial to do this outdoors or in a well-ventilated space (like a garage with the door open), as it produces a massive amount of steam.
| Fact | Guideline |
|---|---|
| Sap-to-Syrup Ratio | It takes approximately 40 gallons of sap from a Sugar Maple to make 1 gallon of syrup. For other maples, the ratio might be closer to 60:1. |
| Boiling Temperature | Syrup is finished when it reaches a temperature of 7°F above the boiling point of water. Water boils at 212°F at sea level, so syrup is done around 219°F. This can change based on your altitude and the daily air pressure. |
| The Finishing Test | Dip a cool spoon into the boiling syrup. If it sheets off the spoon in a wide drip instead of a thin stream, it’s ready! |
For a complete guide on this part of the process, the University of New Hampshire Extension provides excellent, in-depth instructions on backyard boiling.
End of Season Care: Helping Your Tree Heal
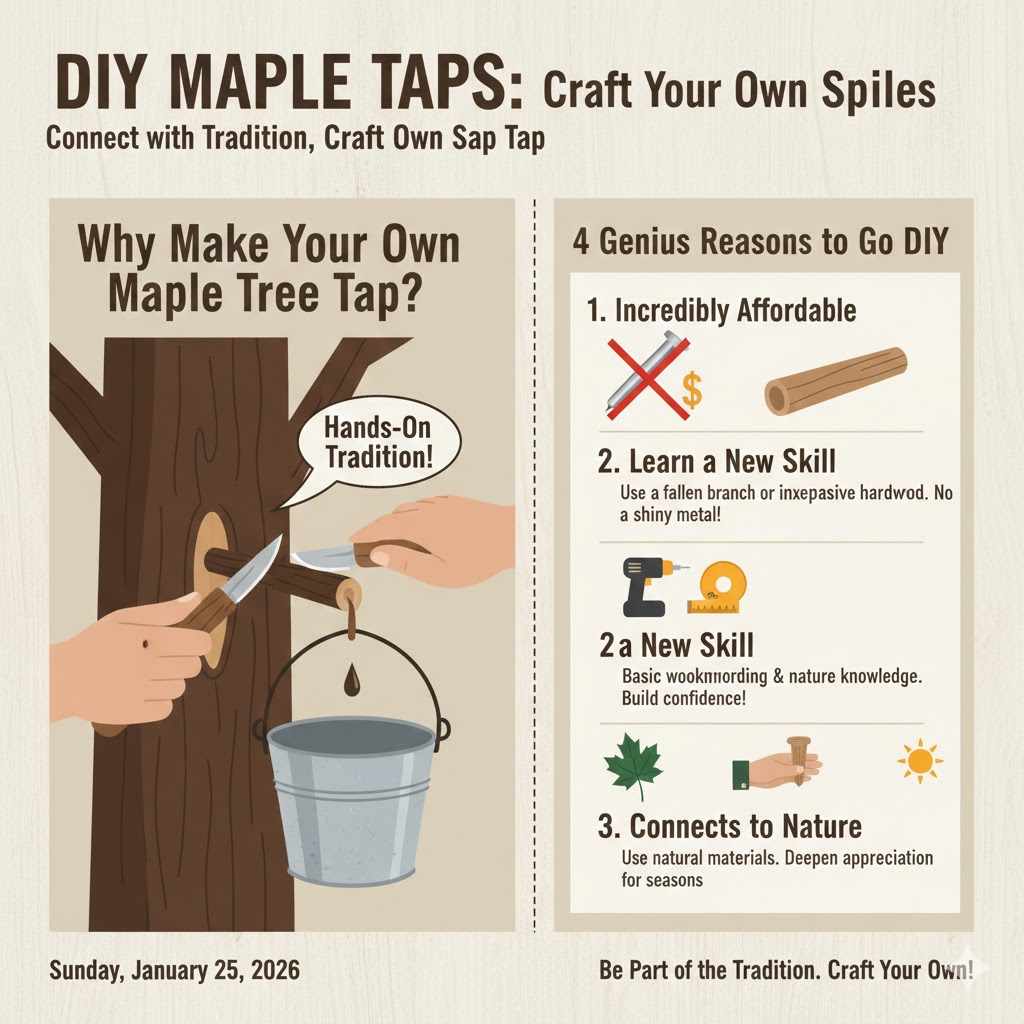
When the season ends, it’s time to help our tree partners heal. The tapping season is over when the weather stays consistently above freezing and you see the tree’s buds begin to swell. At this point, the chemistry of the sap changes, and it’s no longer good for making syrup.
- Remove Your Taps: Gently wiggle your DIY spiles out of the tree. A pair of pliers can help if they are stuck, but be gentle.
- Do NOT Plug the Hole: This is a common mistake. Do not plug the taphole with a twig or any other material. Trees have a natural ability to heal themselves. The hole will close up on its own over the next year. Plugging it can trap moisture and introduce disease.
- Clean and Store: Wash your handmade taps, buckets, and any other equipment with hot water. Let them dry completely and store them in a clean, dry place for next year.
Frequently Asked Questions
Your Questions Answered
What is the best wood for a DIY maple tap?
The best woods are dense, non-toxic hardwoods that won’t impart a strong flavor to the sap. Maple, Ash, Oak, or even fruitwoods like Apple are excellent choices. Avoid porous woods or aromatic woods like Cedar or Pine.
When is the best time to tap maple trees?
The season typically runs from late January to early March, depending on your location. The key is the weather pattern: nights below freezing (20s °F) and days above freezing (40s °F). This daily freeze-thaw cycle gets the sap flowing.
Can I tap any kind of maple tree?
Yes! While Sugar Maples are preferred for their high sugar content, you can also tap Red, Silver, and Box Elder maples. You’ll just need to collect more sap from these trees to produce the same amount of syrup.
How do I know if my maple tree is big enough to tap?
Use a flexible measuring tape to measure the distance around the trunk (circumference) at about chest height. If the circumference is 31 inches or more (which equals a 10-inch diameter), it is safe for one tap.
Will tapping my tree hurt it?
When done correctly on a healthy, mature tree, tapping does not cause long-term harm. A single tap removes only a small fraction of the tree’s total sap, and the tree will heal the small taphole on its own.
Why isn’t sap flowing from my tap?
The most common reason is the weather. If it’s too cold, too warm, or if the temperature hasn’t been cycling above and below freezing, the sap won’t run. Be patient! It can also mean your taphole is too shallow or has become clogged.
How should I store the sap before boiling?
Sap is perishable, just like milk. You should store it in clean, food-grade containers in a very cold place, like packed in snow or in a spare refrigerator. Plan to boil it within a few days of collecting it to ensure the best flavor.
Your Journey into a Sweet Tradition
There you have it. You’ve learned how to identify the right tree, craft your very own tap from a simple piece of wood, and start the wonderful process of collecting maple sap. This project is about so much more than making syrup. It’s about slowing down, observing the seasons, and creating something wholesome with your own two hands. The first time you taste that warm, sweet syrup that you made—from a tap you crafted yourself—is a moment of pure satisfaction.
I hope this guide has given you the confidence to give it a try. Embrace the process, have fun, and enjoy the sweet reward of your efforts. Happy tapping!