How a Drill Bit Is Made: A Simple Guide
Ever wondered how those pointy metal tools, drill bits, get made? It might seem tricky, but it’s actually a neat process. Many people find learning How a Drill Bit Is Made: Step-by-Step Guide a bit confusing at first.
We’ll break it down easily. This guide will show you each step so you can see how they are crafted. Get ready to learn about the creation of a common tool.
How a Drill Bit Is Made Understanding The Process
This section explores the fundamental stages involved in manufacturing a drill bit. It covers the selection of raw materials, the shaping processes, and the heat treatment that gives drill bits their strength and durability. We will look at how metal is transformed into a precise cutting tool, step by step.
This overview sets the stage for a detailed look at each manufacturing phase.
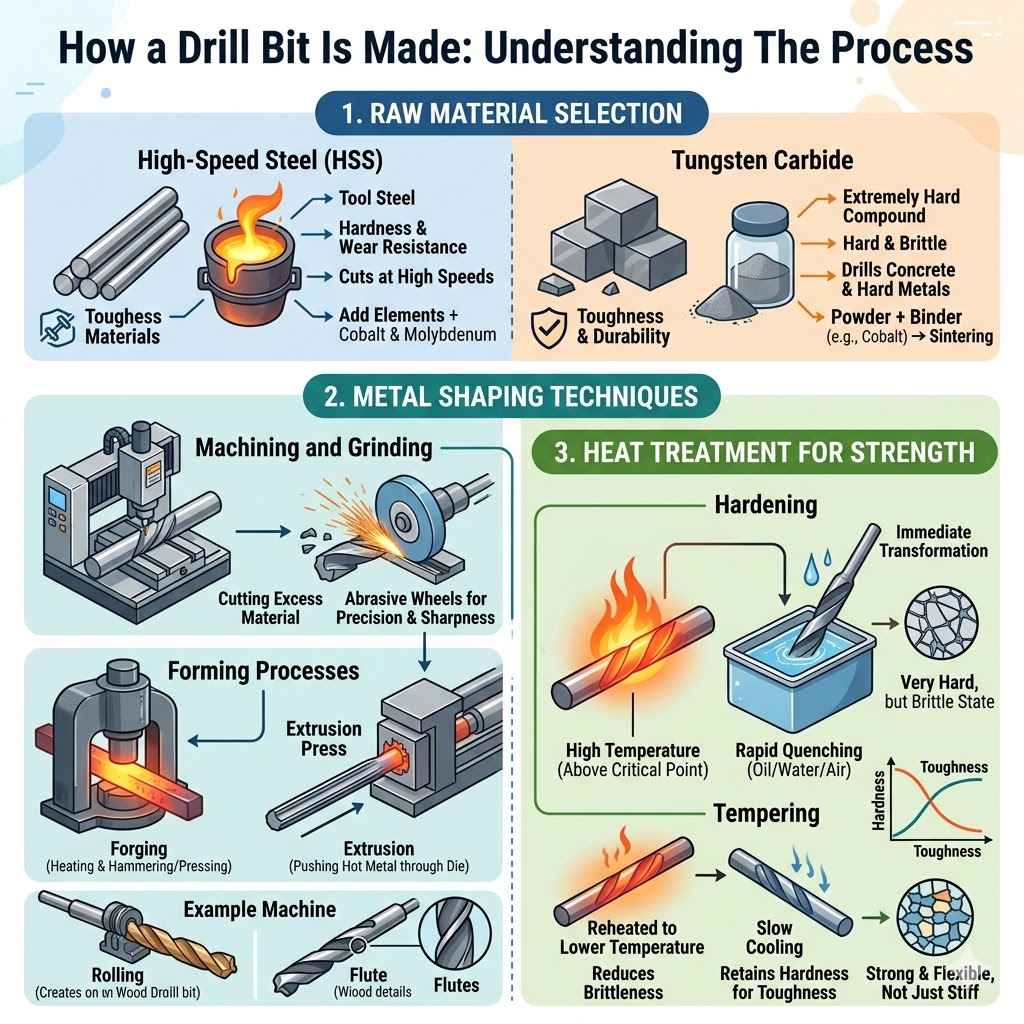
Raw Material Selection
Drill bits need to be tough. They must cut through hard materials without breaking or wearing down too quickly. The most common materials for drill bits are high-speed steel (HSS) and tungsten carbide.
These metals are chosen for their hardness and ability to withstand high temperatures generated during drilling. Other materials might be used for special bits, but HSS and carbide are the standards.
High-Speed Steel (HSS): This is a type of tool steel. It’s known for its hardness, wear resistance, and ability to cut at high speeds without losing its temper. HSS can be alloyed with elements like cobalt and molybdenum to improve its performance further, especially for drilling harder materials or at higher speeds.
It’s a versatile material, making it popular for general-purpose drill bits.
Tungsten Carbide: This is an extremely hard compound. It is much harder and more brittle than HSS. Carbide bits are ideal for drilling very hard materials like concrete, masonry, or hard metals.
They are often made by combining tungsten carbide powder with a binder, like cobalt, and then sintering the mixture under high heat and pressure. This creates a very dense and strong material.
Metal Shaping Techniques
Once the material is chosen, it needs to be shaped into the form of a drill bit. This involves several methods that remove material or form it into the desired shape. The flute, the spiral groove that clears chips, is a key feature that needs precise shaping.
Different techniques are used depending on the material and the type of drill bit being made.
Machining and Grinding
Machining involves cutting away excess material to form the basic shape of the drill bit. This can be done using various cutting tools on machines that precisely control the movement. Grinding is a crucial step where abrasive wheels are used to achieve the exact dimensions and sharp edges needed for cutting.
This stage refines the shape and sharpness created by initial machining.
For example, imagine shaping a block of metal into a pencil. Machining is like using a knife to get the basic round shape and point. Grinding is like using fine sandpaper to make it smooth and truly sharp.
Both are needed to get the final, functional shape.
Forming Processes
Some drill bits, especially those made from simpler steels, can be formed rather than just machined. This can involve processes like forging or extrusion. Forging heats the metal and then hammers or presses it into shape.
Extrusion pushes the hot metal through a die to create a long, consistent shape. These methods can be faster and more economical for mass production of certain types of drill bits.
A real-world example is seen in the production of some wood drill bits. These might be made by taking a metal rod and forming the characteristic spiral flutes directly onto it using specialized rolling machines. This process is highly efficient for creating many bits quickly.
Heat Treatment for Strength
This is a critical phase where the metal’s properties are significantly improved. Heat treatment makes the drill bit hard enough to cut but also tough enough to resist breaking. It involves heating the metal to specific temperatures and then cooling it in a controlled way.
Different types of heat treatments exist, each with a particular outcome.
Hardening
Hardening is usually the first step in heat treatment. The metal is heated to a high temperature, typically above its critical point. At this temperature, the internal structure of the metal changes.
Then, it is rapidly cooled, or “quenched.” This rapid cooling traps the metal in a very hard, but often brittle, state. Quenching can be done in oil, water, or sometimes even air.
For example, a simple metal rod heated until it glows red and then quickly dipped in cold water becomes much harder. This is the basic idea of hardening, though industrial processes are much more precise.
Tempering
After hardening, the metal is usually too brittle. Tempering reduces this brittleness while retaining much of the hardness. The metal is reheated to a lower temperature than for hardening, and then cooled more slowly.
The exact temperature and cooling rate determine the balance between hardness and toughness. This step is vital for making drill bits durable for real-world use.
Think of tempering as making something strong but flexible, not just strong and stiff. If you try to bend a hardened but untempered piece of metal, it might snap. If you temper it, it can bend a bit without breaking, making it much more useful for a tool that experiences stress.
The Manufacturing Steps Explained How a Drill Bit Is Made
This section details the precise sequence of operations that transform raw metal into a finished drill bit. We will walk through each step, from the initial blank to the final inspection. Understanding How a Drill Bit Is Made: Step-by-Step Guide involves appreciating the precision at every stage.
This detailed explanation will clarify the entire production flow.
Step 1 Blank Preparation
The process begins with preparing the basic metal stock. This is usually in the form of rods or bars of the chosen material, like HSS or tungsten carbide. These rods are cut to the correct length for the specific drill bit size.
They are then often straightened if they are not perfectly straight to begin with. This ensures the starting material is ready for shaping.
The blank is essentially the raw material shaped into a manageable piece for further processing. It’s the starting point, like a lump of clay before a sculptor begins. The quality of this blank is important, as any flaws can carry through to the final product.
Step 2 Forming the Shank and Body
The shank is the part of the drill bit that is held by the drill chuck. It’s usually cylindrical. The body of the drill bit is the main part that tapers towards the cutting tip.
This shaping can be done through several methods, including turning on a lathe, milling, or using specialized forming machines.
For example, a metal rod might be placed in a machine that spins it while a cutting tool carves away material to create the smooth shank and the beginning of the body. The precision here is key to ensuring the bit fits properly in the drill.
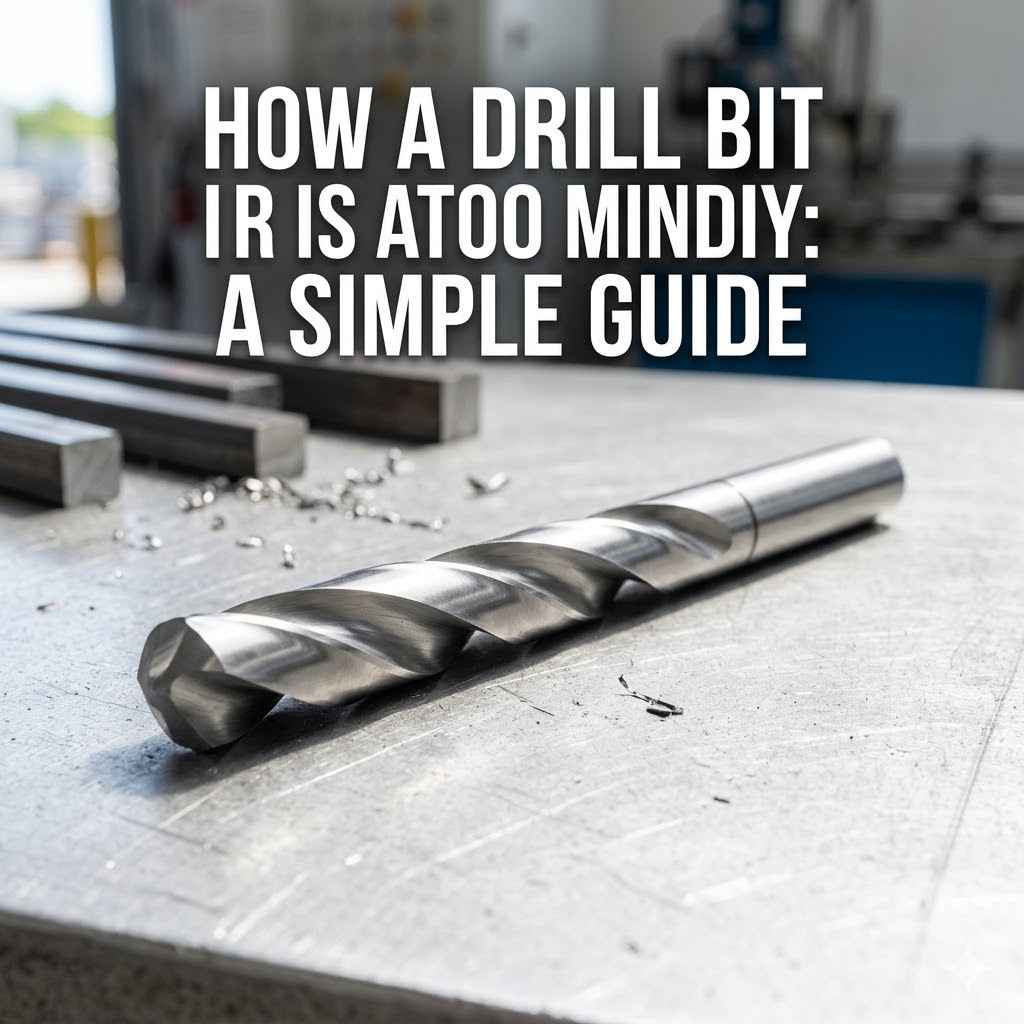
Step 3 Cutting the Flutes
This is one of the most distinctive features of a drill bit. The flutes are the spiral grooves that wrap around the body. They serve two main purposes: to create cutting edges and to channel away the material being drilled (chips).
The flutes are typically created using milling machines with specially shaped cutting tools or by grinding.
The angle and depth of the flutes are important. They affect how efficiently chips are removed and how well the drill bit cuts. The helical shape is designed to move chips up and out of the hole as the bit rotates.
Milling the Flutes: A common method involves using a rotating milling cutter that has a shape designed to cut the spiral groove. The metal blank is slowly fed past the cutter, and the machine precisely controls the movement to create the desired spiral path and depth. This method allows for very accurate control over the flute geometry.
Grinding the Flutes: Another method uses grinding wheels to form the flutes. This is particularly common for HSS drill bits. The grinding wheel spins at high speed, and as the drill bit blank rotates and is fed, the wheel shapes the spiral groove.
This process can achieve very smooth flute surfaces.
Step 4 Forming the Cutting Point
The tip of the drill bit, where the cutting actually happens, needs to be shaped precisely. This involves grinding angled surfaces that create the cutting edges. The angle of these surfaces, known as the point angle, varies depending on the material being drilled.
For instance, wood bits might have a sharper point than metal bits.
A common point for metal bits is a 118-degree angle. This provides a good balance of sharpness and durability for general-purpose metal drilling. For harder materials like concrete, the tips might be fitted with a carbide insert, which is a separate, extremely hard piece brazed onto the bit tip.
Step 5 Heat Treatment Application
As discussed earlier, this is a crucial step. After the bit is shaped, it undergoes hardening and tempering. This process transforms the metal from a workable state into a tool that can withstand the rigors of drilling.
The exact temperatures and timing are carefully controlled to achieve the desired hardness and toughness.
The bit is heated in specialized furnaces. After reaching the correct temperature, it is quenched. Then, it is reheated to a lower temperature for tempering.
This cycle makes the steel strong and durable. For carbide bits, the sintering process itself can achieve hardness, but they still need careful cooling.
Step 6 Finishing and Coating
Once heat-treated, drill bits may undergo further finishing steps. This can include polishing to remove any remaining rough spots or applying coatings to enhance performance. Coatings can improve lubricity (reducing friction), increase wear resistance, and help dissipate heat.
Common coatings include titanium nitride (TiN), titanium carbonitride (TiCN), and cobalt.
Polishing: This removes any surface imperfections left from grinding or heat treatment. A smoother surface can lead to better chip flow and reduced friction. It’s like making sure there are no bumps or scratches that could cause problems.
Coatings: These are applied in special chambers using processes like Physical Vapor Deposition (PVD) or Chemical Vapor Deposition (CVD). TiN coatings, for example, are gold-colored and significantly increase the hardness and wear resistance of the drill bit, allowing it to last longer and drill faster.
Step 7 Quality Inspection
Before drill bits are packaged and sold, they undergo rigorous quality checks. Inspectors examine them for dimensional accuracy, sharpness, absence of defects, and the integrity of any coatings. This ensures that each drill bit meets the required standards and will perform reliably.
This stage is vital. It catches any bits that might not meet the required specifications. Checks might include measuring flute dimensions, checking the point angle, and visually inspecting for cracks or imperfections.
Any bit that fails these tests is usually discarded or reworked if possible.
Specialized Drill Bit Manufacturing Processes
Beyond the standard methods, certain types of drill bits require unique manufacturing approaches. These specialized processes cater to specific applications, materials, and performance demands. Exploring these techniques reveals the innovation in drill bit design and production.
This section highlights advanced methods used for high-performance or niche drill bits.
Tungsten Carbide Tipped (TCT) Bits
These bits are designed for drilling hard materials like concrete, stone, and brick. They are constructed by brazing (a form of soldering) a tip made of extremely hard tungsten carbide onto a steel body. The steel body provides strength, while the carbide tip does the cutting.
The manufacturing involves precise joining and grinding.
The carbide tip is usually formed by powder metallurgy, where carbide powders are mixed with a binder, pressed into shape, and then heated to fuse them together. This results in a material much harder than steel. The brazing process uses a filler metal to bond the carbide tip to the steel shank and body.
This requires careful temperature control to avoid weakening either material.
Brazing Techniques
Brazing is a joining process that uses a filler metal to bond two materials together. For TCT bits, a specialized brazing alloy is used that melts at a high temperature, creating a strong bond between the carbide tip and the steel. The process is often done in a controlled atmosphere furnace to prevent oxidation and ensure a clean, strong joint.
The strength of the braze joint is critical. If it fails, the carbide tip can detach. Therefore, the surfaces must be perfectly clean, and the correct amount of filler metal must be used.
The temperature is carefully managed so that the steel doesn’t overheat and lose its temper.
Solid Carbide Bits
Unlike TCT bits, solid carbide bits are made entirely from tungsten carbide. These bits are exceptionally hard and are used for high-precision machining and drilling very hard materials. Their manufacturing is more complex because carbide is brittle and difficult to machine.
Grinding is the primary method used to shape these bits.
Solid carbide bits are often manufactured using advanced grinding machines that use diamond-impregnated grinding wheels. These wheels can cut through the extremely hard carbide material. The flutes and the cutting point are precisely ground to exact specifications.
Due to their brittleness, careful handling is required throughout the manufacturing process.
Grinding Precision
Achieving the required precision with solid carbide is a testament to advanced manufacturing technology. Machines used for grinding carbide bits are highly sophisticated. They use computer numerical control (CNC) to execute complex cutting paths with extreme accuracy.
Diamond abrasives are essential because they are one of the few materials hard enough to effectively grind tungsten carbide.
A statistic from the industry notes that specialized CNC grinding machines can achieve tolerances of less than 0.0001 inches when shaping solid carbide bits. This level of precision is necessary for applications where accuracy is paramount, such as in aerospace or microelectronics manufacturing.
Coated Drill Bits
We touched on coatings in the finishing stage, but some bits are specifically manufactured with advanced coatings as a primary feature. These coatings are not just for added protection but are integral to the bit’s performance. Processes like PVD and CVD are used to apply thin, hard layers onto the bit surface.
For example, a titanium nitride (TiN) coating gives the bit a distinctive gold color. It makes the bit harder and more resistant to heat and wear. This allows it to drill faster and last much longer, especially in demanding applications like drilling metals.
Other coatings offer different benefits, such as increased lubricity for smoother cutting or greater resistance to specific types of wear.
Physical Vapor Deposition (PVD): In this process, a solid material is vaporized in a vacuum chamber, and then it condenses onto the surface of the drill bit, forming a thin, hard coating. PVD is often used for coatings like TiN and TiCN. It’s a highly controlled process that creates very uniform and adherent coatings.
Chemical Vapor Deposition (CVD): This method involves chemical reactions of gaseous compounds at high temperatures, which deposit a solid coating onto the drill bit. CVD is often used for harder coatings like diamond-like carbon (DLC) or aluminum oxide. The high temperatures involved require careful control to avoid damaging the underlying material of the drill bit.
Twist Drill Manufacturing Example
Let’s consider the making of a common HSS twist drill bit, which is one of the most frequently produced types. The process begins with cutting a rod of HSS to the correct length for the desired bit size. This rod is then heated and fed into a machine that rolls the spiral flutes directly onto it.
After fluting, the bit is then ground to create the sharp cutting point at the tip. This often involves a specialized point grinding machine that ensures the correct lip relief angles and chisel edge. Following this, the bit undergoes heat treatment—hardening by heating and quenching, followed by tempering to achieve the right balance of hardness and toughness.
Finally, it might be polished and inspected.
A comparison of HSS and Carbide bit production shows the difference in approach:
| Feature | HSS Twist Drill Bit | Tungsten Carbide Tipped (TCT) Bit | Solid Carbide Bit |
|---|---|---|---|
| Primary Material | High-Speed Steel | Steel body with Tungsten Carbide tip | 100% Tungsten Carbide |
| Main Shaping Method | Rolling, Milling, Grinding | Carbide tip formed by powder metallurgy, Steel body machined/formed | Advanced Grinding (often with diamonds) |
| Key Joining Process | None (monolithic) | Brazing | None (monolithic) |
| Typical Applications | General metal, wood drilling | Masonry, concrete, stone | Hard metals, composites, high-precision drilling |
The Importance of Quality Control in Drill Bit Production
Quality control is an indispensable part of making drill bits. It ensures that every bit produced is safe, effective, and meets high standards for performance. From raw material checks to final inspection, every step matters.
This focus on quality prevents issues and builds trust with users. Let’s explore why this is so vital.
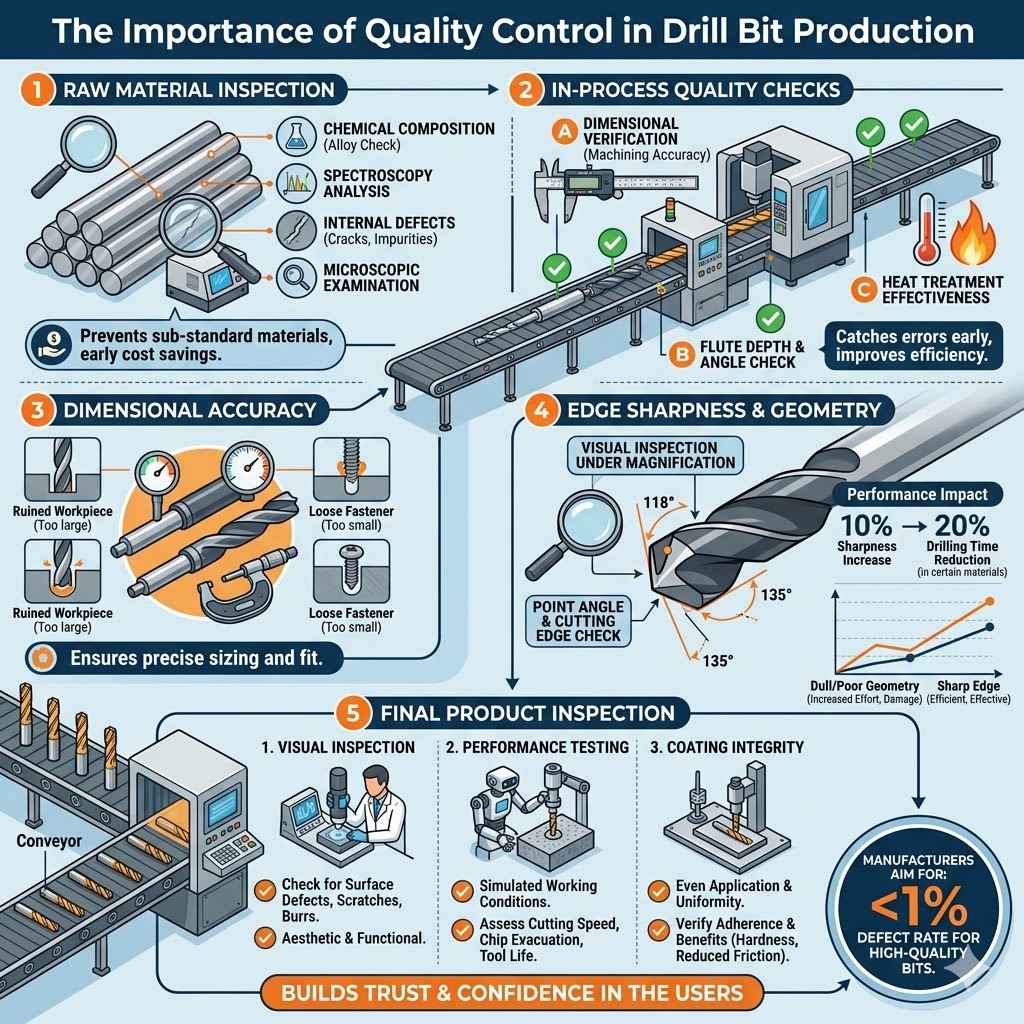
Raw Material Inspection
Before any metal is shaped, it’s inspected. This involves checking its chemical composition to ensure it’s the correct alloy. It also includes looking for any internal defects like cracks or impurities that could weaken the final product.
Using substandard materials would lead to drill bits that break easily or don’t perform as expected.
For instance, a batch of steel might be tested using spectroscopy to confirm its alloy content. Microscopic examination might also be done to check for inclusions. This initial screening saves significant costs by preventing defective materials from entering the production line.
In-Process Quality Checks
During manufacturing, checks are performed at various stages. These might include verifying the accuracy of dimensions during machining, checking flute depth and angle, and confirming the effectiveness of heat treatment. Catching errors early in the process is much more efficient and cost-effective than finding them at the end.
An example would be measuring the diameter of a drill bit blank after the shank is formed. If it’s out of tolerance, it can be adjusted or scrapped before more work is done on it. Similarly, samples from a heat-treating batch might be tested for hardness to ensure the process was successful.
Dimensional Accuracy
Drill bits must be precisely sized to fit into drill chucks and to create holes of the intended diameter. Gauges and measuring instruments are used throughout production to verify these dimensions. Even small deviations can cause problems, such as a bit not fitting properly or creating holes that are too large or too small.
Imagine a drill bit that is slightly larger than its stated size. When used in a precision application, this could ruin a workpiece. Conversely, a bit that is too small might not create a secure fit for a fastener.
Therefore, maintaining precise dimensions is paramount.
Edge Sharpness and Geometry
The cutting edges of a drill bit are its most important functional feature. Quality control ensures these edges are sharp and correctly shaped. This involves visually inspecting the edges under magnification and checking the angles of the point.
Dull or improperly formed edges will result in poor performance, increased effort, and potential damage to the material being drilled.
A study on drill bit performance found that a 10% increase in cutting edge sharpness could reduce drilling time by up to 20% in certain materials. This highlights how critical edge quality is for efficiency and effectiveness.
Final Product Inspection
The final stage involves a comprehensive inspection of the finished drill bits. This includes checking for any surface defects, ensuring the coatings are properly applied and uniform, and confirming that the bit meets all specified performance criteria. Bits that pass this inspection are then deemed ready for packaging and distribution.
Visual Inspection: Trained inspectors look for any visible flaws, such as scratches, burrs, or uneven surfaces. Magnifying tools are often used. This catches aesthetic issues and potential functional problems.
Performance Testing: In some cases, sample bits from a production run are tested under simulated working conditions. This might involve drilling into a test material to assess cutting speed, chip evacuation, and tool life. This provides real-world validation of the bit’s performance.
Coating Integrity: For coated bits, checks are made to ensure the coating is evenly applied, adheres well, and provides the intended benefits like hardness and reduced friction. Techniques like adhesion tests might be performed.
Statistics show that manufacturers aim for a defect rate of less than 1% for high-quality drill bits. This commitment to quality ensures that users receive reliable tools.
Frequently Asked Questions
Question: What are the main materials used to make drill bits
Answer: The most common materials are high-speed steel (HSS) and tungsten carbide. HSS is strong and wear-resistant, while tungsten carbide is extremely hard and used for very tough materials.
Question: Why is heat treatment important for drill bits
Answer: Heat treatment makes drill bits hard enough to cut through materials and tough enough to resist breaking under stress. It involves controlled heating and cooling cycles.
Question: How are the spiral flutes on a drill bit made
Answer: Flutes are typically created using milling machines with special cutters or by grinding. The spiral shape helps clear chips away from the cutting area.
Question: What is the purpose of coatings on drill bits
Answer: Coatings like titanium nitride (TiN) improve hardness, wear resistance, and lubricity. This allows drill bits to last longer and drill faster with less friction.
Question: How do manufacturers ensure drill bits are good quality
Answer: Quality control involves inspecting raw materials, checking dimensions during production, and performing final inspections for defects and performance. This ensures each bit is reliable and effective.
Conclusion
Drill bits are made through a precise sequence of steps. Metal is shaped, hardened, and often coated. Quality checks happen at every stage.
This ensures you get a tool that cuts effectively and lasts a long time. Now you know the fascinating process behind this everyday item.