How Do You Drill a Square Hole?
Many people starting out in woodworking wonder, “How do you drill a square hole?” It sounds impossible, right? Drills make round holes. But with a few clever tricks, you can make perfectly square ones.
This can be a tricky part for beginners, but it doesn’t have to be hard. We’ll show you a simple, step-by-step way to do it. Get ready to learn some useful How Do You Drill a Square Hole?
Pro Woodworking Hacks that will make your projects look amazing.
Making a Square Hole The Easy Way
Making a clean square hole in wood is a common woodworking challenge. Traditional drill bits are designed to create circular openings. Achieving a sharp, square corner with just a standard drill and bit is practically impossible.
This technique is essential for tasks like creating mortises for joinery, fitting hardware precisely, or adding decorative elements. While it might seem like magic, the process involves combining simple tools and techniques. This section will walk you through the fundamental methods and tools needed to achieve this seemingly difficult task with confidence.
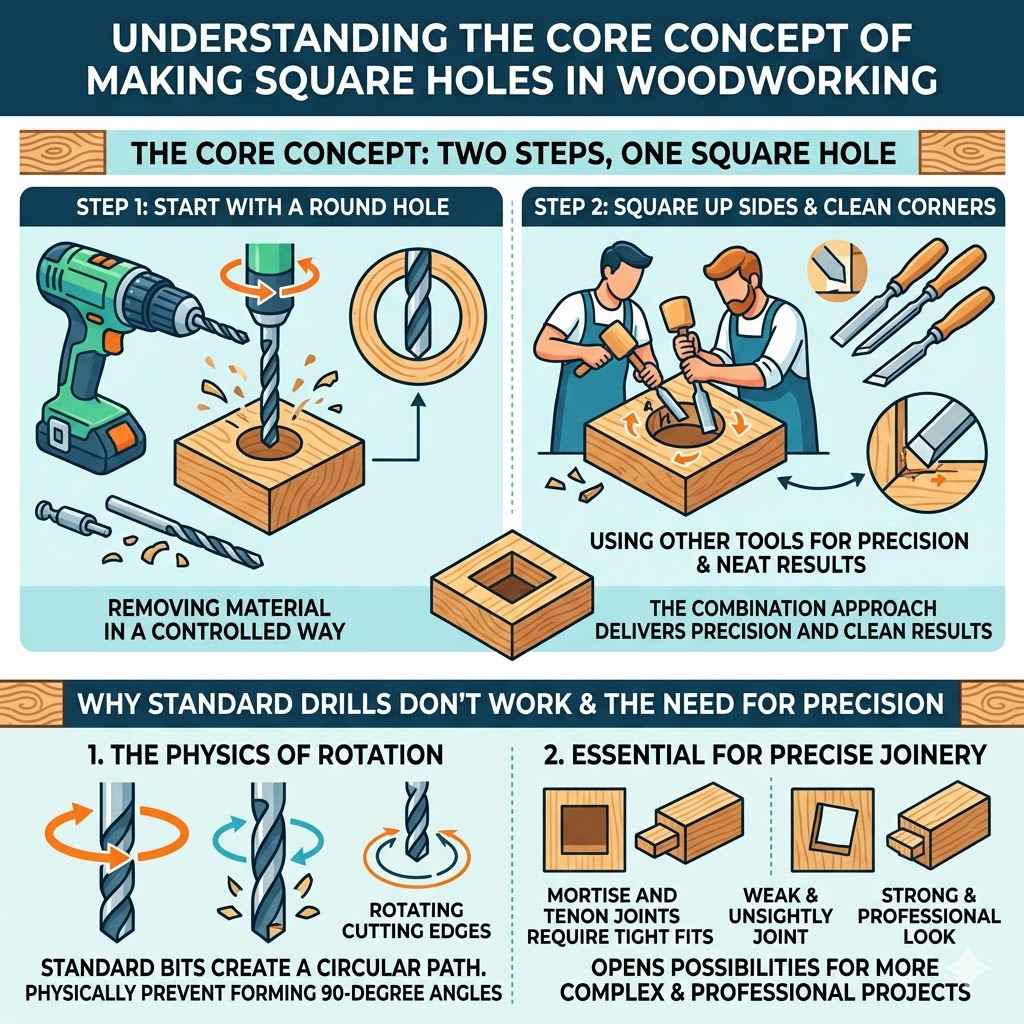
Understanding the Core Concept
The idea behind making a square hole is not to use a single tool that drills a square shape. Instead, it’s about removing wood in a controlled way to define square edges and corners. You’ll typically start with a round hole created by a drill bit.
Then, you’ll use other tools to square up the sides and clean out the corners. This combination approach is what makes the magic happen. It allows for precision and neat results that are crucial for good woodworking.
Why Standard Drills Don’t Work
A standard drill bit rotates. As it spins, its cutting edges create a circular path. This is how it removes wood.
The shape of the cutting edge, often angled or fluted, is designed for efficient material removal in a round pattern. Trying to force a round shape into a square one simply results in a round hole with rounded corners. The physics of rotation and cutting action prevent a standard drill bit from forming sharp, 90-degree angles on its own.
Woodworking often requires precise joinery. Mortise and tenon joints, for example, rely on perfectly square mortises to fit snugly. If the mortise is not square, the joint will be weak and unsightly.
This is where understanding how to create square holes becomes a valuable skill. It opens up possibilities for more complex and professional-looking projects.
Essential Tools for Square Holes
To successfully drill a square hole, you’ll need a few key tools. These tools work together to achieve the desired shape. The core of the process relies on starting with a round hole and then refining it.
Each tool plays a specific role in transforming that initial round opening into a crisp square.
The Drill and Drill Bits
You’ll start with a power drill, either corded or cordless. The size of the drill bit you choose will depend on the size of the square hole you need. You’ll use standard twist drill bits for the initial rough opening.
Larger bits are useful for removing more material quickly. Some people use spade bits or Forstner bits for a cleaner initial hole, especially if the hole is large.
A Forstner bit, for instance, drills flat-bottomed holes and can create a cleaner starting point than a twist bit. Twist bits tend to wander more and leave a conical bottom. Forstner bits use a pilot point to center the bit and a series of spurs around the rim to score the wood cleanly.
This results in a hole with a much flatter bottom and less tear-out on the edges, which is beneficial for the subsequent squaring steps.
The Chisel
A sharp chisel is your primary tool for squaring up the sides and cleaning out the corners. You’ll use it to pare away the excess wood left by the drill. A good quality bench chisel is recommended.
Keeping it razor-sharp is absolutely critical for making clean cuts and avoiding frustration. A dull chisel will just chew up the wood and make the job much harder.
Chisels come in various widths, and having a few different sizes can be helpful. A wider chisel is good for removing larger amounts of material quickly, while a narrower one is useful for fine-tuning and cleaning up the corners. The bevel on the chisel edge is important.
For paring cuts, you often want the flat side of the chisel against the surface you are working against to keep it flat.
Mallet or Hammer
You’ll need a mallet or a hammer to drive the chisel when necessary. A wooden or rubber mallet is preferred as it’s less likely to damage the chisel handle than a metal hammer. When you need to make deeper cuts or remove more stubborn wood, striking the end of the chisel handle with the mallet allows for more force than you can generate by hand.
This is especially useful for mortising.
Using a mallet provides controlled force. You can tap the chisel gently for fine adjustments or deliver firmer blows for more aggressive wood removal. It’s important to strike the chisel squarely on its end to avoid damaging the handle or the chisel itself.
The type of mallet matters; a heavier mallet will remove more wood with each strike.
Marking Tools
Accurate marking is key. You’ll need a pencil for marking the outline of your square hole. A marking knife or a scribe can also be very useful for scoring the lines.
This scoring helps to prevent the wood from splitting or splintering when you chisel. It creates a clean break line for your chisel to follow.
Using a marking knife to score the lines gives you a much sharper and more precise reference than a pencil line, especially for small details. The knife cuts the wood fibers, creating a clear boundary. This prevents the chisel from pushing past your intended line, leading to much cleaner results and better joinery.
The Step-by-Step Process
Now, let’s get to the actual process of making that square hole. This method combines drilling and chiseling to achieve a precise result. Following these steps carefully will ensure you get the clean, square opening you need for your project.
Step 1 Mark Your Square
First, you need to precisely mark the outline of your square hole on the wood. Use a ruler and pencil to draw the exact dimensions. For the best results, especially when starting, score the lines with a marking knife.
This creates a small groove that guides your chisel and prevents tear-out.
Make sure your lines are perfectly perpendicular. A combination square or a carpenter’s square is excellent for this. If you’re making a mortise, the knife line should be just outside the intended final dimensions of the square hole.
This accounts for the material you will remove with the chisel.
Step 2 Drill the Interior
Next, use your drill to remove the bulk of the wood inside the marked square. You can drill multiple holes close together, or use a larger bit if possible. The goal here is to remove most of the material, leaving a small amount of wood to be cleaned up by the chisel.
For a square hole of reasonable size, drilling several overlapping holes within the marked area is a common approach. Start by drilling a hole near one corner, then move over and drill another hole close to the first, working your way across the marked area. The idea is to break up the wood mass, making it easier for the chisel to do its work.
If you are drilling a larger square hole, a Forstner bit can be very effective here. A Forstner bit will drill a flat-bottomed hole, which makes the subsequent chiseling easier. You can use a larger Forstner bit and drill a few holes, or use a smaller Forstner bit and drill many closely spaced holes to remove most of the waste.
Step 3 Square the Corners
This is where the chisel comes in. Using your sharp chisel and mallet, carefully clean out the corners of the drilled hole. Work from the edges of the drilled area towards the corners.
Make shallow, controlled cuts. You want to pare away the remaining wood to create sharp, 90-degree angles.
Start by clearing out the corners first. Place the bevel side of the chisel down, and use the sharpened edge to carefully chip away wood at each of the four corners. Then, work along the sides.
For each side, place the chisel perpendicular to the surface and the scored line, and pare away the wood.
It’s crucial to keep your chisel sharp. A dull chisel will require more force and will likely result in ragged edges. Check your progress frequently against your marked lines.
Take small shavings rather than trying to remove large chunks of wood. This gives you more control and leads to a cleaner finish.
Step 4 Clean Up the Sides
Once the corners are sharp, use the chisel to refine the sides of the square hole. Stand the chisel up with the bevel facing the waste wood and use controlled taps from the mallet to pare away wood. Work your way around the opening, ensuring each side is straight and perpendicular to the adjacent sides.
You can also use the chisel to flatten the bottom of the hole if needed. For mortises, a flat bottom is often desirable for a good fit. Use a paring cut to level the bottom surface.
The goal is to create smooth, straight walls that meet at crisp, clean corners.
A useful tip is to check for squareness as you go. You can use a small machinist’s square to check the corners. Another trick is to use a scrap piece of wood that is the exact size you want your square hole to be.
Try to fit it into the hole as you work. This helps you gauge your progress and ensure you’re on track for a perfect fit.
Pro Woodworking Hacks for Perfect Holes
Beyond the basic steps, experienced woodworkers have developed clever tricks to make this process even more efficient and precise. These hacks are the essence of How Do You Drill a Square Hole? Pro Woodworking Hacks, elevating your craftsmanship.
They often involve using specialized jig or combining tools in unexpected ways.
Using a Mortising Jig
For those who frequently need square holes, especially for mortise and tenon joinery, a mortising jig is an invaluable tool. A mortising jig attaches to your drill press and guides a mortising chisel, which has a square, hollow auger bit. This tool is specifically designed to create square holes quickly and accurately.
A mortising jig works by using a router bit and a chisel together. The router bit spins and removes wood in a circular pattern, while the square chisel surrounding it simultaneously cuts the corners and sides, clearing out the waste. This combination efficiently creates a perfectly square hole with a single pass.
The accuracy of a mortising jig is exceptional, and it significantly speeds up the process compared to manual chiseling.
The setup of a mortising jig typically involves clamping the workpiece securely to the drill press table and aligning the jig. You then position the jig so that the auger bit and chisel are centered within your marked area. As you lower the drill press, the auger bit drills into the wood, and the chisel squares the opening.
Repeated plunging and some repositioning are usually required for deeper mortises.
The Square Chisel (Mortise Chisel)
A square chisel, also known as a mortise chisel, is a specialized tool designed for chopping out square mortises. It consists of a long, narrow blade with sharp corners. It’s used in conjunction with a mallet or hammer.
This is a more traditional method but very effective for creating strong joints.
A mortise chisel is essentially a very sharp, robust chisel with a square profile. It is designed to be struck repeatedly with a mallet to chop through wood fibers cleanly. The long tang of the chisel extends through the handle, allowing it to withstand forceful blows without breaking.
When used correctly, it can create very precise and deep square mortises.
When using a mortise chisel, you typically start by scoring the outline of the mortise with a marking knife. Then, you begin chopping into the wood, working from one end to the other. The chisel is angled slightly to create a waste channel, and each chop removes a sliver of wood.
After chopping out the bulk of the waste, you use the chisel to pare the sides and square up the corners.
Using Templates and Guides
For repetitive tasks or when extreme accuracy is needed, creating a template can be a game-changer. You can make a template out of plywood or MDF with a precisely cut square opening. This template is then clamped over your workpiece, and you use it to guide your drill and chisel.
A template provides a repeatable reference. For instance, if you need to create several identical square holes for a project, a template ensures each one is the same size and in the same location. You can cut the square opening in the template slightly larger than your final desired size to allow for the chisel to clean up the edges.
When using a template, clamp it firmly to the wood. You can then drill within the opening of the template. For the chiseling step, the template edges act as a guide.
You can rest your chisel against the inside edge of the template opening to ensure straight cuts and clean corners. This method is particularly useful for cabinet hardware or decorative inlays.
Real-Life Examples and Scenarios
Understanding how to make square holes has practical applications in many woodworking scenarios. Here are a few examples to illustrate their importance.
Example 1 Traditional Furniture Joinery
A carpenter is building a solid wood dining table. For the leg-to-apron joints, they need to create strong mortise and tenon connections. The mortise, which is the hole part of the joint, must be perfectly square to accept the tenon (the projecting part) snugly.
Using a combination of drilling and chiseling, they precisely cut square mortises into the apron pieces. This ensures the table is strong and will last for generations.
The process involves marking the mortise area, drilling out the bulk of the waste with a bit sized appropriately, and then using a sharp mortise chisel to pare the sides and square the corners. The precision required means that even a slight deviation from a perfect square can lead to a weak joint. This is where the pro woodworking hacks become critical for structural integrity and aesthetic appeal.
Example 2 Cabinet Hardware Installation
Imagine installing antique hardware on a custom-made cabinet. The hinges or drawer pulls might have square mounting plates that require a flush fit. Simply drilling a round hole won’t work.
Woodworkers use the chiseling technique to create a small recess or a square opening that perfectly matches the hardware’s shape. This allows the hardware to sit flush and look professionally installed, adding to the cabinet’s overall quality.
This involves carefully measuring and marking the outline of the hardware plate. Then, a shallow square recess is carefully chiseled out. The depth of the recess is critical; it needs to be deep enough for the hardware to sit flush but not so deep that it weakens the wood.
The edges of the recess must be crisp and square to perfectly cradle the hardware.
Scenario 1 Creating a Raised Panel Door Recess
You are building a cabinet door with a raised panel. The panel needs to sit in a groove or recess on the back of the door. If the corners of this recess are to be perfectly square to create a neat frame for the panel, you’ll need to use the chiseling technique.
- Mark the rectangular recess for the panel on the back of the door.
- Use a router or a dado blade on a table saw to cut the long sides of the recess, leaving the corners square.
- Use a sharp chisel to carefully remove the wood from the corners, making them perfectly square.
- Test fit the panel to ensure it sits snugly in the recess with clean corners.
This scenario highlights how square corners are important for both function and appearance in woodworking. A well-fitted panel that sits flush in precisely cut square corners makes for a professional-looking door.
Scenario 2 Making a Dovetail Key Housing
In some fine woodworking, especially in clock making or intricate boxes, you might need to create a housing for a dovetail key. This key is a small wedge used to secure a joint. The housing needs to be a precise square or rectangular channel.
- Accurately measure and mark the dimensions of the channel.
- Drill out the majority of the waste within the marked area using a bit suitable for the channel’s depth.
- Use a small, sharp chisel to pare the sides and square up the corners of the channel.
- Ensure the channel is clean, flat-bottomed, and the exact dimensions to accept the dovetail key.
This requires a high degree of precision, showcasing the value of mastering the art of creating square openings, even for small, intricate details. The sharpness of your chisel and your steady hand are paramount here.
Troubleshooting Common Issues
Even with the best techniques, you might run into a few snags. Here are some common problems and how to fix them.
Issue 1 Splintering Wood
Wood splintering or “tear-out” is common, especially with softer woods or when chiseling against the grain.
- Solution: Always use a very sharp chisel. Score your lines deeply with a marking knife before chiseling. When paring, take very shallow cuts. You can also try clamping a scrap piece of wood over the area you are about to cut to support the fibers. Another trick is to mist the wood lightly with water before chiseling, which can sometimes help.
Issue 2 Rounded Corners
If your corners aren’t sharp enough, it usually means you haven’t removed enough material or your chisel isn’t effective.
- Solution: Go back to the corners with your sharpest chisel. Ensure you are using controlled, paring cuts. Use the flat side of the chisel against the edge you want to keep straight. You might need to work from both directions to meet in the middle for a clean edge.
Issue 3 Inconsistent Depth
The depth of your square hole might be uneven, especially if you’re not using a depth stop on your drill or are chiseling freehand.
- Solution: Use a depth stop on your drill press or wrap tape around your drill bit to mark the desired depth. When chiseling, pay close attention to the depth of your cuts and use a depth gauge if necessary. For mortises, ensure you are removing waste evenly across the entire length.
Issue 4 The Hole Is Too Big
Sometimes, you can accidentally remove too much material, making the hole larger than intended.
- Solution: This is where biscuit joinery or wood plugs can help. You can glue in a piece of wood to fill the excess area and then re-drill or re-chisel to the correct size. For structural parts, this might require starting over, but for decorative elements, repairs are often possible.
Statistics on Woodworking Accuracy
Precision in woodworking is key to strong joints and beautiful projects. Studies show that joinery accuracy can significantly impact the longevity and stability of furniture. For instance, a study on mortise and tenon joints found that a deviation of just 1/16th of an inch in the mortise can reduce the joint’s strength by up to 20%.
Another relevant statistic comes from the professional woodworking industry. According to a survey of custom furniture makers, over 75% reported that the ability to create precise joinery, including square mortises, was essential for client satisfaction and repeat business. This highlights the commercial value of mastering techniques like making square holes.
| Technique | Approximate Time Per Hole (Medium Size) | Accuracy Level |
|---|---|---|
| Manual Drilling & Chiseling | 5-15 minutes | High with practice |
| Mortising Jig with Drill Press | 1-3 minutes | Very High |
| Mortise Chisel (Hand Chopping) | 3-10 minutes | High, skill dependent |
This table illustrates the trade-offs between speed and tools. While manual methods require more time, they are accessible to most woodworkers. Specialized tools like mortising jigs offer speed and consistent accuracy but require a significant investment.
The choice often depends on the volume of work and the user’s budget and skill level.

Frequently Asked Questions
Question: Can I make a square hole with just a drill?
Answer: No, a standard drill alone cannot make a square hole because it spins in a circle. You need to combine drilling with chiseling or use specialized tools designed for square holes.
Question: What is the most important tool for making a square hole?
Answer: A very sharp chisel is arguably the most important tool, as it’s used to define the straight sides and clean corners after the initial drilling.
Question: How do I prevent wood from splintering when chiseling?
Answer: Use a very sharp chisel, score your lines with a marking knife, take shallow cuts, and consider supporting the wood fibers with a clamp or by misting with water.
Question: Is a mortising jig necessary for all square holes?
Answer: No, a mortising jig is very helpful for repetitive or precise work like making many mortises, but it’s not necessary for occasional square holes. Manual methods work well.
Question: How do I ensure my square hole is perfectly straight?
Answer: Use a ruler and marking knife to draw straight lines. When chiseling, use the edge of the wood as a guide, and periodically check for squareness with a machinist’s square or by fitting your tenon.
Wrap Up
You can make square holes effectively with basic tools and a bit of patience. Combine drilling to remove bulk wood with a sharp chisel for clean sides and corners. With these How Do You Drill a Square Hole?
Pro Woodworking Hacks, you can tackle joinery and hardware challenges with confidence. Keep practicing, and your results will become even better.