
How Long To Lay Hardwood Floor: Proven Essential
How Long To Lay Hardwood Floor: Proven Essential. Laying hardwood flooring typically takes 1-3 days for a single room (around 200-300 sq ft). This estimate covers preparation, acclimation, and installation, but varies based on room complexity, experience level, and floor type. Allow extra time for larger areas or intricate layouts.
Hey there, woodworking friends! Md Meraj here. Ever stand in a room, dreaming of beautiful hardwood floors, but then the big question pops into your head: “How long will this actually take?” It’s a common worry for DIYers! The thought of a flooring project can seem overwhelming, and not knowing the timeline can lead to stress. But don’t you worry! We’re going to break it all down, step by step. By the end of this guide, you’ll have a clear picture of what to expect, making your hardwood flooring project feel totally achievable. Let’s get those floors looking fantastic!
Understanding the Timeline: Factors That Influence How Long It Takes to Lay Hardwood Floor
So, you’re ready to transform your space with gorgeous hardwood floors! That’s fantastic! But before you dive in, let’s talk about time. How long does this project really take? It’s not a one-size-fits-all answer, and that’s okay. Several key factors play a role in the total time you’ll spend installing your new floors.
Think of it like baking a cake. The time it takes to bake depends on the recipe, the oven, and your decorating skills. Laying hardwood is similar! We’ll explore these factors so you can plan your project with confidence.
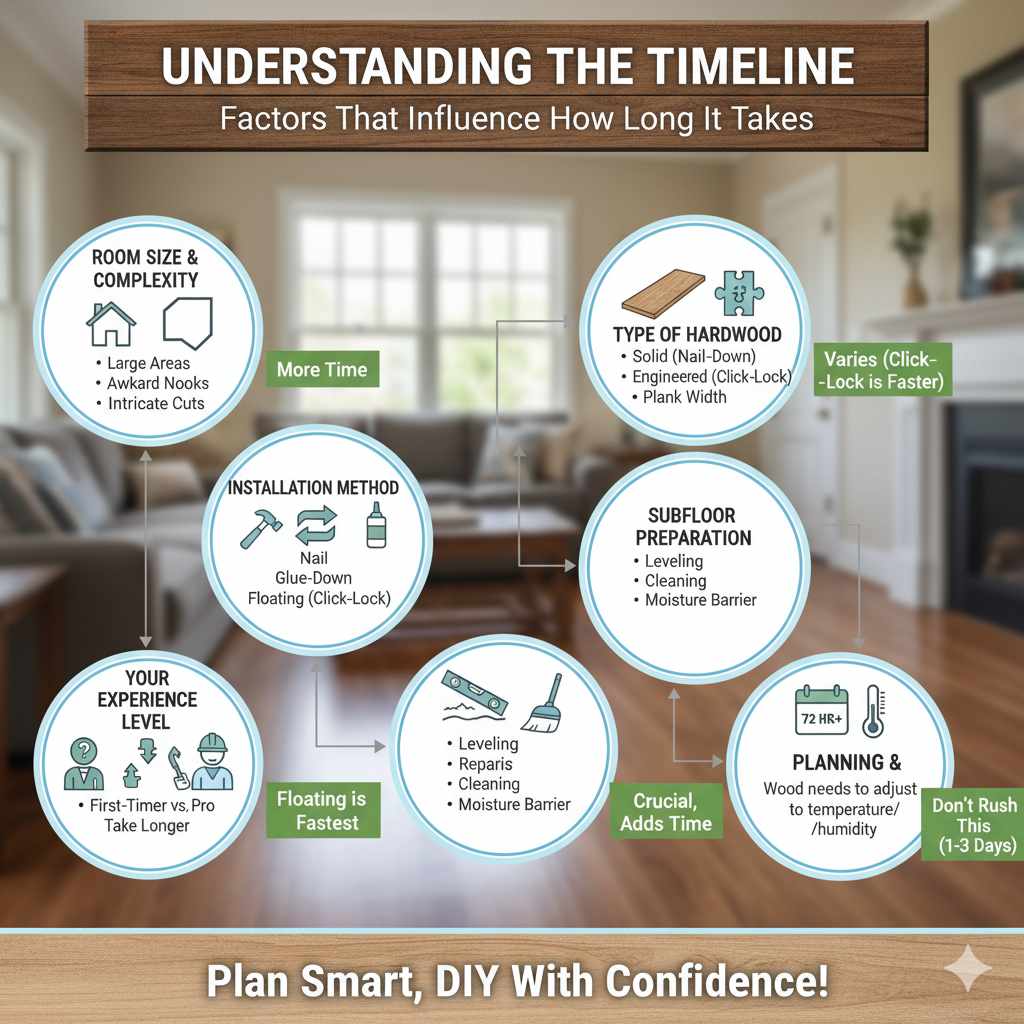
1. Room Size and Complexity
This is perhaps the most obvious factor. A small, square bedroom is going to be much quicker to floor than a large, open-concept living area with awkward nooks and crannies. The more square footage you have, the more planks you need to cut, fit, and secure. Complex room shapes, like those with bay windows, multiple doorways, or irregular angles, require more intricate cuts and careful fitting. These detailed sections take significantly more time and precision.
2. Type of Hardwood Flooring
Not all wood floors are created equal when it comes to installation speed. The type of hardwood you choose can make a difference:
- Solid Hardwood: These planks are milled from a single piece of wood. They are typically installed by nailing or stapling them to a subfloor. This method can be a bit more time-consuming due to the securing process.
- Engineered Hardwood: These planks have a real wood veneer top layer with a composite wood core. Many engineered floors use a ‘click-lock’ system, which can speed up installation considerably as planks snap together easily. Some are still glued or nailed down.
- Plank Width: Wider planks cover more area per board, potentially speeding up the installation process. However, they can also be heavier and sometimes trickier to maneuver, especially for beginners.
3. Installation Method
How you choose to install your hardwood floors will impact the timeline. The most common methods include:
- Nail-Down/Staple-Down: This is the traditional method for solid hardwood floors. It requires a specialized floor nailer or stapler and is generally considered more durable for solid wood. It can take longer than other methods because each board needs to be carefully positioned and secured.
- Glue-Down: This method involves adhering the planks to the subfloor using a special flooring adhesive. It’s often used for engineered hardwood, especially in basements or on concrete slabs. While it can be straightforward, the extensive use of adhesive and the need for a clean subfloor can add time.
- Floating Floor (Click-Lock): Engineered hardwoods are frequently designed with a click-lock system. The planks simply click and lock into each other, forming a stable floor that isn’t attached to the subfloor. Some laminate floors also use this system and are very fast to install. This is often the quickest installation method for DIYers.
4. Subfloor Preparation
This is a crucial step that many beginners underestimate. A smooth, level, and clean subfloor is essential for a beautiful and long-lasting hardwood floor. If your subfloor needs significant work – like leveling, repairing squeaks, or removing old flooring adhesives – this will add considerable time to your project. Rushing subfloor prep is a sure way to encounter problems later!
A good resource for understanding subfloor requirements can be found on the Building Science Corporation website, which discusses structural panel performance and moisture effects, highlighting the importance of a stable subfloor.
5. Your Experience Level
Let’s be honest, if this is your first time laying flooring, it will likely take longer than for a seasoned pro. DIYers need to take more time to read instructions, measure carefully, make precise cuts, and learn the feel of working with the material. This is completely normal and where the satisfaction of a job well done really shines! Think of the learning curve as part of the project’s value.
The Hardwood Flooring Timeline: A Room-by-Room Breakdown
Now that we know what influences the time, let’s get to some estimates. These are general guidelines, and your project might take a little more or less time. It’s always better to overestimate slightly to avoid feeling rushed.
Phase 1: Preparation and Acclimation (1-3 Days)
This phase is critical and often takes longer than people expect. Don’t skip or rush it!
- Acclimation: Hardwood flooring needs to adjust to the temperature and humidity levels of your home. This process helps prevent buckling or shrinking later on. Most manufacturers recommend acclimating the wood for at least 72 hours (3 days) in the room where it will be installed. Keep the room at your normal living temperature and humidity.
- Room Preparation: This involves several steps:
- Clearing the room of all furniture and belongings.
- Removing baseboards and trim (carefully, so you can re-install them later!).
- Removing any old flooring (carpet, vinyl, etc.).
- Inspecting and preparing the subfloor (cleaning, leveling, repairing). A perfectly smooth and level subfloor is key.
- Possibly installing a moisture barrier or underlayment, depending on your flooring type and subfloor.
So, this initial setup, especially the acclimation period, can easily span 1 to 3 days before you even lay down the first plank.
Phase 2: Installation (1-2 Days per Room)
This is where the magic happens – laying down the beautiful wood planks!
- Day 1 (or first half of installation day):
- Lay out your first row of planks. This often involves cutting the first plank to fit the starting wall (usually making a straight cut).
- Begin installing planks, carefully fitting them together. For nail-down, you’ll be securing each board. For click-lock, you’ll be snapping them into place.
- Work systematically across the room. You’ll encounter doorways and obstacles that require more precise cuts.
- Day 2 (or second half of installation day):
- Continue across the room, finishing the main field of the floor.
- The final rows often require the most intricate cuts, fitting planks against the last wall. You might need to rip (cut lengthwise) some planks.
- Clean up any adhesive residue immediately if you’re gluing.
For a typical room of about 200-300 square feet, expect this installation phase to take at least a full day, and often closer to two, especially for beginners. Working with nail-down or intricate patterns will extend this time.
Phase 3: Finishing Touches (1 Day)
Once all the planks are down, there are still a few more steps to complete the job:
- Re-installing Trim: Carefully nail your baseboards and any other moldings back into place. This ‘trims’ the exposed edges of the flooring and gives a professional, finished look.
- Cleaning: A thorough cleaning of your new floor is essential. Sweep, vacuum, and then damp-mop according to the manufacturer’s recommendations.
- Protection: Place felt pads on the bottom of all furniture before moving it back onto the floor.
This finalization phase typically takes about a day.
Estimated Time for Common Room Sizes
To give you a clearer picture, here’s an estimated timeline for different room sizes, assuming a beginner DIYer working at a steady, careful pace. These times include preparation, acclimation, installation, and finishing touches.
| Room Size (Approx. Sq Ft) | Estimated Total Time (Days) | Notes |
|---|---|---|
| 100 – 150 sq ft (e.g., Small Bedroom, Hallway) | 2-3 Days | Quicker installation but still requires full prep and acclimation. |
| 200 – 300 sq ft (e.g., Standard Living Room, Large Bedroom) | 3-5 Days | Most common scenario, allows for thorough work. |
| 400 – 500 sq ft (e.g., Large Open Plan Area) | 5-7 Days | Significantly more material and installation time. Consider breaking into smaller sections. |
| Multi-room Project (e.g., Hallway + Living Room) | 7-14 Days (or more) | Each area adds time. Plan for breaks between rooms for your sanity and quality! |
Remember, these are estimates. If you have experience, you might cut these times by a day or two. If you encounter unexpected subfloor issues, add more time. Patience is your best tool!
Tips for a Faster (and Better!) Hardwood Flooring Installation
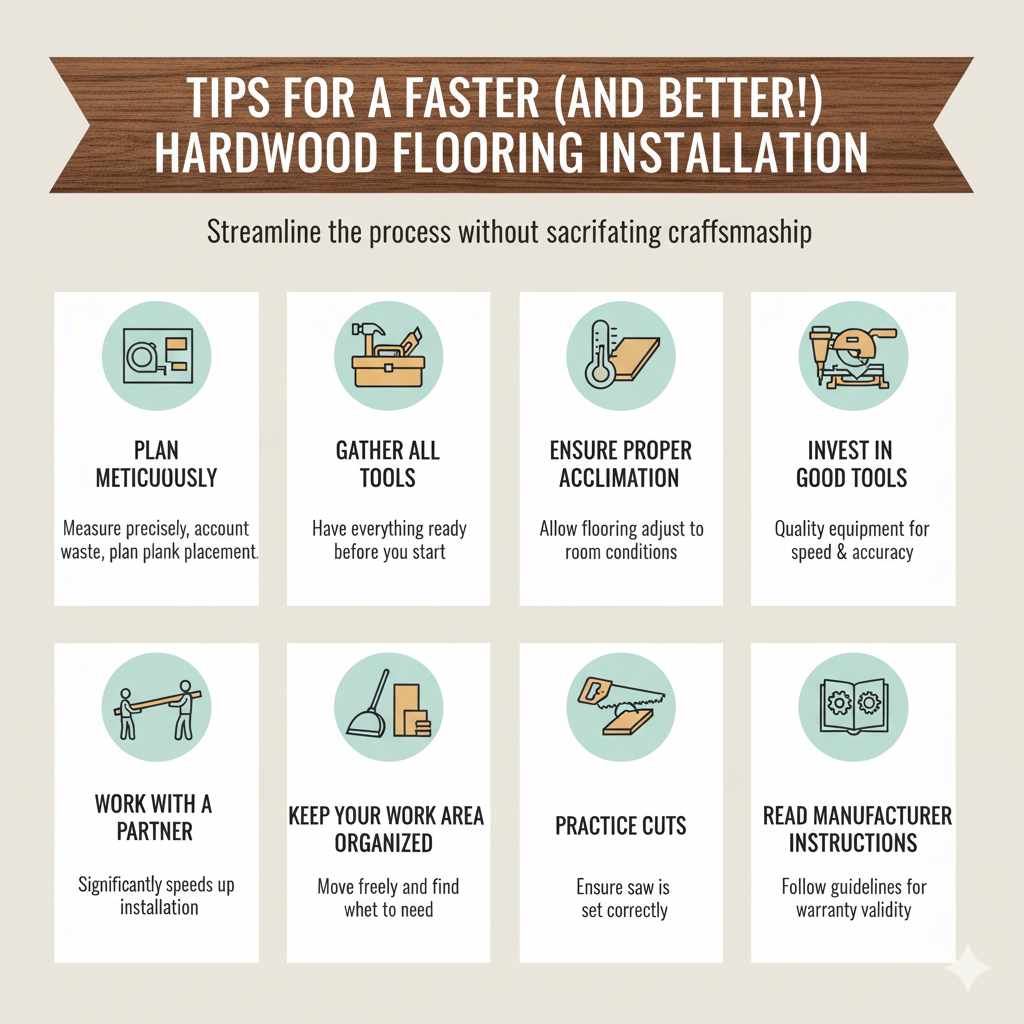
While we encourage taking your time for quality, there are ways to work more efficiently and ensure a great result. These tips can help you streamline the process without sacrificing craftsmanship:
- Plan Meticulously: Before you even buy your flooring, measure your space precisely. Account for waste (typically 5-10%, more for diagonal or intricate patterns). Plan where your first and last planks will go.
- Gather All Tools in Advance: Having everything you need ready before you start saves countless trips to the store or tool shed.
- Ensure Proper Acclimation: As mentioned, this is non-negotiable. It takes time, but it prevents future headaches.
- Invest in Good Tools: A proper floor nailer, a good miter saw for precise cuts, and a quality measuring tape can make a huge difference in both speed and accuracy.
- Work with a Partner: If possible, having another person to help can significantly speed up installation, especially when maneuvering long planks or holding them in place.
- Keep Your Work Area Organized: A clean and organized space allows you to move freely and find what you need quickly.
- Practice Cuts: Before making critical cuts on your main planks, make practice cuts on scrap pieces to ensure your saw is set correctly.
- Read Manufacturer Instructions: Different flooring types have specific installation requirements. Always follow the manufacturer’s guidelines. This is a must-do for ensuring warranty validity. For example, The National Wood Flooring Association (NWFA) provides excellent, detailed installation guidelines that are invaluable.
FAQ: Your Hardwood Flooring Questions Answered
Let’s tackle some common questions beginners have about the timeline and process of laying hardwood floors.
Q1: How long does it take to lay 1000 square feet of hardwood floor?
For 1000 square feet, a good estimate for a DIYer is typically 7-12 days. This includes the essential acclimation period, subfloor prep, installation of the planks, and re-installing trim. Larger areas naturally take more time due to the sheer volume of material and installation work. It’s also wise to add a couple of buffer days for any unforeseen issues.
Q2: Can I lay hardwood floors in a weekend?
For a very small area (like a small bathroom or a tiny entryway) and if you have all your supplies and a perfectly prepped subfloor, it might be possible to do much of the installation in a weekend. However, this is very ambitious and does not account for proper acclimation (which requires days) or the inevitable complexities that arise. For most rooms, a weekend is too short to do a quality job.
Q3: How long should hardwood planks acclimate before installation?
Most manufacturers strongly recommend acclimating hardwood flooring in the room where it will be installed for a minimum of 72 hours (3 days). Some recommend up to 7-14 days, especially for solid hardwood. Always check the specific manufacturer’s instructions for your flooring product. The goal is for the wood to match the home’s average humidity and temperature.
Q4: What’s the fastest way to install hardwood floors?
The fastest installation method for homeowners is typically a pre-finished engineered hardwood floor with a click-lock system, installed as a floating floor. These planks are already sealed and finished, and the click-lock mechanism allows them to snap together quickly. However, “fastest” shouldn’t compromise quality, so careful subfloor prep and following installation guidelines remain crucial.
Q5: How long does it take to remove old flooring before installing hardwood?
This can vary wildly. Removing carpet might take a few hours. Removing old tile or stubborn vinyl with old adhesive can take a full day or even longer, depending on how well it’s adhered and the methods needed to remove it. This step is part of the overall ‘preparation’ time, so factor it in.
Q6: What is considered a “complex” room shape that would slow down installation?
A complex room shape includes features like intricate angles, multiple bay windows that require detailed cutting and fitting, numerous doorways, columns, built-in cabinets, or irregular wall shapes. Any room that isn’t a simple rectangle or square will require more measuring, more cuts (many of which will be angled or curved), and more careful fitting, thus slowing down the installation process.
Conclusion: Your Confidence in Craftsmanship
There you have it! You’ve explored the ins and outs of how long it takes to lay hardwood floors. We’ve covered everything from understanding the factors that influence the timeline – the size and shape of your room, the type of wood, and your experience level – to detailed phase breakdowns and practical tips for working efficiently. Remember, this isn’t just about slapping down boards; it’s about preparing your space, respecting the material, and applying careful craftsmanship.
While the exact duration will vary, a good ballpark for a typical room is 3 to 5 days from start to finish. This allows ample time for acclimation, meticulous subfloor preparation, patient installation, and those essential finishing touches. Don’t let the numbers intimidate you; instead, let them empower you with knowledge. With careful planning and this guide in hand, you’re well on your way to achieving those beautiful, durable hardwood floors you’ve been dreaming of. Enjoy the process, take pride in your work, and welcome your stunning new floors!