How to Oil Butcher Block the Right Way
So, you’ve got a beautiful butcher block countertop or cutting board. Great choice! But now you’re wondering about oiling it.
Many people find this a bit tricky at first. You want to make sure you’re doing it right to keep your wood looking good and lasting a long time. Don’t worry!
We’re going to walk you through How to Oil Butcher Block the Right Way with simple steps anyone can follow. Let’s get your wood protected and shining!
Choosing The Right Oil For Your Butcher Block
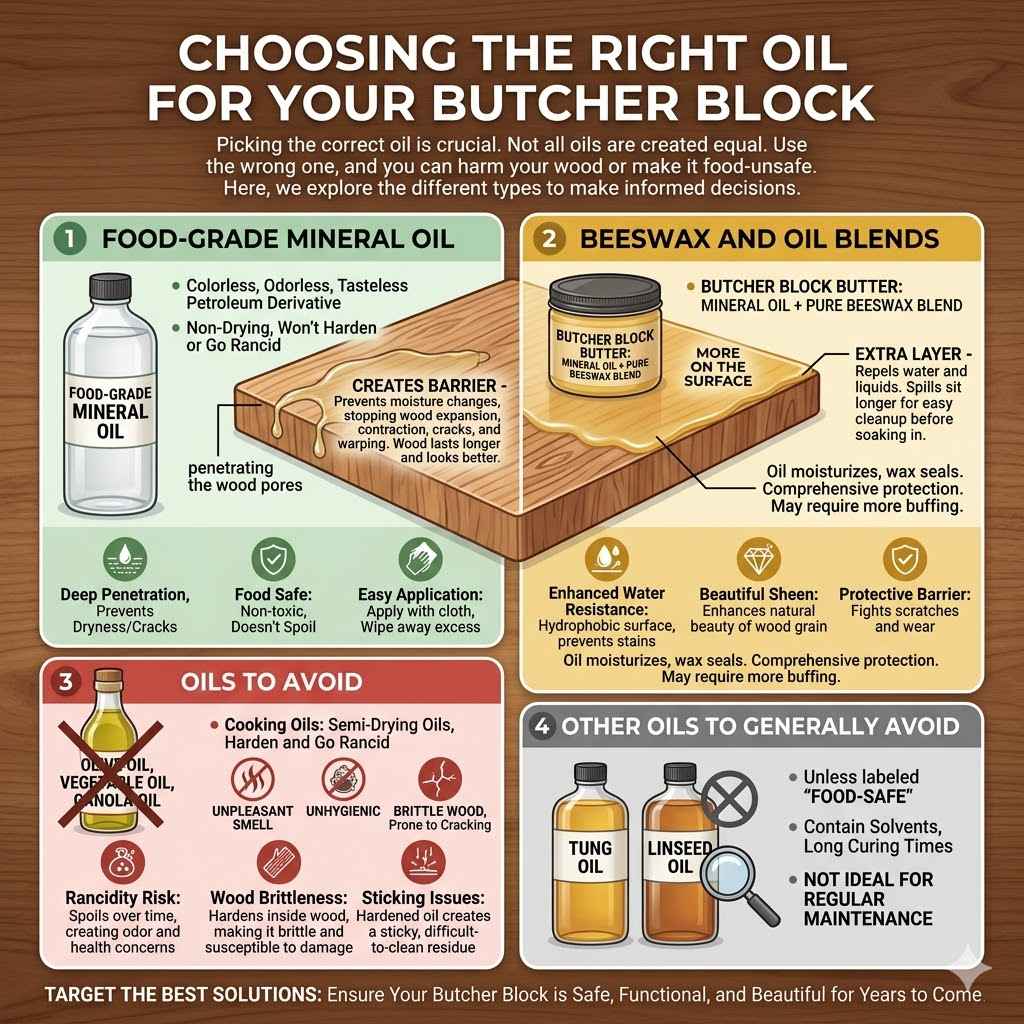
Picking the correct oil is the very first step to properly caring for your butcher block. Not all oils are created equal, and using the wrong one can actually harm your wood or even make it unsafe for food prep. We will explore the different types of oils available, discuss what makes certain oils ideal for butcher block, and explain why some oils should be avoided entirely.
This section helps you make informed decisions from the start.
Food-Grade Mineral Oil
Food-grade mineral oil is a very popular choice for butcher block. It’s a colorless, odorless, and tasteless oil derived from petroleum. It’s also non-drying, meaning it won’t harden or go rancid over time.
Mineral oil works by penetrating the wood pores and creating a barrier. This barrier helps to prevent moisture from seeping in and out of the wood. This is super important because changes in moisture content are what cause wood to expand, contract, crack, and warp.
When the wood stays more stable, it lasts much longer and looks better.
One of the biggest benefits of mineral oil is its safety. Since it’s food-grade, it’s perfectly fine if a little bit gets on your food. This is a major plus for cutting boards and countertops that are used for food preparation.
It also doesn’t go rancid like some cooking oils might, so you don’t have to worry about your butcher block smelling bad over time.
Many people recommend using a dedicated butcher block mineral oil. These are often the same as regular food-grade mineral oil but might be filtered to be extra pure or come with a specific applicator. You can usually find these at kitchen supply stores or online.
- Penetrates Wood: Mineral oil seeps deep into the wood fibers, offering protection from within. This deep penetration is key to preventing dryness and cracks.
- Food Safe: It is non-toxic and does not spoil, making it ideal for surfaces that come into contact with food. This ensures your kitchen remains safe for everyone.
- Easy Application: It’s simple to apply with a clean cloth, and excess oil wipes away easily. This makes maintenance a breeze, even for beginners.
Beeswax and Oil Blends
Beeswax and oil blends are another excellent option for butcher block care. These products combine a food-safe oil, like mineral oil, with pure beeswax. The beeswax adds an extra layer of protection and a slightly different finish to the wood.
When you apply a blend, the oil penetrates the wood as usual. The beeswax then sits more on the surface. It creates a protective film that repels water and other liquids.
This is particularly useful for countertops where spills are common. This extra barrier means spills sit on the surface longer, giving you more time to wipe them up before they can soak into the wood.
These blends often give the wood a nice sheen and a smoother feel. Many users prefer the look and feel of wood treated with a beeswax blend. It can make the grain pop and give the block a richer appearance.
Plus, beeswax is a natural product, which appeals to many homeowners.
Applying these blends is a bit different than plain oil. You might need to rub it in a bit more firmly. The beeswax can be thicker, so a bit of elbow grease helps it spread evenly.
Always follow the product’s specific instructions for the best results. Some blends might require a bit more buffing to get that perfect finish.
These blends offer a dual benefit. The oil moisturizes the wood from the inside, and the wax seals the surface from the outside. This comprehensive protection helps extend the life of your butcher block considerably.
It is a more complete care solution.
- Enhanced Water Resistance: The beeswax component creates a hydrophobic surface, actively repelling water and preventing stains. This is vital for active kitchens.
- Beautiful Sheen: Many blends impart a lovely, subtle sheen that enhances the natural beauty of the wood grain. This makes your butcher block look even more appealing.
- Protective Barrier: It forms a durable, protective layer on the surface that helps resist scratches and wear. This keeps your block looking new for longer.
Oils to Avoid
While many oils are safe and beneficial for butcher block, some should be strictly avoided. These are typically cooking oils like olive oil, vegetable oil, or canola oil.
The main problem with cooking oils is that they are “drying” or semi-drying oils. This means they will eventually harden and can go rancid. When cooking oil hardens in the wood, it can make the wood brittle and prone to cracking.
Even worse, rancid oil creates a very unpleasant smell and can even be unhygienic.
If you’ve already used cooking oil on your butcher block, it’s best to remove as much as possible and re-oil with a food-safe mineral oil or a beeswax blend. Cleaning off the old oil might require a bit of work, but it’s worth it to protect your investment. This prevents future issues with odor and wood integrity.
Another oil to generally avoid for regular maintenance is Tung oil or Linseed oil unless specifically formulated and labeled as food-safe. While these are excellent wood finishes for other applications, they often contain solvents and can take a long time to cure. Even food-safe versions can require longer curing times and careful application, making them less ideal for the casual user wanting simple, regular maintenance.
- Rancidity Risk: Cooking oils can spoil over time, leading to unpleasant odors and potential health concerns. This is a significant drawback for kitchen surfaces.
- Wood Brittleness: Drying oils harden within the wood, making it brittle and more susceptible to damage. This can shorten the lifespan of your butcher block.
- Sticking Issues: When cooking oils harden, they can create a sticky residue on the surface. This makes cleaning and general use unpleasant and difficult.
Preparing Your Butcher Block For Oiling
Before you even think about applying oil, proper preparation is key. This involves cleaning the wood thoroughly and ensuring it’s completely dry. Skipping these steps can lead to an uneven finish or trapped contaminants, neither of which is ideal for your butcher block’s longevity and appearance.
We will cover how to get your butcher block ready for its oil treatment.
Cleaning The Butcher Block
Start by cleaning your butcher block to remove any dirt, grease, or old residues. For regular cleaning, a damp cloth with mild soap is usually sufficient. You can use a soft sponge or a microfiber cloth.
If you have tougher grime or stains, you can use a paste of baking soda and water. Gently scrub the stained area with the paste using a soft brush or cloth. Rinse the area thoroughly with a damp cloth to remove all baking soda residue.
Make sure not to oversaturate the wood.
For very deep cleaning or if you suspect old, rancid oil is present, you might need to use a dedicated wood cleaner. Always choose a cleaner specifically designed for wood and follow the product instructions carefully. Some cleaners might require a bit of scrubbing.
After cleaning, always wipe the surface down with a clean, damp cloth to remove any soap or cleaner residue. This step is crucial to ensure that the new oil can penetrate the wood properly. Any leftover cleaning agents can interfere with the oil.
It’s important to remember that you should never soak your butcher block in water or put it in a dishwasher. Excessive water is the enemy of solid wood. Gentle cleaning methods are always best.
- Remove All Contaminants: Thorough cleaning ensures that only pure oil penetrates the wood. This prevents old food particles or grease from being sealed in.
- Mild Cleaning Agents: Use gentle soaps or natural cleaners like baking soda. Harsh chemicals can strip the wood’s natural oils or damage the finish.
- Rinse Thoroughly: After cleaning, make sure to rinse away all traces of soap or cleaner. Residue can prevent oil from absorbing properly.
Ensuring The Wood Is Dry
This is perhaps the most critical step in the preparation process. Applying oil to wet or even damp wood is a recipe for disaster. Moisture trapped within the wood can lead to mold, mildew, or uneven oil absorption, causing blotchiness.
After cleaning, allow your butcher block to air dry completely. This usually takes at least 24 hours, but it can take longer depending on the humidity in your home and how much water was used during cleaning. You can speed up the process by wiping it down with a dry, clean towel.
Feel the wood surface. It should feel completely dry to the touch. You can even gently press your hand on the surface for a minute; if any moisture transfers to your skin, it’s not dry enough.
For very thorough drying, some people use a fan to circulate air around the butcher block.
If your butcher block is a cutting board that can be moved, you can also stand it on its edge to allow air to circulate around all sides. This helps it dry more evenly. Ensure it is propped up securely so it doesn’t fall.
Never use heat sources like a hair dryer or oven to dry the wood, as this can cause it to crack or warp. Patience is key here. A well-dried block will absorb oil much more effectively, leading to a superior finish and better protection.
- Prevent Mold and Mildew: Water trapped under oil is a breeding ground for bacteria and mold. Ensuring dryness is a primary safety step.
- Even Oil Absorption: Dry wood absorbs oil uniformly. This prevents splotchy or uneven finishes that can be visually unappealing.
- Avoid Warping: Moisture imbalances are a major cause of wood warping. Proper drying maintains the block’s structural integrity.
The Step-By-Step Oiling Process
Now that your butcher block is clean and dry, it’s time for the actual oiling. This process is straightforward, but paying attention to the details will make a big difference in the final result. We will guide you through each step, from applying the oil to letting it cure.
Following these instructions will ensure your butcher block is well-protected and looks its best.
Applying The Oil Generously
Pour a generous amount of your chosen food-grade mineral oil or beeswax blend directly onto the butcher block surface. Don’t be shy with the oil! The wood needs to absorb as much as it can to become fully protected.
Think of it like giving your wood a drink.
Use a clean, lint-free cloth or a paper towel to spread the oil evenly over the entire surface. Make sure to cover all areas, including the edges and ends. If you’re oiling a cutting board, don’t forget the sides.
Some people even like to oil the underside of their butcher block for balanced protection.
Work the oil into the wood in the direction of the grain. You’ll see the wood darken as it absorbs the oil. This is a good sign!
It means the oil is doing its job. If you’re using a beeswax blend, you might need to rub a little more vigorously to get the beeswax to spread evenly.
Let the oil sit on the surface for a good amount of time. For mineral oil, aim for at least 15-30 minutes. For beeswax blends, follow the product instructions, but it could be longer.
During this time, the wood will continue to soak up the oil. You might even see some dry spots appear as the wood drinks up the oil.
If dry spots appear, apply more oil to those areas. The goal is to have a visible layer of oil sitting on the surface after the initial soaking period. This indicates the wood can’t absorb any more at this time.
- Saturate The Wood: Apply more oil than you think you need. The wood will only absorb what it can, and excess can be wiped away later.
- Even Distribution: Use a cloth to spread the oil in the direction of the wood grain. This ensures a uniform coating across the entire surface.
- Allow Soaking Time: Let the oil penetrate the wood for a significant period. This allows the oil to reach deep into the fibers for maximum protection.
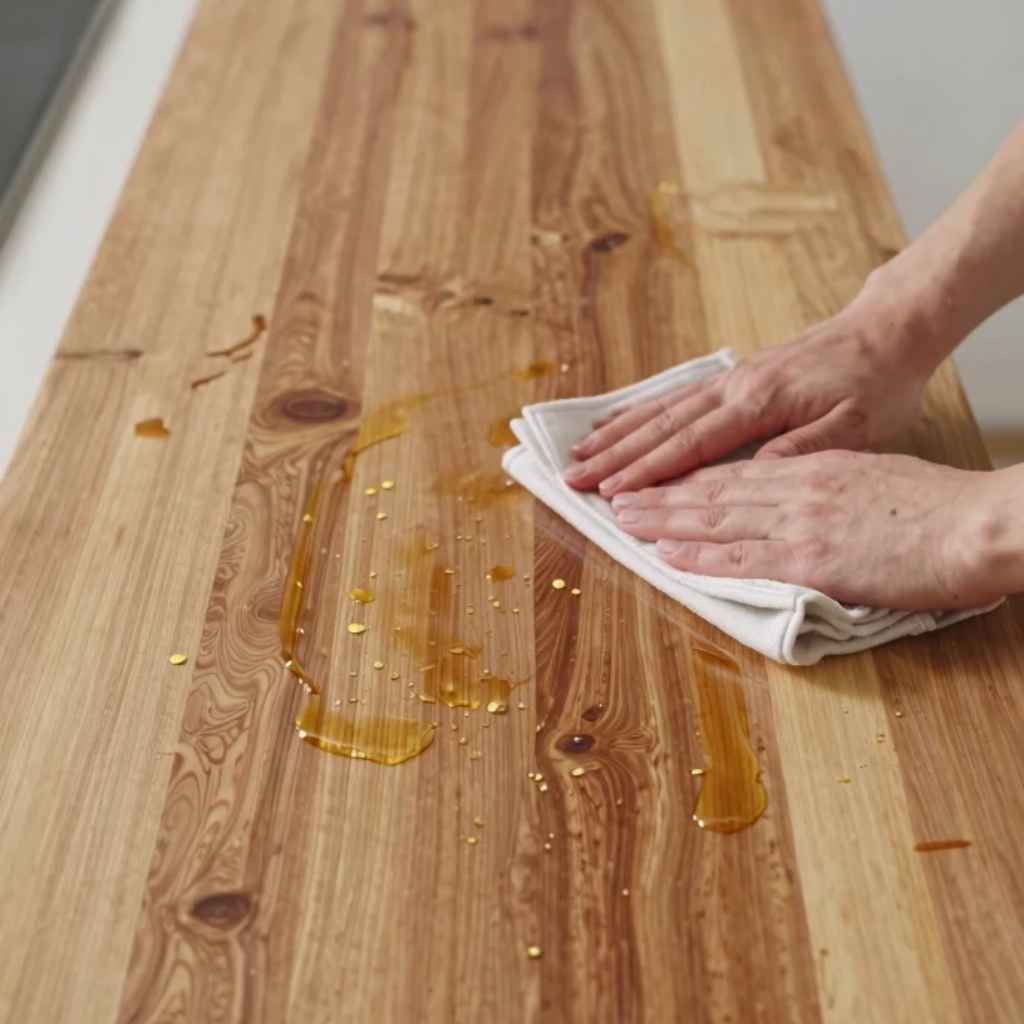
Wiping Off Excess Oil
After the oil has had time to soak into the wood, it’s time to wipe away any excess. Use a clean, dry, lint-free cloth or paper towels for this. You want to remove all the oil that the wood couldn’t absorb.
Wipe the surface thoroughly. You’ll notice that the wood has a lovely sheen and a darker, richer color. The excess oil won’t just sit there; it can become sticky and attract dust and dirt if not removed properly.
So, this step is very important for a clean finish.
Pay attention to corners and edges. Sometimes excess oil can pool in these areas, so make sure you get it all. A gentle buffing motion can help remove stubborn bits.
If you used a beeswax blend, you might need to do a bit more buffing to get a smooth, non-tacky finish. The goal is a smooth, protected surface that feels great to the touch. A well-buffed surface will resist fingerprints and smudges better.
Don’t be alarmed if the wood looks a bit streaky or uneven at this stage. This is normal, and it often evens out with subsequent oilings. The first oiling is often the most dramatic.
Subsequent treatments will maintain and deepen the look.
- Remove Unabsorbed Oil: Wipe away any oil that the wood couldn’t absorb. This prevents stickiness and dust attraction.
- Achieve a Smooth Finish: Buff the surface with a clean cloth until it feels smooth and non-greasy. This step is key for a professional look.
- Attention to Detail: Ensure all excess oil is removed from corners and edges. These areas can easily retain oil if not checked carefully.
Allowing For Proper Curing Time
After you’ve wiped off the excess oil, it’s essential to let the butcher block cure. Curing is the process where the oil fully penetrates the wood and starts to harden slightly or set, creating a more durable finish. This isn’t instant!
For pure mineral oil, the curing time is quite short. You can typically start using your butcher block after 12-24 hours. However, letting it cure for a full 24 hours is recommended for best results.
If you used a beeswax blend or an oil with added curing agents, the curing time might be longer. Always check the product packaging for specific instructions. Some blends might need 48-72 hours to cure fully.
During this time, try to avoid heavy use or exposure to moisture.
It’s a good idea to place your butcher block in a well-ventilated area during the curing process. This helps the oil to set properly. Avoid placing it in direct sunlight or near heat sources.
The curing process might seem like waiting, but it’s a vital step. It ensures the oil creates a strong, protective barrier that will shield your butcher block from everyday wear and tear. A properly cured block is more resistant to stains and damage.
- Oil Penetration: Curing allows the oil to fully soak into the wood fibers, providing deep, lasting protection. This makes the wood less susceptible to damage.
- Durable Finish: The curing process helps the oil to set, creating a harder, more resilient surface against scratches and stains. This extends the beauty and function of your block.
- Ventilation is Key: Allow air to circulate around the block during curing. This promotes even drying and prevents odors from developing.
Maintaining Your Oiled Butcher Block
Regular maintenance is the secret to a long-lasting and beautiful butcher block. It’s not a one-time job; consistent care will keep your wood looking its best for years to come. We will cover how often to oil, what to do if you notice issues, and tips for everyday care.
This ongoing attention is what truly makes the difference.
How Often To Oil Your Butcher Block
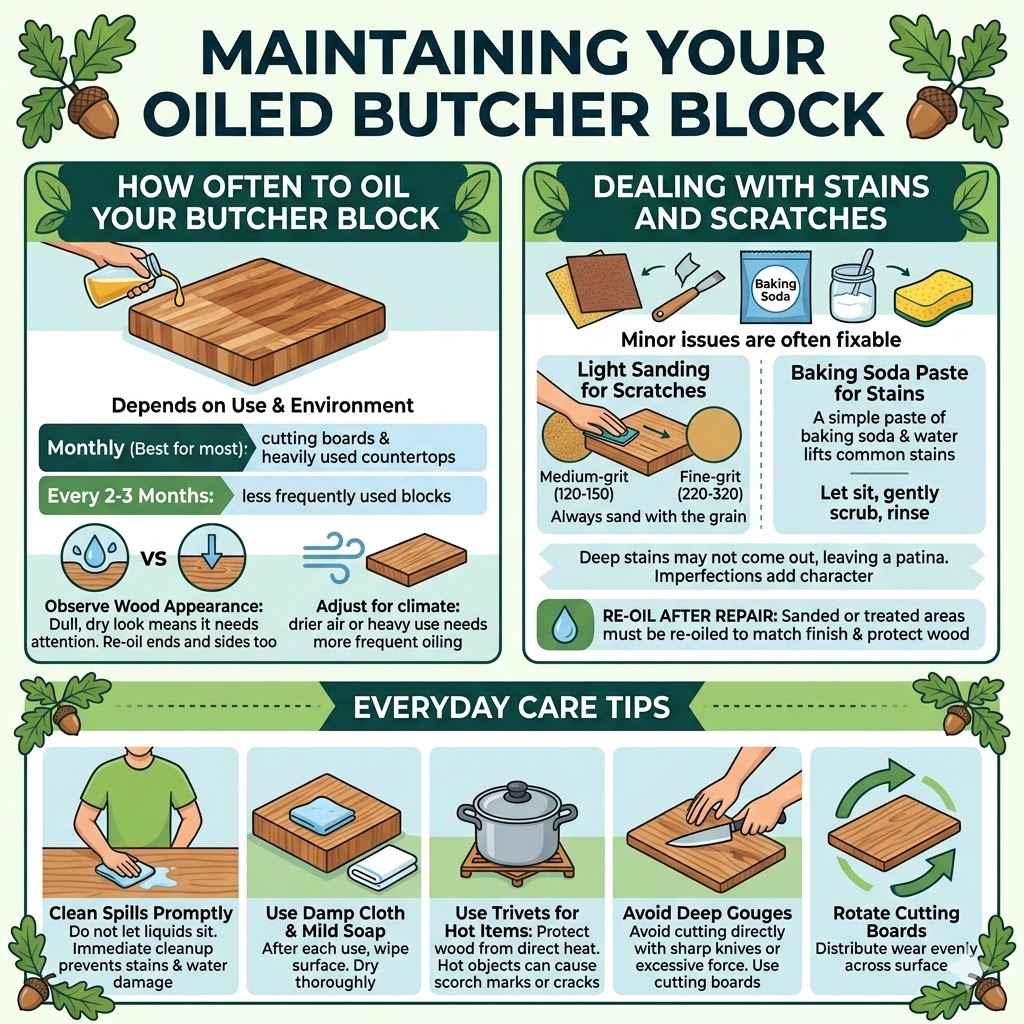
The frequency of oiling depends on how much you use your butcher block and the conditions in your home. For cutting boards and heavily used countertops, it’s a good idea to re-oil at least once a month.
You’ll know it’s time to re-oil when the wood starts to look dry or dull. Another sign is when water stops beading up on the surface and instead soaks in quickly. If you see water spots forming easily, that’s a clear indication that the protective oil layer is wearing thin.
For less frequently used butcher blocks, you might be able to get away with oiling every 2-3 months. It’s better to oil too often than not often enough. A quick once-over with oil is much better than letting the wood become excessively dry.
If you live in a very dry climate or your home heating system tends to dry out the air significantly, you might need to oil more often. Humidity levels play a big role in how quickly wood dries out and needs re-oiling. Consider the environment your butcher block lives in.
Don’t forget to oil the ends and sides of your butcher block too. These areas are often more exposed to air and can dry out faster. Consistent oiling of all surfaces ensures balanced protection and prevents uneven drying or warping.
- Monthly is Often Best: For active use, re-oiling about once a month keeps the wood saturated. This is a good benchmark for most kitchens.
- Observe Wood Appearance: If the wood looks dull, dry, or water soaks in quickly, it’s time for more oil. Your eyes will tell you when it needs attention.
- Environmental Factors Matter: Dry air or heavy use means more frequent oiling. Adjust your schedule based on your home’s conditions and how you use the block.
Dealing With Stains and Scratches
Stains and scratches are a natural part of using a butcher block. The good news is that they are often fixable. For minor scratches, you can often buff them out with fine-grit sandpaper.
If you get a scratch, lightly sand the area in the direction of the wood grain. Start with a medium-grit sandpaper (around 120-150 grit) and then move to a finer grit (220-320 grit). Once you’ve smoothed out the scratch, clean the area and re-oil it.
This will help blend the sanded area with the rest of the block.
For stains, try to identify the source. If it’s a fresh spill, wipe it up immediately. For set-in stains, a paste of baking soda and water can often lift them.
Apply the paste, let it sit for a few minutes, and then gently scrub and rinse.
If a stain is particularly stubborn, you might need to try a specialized wood stain remover, but always test it in an inconspicuous area first. After stain removal, you will likely need to lightly sand the area and re-oil it to restore the finish. Some stains, especially deep ones, might not come out completely, leaving a slight discoloration.
Remember that butcher block is a natural material. Some minor imperfections add character. Embrace them as part of the material’s charm.
Over time, your block will develop a unique patina.
- Light Sanding for Scratches: Minor surface scratches can often be removed with fine-grit sandpaper. Always sand with the grain.
- Baking Soda Paste for Stains: A simple paste of baking soda and water can help lift many common stains. It’s a gentle yet effective cleaner.
- Re-oil After Repair: Any time you sand or treat a specific area, make sure to re-oil it to protect the wood and match the finish. This step is crucial for repair.
Everyday Care Tips
Beyond regular oiling, simple everyday habits can significantly extend the life and beauty of your butcher block. One of the most important is to clean up spills immediately. Don’t let liquids sit on the surface for long, as they can penetrate and cause staining or damage.
When cleaning your butcher block for daily use, use a damp cloth with mild soap. Wipe it down after each use to remove food particles and prevent bacteria growth. Always dry the surface thoroughly with a clean towel after cleaning.
Avoid placing hot pots or pans directly on the butcher block. Use trivets or pot holders to protect the wood from heat damage. Extreme heat can cause scorch marks or even cracks.
Try not to cut directly on the surface with knives that are too sharp or are used with excessive force. While butcher blocks are durable, deep gouges can be harder to repair and can harbor bacteria. Consider using cutting boards for particularly demanding tasks.
Rotate cutting boards if you have them. If your butcher block is a countertop, try to distribute wear evenly across the surface to avoid creating deep grooves in one area.
- Clean Spills Promptly: Do not let liquids sit on the surface. Immediate cleanup prevents stains and water damage.
- Use Trivets for Hot Items: Protect the wood from direct heat. Hot objects can leave scorch marks or crack the wood.
- Dry Thoroughly After Cleaning: Always wipe the butcher block dry after washing. Moisture left on the surface can lead to damage.
Frequently Asked Questions
Question: How often should I oil my butcher block for the first time
Answer: For the very first oiling, apply multiple coats. Let the first coat soak in for 30 minutes, wipe off excess, and then apply another coat. Repeat this several times over 24-48 hours to really saturate the wood.
Then allow it to cure for at least another 24 hours before regular use.
Question: Can I use olive oil to oil my butcher block
Answer: No, it is not recommended to use olive oil or other cooking oils on your butcher block. These oils are prone to going rancid, which can cause unpleasant odors and make the wood sticky and dull. Stick to food-grade mineral oil or specialized butcher block oils/waxes.
Question: How do I know if my butcher block needs oiling
Answer: You’ll know it’s time to oil when the wood looks dry, dull, or thirsty. Water will no longer bead up on the surface and will instead soak in quickly, leaving dark spots. Any change in the wood’s appearance from its usual rich luster is a sign it needs oil.
Question: Can I clean my butcher block with bleach
Answer: It is generally not advisable to use bleach on butcher block. Bleach can be very harsh and can strip the natural oils from the wood, potentially damaging the finish and even discoloring it. Mild soap and water or a baking soda paste are safer alternatives for cleaning.
Question: Will oiling my butcher block make it waterproof
Answer: Oiling your butcher block makes it highly water-resistant, not completely waterproof. The oil creates a barrier that repels liquids, but prolonged exposure to water can still lead to damage. Promptly wiping up spills is still essential for maintaining the wood’s integrity.
Summary
Oiling your butcher block the right way ensures its beauty and longevity. By choosing the correct food-safe oils, preparing your wood properly by cleaning and drying, and following a simple application process, you protect your investment. Regular maintenance with oiling and everyday care will keep your butcher block looking its best.