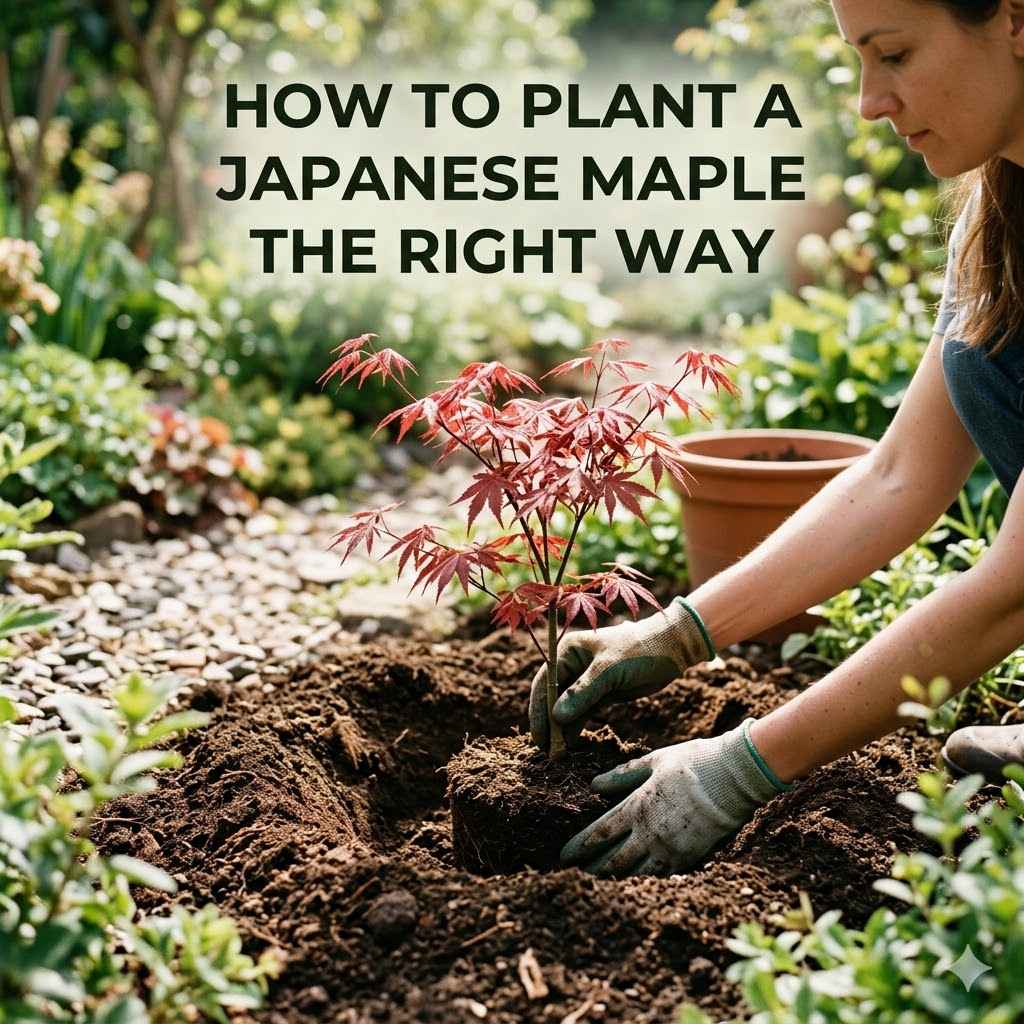
How to Plant a Japanese Maple The Right Way
Many gardeners dream of adding a stunning Japanese maple to their landscape, but they can seem a bit tricky. This is especially true when you’re just starting out. You might worry about getting it wrong and seeing your beautiful tree struggle.
But don’t fret! We’ve got a super simple, step-by-step plan for How to Plant a Japanese Maple the Right Way. Follow these easy directions, and you’ll have a happy, healthy tree in no time.
Let’s get your new tree settled in perfectly.
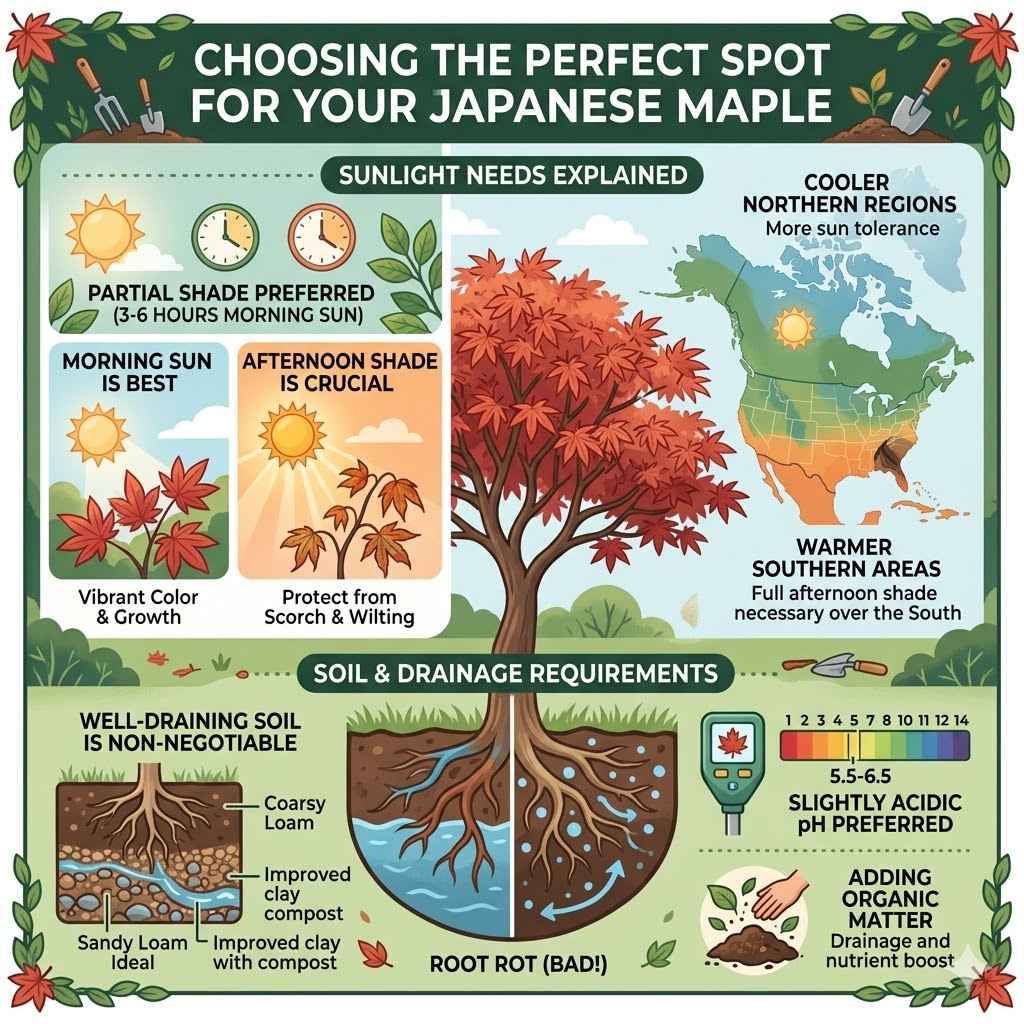
Choosing The Perfect Spot For Your Japanese Maple
Picking the right place for your Japanese maple is super important for its happiness. These trees are special, and they need a little care in choosing their home. They don’t like too much harsh sun, especially in the afternoon, which can scorch their delicate leaves.
They also need a spot that drains well, meaning water doesn’t just sit around their roots. If water stays too long, it can cause root rot, which is bad news for any plant. Think about places that get morning sun but are shaded from the hot afternoon rays.
This could be near a building or under the canopy of a larger, established tree.
Sunlight Needs Explained
Understanding sunlight is key to planting a Japanese maple correctly. Most Japanese maples prefer partial shade. This means they should receive about 3 to 6 hours of sunlight per day, preferably in the morning.
Morning sun is gentler and helps the tree photosynthesize without risking leaf burn. Afternoon sun, especially in hotter climates, can be too intense and damage the leaves, causing them to turn brown and crispy. Some varieties, particularly those with green or deeply lobed leaves, can tolerate a bit more sun than those with bright red or variegated foliage.
Always check the specific needs of your chosen cultivar, as there’s a lot of variety within Japanese maples.
Morning Sun is Best
Morning sunlight is the most beneficial for Japanese maples. It provides the energy the tree needs to grow and thrive without the risk of scorching its leaves. This gentle light helps the leaves produce food through photosynthesis, supporting overall health and vibrant color.
Aim for a location that captures the early day’s rays.
Afternoon Shade is Crucial
The intense heat of the afternoon sun can be detrimental to Japanese maples. Their thin, delicate leaves are prone to sunburn, leading to unsightly brown spots and wilting. Providing shade during the hottest part of the day protects the tree from this damage.
This is especially important in regions with hot summers.
Consider Your Climate
The amount of sun a Japanese maple can handle depends heavily on your local climate. In cooler northern regions, they might tolerate more direct sun. In warmer southern areas, full afternoon shade is almost always a necessity.
Observing how other plants in your area react to sunlight can offer clues for your maple’s placement.
Soil And Drainage Requirements
The soil your Japanese maple grows in is its foundation. It needs to be well-draining, meaning water can flow through it easily and doesn’t stay soggy. Soggy soil is a recipe for root rot, a serious problem that can kill your tree.
Japanese maples also like soil that is slightly acidic. This means the pH level should be somewhere between 5.5 and 6.5. You can test your soil’s pH with a simple kit you can buy at a garden center.
If your soil is too alkaline, you might need to amend it to make it more acidic.
Well-Draining Soil is Non-Negotiable
This is perhaps the most critical soil condition for Japanese maples. Roots need air to breathe, and waterlogged soil suffocates them. When water can drain away freely, it prevents root rot and allows for healthy root development.
Sandy loam is often ideal, but you can improve drainage in clay soil by adding organic matter like compost.
Slightly Acidic pH Preferred
Japanese maples thrive in slightly acidic soil conditions, typically with a pH between 5.5 and 6.5. This pH range allows them to absorb essential nutrients from the soil more effectively. If your soil is too alkaline (pH above 7.0), you may need to amend it with materials like sulfur or peat moss over time to lower the pH.
Adding Organic Matter
Incorporating compost or well-rotted manure into the soil before planting helps improve both drainage and nutrient content. Organic matter also helps the soil retain a little moisture without becoming waterlogged. It creates a more hospitable environment for the tree’s roots to establish and grow strong.
Preparing The Planting Hole For Your Japanese Maple
Getting the hole ready is the next big step. This isn’t just about digging a hole; it’s about creating the best possible welcome for your new tree. The hole should be wider than the root ball, but not necessarily deeper.
This helps the roots spread out easily into the surrounding soil. You want the top of the root ball to be level with the ground. Digging too deep can cause the tree to settle too much, which can lead to problems.
Make sure the soil you dig out is loosened up so the roots don’t hit a hard barrier.
Digging The Right Size Hole
The size of the planting hole matters a lot. You should dig a hole that is about two to three times wider than the tree’s root ball. This extra width gives the roots plenty of space to spread out and anchor the tree securely.
Think of it like giving them room to explore. The depth of the hole, however, should only be as deep as the root ball. You want the top of the root ball to sit right at or slightly above the soil level.
If the hole is too deep, the tree can sink down too far after planting, which can damage the trunk.
Width Is More Important Than Depth
Japanese maples have a fibrous root system that tends to spread outwards. Making the hole significantly wider than the root ball encourages these roots to grow horizontally into the surrounding soil. This helps the tree establish itself more firmly and become more drought-tolerant over time.
A wide hole breaks up any compacted soil that might otherwise restrict root growth.
Depth Should Match The Root Ball
Carefully measure the height of the root ball on your Japanese maple. Your planting hole should be no deeper than this measurement. If you dig too deep, the soil can settle, causing the tree to be planted too low.
This can lead to the trunk being buried, which can cause rot and disease. The goal is to have the root flare (where the trunk widens at the base) visible at ground level.
Loosen The Sides
Once the hole is dug to the correct width and depth, take some time to loosen the soil on the sides of the hole. Use your shovel or a garden fork to break up any clods or compacted soil. This makes it easier for new roots to penetrate the surrounding earth and grow outward.
It creates a more welcoming environment for the root system.
Preparing The Tree For Planting
Before the tree goes into its new home, it needs a little prep work. If your tree is in a container, gently remove it. You might need to loosen the soil around the edges if it looks root-bound.
If it’s in burlap, carefully remove any twine or wire around the top. Gently tease out any circling roots. Some people like to soak the root ball for a bit before planting, but this isn’t always necessary if the soil is already moist.
Gently Remove From Container
If your Japanese maple is in a pot, carefully tip it on its side and slide the tree out. Avoid pulling on the trunk. If the roots are tightly wound around the pot (root-bound), you can gently loosen them with your fingers or a small trowel.
This encourages them to grow outwards into the new soil.
Address Root-Bound Issues
For container-grown trees, it’s common to find roots circling the pot. Gently score the sides of the root ball with a knife or trowel in a few places, or make shallow vertical cuts. This helps break the circling pattern and encourages roots to grow into the new soil, promoting better anchoring and water uptake.
Handling Balled And Burlapped Trees
If your tree came wrapped in burlap, untie and remove any twine or wire from the top of the root ball. Once the tree is in the planting hole, it’s often recommended to cut away as much of the burlap as possible, especially if it’s synthetic. Natural burlap can be left at the bottom but should not be bunched up around the trunk.
Planting Your Japanese Maple Step By Step
Now for the actual planting! Place your Japanese maple carefully into the prepared hole. Make sure the top of the root ball is level with the ground around it.
Gently backfill the hole with the soil you removed. Don’t pack it down too hard; you want air pockets. Water it really well after planting to help settle the soil.
This is a crucial step to get right for your tree’s success.
Placing The Tree In The Hole
Carefully lift the Japanese maple and center it in the planting hole. Position it so that the top of the root ball is perfectly level with or slightly above the surrounding soil surface. This is critical for the tree’s long-term health.
If you plant it too deep, the trunk can rot, and the tree may struggle to establish. Ensure the tree is standing upright from all angles.
Center The Root Ball
Gently place the Japanese maple into the prepared hole, ensuring it is centered. Visually inspect from several directions to confirm it is straight up and down.
Check The Planting Depth
The most important check is the depth. The top surface of the root ball should be level with the surrounding ground. If it’s too low, add a little soil underneath the root ball to raise it to the correct height.
Never plant a tree deeper than its root ball.
Backfilling The Planting Hole
Once the tree is in place, start filling the hole back in with the soil you removed earlier. It’s best to use the original soil, as amendments can sometimes create a “potting effect” where roots are reluctant to grow out into the native soil. Gently break up any large clumps.
As you fill, lightly tamp the soil with your hands or feet to remove large air pockets. Avoid heavy tamping, which can compact the soil too much and hinder root growth.
Use Original Soil
It’s generally best to use the soil that you dug out of the hole to backfill. This helps the tree’s roots adapt to the surrounding soil conditions. Adding too many amendments directly into the planting hole can create a stark contrast that discourages roots from spreading outwards.
Gentle Tamping
As you add soil, gently firm it around the root ball. This removes large air pockets, which can dry out the roots. However, do not stomp on the soil or pack it down too hard.
You want the soil to remain somewhat loose to allow for air circulation and root penetration.
Water As You Fill
A common technique is to fill about halfway, then water thoroughly. This helps settle the soil and remove air pockets naturally. Then, continue filling the rest of the way and water again.
Initial Watering And Mulching
After planting, give your Japanese maple a good, deep soaking. This helps settle the soil around the roots and reduces transplant shock. Aim to water until the soil is moist but not waterlogged.
After watering, apply a layer of organic mulch around the base of the tree, keeping it a few inches away from the trunk. Mulch helps retain moisture, suppress weeds, and regulate soil temperature. Pine bark or shredded hardwood are good options for Japanese maples.
Deep Watering Is Key
Immediately after planting, water the tree slowly and deeply. Let the water soak into the soil, ensuring that the entire root ball and the surrounding backfilled area are well-moistened. This first watering is crucial for settling the soil and providing essential moisture to the roots.
Apply Organic Mulch
Spread a 2-3 inch layer of organic mulch around the base of the tree. Keep the mulch a few inches away from the trunk itself to prevent moisture buildup against the bark, which can lead to disease. Mulch helps keep the soil cool, conserves moisture, and reduces weed growth.
Benefits Of Mulching
Mulch acts like a blanket for the soil. It prevents water from evaporating too quickly, meaning you won’t have to water as often. It also insulates the soil, protecting the roots from extreme temperatures, both heat and cold.
Over time, organic mulch breaks down, adding valuable nutrients to the soil.
Ongoing Care For A Healthy Japanese Maple
Caring for your Japanese maple after planting is all about consistency. Regular watering, especially during dry spells, is important. You don’t want the soil to dry out completely.
Fertilizing isn’t usually needed in the first year. After that, a light feeding in spring can be beneficial. Keep an eye out for pests, although Japanese maples are generally quite resistant.
Pruning is mostly for shape and removing dead branches. With a little ongoing attention, your tree will flourish.
Watering Needs Over Time
Your Japanese maple will need consistent watering, especially during its first year or two as it establishes its root system. Water deeply when the top inch or two of soil feels dry. Avoid frequent, shallow watering, which encourages shallow root growth.
As the tree matures and its roots spread deeper, it will become more drought-tolerant, but it’s still wise to provide water during extended dry periods.
First Year Focus
In the first year, consistent moisture is vital. Check the soil moisture regularly, especially during hot or windy weather. Water deeply when the top 1-2 inches of soil feel dry to the touch.
This helps the roots grow outwards and anchor the tree.
Mature Tree Tolerance
Once established, Japanese maples are relatively drought-tolerant. However, they will still benefit from watering during prolonged dry spells to maintain healthy foliage and growth. Observe the leaves; wilting is a clear sign the tree needs water.
Avoid Waterlogging
While consistent moisture is good, never let the soil become waterlogged. Ensure your chosen planting spot has good drainage to prevent root rot. If the soil stays saturated for too long, it can be harmful.
Fertilizing And Feeding
Japanese maples are not heavy feeders. In fact, over-fertilizing can be more harmful than beneficial, potentially burning the roots or promoting weak, leggy growth. For the first year, it’s usually best to avoid fertilizer altogether.
After the first year, you can apply a balanced, slow-release fertilizer in early spring, just as the tree begins to wake up. A light application is all that’s needed.
Fertilize Sparingly
Japanese maples generally do not require much fertilizer. They are adapted to nutrient-poor soils in their native habitat. Over-fertilizing can lead to burnt leaf tips, excessive growth that weakens the tree, and can even be toxic to the plant.
Spring Feeding
If you choose to fertilize, do so in early spring as new growth begins. Use a balanced, slow-release fertilizer. Follow the package directions carefully, and remember that less is often more with these trees.
Nutrient Deficiencies
Yellowing leaves that are not related to watering issues or sun scorch might indicate a nutrient deficiency, often iron. In such cases, a chelated iron supplement can be applied to correct the problem, but this should be done cautiously and as needed.
Pruning For Shape And Health
Pruning is an art for Japanese maples, done more for aesthetics and health than for encouraging growth. The best time to prune is usually in late winter or early spring, before the sap starts flowing heavily. Remove any dead, damaged, or crossing branches.
You can also prune to enhance the tree’s natural shape and structure. Light pruning throughout the year to remove suckers or errant twigs is also fine. Always use clean, sharp pruning tools.
When To Prune
The ideal time for major pruning is during the dormant season, typically in late winter or early spring before the buds swell. This allows you to see the tree’s structure clearly. Light pruning can also be done in mid-summer to remove small, unwanted branches or to refine the shape after the initial flush of growth.
What To Remove
Focus on removing any branches that are dead, diseased, or damaged. Also, remove any branches that are crossing or rubbing against each other, as this can create wounds where disease can enter. Thinning out crowded areas helps improve air circulation within the canopy.
Shaping The Tree
Pruning can be used to maintain or enhance the tree’s natural graceful form. Aim to create a balanced canopy with well-spaced branches. Avoid drastic pruning that can shock the tree; instead, make small, incremental changes over time to achieve your desired shape.
Common Issues And How To Solve Them
While beautiful, Japanese maples can sometimes face problems. Pests like aphids or scale can appear, but often a strong blast of water or insecticidal soap can handle them. Fungal diseases, like powdery mildew, can occur, especially in humid conditions.
Good air circulation and watering at the base of the tree help prevent this. The most common issue, however, is planting it in the wrong spot or poor drainage, leading to root problems. Addressing these early is key.
Pest And Disease Management
Japanese maples are generally resistant to many pests and diseases. However, they can occasionally be affected by aphids, scale insects, or Japanese beetles. If you spot pests, try a strong spray of water from your hose or use an insecticidal soap.
For fungal issues like powdery mildew, which appears as a white, powdery coating on the leaves, ensure good air circulation and avoid overhead watering. Pruning to open up the canopy can help.
Aphids And Scale
These small insects can suck sap from the leaves and tender shoots. They can weaken the tree and cause distorted growth. A strong jet of water can dislodge aphids, while scale insects can be scrubbed off or treated with horticultural oil or insecticidal soap during their active stages.
Powdery Mildew
This common fungal disease appears as white, powdery spots on leaves and stems. It thrives in humid conditions and poor air circulation. To manage it, ensure your tree has adequate spacing, prune to improve air flow, and avoid wetting the foliage when watering.
Fungicides can be used if the problem is severe.
Japanese Beetles
These iridescent green and copper beetles can skeletonize leaves by eating the tissue between the veins. Handpicking them off the tree and dropping them into a bucket of soapy water is an effective control method. Avoid using pesticides that harm beneficial insects.
Troubleshooting Root Problems
Root problems are often the result of planting in the wrong location or inadequate drainage. If your tree looks sickly, wilting, or its leaves are turning yellow despite adequate watering, it could be a root issue. Overwatering can lead to root rot, a fungal disease where the roots decay.
Underwatering can cause roots to dry out and die. Ensuring proper drainage and consistent, but not excessive, watering is the best prevention.
Root Rot Symptoms
Symptoms of root rot include wilting leaves that may turn yellow or brown, stunted growth, and dieback of branches. The soil will likely remain constantly wet and may have a foul odor. This is often caused by poorly draining soil and overwatering.
Addressing Root Rot
If root rot is suspected, the first step is to improve drainage. Avoid watering until the soil begins to dry out. In severe cases, you may need to carefully excavate around the roots to remove any diseased tissue and replant in a better-draining location.
Fungicides can sometimes help, but prevention is key.
Drought Stress
If the soil is too dry for extended periods, the roots can suffer from drought stress. This also leads to wilting and leaf browning. Ensure you are watering deeply and consistently, especially during hot, dry weather.
Mulch helps conserve soil moisture.
Winter Care For Young Trees
Young Japanese maples are more vulnerable to winter damage than mature trees. Protect them from harsh winds and extreme cold. In colder climates, consider wrapping the trunk of young trees with burlap or protective tree wrap.
Mulching around the base of the tree provides insulation for the roots. Avoid fertilizing late in the season, as this can encourage new growth that is susceptible to frost damage.
Protection From Wind
Strong winter winds can dry out the branches and leaves of Japanese maples, especially evergreen varieties or those with thin bark. Planting them in a sheltered location or using a burlap screen can help protect them from desiccating winds.
Trunk Protection
Young trees with thin bark are susceptible to frost cracks. Wrapping the trunk with horticultural fabric or burlap can help regulate temperature fluctuations and prevent damage. Remove the wrap in the spring.
Mulch For Insulation
A thick layer of organic mulch around the base of young trees helps insulate the roots from freezing temperatures. This keeps the soil temperature more stable, protecting the delicate root system from extreme cold.
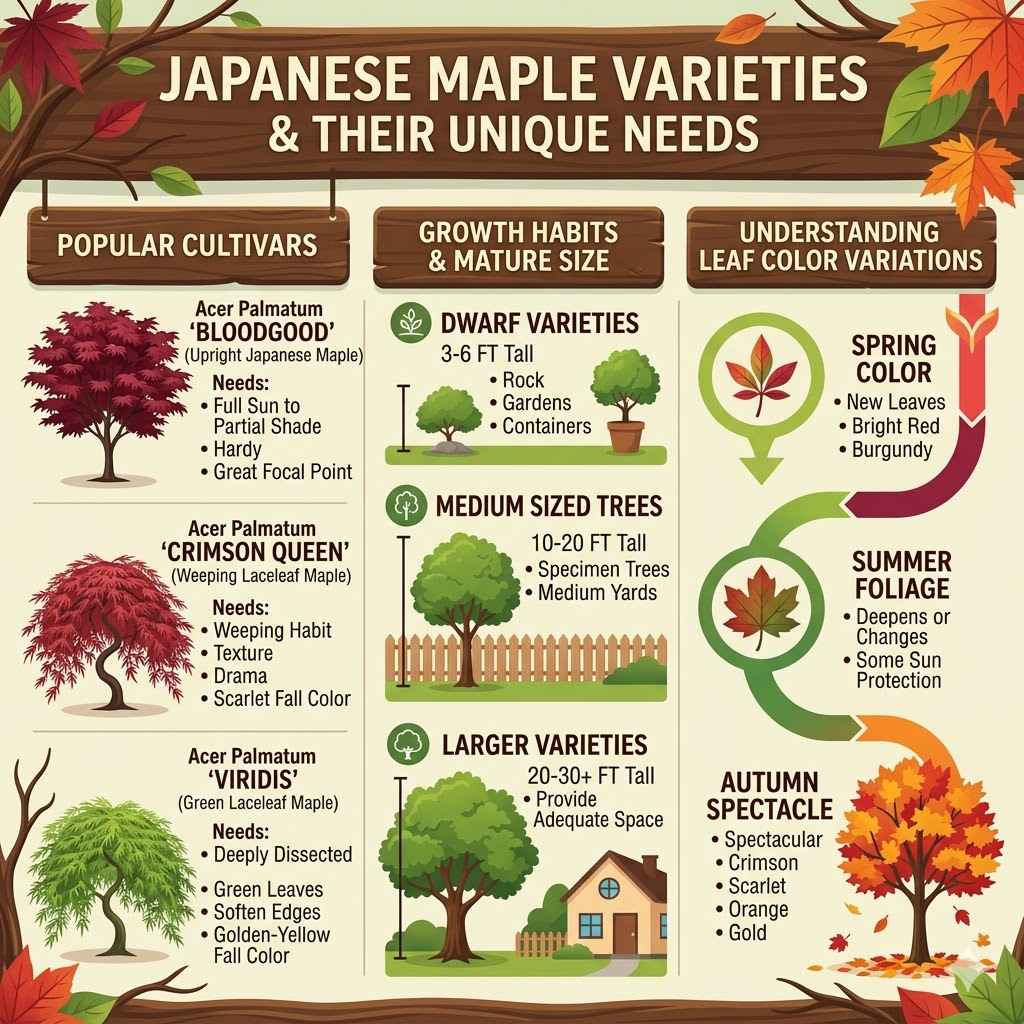
Japanese Maple Varieties And Their Unique Needs
There are hundreds of Japanese maple varieties, each with its own unique beauty and specific needs. From the delicate lace-leaf types to the bold upright growers, they offer incredible diversity. Some popular ones include Acer palmatum ‘Bloodgood’ with its deep red foliage, ‘Crimson Queen’ a beautiful dissected leaf variety, and ‘Viridis’ a vibrant green lace-leaf type.
While the general principles of planting apply to all, it’s always a good idea to research the specific cultivar you choose.
Popular Japanese Maple Cultivars
The world of Japanese maples is vast, with thousands of cultivars developed for unique leaf shapes, colors, and growth habits. Some of the most sought-after include Acer palmatum ‘Bloodgood’, known for its brilliant red spring and summer foliage and good heat tolerance. Acer palmatum ‘Crimson Queen’ is a popular weeping laceleaf variety with finely dissected, deep red leaves that turn scarlet in fall.
Acer palmatum ‘Viridis’ offers delicate, light green, dissected leaves that turn a beautiful golden-yellow in autumn, creating a graceful, airy appearance.
Acer Palmatum ‘Bloodgood’
This is a classic upright Japanese maple that is celebrated for its stunning deep red foliage that lasts throughout the summer. It’s relatively hardy and can tolerate more sun than some other red-leafed varieties. Its upright structure makes it a great focal point in the garden.
Acer Palmatum ‘Crimson Queen’
A striking weeping variety, ‘Crimson Queen’ features finely dissected, lace-like leaves that are a vibrant red color. It creates a cascading effect and is perfect for adding texture and drama to a landscape. Its fall color is an intense scarlet.
Acer Palmatum ‘Viridis’
Known for its graceful weeping habit and delicate, deeply cut green leaves, ‘Viridis’ offers a lighter, more airy feel. The foliage turns a lovely golden-yellow in the fall. This variety thrives in partial shade and is excellent for softening garden edges.
Understanding Leaf Color Variations
The dramatic leaf colors of Japanese maples are a major draw. Spring foliage can range from bright red, burgundy, or orange to vibrant green. Summer colors might deepen or change.
Fall is when many Japanese maples truly shine, transforming into spectacular shades of red, orange, and yellow. The intensity and exact shade of these colors can be influenced by sunlight exposure, soil conditions, and the specific cultivar. Some varieties are bred for their consistent color, while others change dramatically throughout the seasons.
Spring Color
New leaves emerging in spring often have the most intense coloration. Reds can be fiery, and greens can be bright and fresh. This early color is a key reason many gardeners choose Japanese maples.
Summer Foliage
As the season progresses, leaf colors can sometimes deepen or become less intense, especially in hot climates where some protection from direct sun is needed. Some varieties maintain their vibrant summer color, while others might shift slightly.
Autumn Spectacle
Fall brings the grand finale for many Japanese maples. Reds turn to crimson and scarlet, oranges deepen to fiery hues, and yellows can become a brilliant gold. This seasonal display is unparalleled and adds significant landscape value.
Growth Habits And Mature Size
Japanese maples come in a surprising range of sizes and shapes. Some are small, dwarf varieties that stay under 6 feet tall and wide, perfect for small gardens or containers. Others can grow into medium-sized trees, reaching 15-20 feet, and a few can become quite large, though typically not massive.
It’s crucial to know the mature size of the cultivar you choose so you can give it adequate space to grow without crowding other plants or structures. This planning prevents future problems and ensures the tree can reach its full, beautiful potential.
Dwarf Varieties
These are perfect for small gardens, rock gardens, or growing in containers. They typically reach mature heights of 3-6 feet, with a similar spread. Examples include ‘Hogyoku’ or many of the smaller laceleaf types.
Medium Sized Trees
Many popular Japanese maples fall into this category, growing to around 10-20 feet tall and wide. They are excellent for specimen trees in medium-sized yards. ‘Bloodgood’ and ‘Viridis’ are good examples.
Larger Varieties
While not as large as many native trees, some Japanese maples can reach 20-30 feet or more. It is important to check the specific cultivar’s mature size to ensure it has enough space to develop properly.
Conclusion
Planting a Japanese maple the right way sets it up for a lifetime of beauty. By picking the right spot with good drainage and partial shade, digging a wide, shallow hole, and planting with care, you give your tree the best start. Consistent watering and minimal fertilization support its health.
With these simple steps, you can confidently enjoy your stunning Japanese maple for years to come.
Frequently Asked Questions
Question: What is the best time of year to plant a Japanese maple
Answer: The best times to plant a Japanese maple are in early spring after the last frost, or in early fall, about 6-8 weeks before the first hard frost. This gives the roots time to establish before extreme weather.
Question: How often should I water my newly planted Japanese maple
Answer: Water your newly planted Japanese maple deeply every few days for the first few weeks, especially if the weather is warm or dry. Check the soil; water when the top 1-2 inches feel dry. Once established, watering needs will decrease.
Question: Can I plant a Japanese maple in full sun
Answer: Most Japanese maples prefer partial shade, especially protection from the harsh afternoon sun. Planting in full sun, particularly in hot climates, can scorch their delicate leaves. Some varieties are more sun-tolerant than others.
Question: Do Japanese maples need special fertilizer
Answer: No, Japanese maples generally do not need much fertilizer. Over-fertilizing can be harmful. If needed, use a balanced, slow-release fertilizer very sparingly in early spring after the first year.
Question: How do I know if my Japanese maple is planted too deep
Answer: If the root flare (where the trunk widens at the base) is buried under the soil, the tree is planted too deep. This can lead to trunk rot. The top of the root ball should be level with or slightly above the surrounding soil.