How To Recondition Teak Wood: Proven Best Method
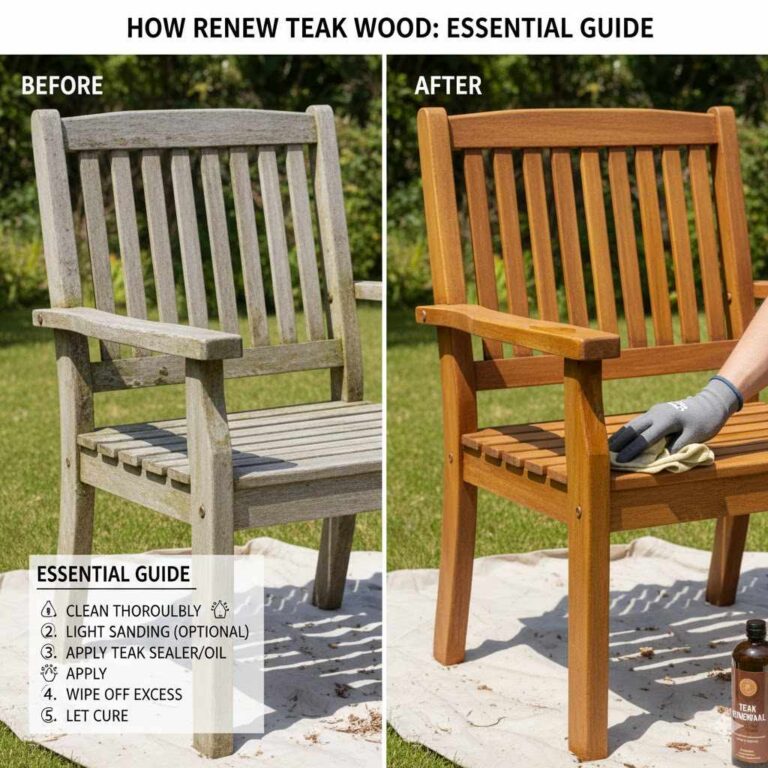
Recondition teak wood by cleaning thoroughly, sanding gently with progressively finer grits (starting with 80-120, moving to 180-220), and applying a teak sealer or oil. This proven method restores its rich, golden hue and protects it from the elements, making your outdoor furniture look brand new.
Teak wood is beautiful and durable, but over time, exposure to sun and rain can turn it a dull, silvery gray. This might make your beloved teak furniture look tired and neglected. Don’t worry! Bringing back its warm, golden glow is easier than you think. You don’t need to be a master craftsman to bring your teak back to life. This guide will walk you through the best method, step-by-step, so you can enjoy your refreshed teak for years to come.
Why Recondition Teak Wood?
Teak is a fantastic wood for outdoor furniture and other applications because it naturally contains oils. These oils make it resistant to water, rot, and insects, even when exposed to the elements. However, those same elements can leach out these protective oils and break down the wood’s surface. The distinctive gray color isn’t rot; it’s a surface layer of oxidized wood. Reconditioning your teak wood does two main things:
- Restores Aesthetics: It brings back that rich, warm, golden-brown color that makes teak so desirable.
- Protects the Wood: By cleaning and sealing, you protect the wood from further damage by UV rays, moisture, and dirt, extending its lifespan.
Regular maintenance and periodic reconditioning will keep your teak looking its best and performing its durable best.
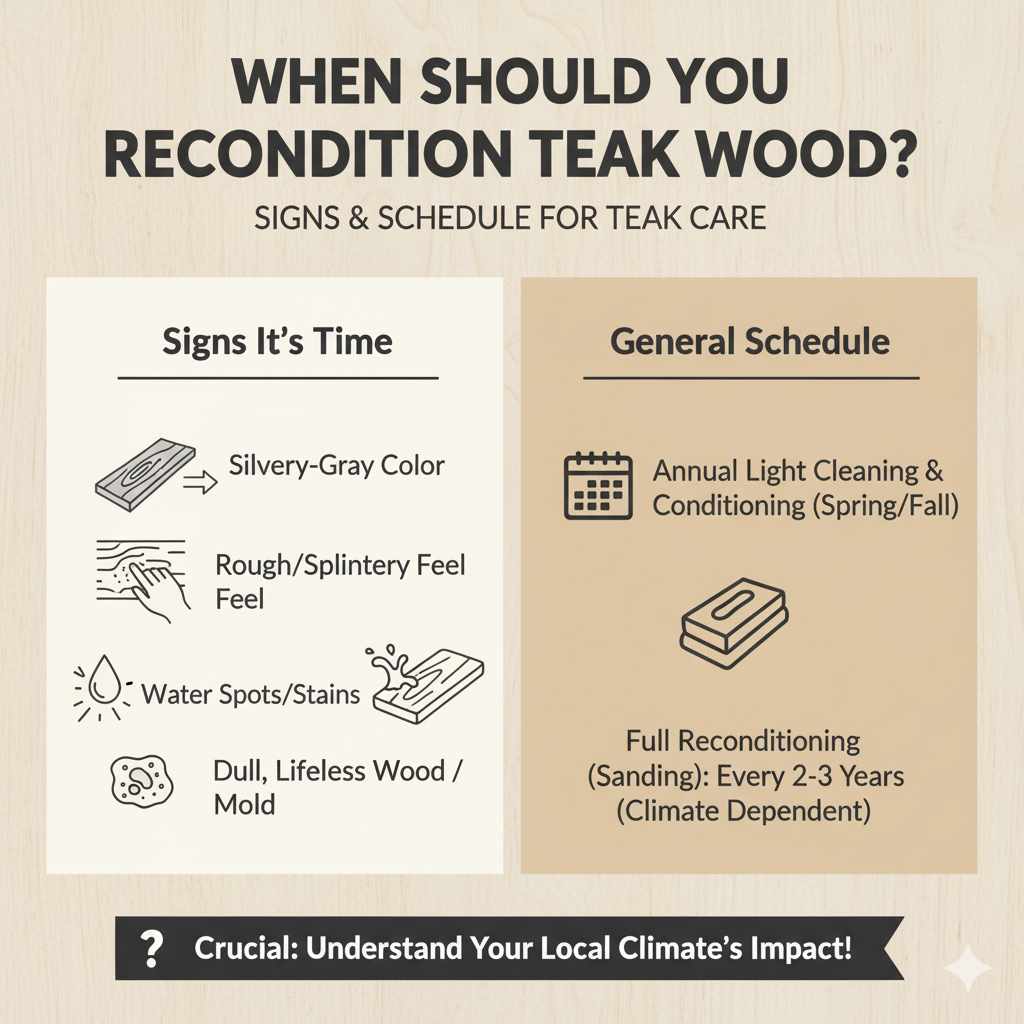
When Should You Recondition Teak Wood?
The most obvious sign is when your teak starts to fade to that characteristic silvery-gray color. Other indicators include:
- The wood surface feels rough or splintery.
- There are visible water spots or stains.
- Mold or mildew begins to appear.
- You notice the wood is generally looking dull and lifeless.
Most outdoor teak furniture benefits from a light cleaning and conditioning once a year, usually in the spring before heavy use, or in the fall after the season ends. A full reconditioning, involving sanding, might be needed every 2-3 years, depending on your climate and how much sun exposure the teak receives. Understanding your local climate’s impact on wood is crucial; for example, areas with intense sun or heavy rainfall will require more frequent attention. The United States Forest Service offers great resources on wood properties and care.
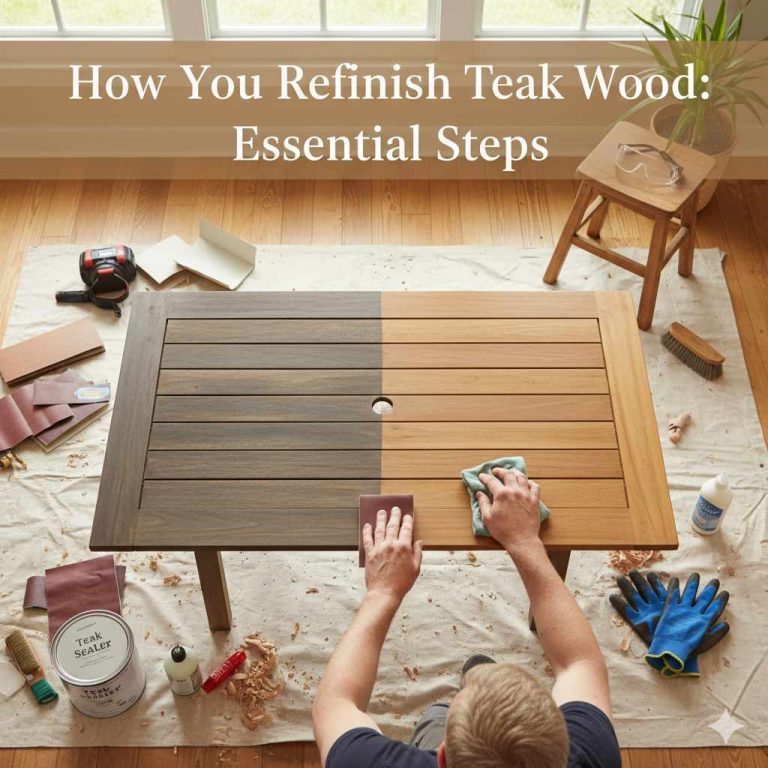
The Proven Best Method for Reconditioning Teak Wood (Step-by-Step)
This method focuses on cleaning, sanding, and finishing. It’s designed to be straightforward enough for beginners while delivering professional-looking results. Safety first! Always wear safety glasses and gloves, especially when using cleaning solutions or sanding.
Step 1: Gather Your Supplies
Having everything ready makes the process smooth. Here’s what you’ll need:
- Protective eyewear (safety glasses)
- Rubber gloves
- Stiff-bristle brush (not wire, to avoid rust stains)
- Bucket
- Mild dish soap or a dedicated teak cleaner solution
- Garden hose with a spray nozzle
- Sandpaper (various grits: 80-120, 180-220)
- Sanding block or orbital sander (optional, but helpful for larger areas)
- Clean, lint-free cloths or rags
- Teak oil or teak sealer
- Paintbrush for applying finish
Step 2: Clean the Teak Wood
This is a critical first step to remove dirt, grime, and grayed wood fibers. Don’t skip it!
- Prepare Your Workspace: Choose a well-ventilated area, preferably outdoors. If working on a deck or patio, lay down a tarp to protect the surface from cleaning solutions.
- Mix Your Cleaning Solution: In your bucket, mix a few tablespoons of mild dish soap with warm water. For tougher grime or stubborn graying, you can use a commercial teak cleaner, following the product’s instructions. Some cleaners contain oxalic acid, which helps to bleach out stains and the gray layer effectively. This Old House offers excellent guidance on cleaning teak.
- Apply the Cleaner: Wet the teak surface thoroughly with the garden hose. Then, using your stiff-bristle brush, scrub the wood with your cleaning solution. Work in the direction of the wood grain. Don’t use excessive force; let the brush and solution do the work.
- Rinse Thoroughly: Rinse the teak completely with the hose. Make sure no soap residue is left behind, as this can affect the finish later. Repeat the scrubbing and rinsing if the wood is still visibly dirty or stained.
- Allow to Dry: Let the teak wood dry completely. This can take anywhere from a few hours to a full day, depending on humidity and temperature. Ensure it’s bone dry before moving to the next step.
Step 3: Sand the Teak Wood
Sanding is what truly removes the damaged gray layer and smooths the surface. Patience here will pay off!
- Start with Coarse Grit: Begin with sandpaper in the 80- to 120-grit range. This will effectively remove the grayed outer layer and any minor imperfections.
- Sand with the Grain: Always sand in the direction of the wood grain. Going against the grain will create unsightly scratches that are difficult to remove.
- Use a Sanding Block or Sander: For smaller items, a sanding block is sufficient. For larger pieces like tables or benches, an orbital sander can save a lot of time and effort. If using an orbital sander, keep it moving to avoid creating divots.
- Work in Sections: Sand the entire piece of furniture, working in manageable sections.
- Progress to Finer Grits: Once you’ve gone over the entire piece with the coarser grit, switch to a finer grit sandpaper (180-220). This step smooths out the surface and removes any scratches left by the coarser grit. You’ll notice the wood starting to reveal its natural golden color.
- Clean Off Dust: After each sanding stage, use a clean cloth or a vacuum cleaner to remove all the sanding dust. A tack cloth is excellent for picking up fine dust particles.
You should now see the beautiful, warm color of the teak emerging. If any stubborn gray areas remain, you might need to re-sand them with the coarser grit, followed by the finer grits again.
Step 4: Apply Teak Oil or Sealer
This is the final step that protects your reconditioned teak and enhances its natural beauty.
-
- Choose Your Finish:
- Teak Oil: This is a popular choice. It penetrates the wood, reviving its color and providing water resistance. It typically requires reapplication more often than a sealer. Look for oils specifically formulated for teak.
- Teak Sealer: Sealers create a protective barrier on the surface. Some offer UV protection and are designed to maintain the teak’s golden color for longer periods.
- Choose Your Finish:
For a natural, low-maintenance look, many prefer teak oil. For maximum protection against UV fading, a good quality sealer is the way to go. You can explore options from reputable brands like Star Brite or Semco. The choice often comes down to the desired look and how much maintenance you’re willing to do. For more detailed information on wood finishes, resources like the Woodweb forum can offer expert insights.
- Apply Generously: Using a clean paintbrush, apply the teak oil or sealer liberally to the wood. Work in the direction of the grain.
- Allow Penetration: Let the oil or sealer soak into the wood. The time required will vary depending on the product, so always check the manufacturer’s instructions. Typically, this is about 15-30 minutes.
- Wipe Off Excess: Using a clean, lint-free cloth, wipe away any excess oil or sealer that hasn’t been absorbed by the wood. This prevents a sticky or uneven finish.
- Apply a Second Coat (Optional): For deeper color and better protection, you can apply a second coat after the first has had time to penetrate (follow product directions).
- Allow to Cure: Let the finish cure fully before exposing the teak to the elements or using it. This can take 24-48 hours.
Tools vs. Techniques: What Matters Most?
While having the right tools makes the job easier, the technique is paramount for success. Here’s a breakdown:
| Tool/Technique | Importance for Reconditioning Teak | Beginner Tip |
|---|---|---|
| Stiff-Bristle Scrub Brush | Essential for removing surface dirt and grime effectively without damaging the wood grain during cleaning. | Avoid wire brushes, as they can leave rust marks. A nylon or natural bristle brush is best. |
| Sandpaper (80-120 grit) | Crucial for the initial removal of the weathered gray layer. | Sand in the direction of the grain. Be thorough but avoid over-sanding, which can thin the teak. |
| Sandpaper (180-220 grit) | Key for smoothing the surface after coarse sanding, revealing the wood’s natural color and preparing it for finishing. | This is where the wood really starts to shine. Go slow and ensure an even finish. |
| Orbital Sander (Optional) | Speeds up sanding considerably for larger projects. | If using, keep it moving. Practice on a scrap piece first if you’re new to it. |
| Teak Oil/Sealer | Vital for protection and enhancing color after cleaning and sanding. | Read the product label carefully for application and drying times. |
| Sanding Technique | Going with the grain is non-negotiable for a smooth, professional finish. | Visualize the wood grain and follow its path with your sanding motion. |
| Drying Time | Allowing wood to dry completely between steps prevents issues like mold or poor finish adhesion. | Patience is key! Resist the urge to rush the drying process. |
Alternative Methods & What to Avoid
While the cleaning-sanding-finishing method is widely considered the best, you might encounter other suggestions. Let’s look at some and why our proven method is superior for beginners.
- Pressure Washing: While tempting for quick cleaning, pressure washers can easily damage teak wood. The high pressure can be too aggressive, blasting away wood fibers, creating a rough surface, and even causing splintering. It’s generally not recommended for delicate teak furniture, especially for beginners.
- Harsh Chemicals: Avoid bleach or strong chemical cleaners not specifically designed for teak. These can strip too much of the natural oil, dehydrate the wood, and sometimes cause discoloration.
- Metal Polishers: Teak is wood, not metal. Metal polishes are too abrasive and contain chemicals that will damage the wood.
- Just Oiling Without Cleaning/Sanding: Applying oil to dirty, grayed teak won’t achieve the desired aesthetic or offer proper protection. The dirt and gray layer will just be sealed in, and the finish won’t adhere as well.
Our recommended method ensures you’re addressing the root cause of the dullness (oxidation and dirt) before applying a protective finish. This layered approach is key to achieving a beautiful, long-lasting result.

Frequently Asked Questions (FAQ)
Q1: How often should I recondition my teak furniture?
A1: For general cleaning and a light oiling, aim for once a year, usually in spring or fall. A full reconditioning involving sanding is typically needed every 2-3 years, depending on how much sun and rain exposure your teak gets.
Q2: Can I use steel wool on teak?
A2: No, it’s best to avoid steel wool. It can leave behind small metal particles that can rust and stain the wood. Sandpaper is a much safer and more effective abrasive for teak.
Q3: My teak has black spots. What are they and how do I get rid of them?
A3: Black spots are usually mildew or mold. A good teak cleaner (some contain mild bleaches) or a solution of warm water and dish soap, scrubbed with a stiff brush, should remove them. For stubborn spots, a specialized mildew remover for wood might be necessary, but always test in an inconspicuous area first.
Q4: Do I have to sand? Can’t I just clean and oil?
A4: While you can clean and oil without sanding, you won’t achieve the original rich color or a truly smooth finish. Sanding removes the gray, oxidized layer. Skipping it means you’re just applying a finish over damaged wood, which won’t look nearly as good or last as long.
Q5: How long does the reconditioned teak finish last?
A5: The longevity of the finish depends on the product used (oil vs. sealer) and the environmental conditions. Teak oil may need reapplication every few months to a year, while a good quality sealer can last for one to two years. Regular cleaning will also help maintain the finish.
Q6: Can I leave my teak furniture outside year-round?
A6: Yes, teak is designed for outdoor use and can withstand various weather conditions. However, covering it or storing it in a shed during harsh winters or extended periods of heavy rain can help prolong its life and beauty, reducing the need for frequent, intensive reconditioning.
Conclusion
Restoring the beauty of your teak wood furniture doesn’t require professional skills, just a little time, patience, and the right approach. By following this step-by-step guide—cleaning thoroughly, sanding systematically with progressively finer grits, and applying a quality teak oil or sealer—you can transform weathered, grayed teak into a warm, inviting centerpiece for your outdoor space. Remember to always work with the grain, use appropriate safety gear, and allow ample drying time between steps. With this proven method, you’ll not only bring back that stunning golden hue but also protect your investment, ensuring your teak furniture remains a source of pride and enjoyment for many years to come. Happy woodworking!