How to Stain a Straight Line on Wood: Pro Techniques
To stain a straight line on wood, use painter’s tape to mask the area. Apply the stain carefully, then remove the tape for a clean edge.
Staining wood can elevate its natural beauty, but achieving a straight line requires precision. Whether you’re working on furniture, cabinetry, or decorative projects, clean lines enhance the overall appearance. Using painter’s tape not only protects adjacent areas but also helps maintain the clarity of your design.
Choosing the right stain and applying it evenly is crucial for a professional finish. This guide will walk you through the steps to ensure you achieve stunning, straight lines on your wood projects. With the right techniques, you can transform your wood surfaces into beautiful focal points in any space.
Introduction To Wood Staining
Wood staining requires skill and attention to detail. The art of wood staining creates beautiful finishes. A straight line is crucial for a professional look. Precision ensures no drips or uneven colors. Use painter’s tape to mark edges. This simple tool helps maintain clean lines. Apply the stain carefully and evenly. Choose the right brush for the job. A foam brush works well for smooth surfaces. Patience is key; let each coat dry fully before adding more. Experiment with different stains to find your favorite shade. Staining wood can enhance its natural beauty. It also protects against damage and wear.
Selecting The Right Stain
Choosing the right wood stain depends on the type of wood. Oil-based stains penetrate deeply and enhance grain. They dry slowly but offer a rich finish. Water-based stains are quick-drying and easy to clean. They usually have less odor and are safer for indoor use.
For softwoods like pine, oil-based stains work well. They help to bring out the natural beauty. Hardwoods like oak benefit from both types. Experiment with samples to see which looks best.
| Wood Type | Best Stain Type |
|---|---|
| Softwoods (Pine) | Oil-based Stains |
| Hardwoods (Oak) | Oil or Water-based Stains |
| Exotic Woods | Water-based Stains |
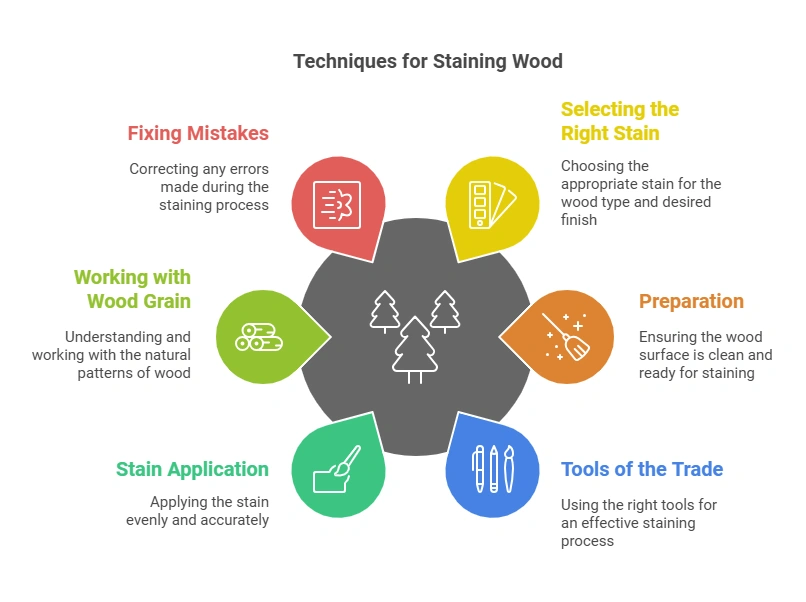
Preparation Is Key
Sanding the surface is important for a good stain. Start with a medium grit sandpaper. This helps remove rough spots and old finishes. Move to a finer grit for a smooth finish. Always sand in the direction of the wood grain.
After sanding, clean the surface well. Use a damp cloth to wipe away dust. A clean surface helps the stain to stick better. Let the wood dry completely before applying the stain. This ensures an even color.
Tools Of The Trade
Choosing the right brushes and applicators is essential for staining wood. Foam brushes work well for smooth surfaces. For textured wood, use natural bristle brushes. They hold more stain and provide better coverage.
Tape is crucial for achieving a straight line. Use painter’s tape to mask areas. This prevents stain from bleeding onto unwanted spots. Make sure to press the tape down firmly.
Using a straight edge helps ensure a clean line. A ruler or level can guide your brush or applicator. This method creates a professional-looking finish on your wood projects.
Mastering The Stain Application
To achieve a straight line when staining wood, use painter’s tape. This tape helps create a clean edge. Apply the tape along the area you want to stain. Press it down firmly to avoid leaks.
Choose a good quality stain brush or foam applicator. Dip it lightly in the stain. Apply it evenly along the wood grain. Avoid overloading the brush to prevent runs.
Work in small sections to maintain control. Wipe away any excess stain immediately. This helps keep the line sharp and neat. Always follow the manufacturer’s instructions for drying times.
Working With Wood Grain
Understanding grain direction is key for a smooth stain. The wood grain runs in different patterns. Always stain along the grain for the best results. This helps avoid streaks and uneven color.
Look closely at your wood surface. Identify the grain direction before starting. Use a soft cloth to apply the stain. Work in small sections to maintain control. Wipe off excess stain immediately. This prevents dark spots and promotes an even finish.
For better results, test the stain on a scrap piece first. This shows how the wood reacts to the stain. Choose a high-quality stain for a rich appearance. With care, your wood will look beautiful and well-finished.
Fixing Mistakes
Fixing mistakes is important for a great finish. Bleeding edges can ruin your woodwork. To fix these, use painter’s tape. Apply it along the edge before staining. This keeps the stain from spreading.
For uneven stains, sand the area lightly. Use fine-grit sandpaper to smooth it out. Wipe off the dust with a damp cloth. Then, apply a new layer of stain. Allow it to dry completely before checking the color.
Always test stains on a scrap piece of wood. This helps to see how it looks. Remember, patience is key for a perfect finish!
Finishing Touches
After applying the stain, sealing is essential. Use a clear coat to protect the wood. This will help maintain the color and prevent fading.
Choose between water-based or oil-based sealers. Water-based options dry quickly and are easy to clean. Oil-based sealers offer a richer finish but take longer to dry.
Check for any uneven spots or drips after sealing. A soft cloth can help smooth out any mistakes. Touch-ups may be needed for a flawless look. Always allow the final coat to cure properly for the best results.
Maintenance And Care
Protecting stained wood is important for its long life. Use a soft cloth to clean the surface regularly. Avoid harsh chemicals that can damage the stain. Apply a protective finish every few years. This helps to keep the color bright and prevents fading.
Keep wood away from direct sunlight. Sunlight can cause discoloration and damage the finish. Use curtains or blinds to block harsh rays. Maintain humidity levels in your home. Too much moisture can warp the wood.
| Tip | Description |
|---|---|
| Cleaning | Use a soft cloth to avoid scratches. |
| Protective Finish | Reapply every few years for best results. |
| Sunlight | Block rays to prevent fading. |
| Humidity | Keep levels stable to avoid warping. |

Frequently Asked Questions
How Do You Prepare Wood For Staining?
Preparing wood for staining involves cleaning and sanding. Start by removing dirt and dust with a damp cloth. Sand the surface using fine-grit sandpaper to create a smooth finish. This helps the stain adhere better and ensures a uniform color.
Always wipe off any dust before applying the stain.
What Tools Do I Need For Staining Wood?
To stain wood effectively, gather essential tools. You’ll need a high-quality wood stain, brushes or rags for application, and painter’s tape for masking edges. Additionally, have a drop cloth to protect your workspace and sandpaper for surface preparation. These tools will help achieve a professional-looking finish.
How Do I Achieve A Straight Line When Staining?
To achieve a straight line, use painter’s tape along edges. Press the tape down firmly to prevent bleed-through. Apply the stain carefully, avoiding excess on the tape. Once the stain dries, remove the tape for a clean, crisp line. This technique ensures a professional appearance in your woodworking projects.
Can I Stain Over An Existing Finish?
Staining over an existing finish is tricky but possible. First, ensure the original finish is compatible with the new stain. You may need to sand or strip the surface to achieve better adhesion. Test on a small area first to see how the wood reacts before proceeding.
Conclusion
Achieving a clean, straight line while staining wood is simple with the right techniques. Patience and practice are key. Use painter’s tape, apply even pressure, and choose the right tools. With these tips, your wood projects will stand out with professional-looking results.
Enjoy the satisfaction of your beautifully stained surfaces!