Is-Wood-Ash-Good-For-Chickens: Essential Guide
Is wood ash good for chickens? Yes, in moderation and when properly prepared, wood ash can offer benefits like pest control and added minerals for your flock. However, it’s crucial to use the right type of ash and apply it safely to avoid potential harm. This guide will walk you through everything you need to know.
Keeping chickens can be incredibly rewarding, but sometimes we wonder about the best ways to care for our feathered friends. One common question that pops up is about using common household items, like wood ash from the fireplace or wood stove, for the flock. You might have seen or heard that wood ash can be good for chickens, but it can also feel a bit confusing to know if it’s truly safe and beneficial. Is it a miracle cure for mites, or could it cause problems? Don’t worry, we’ll break it down simply!
As someone who loves working with wood and building things that last, I understand the importance of using materials correctly. The same goes for caring for chickens – understanding what’s safe and what’s not is key to a healthy flock. We’ll explore if wood ash is a good idea for your backyard birds, covering what to look for, how to use it safely, and its potential pros and cons. By the end of this guide, you’ll feel confident in making the right choice for your chickens’ well-being.
Understanding Wood Ash for Chickens
Wood ash, the powdery residue left after burning wood, has been used for centuries in various home and garden applications. For chicken keepers, it’s often discussed in the context of dust baths and pest control. The idea is that the minerals and alkaline nature of wood ash might benefit chickens, but it’s important to understand the specifics to use it effectively and safely.
Think of it like using a new tool in your workshop. You need to know what it’s best for, how to handle it safely, and what materials it works well with. Wood ash is similar; it has its uses, but also requires careful handling and knowledge to avoid any mishaps.
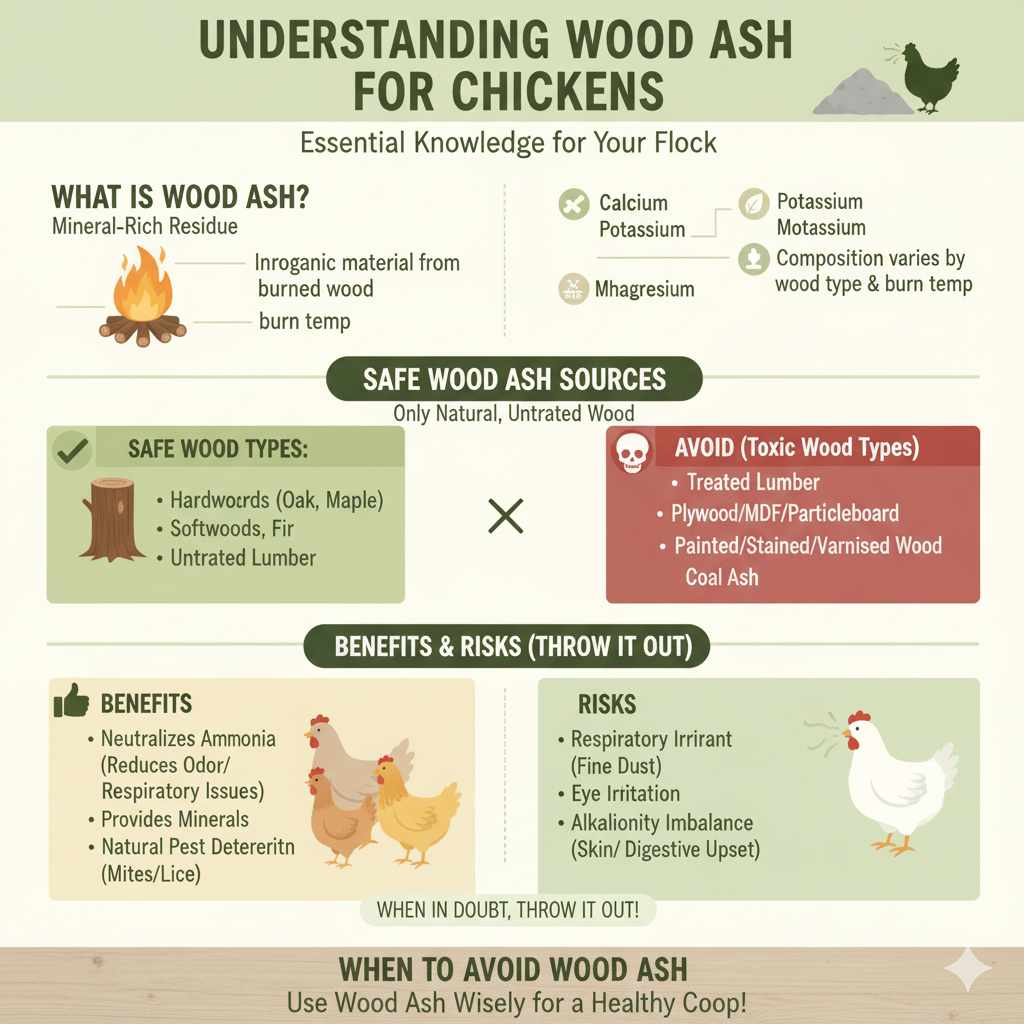
What is Wood Ash?
Wood ash is the inorganic material that remains after combustible organic materials, primarily wood, are burned. It consists of a mix of elements like calcium, potassium, magnesium, and phosphorus, along with trace minerals. The exact composition can vary significantly depending on the type of wood burned, the burning temperature, and whether any additives were used during combustion.
For a long time, people have understood that ash contains valuable nutrients. Farmers have used it to enrich soil, and gardeners incorporate it for pH adjustments. So, it’s no surprise that chicken keepers started exploring its potential benefits for their flock.
What Types of Wood Ash Are Safe?
This is a crucial point. Not all wood ash is created equal, and some types can be harmful to your chickens. The safest and most recommended type of wood ash comes from burning plain, untreated, natural wood. This includes hardwoods like oak, maple, or fruitwoods, and softwoods like pine or fir, as long as they haven’t been treated with anything.
Avoid using ash from:
- Treated lumber: Chemicals in treated wood can be toxic to your birds.
- Plywood, particleboard, or MDF: These engineered woods contain glues and resins that are unhealthy.
- Charcoal briquettes or treated fire logs: These often contain accelerants and chemical binders.
- Any wood that has been painted, stained, or varnished.
- Coal ash: This is different from wood ash and can contain heavy metals.
Always ensure the wood you burn is natural and untreated. If you’re unsure about the source of the wood, it’s best to steer clear of using its ash for your chickens.
The Science Behind Wood Ash Benefits (and Risks)
The primary benefits of wood ash for chickens are often attributed to its alkaline nature and mineral content. Its alkalinity can help neutralize ammonia in coops, which can reduce respiratory issues for your birds. The minerals, like calcium and phosphorus, are essential nutrients for chickens, playing roles in bone health and eggshell quality. Some keepers also use it as a natural deterrent for external parasites like mites and lice.
However, overuse or improper application can lead to problems. Ash is very fine and can be dusty, which can irritate chickens’ lungs and eyes if inhaled in large quantities. Its alkalinity, while beneficial in moderation, could potentially disrupt the natural pH balance on their skin or in severe cases, if ingested excessively, could cause digestive upset. It’s a bit like using too much of a good woodworking finish – a little goes a long way, but too much can ruin the effect.
How to Prepare and Use Wood Ash for Your Chickens
Using wood ash safely involves proper preparation and application. It’s not as simple as just dumping a pile of ash into the coop. Taking a few simple steps ensures you can harness its benefits without causing harm.
Step 1: Source and Cool the Ash
Obtain ash only from burning natural, untreated wood. Whether it’s from your home fireplace, a wood stove, or a fire pit, make sure the wood was clean. Crucially, the ash must be completely cool before you handle or use it. Hot embers can cause burns and fires.
Step 2: Sift the Ash
Wood ash often contains larger, unburned chunks. It’s best to sift the ash through a fine-mesh screen or a sieve to remove these larger pieces and any debris. This also helps create a finer powder, which is more effective for dust baths and easier to manage.
The goal is to get a fine, powdery consistency. This is similar to how you might prepare fine sawdust for a finishing project – you want a consistent texture.
Step 3: Store the Ash
Once sifted and completely cool, store the wood ash in a dry, sealed container. A plastic bin with a lid or a sturdy bag works well. This keeps it dry, prevents it from blowing away, and stops moisture from clumping it together. Keeping it dry is key for its effectiveness and ease of use. You can find great storage solutions at your local hardware store.
Step 4: Application Methods
There are a few common ways to introduce wood ash to your chickens’ environment:
1. Dust Baths: This is the most popular and generally safest method. Chickens naturally take dust baths to clean themselves and manage parasites. You can add a shallow pan or a designated area in their coop or run filled with sifted, cool wood ash, or mix it with sand and dry soil. This allows the chickens to self-regulate their exposure. They will roll and peck at it as they please.
2. Coop Litter Amendment: You can lightly sprinkle a small amount of sifted wood ash over the coop bedding (like pine shavings or straw). This can help absorb moisture and neutralize ammonia odors. However, use this sparingly. Too much can make the bedding dusty.
3. Direct Application (with caution): Some keepers lightly dust their chickens directly with ash, especially if they suspect a mite or lice infestation. This should be done very carefully, avoiding the head and eyes, and only with a very fine ash, applied in a well-ventilated area. It’s generally recommended to prioritize dust baths as the safer, self-regulated option.
When applying, always aim to keep the ash dry. Wet ash can become clumpy and less effective, and also harder to clean up.
How Much Wood Ash is Too Much?
This is where caution is essential. For dust baths, let the chickens decide how much they want to use. If you’re amending litter, a light dusting – think a few tablespoons per square foot – is usually sufficient. Overdoing it can create too much dust, leading to respiratory irritation and eye problems for your flock. It can also make the coop floor too alkaline, which can be drying or irritating to their feet.
Think of it like paint – a thin, even coat is usually best for a smooth finish. Too much thick paint can cause drips and an uneven surface.
Benefits of Wood Ash for Chickens
When used correctly, wood ash can offer several advantages for your backyard flock:
- Pest Control: The fine, abrasive nature of ash can help deter and kill external parasites like mites, lice, and fleas. When chickens take dust baths in ash, it can coat the mites and disrupt their life cycle.
- Odor and Moisture Absorption: Its alkaline properties help neutralize ammonia, a common culprit in foul-smelling coop environments. This can lead to a healthier living space for your chickens and reduce respiratory irritation.
- Mineral Supplementation: Wood ash contains trace amounts of minerals like calcium and potassium, which are important for overall chicken health, including bone strength and eggshell quality. However, it should not be relied upon as a primary mineral source.
- Fly Reduction: By absorbing moisture and helping to break down droppings faster, wood ash can make the coop environment less attractive to flies.
These benefits are most pronounced when ash is used as part of a well-maintained coop system.
Potential Risks and Drawbacks of Wood Ash
While there are benefits, it’s equally important to be aware of the potential downsides:
- Dust and Respiratory Issues: The biggest concern is dust. Very fine ash can become airborne easily, leading to irritation of the eyes, nose, and lungs of both chickens and humans. This is especially problematic in enclosed spaces like coops.
- Eye Irritation: Ash particles getting into a chicken’s eyes can cause significant discomfort and temporary blindness.
- Skin Irritation: While small amounts might help, excessive exposure to highly alkaline ash can dry out and irritate a chicken’s skin and combs.
- Toxicity from Improper Ash: As mentioned earlier, ash from treated wood, painted wood, or processed wood products can contain harmful chemicals or heavy metals, posing a serious health risk.
- Difficult to Clean: Fine ash can be difficult to clean thoroughly from coop surfaces and bedding, and it can cling to feathers.
It’s always wise to monitor your chickens for any signs of irritation or distress when introducing new elements to their environment.
Comparing Wood Ash to Other Dust Bath Materials
Wood ash is often compared to other popular dust bath materials. Understanding these differences can help you decide the best options for your flock.
Sand
Sand is a classic and safe dust bath material. It’s readily available, inexpensive, and excellent for general cleaning and feather maintenance. It’s less likely to cause respiratory issues than fine ash.
Pros: Safe, effective for cleaning, readily available, low risk of irritation.
Cons: Less effective at pest control than ash or diatomaceous earth.
Diatomaceous Earth (Food Grade)
Food-grade DE is a popular choice for natural pest control. It works by dehydrating insects. While effective, it must be food-grade, and even then, there are concerns about its fine particles causing respiratory irritation if inhaled by chickens or humans. It should be used very judiciously and ideally, not be the primary dust bath material.
Pros: Highly effective against external parasites.
Cons: Can cause respiratory and eye irritation, requires careful handling, must be food-grade.
Soil and Dry Leaves
A mix of dry soil and leaves can also provide a good dust bath. This is a natural option that chickens often enjoy. While not as potent for pest control as ash or DE, it’s perfectly safe and helps them groom.
Pros: Natural, safe, enjoyable for chickens.
Cons: Limited pest control benefits.
Wood Ash vs. Other Options
While wood ash can offer pest control and odor control benefits that sand or soil alone cannot, it comes with a higher risk of irritation due to its fineness and alkalinity. Many keepers opt for a blend, using wood ash in moderation within a larger sand or soil bath. For example, a common approach is a large sand-based dust bath with a small, separate area containing sifted wood ash that chickens can choose to use.
This is like having a high-performance tool and a general-purpose one. You wouldn’t use a precision router for every cut; you’d choose the right tool for the job. Similarly, you might use ash strategically rather than as the sole component of the dust bath.
Here’s a quick comparison:
| Material | Pest Control | Odor Control | Risk of Irritation | Availability |
|---|---|---|---|---|
| Wood Ash (prepared) | Good | Good | Moderate to High (dust) | Variable (depends on burning) |
| Sand | Low | Low | Very Low | High |
| Diatomaceous Earth (Food Grade) | Excellent | Low | High (dust) | Moderate |
| Soil/Dry Leaves | Low | Low | Very Low | High |
Best Practices for Using Wood Ash in the Coop
To maximize the benefits and minimize risks, follow these best practices:
- Always Use Sifted, Cool Ash: Ensure it’s free of embers and large particles.
- Source Ash Wisely: Only use ash from untreated, natural wood burning.
- Offer, Don’t Force: Provide ash in a dust bath area and let chickens choose how much they use.
- Mix Wisely: Consider mixing ash with sand or soil rather than using it as a sole component. A ratio of 1 part ash to 4-5 parts sand/soil is a good starting point.
- Ventilate: Ensure good ventilation in the coop and run, especially when introducing ash.
- Monitor Your Flock: Watch for any signs of respiratory distress, eye irritation, or skin issues. If you notice any problems, remove the ash immediately.
- Keep it Dry: Store ash properly and ensure it doesn’t get wet in the dust bath area, as wet ash can be a problem.
- Don’t Overdo It: Less is often more. A light dusting or a small portion of a dust bath is usually sufficient.
Think of these as your safety checks before starting a woodworking project. A little preparation goes a long way in ensuring a great, safe outcome.
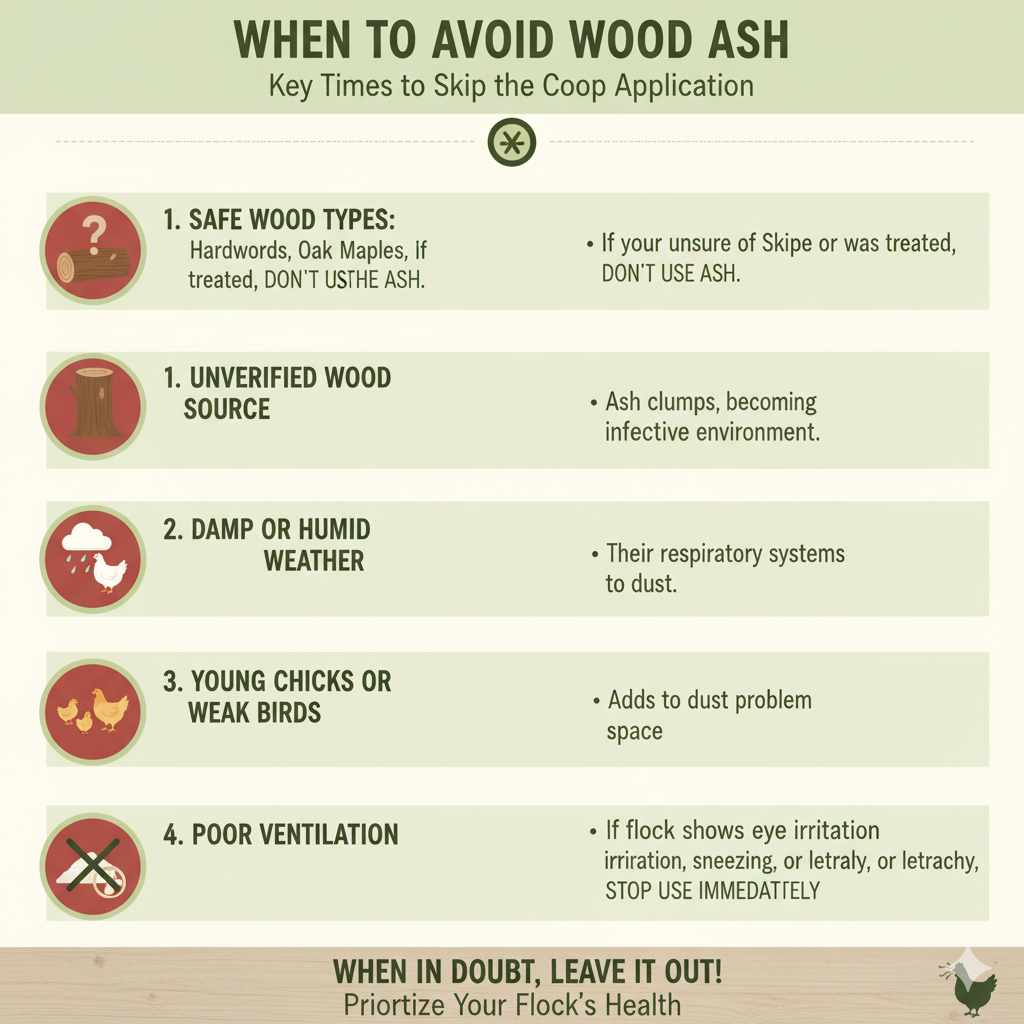
When to Avoid Wood Ash
There are certain situations where it’s best to skip the wood ash:
- If Your Haven’t Verified the Wood Source: If you’re uncertain about the type of wood burned, don’t use the ash.
- During Damp or Humid Weather: Ash clumps up when wet, making it ineffective and messy. It can also create a damp environment.
- If You Have Young Chicks or Weak Birds: Their respiratory systems are more sensitive.
- If Your Coop Already Has Ventilation Issues: Adding to the dust problem could be harmful.
- If You Observe Any Signs of Irritation in Your Flock: Stop using ash immediately.
It’s always better to err on the side of caution when it comes to your chickens’ health.
Frequently Asked Questions (FAQ)
Q1: What is the best way to give my chickens wood ash for pest control?
The best and safest method is to create a dedicated dust bath area. Mix sifted, cool wood ash with sand and dry soil in a shallow container or a designated spot in their run. This allows chickens to self-regulate their exposure. A ratio of about 1 part ash to 4-5 parts sand/soil is a good starting point. Always ensure the ash is fine and free of large chunks.
Q2: Can I put wood ash directly into my chickens’ bedding?
You can sparingly sprinkle a very light dusting of sifted wood ash over coop bedding to help absorb moisture and reduce odors. However, avoid overdoing it, as too much can make the bedding dusty, which can irritate your chickens’ respiratory systems and eyes. It’s generally better for them to self-apply it through dust baths.
Q3: What kind of wood ash is safe for chickens?
Only ash from burning plain, natural, untreated hardwoods or softwoods is considered safe. This means wood that has not been painted, stained, varnished, treated with chemicals, or processed into composite materials like plywood or particleboard. Avoid ash from charcoal briquettes, treated lumber, or coal.
Q4: How often can I add wood ash to my chickens’ dust bath?
You can maintain a dust bath with wood ash mixed in as long as chickens are using it and not showing signs of irritation. Replenish smaller amounts as needed. If it becomes wet or very dusty, it’s time to refresh the entire dust bath mixture. Regular maintenance and observation are key. Aim to refresh the dust bath mixture every few weeks or as needed.