Preventing Cedar Rot: Essential Protection Guide
Dealing with cedar rot can feel like a big puzzle, especially when you’re just starting out. It’s a common worry for many homeowners. But don’t you worry, it’s simpler than it seems!
This guide will break down Preventing Cedar Rot: Essential Protection Guide into easy steps. We’ll show you exactly how to keep your cedar wood looking great for years to come. Let’s get your cedar protected and looking its best.
Understanding Cedar Rot and Its Causes
Cedar rot, also known as decay or rot, is a process where wood breaks down due to fungi. These fungi feed on the wood’s nutrients, weakening its structure and leading to a loss of strength and integrity. Cedar wood, while naturally resistant to some decay, is not immune.
Moisture is the biggest enemy and the main ingredient for rot to start. When cedar wood stays wet for too long, it creates a perfect environment for these fungi to grow and spread.
Several factors contribute to the development of cedar rot. Constant exposure to moisture, poor ventilation, and direct contact with soil are primary culprits. Even seemingly small issues like blocked gutters or improper drainage can lead to water pooling around your cedar structures.
Over time, this persistent dampness compromises the wood’s natural defenses.
Understanding these causes is the first step in effective prevention. By identifying potential moisture traps and addressing them, you can significantly reduce the risk of rot. This section explores the biological and environmental factors that lead to cedar decay.
We will also look at how cedar’s natural properties play a role.
The Biology of Fungal Decay
Fungal decay is a natural process that happens when certain types of fungi attack wood. These fungi are living organisms that need food, water, and air to survive. Wood provides them with food, and moisture provides the water.
Air is usually present in abundance. The fungi produce enzymes that break down the complex compounds in wood, such as cellulose and lignin. Cellulose gives wood its strength, and lignin binds the fibers together.
When these are broken down, the wood loses its structural integrity.
There are several types of wood-destroying fungi. The most common are brown rot, white rot, and soft rot. Brown rot fungi primarily consume cellulose, leaving behind lignin.
This causes the wood to shrink, crack, and turn a reddish-brown color. It often feels dry and crumbly. White rot fungi break down both cellulose and lignin, leading to a spongy or stringy texture.
The wood may appear bleached or whitened. Soft rot fungi are often found in very wet conditions and create a honeycomb-like pattern on the wood surface.
The life cycle of these fungi involves spores, which are like seeds. These spores are carried by the wind, water, or insects. When they land on a suitable surface – damp wood – they germinate and begin to grow.
They spread through mycelial networks, which are thread-like structures that penetrate the wood. Effective prevention strategies aim to eliminate the conditions that allow these spores to thrive and spread.
Environmental Triggers for Rot
Environmental conditions are critical for initiating and accelerating cedar rot. The most significant trigger is prolonged exposure to moisture. This can come from rain, humidity, condensation, or contact with the ground.
When cedar wood absorbs water and stays wet for extended periods, typically more than 20-30% moisture content, it becomes vulnerable to fungal attack. This is because fungi need water to grow and spread their spores.
Poor ventilation is another major environmental factor. When air cannot circulate freely around cedar structures, moisture gets trapped. This is common in areas like enclosed decks, poorly ventilated attics, or areas where foliage constantly overhangs the wood.
Trapped moisture cannot evaporate, creating a perpetually damp microclimate that favors fungal growth. Areas that are constantly shaded and do not receive direct sunlight are also more prone to staying damp.
Direct contact with soil is a significant risk factor. Soil holds moisture and can transfer it directly to the wood. This is why posts, fence bottoms, and decks built too close to the ground are highly susceptible.
Even small amounts of soil clinging to the wood can retain enough moisture to start the decay process. Understanding these environmental triggers allows us to implement targeted protection measures.

Methods for Preventing Cedar Rot
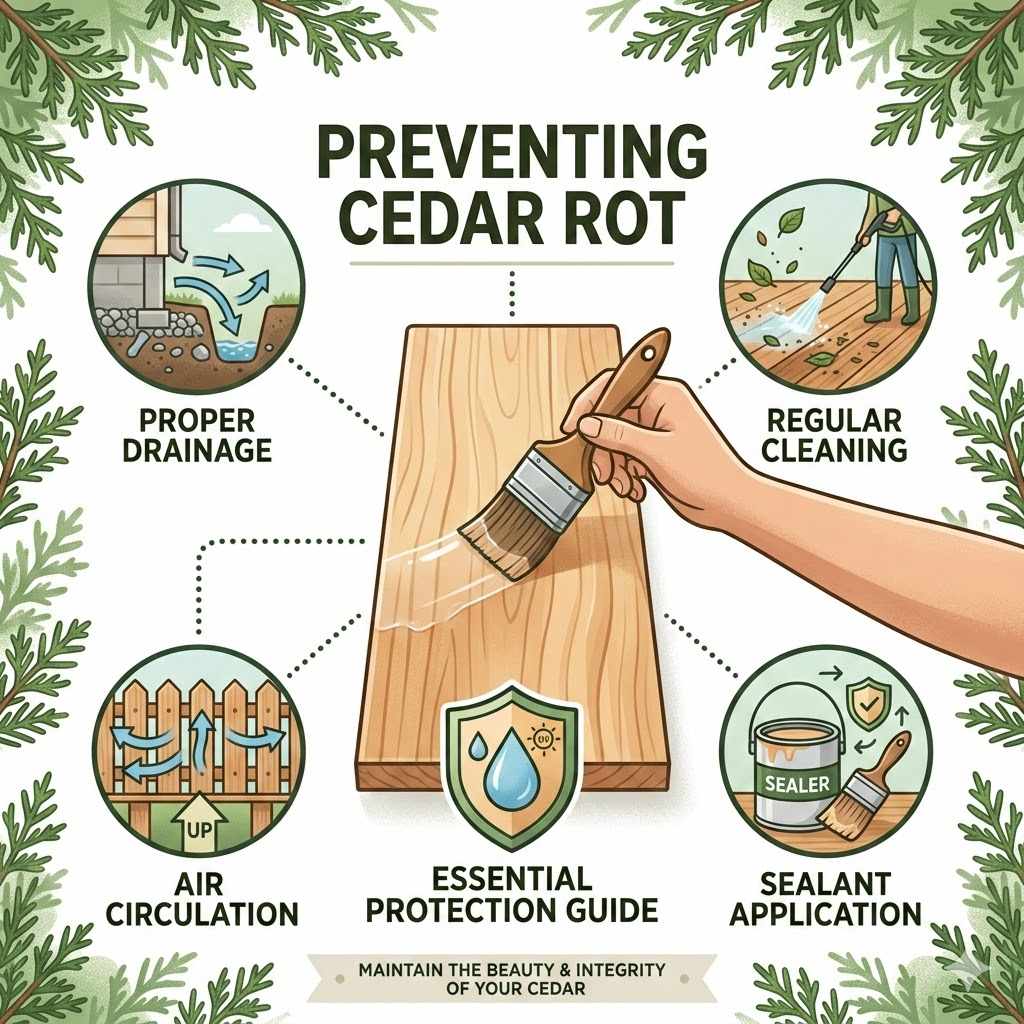
Preventing cedar rot involves a combination of good design, proper installation, and ongoing maintenance. The goal is to keep the cedar wood dry and protected from moisture and pests that can facilitate decay. This means ensuring that water drains away effectively and that air can circulate freely around the wood surfaces.
Regular inspections and timely repairs are also key to catching any problems before they become serious.
A critical aspect of prevention is to minimize contact between cedar wood and the ground or standing water. Proper elevation of structures and the use of protective barriers are essential. Additionally, applying protective finishes can shield the wood from moisture and UV damage, extending its lifespan and maintaining its aesthetic appeal.
Selecting the right materials and techniques from the outset plays a significant role in long-term durability.
We will explore various practical methods to keep your cedar structures sound. This includes understanding different types of finishes, best practices for installation, and simple maintenance routines. By following these steps, you can effectively safeguard your cedar against the damaging effects of rot and enjoy its natural beauty for many years.
Proper Installation Techniques
The way cedar wood is installed plays a huge role in how well it resists rot. One of the most important techniques is to ensure adequate spacing and ventilation. This means not building structures too close to the ground or to other surfaces that can trap moisture.
For decks, for example, ensure there’s enough space between deck boards and also between the deck frame and the ground to allow air to flow freely.
Another key installation practice is to avoid direct contact between cedar and soil. Use concrete footings, gravel bases, or rot-resistant posts (like treated lumber or metal) for any posts or supports that go into the ground. This prevents moisture from wicking up from the soil into the cedar.
When joining pieces of cedar, consider using corrosion-resistant fasteners, as metal can corrode and create points where water can collect. Ensure end grains are well-sealed, as they absorb moisture more readily than face grains.
Proper flashing and drainage are also vital. For any horizontal surfaces, like deck railings or window sills, ensure they are sloped slightly to shed water. Install flashing where different materials meet, such as where a deck attaches to a house, to prevent water from getting into the joint.
These installation details might seem minor, but they are essential for long-term cedar rot prevention. They create a building envelope that actively works to keep the wood dry.
Applying Protective Finishes
Applying the right protective finish to cedar wood is a vital barrier against moisture and UV damage, both of which contribute to rot. There are several types of finishes, each offering different levels of protection and aesthetic qualities. The most common are stains, sealers, and paints.
Stains penetrate the wood and provide color, while also offering water repellency. Sealers are typically clear and focus primarily on repelling water.
Oil-based finishes are popular for cedar as they penetrate deeply, nourishing the wood and providing excellent water resistance. They also tend to enhance the wood’s natural grain and color. Water-based finishes are also available and are often easier to clean up.
Both types typically need reapplication every few years, depending on the climate and exposure. It is crucial to apply finishes to clean, dry wood for optimal adhesion and protection. Ensure all surfaces, including end grains, are thoroughly coated.
Painting cedar is another option, offering the highest level of protection against moisture and UV rays. However, paint can also trap moisture if applied incorrectly or if it cracks. If painting, use a high-quality primer and exterior-grade paint.
Regular inspection of the paint finish for peeling or cracking is necessary. For a more natural look, transparent or semi-transparent stains are often preferred, allowing the wood’s beauty to show through while still providing protection. Choosing the right finish and applying it correctly is a fundamental step in preventing cedar rot.
Maintenance and Regular Inspections
Consistent maintenance and regular inspections are your best defense against cedar rot. Over time, protective finishes can wear away, and minor issues can arise that, if ignored, can lead to significant problems. Scheduling periodic checks of your cedar structures allows you to catch potential issues early, when they are easiest and cheapest to fix.
During inspections, look for any signs of moisture accumulation, such as standing water or damp areas. Check for cracking, peeling, or fading of the protective finish. Inspect for any signs of insect activity, as insects can burrow into wood and create pathways for moisture and fungi.
Pay close attention to areas that are in constant contact with the ground, areas around downspouts, and any joints or seams in the wood.
Simple maintenance tasks can make a big difference. Keeping gutters clean and ensuring downspouts direct water away from your cedar structures is crucial. Trim back any vegetation that is constantly touching or overhanging the wood, as this can trap moisture and shade.
Reapply protective finishes as needed, following the manufacturer’s recommendations. Promptly repair any damage, such as cracks or loose boards, to prevent water from entering the wood. These ongoing efforts are essential for the long-term health and appearance of your cedar.
Advanced Protection Strategies
Beyond basic finishes and good installation, there are advanced strategies that offer enhanced protection against cedar rot. These methods often involve more specialized materials or techniques designed to create a more robust barrier against moisture and decay. They are particularly useful in areas with harsh climates or where cedar is exposed to extreme conditions.
These advanced techniques often focus on creating a more impermeable layer or improving the wood’s inherent resistance. This might include using specialized membranes, advanced sealing compounds, or even treatments that enhance the wood’s natural properties. While they might involve a higher initial investment, they can lead to longer-lasting protection and reduced maintenance over the lifespan of the structure.
We will explore some of these higher-level methods. This includes understanding how to better manage moisture at the source, utilizing advanced materials for critical contact points, and considering professional treatments. These strategies are for those looking to maximize the longevity and resilience of their cedar projects.
Moisture Management Systems
Effective moisture management is paramount for preventing cedar rot, and specialized systems can significantly enhance this. One key aspect is ensuring proper drainage away from cedar structures. This can involve creating air gaps between horizontal surfaces and the ground, installing robust drainage systems around foundations, or using breathable membranes that prevent water ingress while allowing vapor to escape.
For instance, a well-designed deck will have adequate joist spacing and a slight slope to allow water to run off freely.
Another important system involves ventilation. In enclosed spaces like attics or crawl spaces where cedar might be used, ensuring good airflow is critical. This can be achieved through strategic placement of vents, the use of fans, or the installation of vapor barriers that direct moisture away from the wood.
This prevents condensation buildup, which is a primary driver of rot. Even seemingly small details, like ensuring that the bottom of siding is not pressed directly against a deck or patio, can make a difference by allowing air to circulate.
Waterproofing membranes are also a form of moisture management. These are typically applied to the substrate beneath the cedar, acting as a barrier against direct water contact. They are especially important in areas like shower walls, window frames, or foundation elements.
The principle is simple: keep the wood dry, and you prevent rot. These systems, when properly designed and installed, create a proactive defense against moisture.
Using Specialized Sealants and Preservatives
While standard finishes offer good protection, specialized sealants and preservatives can provide a higher level of defense against cedar rot. These products are often formulated with stronger water repellents, UV inhibitors, and sometimes fungicides or insecticides to offer a more comprehensive shield for the wood. For areas that are particularly prone to moisture, such as the base of fences or structural beams, these advanced products can be invaluable.
Some advanced sealants penetrate deeper into the wood’s cellular structure, creating a more durable and long-lasting barrier. Borate-based preservatives, for example, are highly effective against rot and insects. They are typically applied as a liquid or powder and can be brushed, sprayed, or even pressure-treated into the wood.
While not typically applied by homeowners for simple maintenance, they are a crucial component in ensuring the longevity of cedar in high-risk applications.
Another category includes high-performance water repellents. These go beyond simple water beading and create a more tenacious bond with the wood fibers, preventing water absorption over extended periods. When choosing specialized products, it’s essential to read the manufacturer’s instructions carefully and ensure the product is suitable for the type of cedar and the intended application.
Using these products correctly can significantly extend the life of your cedar by providing a superior defense against decay.
Sacrificial and Protective Barriers
In certain applications, using sacrificial or protective barriers can prevent rot by shielding the primary cedar structure from direct contact with moisture or corrosive elements. A sacrificial element is something that is designed to be replaced periodically, taking the brunt of the wear and tear. For cedar, this might involve installing a layer of rot-resistant material between the ground and cedar posts, or between the cedar and a concrete foundation.
For example, instead of directly setting cedar posts into concrete, a metal post anchor can be used, which elevates the wood and prevents it from sitting in moisture that collects at the bottom of the concrete. Another common barrier is the use of specialized flashing tapes or membranes. These are applied to the edges of wooden elements, such as window frames or deck ledger boards, before the cedar is installed.
They create a watertight seal that prevents water from penetrating the joints and causing rot.
The principle behind these barriers is simple: divert or block moisture before it reaches the cedar. This could be a layer of gravel around the base of a post to improve drainage, a polyethylene sheeting to keep soil moisture away from wood siding, or specialized breathable membranes that manage moisture vapor. By creating these physical separation layers, you significantly reduce the risk of rot, especially in vulnerable areas.
They are an essential part of a comprehensive rot prevention strategy.
Real-Life Examples and Scenarios
Seeing how these prevention methods work in practice can be very helpful. Let’s look at a couple of common situations where cedar rot might occur and how prevention could have helped or did help.
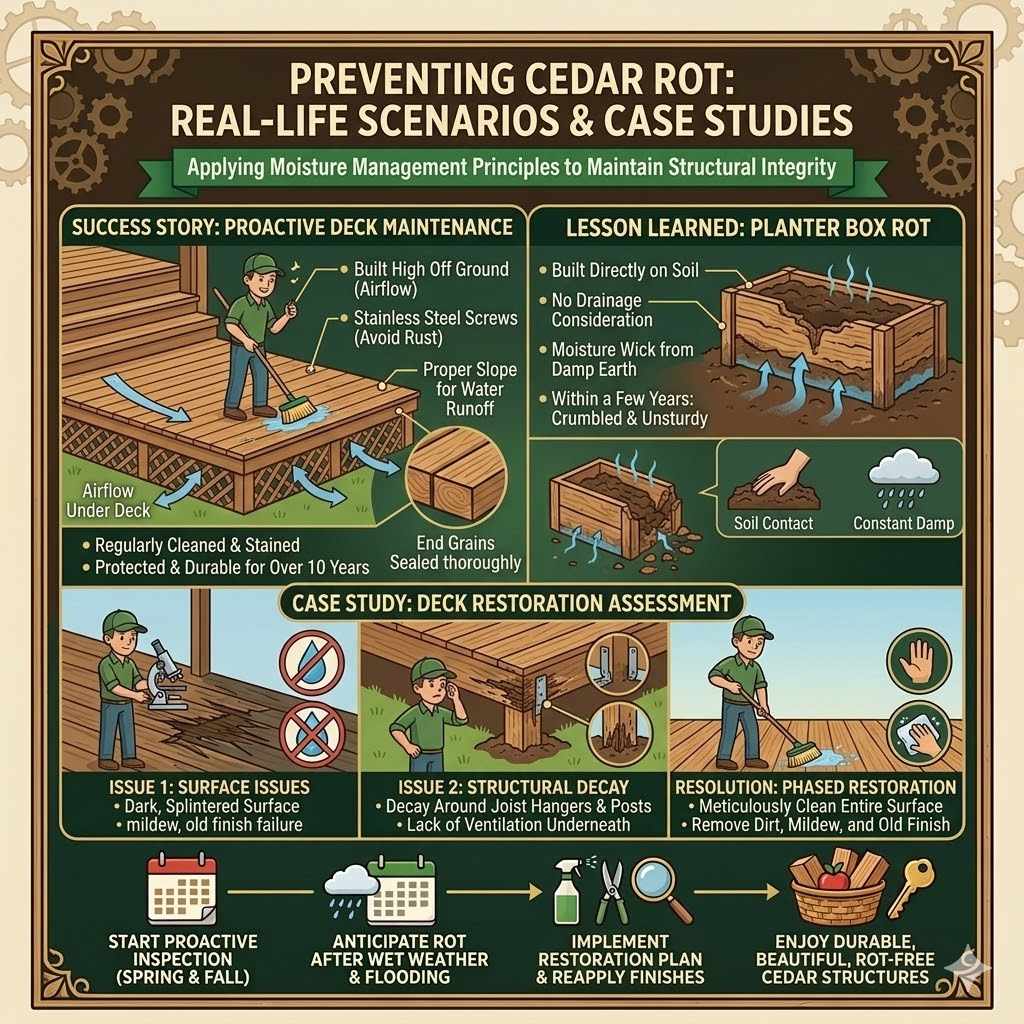
Consider a homeowner who built a beautiful cedar deck. They wanted it to last a long time. First, they made sure the deck was built with a proper slope for water runoff.
They also installed it high enough off the ground to allow air to flow underneath, which is a key part of the Preventing Cedar Rot: Essential Protection Guide. They used stainless steel screws to avoid rust stains and potential moisture traps.
After construction, they applied a good quality oil-based cedar stain. This stain penetrated the wood, adding a protective layer and enhancing the wood’s natural color. They also made sure to seal the end grains of the boards thoroughly, as these are especially vulnerable.
Every year, they clean the deck and reapply the stain as needed. This proactive approach has kept their cedar deck looking great and free from rot for over ten years.
In contrast, another homeowner built a cedar planter box right on the soil. They didn’t consider drainage or how the wood would interact with the damp earth. Over time, the bottom of the planter box began to soften and crumble.
Moisture wicked up from the soil, creating a perfect environment for rot to set in. Within a few years, the box was no longer sturdy. This shows how ignoring basic principles of moisture management can quickly lead to rot, even with naturally resistant wood like cedar.
Case Study Deck Restoration
A client approached us with a cedar deck that was showing significant signs of decay, particularly around the joist hangers and the posts that met the ground. The deck was about 15 years old and had never received regular maintenance or reapplication of finishes. The wood was dark, splintered, and in some areas, soft to the touch.
Our assessment revealed several issues contributing to the rot: poor drainage from the deck surface, lack of ventilation underneath, direct contact between some structural components and the soil, and the failure of the original finish. We recommended a phased approach to restoration. First, we meticulously cleaned the entire deck surface to remove dirt, mildew, and old finish.
Then, we
Scenario Fence Post Issues
Imagine a homeowner who installed a beautiful cedar fence about five years ago. They chose cedar for its attractive look and natural resistance to decay. However, they installed the fence posts by digging holes, placing the cedar posts directly into the soil, and then filling the holes with dirt.
They figured the cedar would be fine.
After about four years, they started noticing that some of the fence posts were leaning. When they investigated, they found that the bottom of the posts, where they were in contact with the soil, had become soft and crumbly. The soil held moisture, and without any protection or way for the water to drain, rot had set in rapidly.
The fence was starting to sag because the posts were losing their structural integrity.
This scenario highlights a common mistake. While cedar has natural resistance, it’s not invincible, especially when placed in direct, constant contact with moisture-retaining soil. A better approach would have been to use concrete footings for the posts, or at least bury rot-resistant metal post anchors and attach the cedar posts to those.
Alternatively, wrapping the buried portion of the posts in heavy-duty plastic sheeting could have offered some protection, though proper drainage and ventilation are always superior. This fence now requires costly replacement of the posts and reinstallation.
Protecting Garden Beds and Structures
Garden beds made from cedar are popular for their natural beauty and resistance to rot, which is important given their constant contact with moist soil and organic matter. However, even cedar can succumb to rot if not properly prepared and maintained. A key step is to ensure good drainage within the garden bed itself.
This can be achieved by adding a layer of gravel or coarse material at the bottom of the bed before filling it with soil.
Applying a food-safe, penetrating sealant to the interior surfaces of the cedar planter box before filling it with soil can also add a significant layer of protection. These sealants create a barrier that repels moisture from the soil. Some people opt for lining the inside of the planter box with heavy-duty plastic sheeting, but it’s crucial to ensure this lining has drainage holes at the bottom to prevent water from pooling.
Proper airflow around the exterior of the planter box is also beneficial; avoid placing them directly against a solid wall or structure if possible.
Regularly inspecting the exterior of the planter boxes for signs of wear or moisture accumulation is a good practice. Reapplying sealants or finishes as needed can prolong the life of the cedar. For more permanent cedar structures in the garden, like pergolas or benches, ensure they are not sited in areas where water tends to collect.
Elevating them slightly on small pads or feet can also help maintain airflow and prevent moisture buildup at the base.
FAQ
Question: How often should I reapply protective finishes to my cedar?
Answer: The frequency of reapplying finishes depends on the type of finish used, the climate, and the amount of sun and rain your cedar is exposed to. Generally, oil-based finishes might need reapplication every 1-3 years, while some water-based finishes may require it more often. It’s best to inspect your cedar annually and reapply when you notice the finish is fading or water no longer beads up on the surface.
Question: Can I use a pressure washer on my cedar wood?
Answer: While a pressure washer can clean cedar, it must be used with extreme caution. High pressure can damage the wood fibers, causing them to fray and splinter, making them more susceptible to moisture and rot. If you must use a pressure washer, use the lowest pressure setting and a wide fan tip, keeping the nozzle at least a foot away from the wood surface.
It’s often safer to clean cedar with a stiff brush, mild soap, and water.
Question: What is the difference between cedar rot and insect damage?
Answer: Cedar rot is caused by fungi that break down the wood’s structure, leading to softness, crumbling, and loss of strength. Insect damage, on the other hand, is caused by insects like termites or carpenter ants burrowing into or nesting within the wood. While insects can weaken wood and create pathways for moisture that can lead to rot, they are distinct issues.
You’ll see holes, frass (insect droppings), or visible insects with insect damage, whereas rot is more about the physical degradation of the wood itself.
Question: Is cedar naturally rot-proof?
Answer: Cedar is naturally resistant to rot and insect decay due to its natural oils and compounds. However, it is not completely rot-proof. When constantly exposed to moisture and without proper maintenance or protection, cedar can and will eventually succumb to rot.
Its natural resistance simply means it lasts longer than many other types of wood under similar conditions.
Question: Should I seal the end grain of my cedar boards?
Answer: Yes, absolutely. The end grain of wood acts like a straw, absorbing moisture much more readily than the face grain. It is critical to seal all exposed end grains thoroughly with a good quality wood sealer or finish.
This is especially important for deck boards, fence posts, and any other cedar components where the end grain is exposed to the elements.
Conclusion
Effectively preventing cedar rot comes down to managing moisture and providing a protective barrier. By understanding how fungi thrive and the environmental triggers, you can implement smart installation techniques and regular maintenance. Specialized finishes and barriers offer extra defense for long-lasting beauty and durability.
Your cedar deserves care to stay strong and look great.