
Skil Circular Saw Change Blade: Quick & Easy Guide
To change the blade on a Skil circular saw, first unplug the saw for safety. Then, use the included wrench to loosen the blade bolt and remove the old blade.
A circular saw is an essential tool for many DIY enthusiasts and professionals alike. Skil circular saws are known for their reliability and ease of use. Changing the blade is a straightforward process that can enhance performance and ensure precision in cuts.
Whether you’re working with wood, metal, or other materials, a sharp blade makes a significant difference. Regular maintenance, including blade changes, prolongs the life of your tool and improves safety. This guide will walk you through the steps to efficiently and safely change the blade on your Skil circular saw.
Introduction To Skil Circular Saw Blade Replacement
Changing the blade on your Skil circular saw is essential. A sharp blade ensures clean cuts. Knowing how to replace it safely is crucial. This guide will help you understand the process easily.
Safety First: Preparing For Blade Change
Safety is vital when handling power tools. Before you begin, follow these steps:
- Unplug the saw: Always disconnect the power source.
- Wear protective gear: Use goggles and gloves.
- Work in a clean area: Keep your workspace organized.
Check that your saw is switched off. Avoid distractions while changing the blade.
Tools Needed For The Job
Gather these tools for an efficient blade change:
| Tool | Purpose |
|---|---|
| Replacement Blade | Sharp blade for cutting materials. |
| Screwdriver | To remove the blade cover. |
| Wrench | To loosen and tighten the blade. |
| Cloth | For cleaning the saw. |
Having the right tools makes the job easier. Ensure everything is in good condition.

Identifying Blade Wear And Tear
Knowing how to identify blade wear is essential for safety and efficiency. A sharp blade cuts smoothly. A dull or damaged blade can ruin your work. Recognizing the signs of wear helps you maintain your Skil circular saw.
Signs Your Blade Needs Changing
- Burn Marks: Dark marks on the wood indicate excessive heat.
- Chipped Teeth: Missing or broken teeth reduce cutting efficiency.
- Uneven Cuts: Irregular cuts mean the blade is not sharp.
- Excessive Vibration: Increased vibration during use suggests a dull blade.
- Strain on the Saw: If the saw struggles, the blade may be worn.
The Impact Of A Dull Blade On Performance
A dull blade affects your circular saw’s performance significantly. Here are some key effects:
| Effect | Description |
|---|---|
| Increased Cutting Time | You spend more time on each cut. |
| Lower Precision | Results may be rough and uneven. |
| More Heat Generation | Heat can warp your workpiece. |
| Higher Risk of Injury | Dull blades can kick back unexpectedly. |
Regularly check your blade for wear. A small investment in a new blade saves time and ensures safety.
Selecting The Right Blade For Your Saw
Choosing the right blade for your Skil circular saw is essential. A suitable blade enhances performance and improves project outcomes. Understanding blade types and their uses helps in making the right choice.
Blade Types And Their Uses
Different blades serve different purposes. Here are some common types:
| Blade Type | Use |
|---|---|
| Crosscut Blade | Ideal for cutting across the grain of wood. |
| Rip Blade | Best for cutting along the grain of wood. |
| Combination Blade | Versatile; can handle both ripping and crosscutting. |
| Metal Cutting Blade | Designed for cutting metal materials. |
| Diamond Blade | Used for cutting hard materials like concrete. |
Matching Blade To Material
Selecting the right blade also depends on the material. Here’s how to match blades:
- Wood: Use a crosscut or rip blade.
- Plywood: A combination blade works well.
- Metal: Choose a metal cutting blade.
- Concrete: Opt for a diamond blade.
Check the teeth per inch (TPI) for finer cuts. Higher TPI gives smoother cuts. For rough cuts, choose a lower TPI.
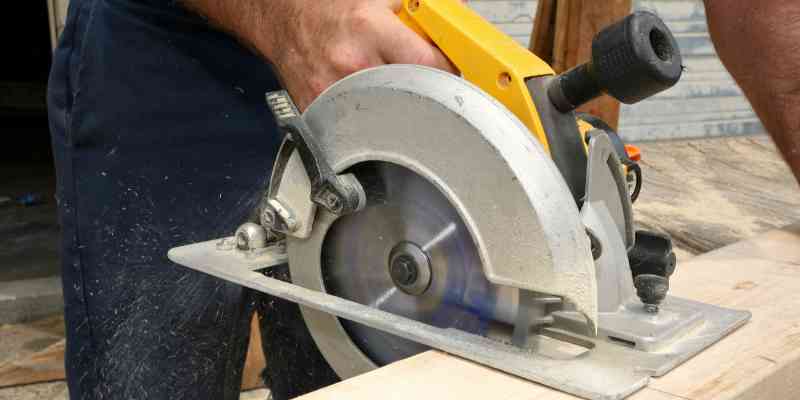
Step-by-step Blade Removal
Changing the blade on your Skil circular saw is essential for safe and efficient cutting. Follow these simple steps to ensure a smooth blade removal process. Proper technique prevents accidents and extends your saw’s life.
Locking The Blade And Saw
Before starting, make sure the saw is unplugged. This prevents accidental starts. Follow these steps to lock the blade:
- Locate the blade lock button on the saw.
- Press the blade lock button firmly.
- Turn the blade until it locks in place.
This step ensures the blade remains still during removal.
Removing The Blade Guard And Bolt
Next, you need to remove the blade guard and bolt. This allows full access to the blade. Follow these steps:
- Locate the blade guard release lever.
- Lift the lever to remove the guard.
Now, focus on the bolt:
- Use the appropriate wrench for the bolt.
- Turn the bolt counterclockwise to loosen it.
- Once loose, remove the bolt completely.
With the bolt removed, you can take off the blade easily.
Following these steps ensures safe and effective blade removal on your Skil circular saw.
Installing The New Blade
Changing the blade on your Skil circular saw is essential. A sharp blade cuts better and safer. Follow these steps to install the new blade correctly.
Aligning The Blade Properly
Proper alignment ensures the blade functions well. Follow these steps:
- Turn off the saw.
- Unplug the power cord for safety.
- Remove the old blade.
- Place the new blade on the spindle.
- Align the blade’s teeth with the direction of the cut.
Check that the blade is flat against the saw’s base. This will help you avoid any binding during cuts.
Securing The New Blade In Place
Securing the blade is crucial for safety. Follow these steps:
- Use the blade lock button to hold the spindle.
- Thread the blade bolt onto the spindle.
- Tighten the bolt using a wrench.
Make sure the blade is tight but not over-tightened. Check the blade’s movement. It should spin freely without wobbling.
Always check for safety before using your saw. A properly installed blade helps prevent accidents.
Safety Checks And Test Run
Before using your Skil circular saw, perform important safety checks. These checks ensure you operate the tool safely and effectively. A quick test run helps confirm everything is working well.
Ensuring Everything Is Tightened
Check all screws and bolts on the saw. Loose parts can cause accidents. Follow these steps:
- Unplug the saw to prevent accidental start.
- Inspect the blade guard for any damage.
- Ensure the blade is securely attached.
- Tighten all screws and bolts with a wrench.
Use a torque wrench for proper tightening. This ensures the blade remains fixed during cuts. A loose blade can lead to dangerous situations.
Performing A Test Cut
After ensuring everything is tight, perform a test cut. This helps confirm the saw works correctly. Follow these steps for a safe test:
- Choose a scrap piece of wood.
- Set the depth of the blade to match the wood thickness.
- Mark a cutting line on the wood.
- Position the wood securely on a stable surface.
Plug in the saw and turn it on. Allow the blade to reach full speed. Align the blade with the marked line. Make the cut smoothly.
Observe the cut quality. If the saw vibrates or makes unusual noises, stop immediately. Check for issues before continuing.
Maintenance Tips For Blade Longevity
Keeping your Skil circular saw blades in top shape requires regular maintenance. Proper care extends blade life and enhances cutting performance. Follow these essential tips for blade longevity.
Regular Cleaning And Storage
Cleaning your blades after each use is crucial. Dust and resin can accumulate, affecting performance. Here’s how to clean and store them:
- Use a brush: Remove debris with a soft brush.
- Soak in detergent: Use warm water and soap to soak blades.
- Rinse and dry: Rinse thoroughly and dry immediately.
Store blades in a safe, dry place. Use a dedicated blade case or rack. Avoid areas with moisture to prevent rust.
Sharpening Your Blades
Regular sharpening keeps blades cutting efficiently. Dull blades can strain your saw and lead to accidents. Follow these steps for effective sharpening:
- Check the blade for wear.
- Use a sharpening stone or file.
- Follow the original angle of the teeth.
- Remove any burrs after sharpening.
Consider professional sharpening for best results. This ensures precision and safety. Always handle blades with care to avoid injury.
| Maintenance Task | Frequency |
|---|---|
| Cleaning | After each use |
| Sharpening | Every 5-10 uses |
| Inspection | Before each use |
Troubleshooting Common Blade Change Issues
Changing the blade on your Skil circular saw can be tricky. Common issues can arise, making the process frustrating. Here’s how to tackle these problems effectively.
Dealing With A Stuck Blade
A stuck blade can cause delays. Follow these steps to fix this issue:
- Check the Lock Mechanism: Ensure the blade lock is disengaged.
- Apply Lubrication: Use a penetrating oil on the blade.
- Use Proper Tools: A wrench can help loosen the blade.
- Tap Gently: Light taps can release a stuck blade.
Always wear safety gloves. Protect your hands from sharp edges.
Adjusting For Accurate Cuts Post-change
After changing the blade, adjustments are crucial for precision. Follow these tips:
- Align the Blade: Ensure the blade is straight.
Frequently Asked Questions
How Do I Change The Blade On A Skil Circular Saw?
To change the blade on a Skil circular saw, first, unplug the saw for safety. Locate the blade lock button and press it while unscrewing the arbor nut. Remove the old blade and place the new one on the arbor.
Finally, secure the nut and ensure the blade is properly aligned.
What Type Of Blade Should I Use For A Skil Saw?
The type of blade you should use depends on your project. For general cutting, a 24-tooth carbide-tipped blade works well. For smoother finishes, opt for a 60-tooth blade. Always check the manufacturer’s specifications to ensure compatibility with your specific Skil circular saw model.
Is It Safe To Change The Blade Myself?
Yes, it is safe to change the blade yourself if done correctly. Always disconnect the power before starting. Use appropriate tools and take your time to follow the instructions. If unsure, consult the user manual or seek professional help to avoid accidents.
How Often Should I Change My Circular Saw Blade?
You should change your circular saw blade when it shows signs of wear or damage. Frequent use can dull the blade, affecting performance. As a general guideline, inspect the blade every few projects. If you notice excessive burning or uneven cuts, it’s time for a replacement.
Conclusion
Changing the blade on your Skil circular saw is straightforward. Regular maintenance enhances performance and ensures safety. With the right tools and steps, you can tackle this task efficiently. Keep your saw in top shape for better cuts and a longer lifespan.
Happy woodworking!