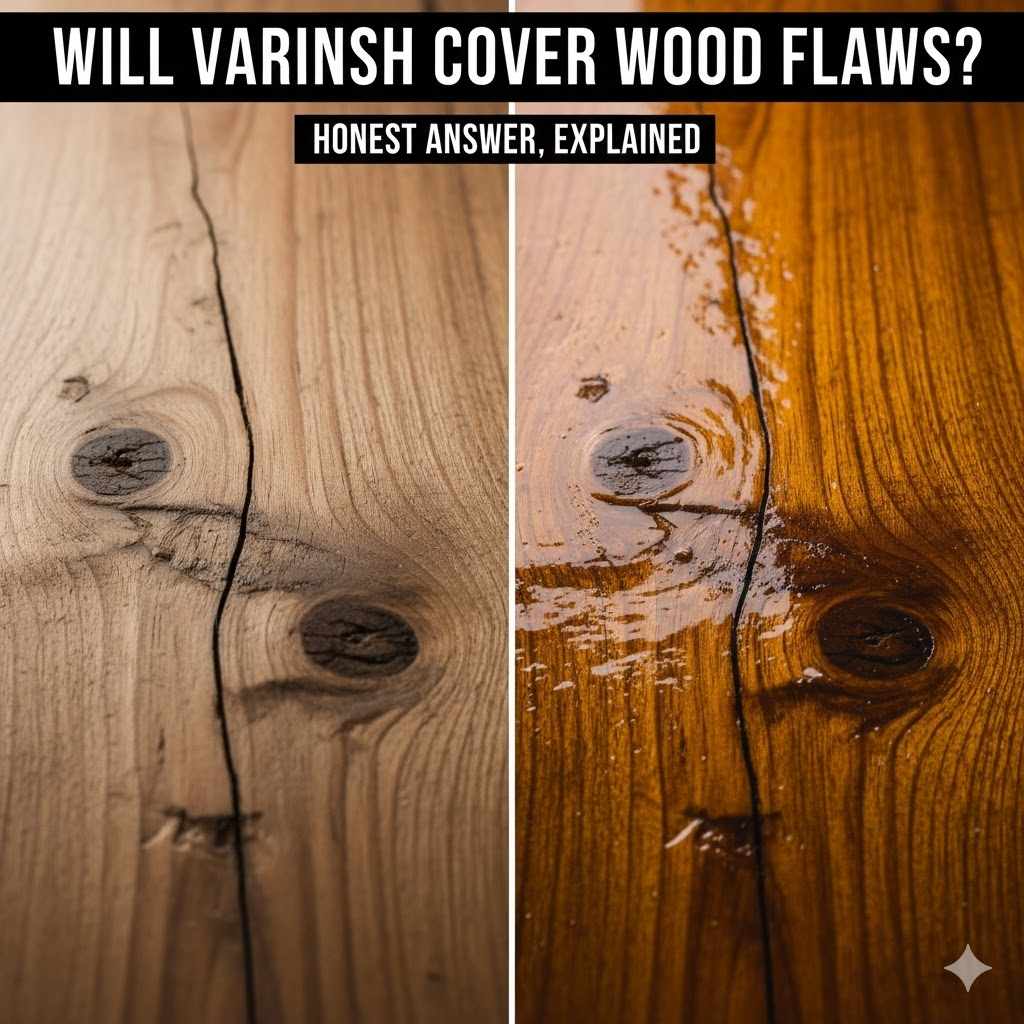
Will Varnish Cover Wood Flaws? Honest Answer, Explained
Many people starting woodworking ask, Will Varnish Cover Wood Flaws? Honest Answer. It’s a common question, especially for beginners. It’s easy to get frustrated wanting a perfect finish. Rest assured, figuring this out is easier than you think. This guide will walk you through the process step-by-step, helping you get beautiful results. Let’s see how varnish works its magic!
The Truth About Varnish and Wood Imperfections
Before putting varnish on wood, it’s important to know what it can and can’t do. Varnish is a protective coating that enhances the wood’s beauty and adds a layer of durability. It works by forming a transparent film on the surface. However, it’s not a magic eraser. It won’t always make flaws disappear. Varnish can highlight flaws, depending on their type. It’s better to prep the wood correctly before varnishing. This section explores how varnish interacts with wood’s imperfections.
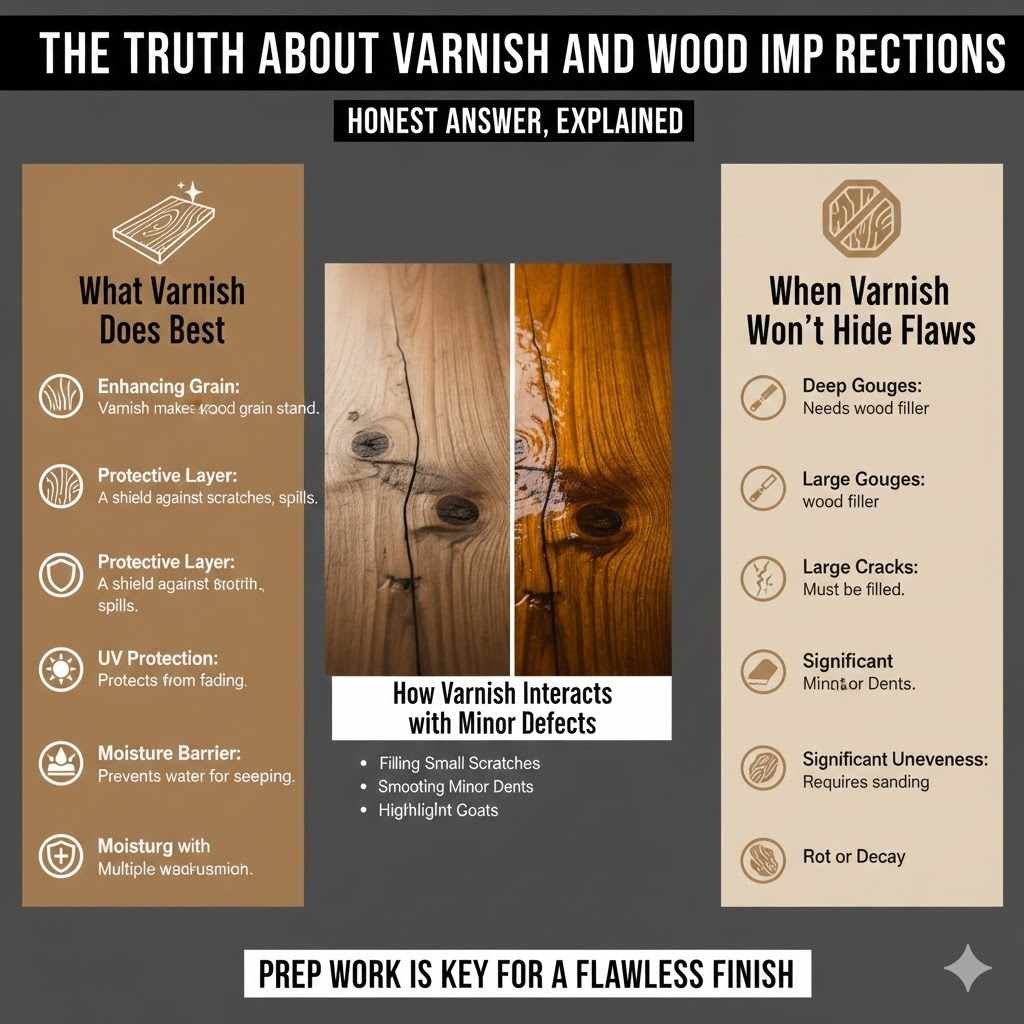
What Varnish Does Best
Varnish excels at enhancing the natural beauty of wood. It provides a protective layer against scratches, moisture, and UV rays. When applied correctly, varnish adds a glossy, satin, or matte finish, improving the wood’s appearance. It can darken the wood slightly, adding warmth and depth to the color. High-quality varnish also offers a smooth, even surface that is easy to clean and maintain.
- Enhancing Grain: Varnish makes the wood grain stand out, making the natural patterns more visible and attractive.
- Protective Layer: It creates a shield against scratches, spills, and everyday wear and tear.
- UV Protection: Some varnishes include UV filters that protect wood from fading due to sunlight.
- Moisture Barrier: Varnish helps prevent water from seeping into the wood, preventing damage like warping and rot.
Choosing the correct type of varnish, whether oil-based or water-based, also plays a key role. Oil-based varnishes often offer a warmer tone and better durability, but they take longer to dry. Water-based varnishes dry faster and have less odor, but they might not be as durable.
How Varnish Interacts with Minor Defects
Small imperfections, like tiny scratches or shallow dents, can be smoothed out with varnish. The liquid nature of varnish allows it to fill in these minor issues. Several layers of varnish can make these flaws less visible. However, success depends on the size and depth of the flaw. This makes proper preparation steps very important before varnishing. The final result will depend on the wood’s initial surface condition. Think of varnish as an added layer of protection and beauty, not a complete fix.
- Filling Small Scratches: Multiple coats of varnish can fill in and minimize the look of small scratches.
- Smoothing Minor Dents: Shallow dents can be smoothed over as the varnish levels out during application.
- Highlighting Grain: Even minor defects can become less noticeable as the varnish accentuates the wood grain.
- Leveling with Multiple Coats: Several thin coats of varnish, properly applied, can create a more even surface.
The success of covering minor defects often depends on the type of varnish. Some varnishes are self-leveling, meaning they spread out evenly during application. This can help to fill in small imperfections. When working with minor defects, you might want to consider using a varnish designed to fill in imperfections better.
When Varnish Won’t Hide Flaws
Varnish isn’t meant for extreme wood problems. Deep gouges, large cracks, and significant unevenness won’t be covered by varnish alone. These more significant flaws need prep work like filling with wood filler. Using the wrong approach to fixing these problems won’t give you the best results. The type of wood also matters; some woods are harder and more likely to show damage. Understanding varnish’s limitations helps you plan the correct steps to get the finish you want.
- Deep Gouges: Varnish will not fill deep gouges; these need to be repaired with wood filler.
- Large Cracks: Big cracks need to be addressed before varnishing, usually by filling them.
- Significant Unevenness: Areas with substantial differences in level require sanding or filling to get a smooth surface before varnish.
- Rot or Decay: Varnish will not repair damaged wood; this needs to be removed and replaced.
The wrong preparation steps can cause problems. For example, applying varnish over a surface that hasn’t been properly cleaned may trap dirt and dust. This creates bumps in the finished surface. Likewise, applying too thick of a coat can lead to drips and runs, ruining the smooth, professional finish. Remember that the quality of your wood project finish depends on prep work.
Prepping Wood for Varnish: The Secret to a Smooth Finish
Preparing wood correctly is the most important part of getting a great result when varnishing. This preparation creates a surface that varnish can bond to properly. It involves cleaning, sanding, and filling any imperfections before applying the varnish. The goal is to make the surface smooth, clean, and ready for the varnish. This will affect how it looks and protects the wood. Skipping any prep work can make the finish look bad and not last long.
Cleaning and Inspection
Start with a clean work surface. Remove any dust, dirt, or old finishes. Use a tack cloth or a vacuum cleaner to remove sanding dust. Inspect the wood closely to find any flaws, like scratches or dents. Consider what kind of wood you are working with. Different types of wood have their own characteristics and may need slightly different preparation. Proper preparation ensures that the varnish can bond well, resulting in a smooth, attractive, and durable finish.
- Remove Dust and Debris: Clean the surface with a tack cloth or vacuum to remove dust particles that can ruin the finish.
- Check for Old Finishes: If the wood has an old finish, remove it. This will make the new varnish stick better.
- Inspect for Flaws: Carefully check the wood for imperfections like dents, scratches, or uneven areas.
- Choose the Right Cleaners: Use appropriate cleaners for the wood and the type of finish being used.
Choosing the correct cleaning products can impact your results. For example, using a cleaner that isn’t compatible with the wood or finish can lead to a reaction. This can damage the wood or prevent the varnish from sticking. In contrast, using the right cleaners, will result in a clean and receptive surface, making the varnish job much easier. Make sure to select products that are meant for your type of wood and varnish.
Sanding Techniques for a Perfect Surface
Sanding is a key part of prepping the wood for varnish. Sanding removes flaws and creates a smooth surface for the varnish to adhere to. Start with a coarser grit sandpaper (like 80-grit) for removing any damage. Then, gradually move to finer grits (like 120, 180, and finally 220) to smooth the wood. This approach will give you a level surface and help the varnish stick better.
- Start with Coarse Grit: Begin with a lower grit sandpaper (80-120) to remove any imperfections, such as scratches or old finishes.
- Progress to Finer Grits: Gradually switch to finer grits (180-220) to smooth the surface and remove scratches.
- Sand with the Grain: Always sand along the wood grain to avoid causing new scratches.
- Use a Sanding Block: Use a sanding block to make sure you get an even and flat surface.
The sanding process helps the wood absorb the varnish properly. If you do not sand well, the varnish will not adhere as evenly. This can cause bumps, rough patches, and an uneven appearance. The final sanding step, using a very fine grit (like 220), prepares the wood for a smooth, glass-like finish.
Filling Imperfections
Minor flaws in the wood, like small dents or scratches, can be fixed by using wood filler. Choose a filler that matches the wood color. Apply the filler evenly into the holes. Let it dry completely and then sand it until it’s level with the surface. This step is important for a smooth look. Properly filled imperfections create a smooth surface and allow the varnish to cover the flaws properly. This step is crucial for the overall appearance.
- Choose the Right Filler: Select a wood filler that matches the color of your wood to ensure it blends seamlessly.
- Apply Filler Evenly: Use a putty knife or similar tool to apply the filler smoothly and evenly into the imperfections.
- Let It Dry Fully: Allow the filler to dry completely before sanding.
- Sand Flush: After drying, sand the filler until it’s flush with the wood surface.
Different types of wood filler have different properties. Some may shrink as they dry, and others may not sand as easily. Using the wrong kind of filler can lead to an uneven surface, causing problems when you apply the varnish. When you take the time to select the right wood filler for the project, you ensure that the end product looks great and the varnish bonds well.
Applying Varnish: Techniques for a Flawless Finish
Applying varnish correctly is a craft that requires careful steps. This part includes choosing the right tools, using the correct methods, and applying multiple thin coats. Using the right tools and following each step will help you get a great look. These steps help with the varnish’s clarity, durability, and visual appeal. This will allow the wood’s beauty to shine through, creating a finish that lasts.
Choosing Your Varnish and Tools
The type of varnish and the tools you use will have a big impact on your project’s final outcome. Several different types of varnish are available: oil-based, water-based, polyurethane, and others. Each type has different qualities. You’ll need the right brushes, applicators, and other items for a professional look. The type of brush, whether it’s natural bristle or synthetic, can affect how smoothly the varnish goes on. Having the right tools makes the process easier.
- Select the Right Varnish: Pick a varnish based on your needs, such as durability, UV protection, and desired finish.
- Choose Quality Brushes: Use high-quality brushes made for varnish.
- Consider Foam Rollers: Foam rollers can apply varnish smoothly on flat surfaces.
- Gather Other Supplies: Get stir sticks, a paint tray, and cloths for spills.
Consider the qualities of different types of varnish when deciding. For instance, oil-based varnishes offer good durability and a warm tone, but they take longer to dry and have a strong smell. Water-based varnishes dry faster, have less odor, and clean up easily. However, they may not be as durable as oil-based varnishes. Your choice will influence how your project turns out. Consider the time you want to invest.
Applying Thin Coats: The Key to Success
The best way to get a smooth, professional finish is to apply multiple thin coats. This method allows each layer to dry thoroughly. Thin coats prevent drips and runs. Start with a thin coat and let it dry completely. Gently sand the surface to remove any imperfections before the next coat. Multiple coats will protect the wood. This approach will make the varnish more durable and look better. Several thin coats lead to a higher quality finish than one thick coat.
- Apply Thin Coats: Use thin, even coats to avoid drips and runs.
- Let Each Coat Dry: Allow each coat to dry completely before applying the next one.
- Lightly Sand Between Coats: Use fine-grit sandpaper between coats to smooth out any imperfections.
- Follow Manufacturer’s Instructions: Refer to the varnish instructions for drying times and application details.
Not applying enough varnish can leave the wood unprotected, while applying too much can result in an uneven, unsightly surface. The process of applying thin coats demands patience and skill. The careful application of each layer, and the light sanding in between, helps to get a smooth and durable finish. This also enhances the wood’s natural grain and beauty.
Troubleshooting Common Varnish Problems
Problems can happen, even with experience. You might see bubbles, drips, or an uneven surface. Knowing how to fix common problems can save you time and prevent you from ruining your work. Learning to recognize and fix these issues can help to get a great look. Knowing the causes and solutions can help make any project look better.
- Bubbles: Bubbles can appear if you apply the varnish too fast or shake the can.
- Drips and Runs: These can happen if the coats are too thick.
- Uneven Finish: An uneven surface can be caused by not prepping the surface well.
- Tackiness: This may be due to improper drying conditions.
For example, if you see bubbles in the varnish, lightly sanding the surface and reapplying a thinner coat can help. If you have drips or runs, sand them gently. Then reapply the varnish. Correcting small problems is possible. Learning to identify these issues and make the right corrections improves the end result. This is about making adjustments as you go.
Advanced Techniques: Getting a Professional Look
If you’re aiming for a professional finish, you can use these techniques. These advanced methods go beyond the basics. They involve using special tools and knowing the process. These techniques will help you achieve a high-quality finish that is durable and attractive. This will also give your project a better, more detailed appearance.
Using a Spray Gun
Using a spray gun can give you a smooth, even finish. A spray gun evenly distributes the varnish. This will help to reduce brush marks and drips. It takes practice to use a spray gun effectively. Make sure you use the right spray gun, varnish type, and air pressure for the job. Using this tool takes a little bit of practice. This can create a professional-looking finish with a great look.
- Choose the Right Spray Gun: Select a spray gun that is meant for varnish.
- Thin the Varnish: You may need to thin the varnish as directed by the manufacturer.
- Practice Before Applying: Test the spray gun on scrap wood before applying it to your project.
- Control the Environment: Make sure you have good ventilation and keep the area free from dust.
Understanding the proper settings for your spray gun and the correct techniques for varnish application will improve the finish. Start with a light, even coat and build up with multiple coats. Sand lightly between coats to remove any imperfections. The results can be very good, creating a beautiful and durable finish.
Achieving a High-Gloss Finish
Getting a high-gloss finish requires extra steps and care. First, choose a high-gloss varnish. The steps will require proper surface preparation. Apply several thin coats of varnish. Let each coat dry fully and then sand lightly between coats. Final polishing will achieve that desired mirror-like sheen. This creates a durable finish with the highest level of reflectivity. It will also highlight the wood’s natural grain and color.
- Choose High-Gloss Varnish: Pick a varnish designed to provide a high-gloss sheen.
- Prepare the Surface Well: Make sure the surface is clean, smooth, and free of defects.
- Apply Multiple Coats: Apply thin coats, sanding lightly between each.
- Polish the Final Coat: After the final coat has dried, polish the surface to achieve a mirror-like finish.
The polishing step is key to a mirror-like appearance. After the final coat has dried, use polishing compounds to increase the gloss. Polishing makes the finish very smooth, which will cause it to reflect light very well. A high-gloss finish highlights the wood’s grain and creates an elegant look that adds visual depth. The additional effort with polishing delivers a refined look.
Adding Color and Staining
Varnish can be used with stains to achieve specific color results. Stains will change the wood’s color, and varnish will seal and protect the stain. Using this approach creates depth, color and protection. Staining the wood before applying varnish will give the color its depth and dimension. This approach offers a broad range of options to match styles. You can then protect the color with the final varnish coat.
- Choose the Right Stain: Pick a stain that matches your desired color and wood type.
- Apply the Stain Evenly: Apply the stain evenly and let it dry completely.
- Sand Lightly: Lightly sand the stained surface before applying the varnish.
- Use a Clear Varnish: Use a clear varnish to protect the stain and enhance its appearance.
The choice of stain and varnish will impact the final look of the project. For instance, choosing an oil-based stain can give the wood a rich, warm tone, while a water-based stain might provide a more subtle color change. A clear varnish protects the stain from damage. Properly staining and varnishing enhances the wood’s appearance, making it a key step in creating beautiful woodwork.
Will Varnish Cover Wood Flaws? Honest Answer: Case Studies and Scenarios
To really see if varnish covers wood flaws, let’s look at some real-life situations. The following case studies show how varnish interacts with wood flaws under different conditions. These studies show how the preparation work affects the result. We will also review various situations.
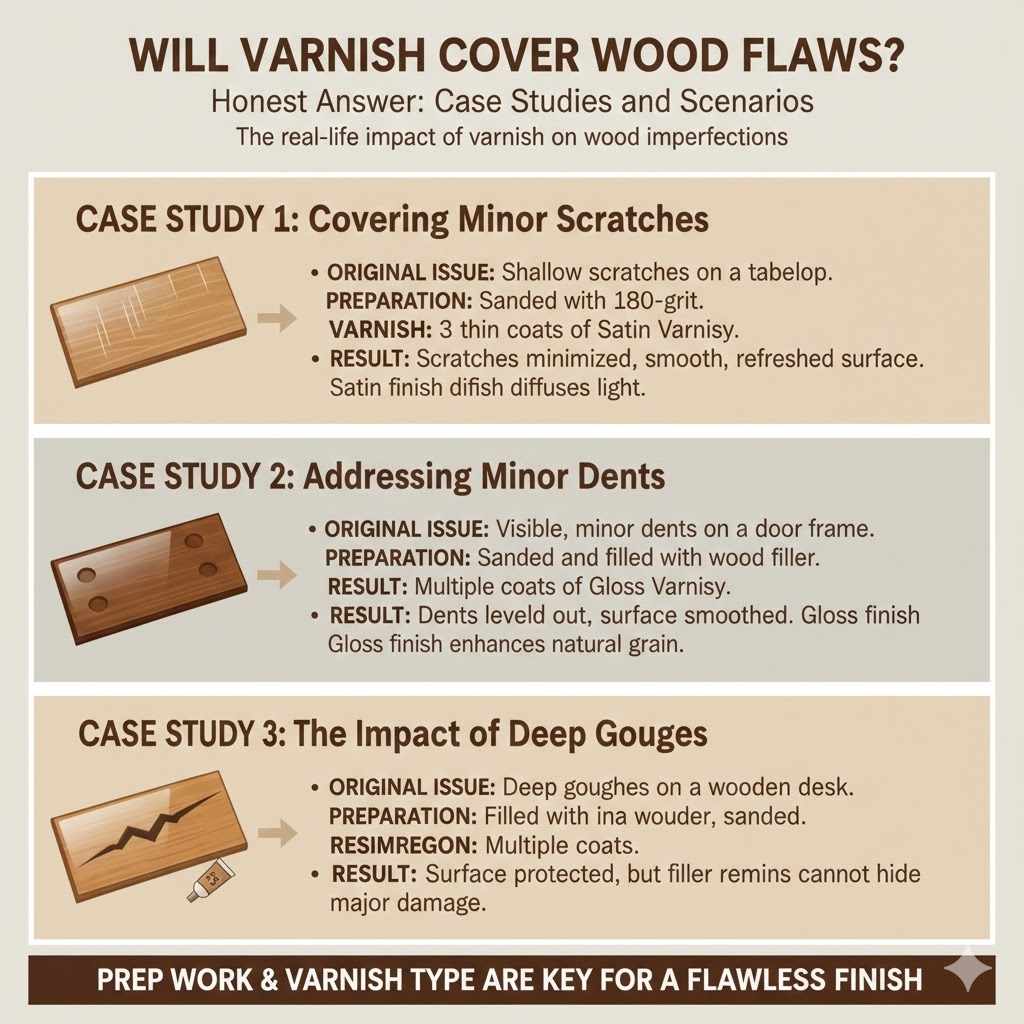
Case Study 1: Covering Minor Scratches
Let’s look at a case where there were small scratches on a wooden tabletop. The scratches were shallow and only visible at certain angles. After cleaning and sanding with 180-grit sandpaper, the surface was ready for varnish. Three thin coats of a satin varnish were applied, with light sanding in between. The varnish filled in the small scratches and made them less obvious. The satin finish diffused the light. This made the scratches less visible than a glossy finish would have. The tabletop now looked smooth and refreshed. The choice of finish made a big difference.
- The original scratches were present.
- After preparing the wood, applying varnish significantly reduced the visibility of the scratches.
- The satin finish diffused the light.
- The result was a smooth, scratch-resistant surface.
The success of the scratches being covered showed that surface preparation and the type of finish are key. The outcome shows how varnish, when paired with the right approach, can solve minor problems. This also shows that you can improve the look of the wood. The careful use of the right materials can change the finish.
Case Study 2: Addressing Minor Dents
Now, let’s explore a project where there were minor dents. These were not very deep, but visible on a wooden door frame. After sanding and filling any imperfections with wood filler, the area was ready for varnish. Multiple coats of gloss varnish were applied. These helped to level out the surface and reduced the visibility of the dents. The gloss varnish enhanced the natural beauty of the wood, making the imperfections less noticeable. The process demonstrated how varnish can improve the look of a surface.
- The existing dents were a minor issue.
- The dents were treated.
- The gloss varnish filled the small imperfections.
- The resulting finish was smooth.
The success of the gloss finish proved how proper preparation and choosing the right varnish can improve the appearance of the wood. The end result showed how a high-quality product is important. It also demonstrates how patience and attention to detail will improve the final result. Understanding the limitations of varnish is also important for managing expectations.
Case Study 3: The Impact of Deep Gouges
In this scenario, we’ll examine a project with deep gouges on a wooden desk. Sanding alone was not enough to fix the damage. The deep gouges required wood filler. After the filler dried and was sanded flush, the surface was ready for varnish. The application of multiple coats of varnish created a smooth, protected surface. However, the areas with the filler were still visible, and the gouges’ original location was not hidden completely. This shows that varnish, by itself, cannot cover significant flaws.
- Gouges were present.
- Wood filler was used to fill the gouges before varnishing.
- Varnish improved the look but did not completely hide the repairs.
- The results demonstrated the limits of the varnish in covering major damage.
The case study helped to demonstrate how varnish alone is not a perfect fix for deep gouges. While varnish is good for minor issues, more serious damage needs a different approach. The outcome showed the importance of the correct preparation. Choosing the right filler and technique made a big difference. This helped get the best results.
Frequently Asked Questions
Question: Can varnish hide small scratches on wood?
Answer: Yes, in many cases, multiple coats of varnish can help to fill in and minimize the look of small scratches, making them less noticeable.
Question: Does varnish work to fill dents in wood?
Answer: Varnish can help smooth over minor dents, especially when applied in multiple thin coats, but deep dents may require wood filler.
Question: What should I do if the wood has deep gouges?
Answer: Varnish is not the answer. You will need to use wood filler. Fill the gouges, let them dry, sand them flush, then varnish.
Question: Can I apply varnish directly to a surface?
Answer: It’s important to prep the surface by cleaning, sanding, and filling imperfections to get the best results before applying varnish.
Question: What’s the best way to get a smooth, professional finish?
Answer: Applying multiple thin coats of varnish with light sanding between each coat is the best way to achieve a smooth and professional finish.
Final Thoughts
So, Will Varnish Cover Wood Flaws? Honest Answer? Varnish is excellent at enhancing wood and protecting it. However, it’s not a magical fix for every problem. Small imperfections, like scratches and minor dents, can often be smoothed out. The key is in the preparation. Thorough cleaning, sanding, and filling are very important for a good look. Remember, multiple thin coats of varnish are always better than a single thick one. Choosing the right tools and techniques also matters. If you’re dealing with deep gouges or large cracks, wood filler is needed. Now that you have explored these aspects, you’re ready to start your woodworking projects. With patience and practice, you can get professional results, creating beautifully finished pieces that you will be proud of!