Ash Wood Bench: Essential & Elegant Design
Ash wood benches offer a perfect blend of durability, natural beauty, and elegant simplicity, making them an excellent choice for beginners. With straightforward construction and readily available materials, crafting your own ash wood bench is an achievable and rewarding project that adds timeless charm to any space.
Hey there, fellow DIYers and home decorators! Ever looked at a beautiful wooden bench and thought, “That looks way too complicated to build”? I get it. Sometimes, furniture projects can seem daunting, especially when you’re just starting. But what if I told you that you can create something truly special, something that adds both function and elegance to your home, without needing years of woodworking experience? Meet the ash wood bench. It’s a fantastic project for beginners because ash is forgiving to work with, and its stunning grain patterns offer a natural elegance that requires little embellishment. We’ll walk through everything you need to know to build your own, ensuring it’s sturdy, beautiful, and something you’ll be proud of.
Why Ash Wood for Your Bench?
Ash wood is a fantastic choice for DIY furniture projects, especially for beginners. It’s known for its strength, durability, and attractive appearance, making it ideal for a bench that will be both functional and a beautiful addition to your home. Let’s dive into why ash makes such a good material.
Strength and Durability
Ash is a hardwood that rivals oak in strength. It has excellent shock resistance, meaning it can handle everyday use and the occasional bump without easily denting or breaking. This makes it perfect for a bench, which is typically placed in high-traffic areas like entryways, living rooms, or gardens.
Aesthetic Appeal
One of the most striking features of ash wood is its beautiful grain patterns. They can range from straight and uniform to wavy and more dramatic. The color is typically light, ranging from creamy white to pale brown, which provides a beautiful canvas for stains or a natural finish. This natural elegance means your ash wood bench will look sophisticated even with a simple design.
Workability
For beginners, how easy wood is to work with is crucial. Ash machines well, takes nails and screws easily, and glues effectively. While it can be prone to tear-out if you’re not careful with your grain direction, with a little attention, it’s a very manageable wood for first-time builders. This ease of manipulation allows for clean cuts and smooth finishes, essential for a professional-looking project.
Cost-Effectiveness
Compared to some other hardwoods like cherry or walnut, ash is often more affordable. This makes it an excellent option for those looking to create quality furniture on a budget. You get the look and durability of a premium wood without the hefty price tag.
Choosing the Right Ash Wood
Not all ash wood is created equal. When you’re heading to the lumberyard, here are a few things to keep in mind:
- Common Ash Species: White Ash is the most common and generally preferred for furniture due to its stability and workability.
- Moisture Content: Always look for kiln-dried lumber. This process reduces the moisture content, making the wood more stable and less likely to warp or crack after you’ve built your bench. Lumber that is not properly dried can lead to problems down the road. You can often find lumber with a moisture content of 6-8%.
- Grain and Appearance: Inspect the boards for any major defects like large knots, cracks, or extensive warping. Consider the grain pattern you like; some prefer a straighter grain for a more minimalist look, while others enjoy the character of more prominent figures.

Essential Tools for Your Ash Wood Bench Project
To make your ash wood bench project a success, having the right tools is important. Don’t worry if you don’t have a professional workshop; many basic tools are sufficient for a beginner-friendly project like this. Safety first, always!
Cutting Tools:
- Measuring Tape: Crucial for accurate measurements.
- Pencil: For marking cut lines.
- Hand Saw or Circular Saw: For cutting the wood to size. A circular saw will make straighter cuts faster but requires a bit more practice. For straight cuts, consider using a guide or saw horses. For tips on making accurate cuts, resources like Popular Mechanics offer great advice on hand saw usage.
- Mitre Saw (Optional but Recommended): If you have access to one, a mitre saw makes precise angled and straight cuts much easier and more consistent.
Assembly Tools:
- Drill/Driver: For pre-drilling holes and driving screws. Getting a good set of drill bits is also essential.
- Countersink Bit: To allow screw heads to sit flush or below the surface of the wood.
- Wood Glue: A strong adhesive that will significantly increase the bench’s durability.
- Clamps: Essential for holding pieces together while the glue dries. You’ll want a few bar clamps or pipe clamps of various lengths.
- Screwdriver: If you prefer manual screwing, though a drill/driver is much faster.
Finishing Tools:
- Sandpaper: Various grits, from coarse (like 80-grit) to fine (like 220-grit), for smoothing the wood.
- Sander (Optional but Recommended): An orbital sander can significantly speed up the sanding process and provide a smoother finish.
- Paintbrushes or Rags: For applying stain, sealant, or paint.
Safety Gear:
Your safety is paramount! Always wear:
- Safety Glasses: Protect your eyes from sawdust and debris.
- Hearing Protection: Especially when using power tools like circular saws or mitre saws.
- Dust Mask: To prevent inhaling fine wood dust.
- Work Gloves: To protect your hands.
Simple Ash Wood Bench Design for Beginners
Let’s plan a straightforward bench design that’s perfect for a beginner. This design focuses on clean lines and strong joinery, making it both elegant and robust. We’ll aim for a bench that’s roughly 48 inches long, 16 inches wide, and 18 inches high – a common and versatile size.
Materials List (Example for a 48″ bench):
You can typically find these at your local lumber yard or home improvement store.
| Component | Material | Quantity | Dimensions |
|---|---|---|---|
| Seat Slats | Ash Wood (1×6 boards) | 4-5 boards | 48 inches long |
| Legs | Ash Wood (2×4 boards) | 2 boards | 18 inches long |
| Apron/Support Rails (Front & Back) | Ash Wood (1×4 boards) | 2 boards | 45 inches long (cut from 1×4) |
| Apron/Support Rails (Sides) | Ash Wood (1×4 boards) | 2 boards | 13 inches long (effectively 16″ – 2x thickness of front/back boards) |
| Optional Cross Brace | Ash Wood (1×3 board) | 1 board | ~10 inches long |
| Screws | Wood Screws (e.g., 1 5/8 inch and 2 1/2 inch) | Approx. 50-75 | Appropriate length for joining |
| Wood Glue | Durable Wood Glue | 1 bottle | N/A |
Note: Board dimensions are nominal. A 1×6 is actually about 3/4″ x 5 1/2″, and a 1×4 is about 3/4″ x 3 1/2″. Adapt lengths based on actual lumber dimensions.
Cutting List:
Based on the above materials, here’s a precise cutting list:
- Seat: 4 pieces of 1×6, cut to 48 inches.
- Legs: 4 pieces of 2×4, cut to 18 inches.
- Front/Back Aprons: 2 pieces of 1×4, cut to 45 inches.
- Side Aprons: 2 pieces of 1×4, cut to 13 inches.
- Optional Cross Brace: 1 piece of 1×3, cut to 10 inches.
Step-by-Step: Building Your Ash Wood Bench
Let’s get building! Remember to measure twice and cut once.
Step 1: Cut Your Wood
Using your measuring tape, pencil, and saw (hand saw, circular saw, or mitre saw), carefully cut all your pieces according to the cutting list. Ensure your cuts are as straight and square as possible. This is fundamental for a sturdy and good-looking bench.
Step 2: Prepare the Legs and Aprons
Take your four 18-inch leg pieces. You’ll attach the apron pieces to these. The apron pieces will form a frame that supports the seat and connects the legs. Measure and mark where the apron pieces will attach to the legs. A common approach is to set the aprons about 1/2 inch down from the top of the legs, creating a slight reveal for the seat to sit on. You can lay out two leg pieces with the front or back apron piece in between them, ensuring it’s flush with the outside face of the legs and set down from the top.
Step 3: Assemble the Leg Frames
For each end of the bench, you’ll create a leg frame. Take two legs and one of the shorter side apron pieces (13 inches). Apply wood glue to the ends of the apron piece where it will meet the legs. Position the apron between the two legs, aligning the top edge of the apron about 1/2 inch below the top of the legs. Clamp them securely. Pre-drill pilot holes through the legs into the apron and drive screws to fasten them. Repeat for the other side apron with the remaining two legs.
Next, connect these two leg assemblies using the longer front and back apron pieces (45 inches). Ensure these are also set 1/2 inch down from the top of the legs and flush with the outer faces of the legs. Apply glue, clamp, pre-drill, and screw. You should now have a sturdy rectangular frame with legs attached.
For added strength, consider attaching the apron pieces from the outside of the legs. You could butt joint the aprons to the legs, meaning the end of the apron sits against the inside face of the leg. Then you would pre-drill and screw through the apron into the leg. Ensure the top of the apron remains 1/2 inch below the top of the leg.
Step 4: Add the Optional Cross Brace
If you’re adding a cross brace for extra stability (recommended for longer benches or if you plan to place heavy items on it), find the center of the long aprons and attach the 1×3 cross brace in the middle. Apply glue to the ends, clamp, pre-drill, and screw it from underneath the apron into the brace.
Step 5: Attach the Seat Slats
Now for the seat! Lay your four 48-inch 1×6 ash boards across the top of your assembled frame. Arrange them so they are evenly spaced. You can place them with slight gaps (about 1/8 to 1/4 inch) for a more classic outdoor look, or push them tightly together for a solid surface. The exact spacing depends on your preference and how perfectly square your frame is. The key is to make them look aligned and evenly distributed.
Once you’re happy with the placement, secure the seat slats to the apron. You’ll want to put screws into the front and back apron pieces. For each slat, use about two screws per end (into the front and back aprons). Pre-drill pilot holes through the seat slats to prevent splitting the wood, especially near the ends. If you want a cleaner look, you can countersink the screws and fill the holes with wood filler later. For a more contemporary look, the Woodsmith Shop offers great insights into joinery techniques that can be adapted for a cleaner seat attachment. They showcase how to make connections that blend seamlessly.
Step 6: Sanding and Finishing
This is where your bench really starts to shine. Begin with a coarser grit sandpaper (like 80 or 100) to smooth out any rough spots, level joints, and remove any pencil marks. Then, move to a medium grit (150) and finally a fine grit (220) for a silky-smooth finish. Spend time on the edges and corners to round them slightly for comfort and safety.
After sanding, wipe down the entire bench with a tack cloth or a slightly damp rag to remove all dust. Now you’re ready for the finish. For ash wood, a clear polyurethane, a natural oil finish, or a light stain can look stunning. Apply your chosen finish according to the manufacturer’s instructions. Multiple thin coats are usually better than one thick coat. For outdoor use, ensure your finish provides UV protection and water resistance. A good exterior-grade polyurethane or a penetrating oil finish designed for outdoor furniture would be suitable.
Consider a finish like:
- Clear Polyurethane: Durable and easy to apply, it protects the wood and highlights its natural color.
- Stain: If you want to change the color, stains come in a vast array of shades. Ash takes stain well, but for a truly elegant look, consider a natural or light-colored stain that complements its inherent beauty.
- Oil Finish (like Tung Oil or Danish Oil): These penetrate the wood and provide a warm, natural look and feel. They often require more maintenance than polyurethane but offer a beautiful, matte finish.
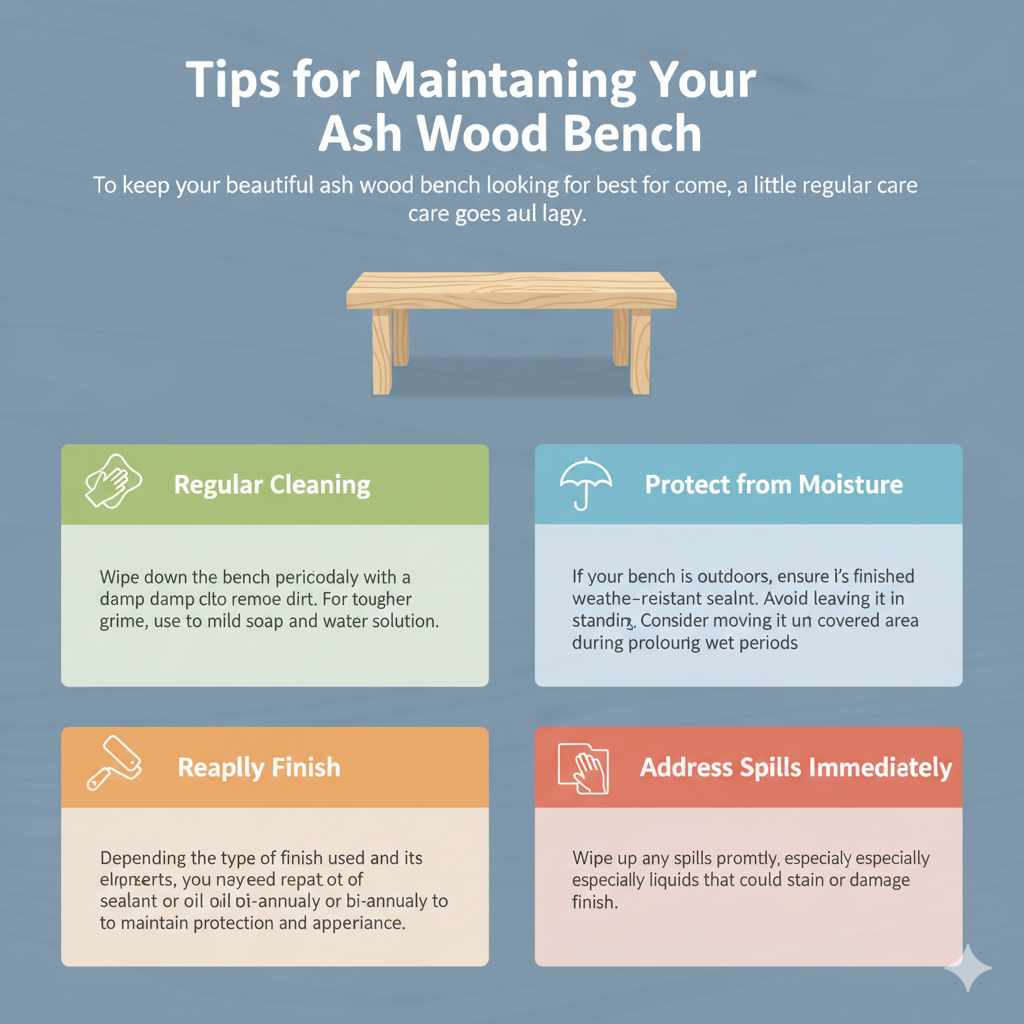
Tips for Maintaining Your Ash Wood Bench
To keep your beautiful ash wood bench looking its best for years to come, a little regular care goes a long way:
- Regular Cleaning: Wipe down the bench periodically with a damp cloth to remove dust and dirt. For tougher grime, use a mild soap and water solution.
- Protect from Moisture: If your bench is outdoors, ensure it’s finished with a weather-resistant sealant. Avoid leaving it in standing water. Consider moving it under a covered area during prolonged wet periods.
- Reapply Finish: Depending on the type of finish used and its exposure to the elements, you may need to reapply a coat of sealant or oil annually or bi-annually to maintain protection and appearance.
- Address Spills Immediately: Wipe up any spills promptly, especially liquids that could stain or damage the finish.
Frequently Asked Questions (FAQ)
Q1: Is ash wood good for outdoor furniture?
Yes, ash wood is a good choice for outdoor furniture because it’s a strong hardwood with good shock resistance. However, like all woods, it needs to be properly finished with a weather-resistant sealant to protect it from moisture, UV rays, and pests. Regularly maintaining the finish is key for longevity outdoors.
Q2: How thick should the wood be for an ash wood bench seat?
For a sturdy bench seat, using standard 1×6 or 1×8 boards (which are actually about 3/4 inch thick) is usually sufficient, especially when supported by a solid frame or legs. If you want a more substantial feel or plan to place very heavy items on the bench, you could opt for thicker lumber like 1.5-inch (2x material) or use more slats for better support.
Q3: What’s the best way to join the legs to the frame for a durable bench?
For beginners, using wood glue and screws is a very effective method. Pre-drilling pilot holes prevents splitting. Ensure the joints are tight and allow the glue to dry completely. For even more strength, some woodworkers use pocket hole joinery. This technique creates strong, hidden joints and can be done with a simple jig.
Q4: Can I stain ash wood a dark color?
Absolutely! Ash wood takes stains very well, and you can achieve a variety of colors, from light natural tones to deep, rich darks. Because of its open grain, you might consider using a pre-stain wood conditioner to ensure a more uniform stain absorption, especially if you’re aiming for a very dark or even color. This prevents blotchiness.