Best Way to Apply Stain to Cedar: Expert Tips and Techniques
Staining cedar can enhance its beauty and protect it from the elements. But applying stain correctly is key for the best results.
Cedar is a popular choice for outdoor projects due to its natural resistance to decay. However, staining cedar not only improves its appearance but also extends its lifespan. Proper application of stain requires some knowledge and technique. This guide will help you understand the best way to apply stain to cedar.
By following these steps, you can ensure your cedar projects remain beautiful and durable for years. From choosing the right stain to applying it correctly, we’ll cover everything you need to know to achieve a professional finish. Keep reading to learn how to make your cedar look its best.
Credit: www.olympic.com
Introduction To Cedar Staining
Staining cedar helps to protect the wood. It adds a layer of protection against weather. This makes the wood last longer. Staining also enhances the natural beauty of cedar. The wood grain stands out more. Stained cedar looks more beautiful. It can also match your home’s style better. Some stains even offer UV protection. This helps to keep the wood from fading. Cedar can be stained in many colors. This gives you many options for your project.
Many people rush the staining process. This can lead to uneven coverage. Another mistake is not preparing the wood. The surface should be clean and smooth. Some people apply too much stain. This makes the wood look blotchy. Using the wrong type of stain is also a common mistake. Cedar needs a stain made for softwood. Not following the stain’s instructions is another issue. Always read and follow the manufacturer’s guidelines. Skipping a test spot can lead to color problems. Test the stain on a small area first.
Credit: www.reddit.com
Choosing The Right Stain
There are different types of stains for cedar. Oil-based stains are popular. They penetrate deep into the wood. Water-based stains dry fast and are easy to clean. Gel stains are thick and good for vertical surfaces. Each type has its own benefits. Choose one based on your need.
Picking the right color is key. Lighter colors show more of the wood’s natural beauty. Darker colors offer more protection. Think about the look you want. Test a small area first. This helps you see the color on your cedar. Make sure it matches your vision.
Preparing Cedar For Stain
Preparing cedar for stain involves cleaning and sanding the wood for a smooth surface. Use a brush or cloth to apply the stain evenly, allowing it to soak properly for better results.
Cleaning The Surface
Start by removing any dirt and debris. Use a soft brush and mild soap. Rinse thoroughly with water. Ensure the surface is dry before moving to the next step. Moisture can affect the stain’s adhesion. Check for any mold or mildew. If found, use a mildew cleaner. Avoid using harsh chemicals. They can damage the cedar.
Sanding Techniques
Begin by sanding the cedar gently. Use a fine-grit sandpaper. This will help smooth the surface. Always sand in the direction of the grain. Avoid circular motions. After sanding, remove any dust particles. Use a tack cloth for best results. Ensure the surface is smooth and clean before applying the stain. This will help the stain penetrate evenly.

Tools And Materials Needed
Quality tools and materials are essential for staining cedar effectively. Use a brush, stain, drop cloth, and sandpaper. Proper preparation ensures a smooth finish.
Essential Tools
A few essential tools are needed to apply stain to cedar. Brushes are important for even application. Sandpaper helps smooth the wood. A stir stick keeps the stain mixed. Painter’s tape protects areas you don’t want stained. A drop cloth keeps the workspace clean. Gloves protect your hands from chemicals.
Recommended Materials
Cedar stain is the most important material. Choose a high-quality stain for the best results. Wood cleaner helps prepare the surface. A sealer can provide extra protection. Rags are useful for wiping excess stain. Buckets can hold water or cleaner.
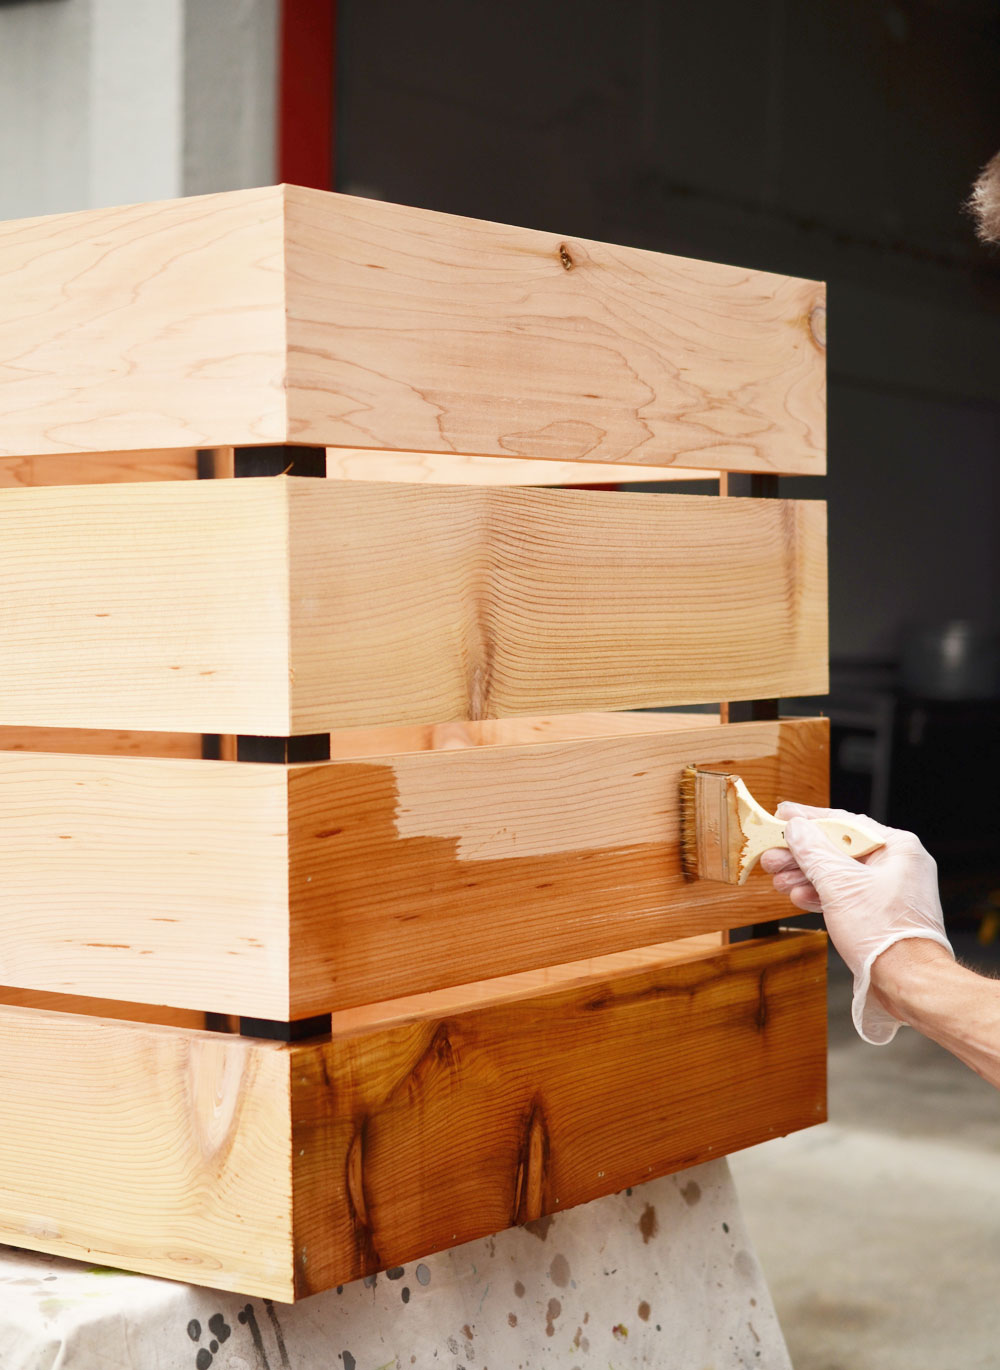
Application Techniques
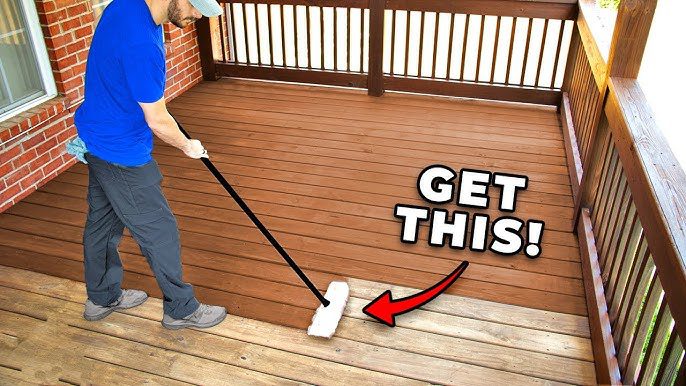
Applying stain to cedar requires a soft bristle brush for even coverage. Work in small sections to prevent streaks. Always wipe off excess stain promptly.
Brush Vs. Spray
Both brushing and spraying are effective ways to stain cedar. A brush gives you better control. It allows you to apply stain evenly. This method works well for detailed areas. Spraying is faster. It covers large areas quickly. But it might not be as even as brushing. Spraying also requires more preparation. You need to cover nearby areas to avoid overspray. Both methods can give good results. The choice depends on your project needs.
Step-by-step Process
First, clean the cedar surface. Remove dirt and debris. Let it dry completely. Next, choose your stain. Mix it well. For brushing, dip the brush into the stain. Apply with smooth, even strokes. Work along the grain. For spraying, use a paint sprayer. Hold it 6-12 inches from the surface. Spray in steady, even motions. Overlap each pass slightly. After applying, let the stain dry. Check for missed spots. Apply a second coat if needed.
Drying And Curing
For the best results, apply stain to cedar using a brush or spray. Ensure even coverage by working in small sections. Allow proper drying and curing for a lasting finish.
Optimal Conditions
The best way to stain cedar is in dry weather. The temperature should be between 50°F and 70°F. Humidity levels should be low. This helps the stain to dry properly. Direct sunlight can cause problems. It can make the stain dry too fast. Shade is the best place to stain cedar.
Timeframes
Staining cedar needs time. The stain will dry in about 24 hours. Curing takes longer. It can take up to 30 days. During this time, keep the cedar dry. Avoid touching it. This will help the stain to set properly.
Maintenance Tips
Apply stain to cedar with a brush for best results. Use smooth, even strokes and work along the wood grain. Clean the cedar first to ensure a smooth finish.
Periodic Cleaning
Cedar needs regular cleaning. Use a gentle cleaner and a soft brush. Avoid harsh chemicals. These can damage the wood. Clean cedar in the spring and fall. This keeps it looking nice. Rinse well with water. Let it dry fully before staining.
Reapplication Guidelines
Reapply stain every 2-3 years. Check for faded areas. Restain them right away. This keeps the wood protected. Apply a thin coat. Thick coats may peel. Follow the stain product’s instructions. Use a brush or sprayer. Make sure the wood is dry. Stain in dry, mild weather. This helps the stain set properly.
Credit: www.swansonsnursery.com
Troubleshooting Common Issues
Applying stain to cedar can be tricky. Ensure the wood is clean and dry before starting. Use a brush for best coverage.
Blotchy Stain
Blotchy stain can happen if the cedar is not prepared well. Always sand the wood evenly. This ensures a smooth surface. Clean the wood thoroughly to remove dust. Use a pre-stain wood conditioner. It helps the stain apply evenly. Avoid applying too much stain at once. Thin coats work best. Let each coat dry fully before adding another. This reduces blotchiness.
Peeling And Flaking
Peeling and flaking can occur if the stain is not applied properly. Make sure the wood is clean and dry. Moisture can cause the stain to peel. Use a high-quality stain. Cheap stains may not adhere well. Apply the stain in thin, even coats. Thick coats are more likely to peel. Allow each coat to dry completely. This helps the stain bond to the wood. Regular maintenance can prevent future peeling.
Expert Advice And Recommendations
Clean the cedar before applying the stain. Use a mild soap and water. Rinse well and let it dry completely. This will help the stain stick better.
Use a quality brush or a sprayer. Apply the stain evenly. Do not leave any puddles. Work in small sections. This ensures even coverage.
Always test the stain on a small hidden area first. Check the color. Make sure you like it.
Apply the stain in the direction of the wood grain. This makes the wood look natural.
Let the first coat dry. Then apply a second coat if needed. This gives a deeper color and more protection.

Frequently Asked Questions
What Is The Best Stain For Cedar?
The best stain for cedar is a semi-transparent stain. It penetrates deeply, offers UV protection, and enhances cedar’s natural beauty.
How To Prepare Cedar For Staining?
Clean the cedar surface thoroughly. Remove dirt, mold, and old stain. Sand the wood lightly to ensure smooth application.
Should I Use A Brush Or Sprayer For Staining Cedar?
A brush is ideal for staining cedar. It allows for better penetration and even coverage, ensuring a long-lasting finish.
How Many Coats Of Stain Does Cedar Need?
Typically, one or two coats of stain are sufficient for cedar. This ensures adequate protection and an even, rich color.
Conclusion
Applying stain to cedar enhances its beauty and longevity. Follow proper steps for best results. Prepare the wood, choose the right stain, and apply evenly. Patience ensures even coverage. Regular maintenance keeps cedar looking fresh. Enjoy the natural charm of your stained cedar.
Thank you for reading. Happy staining!