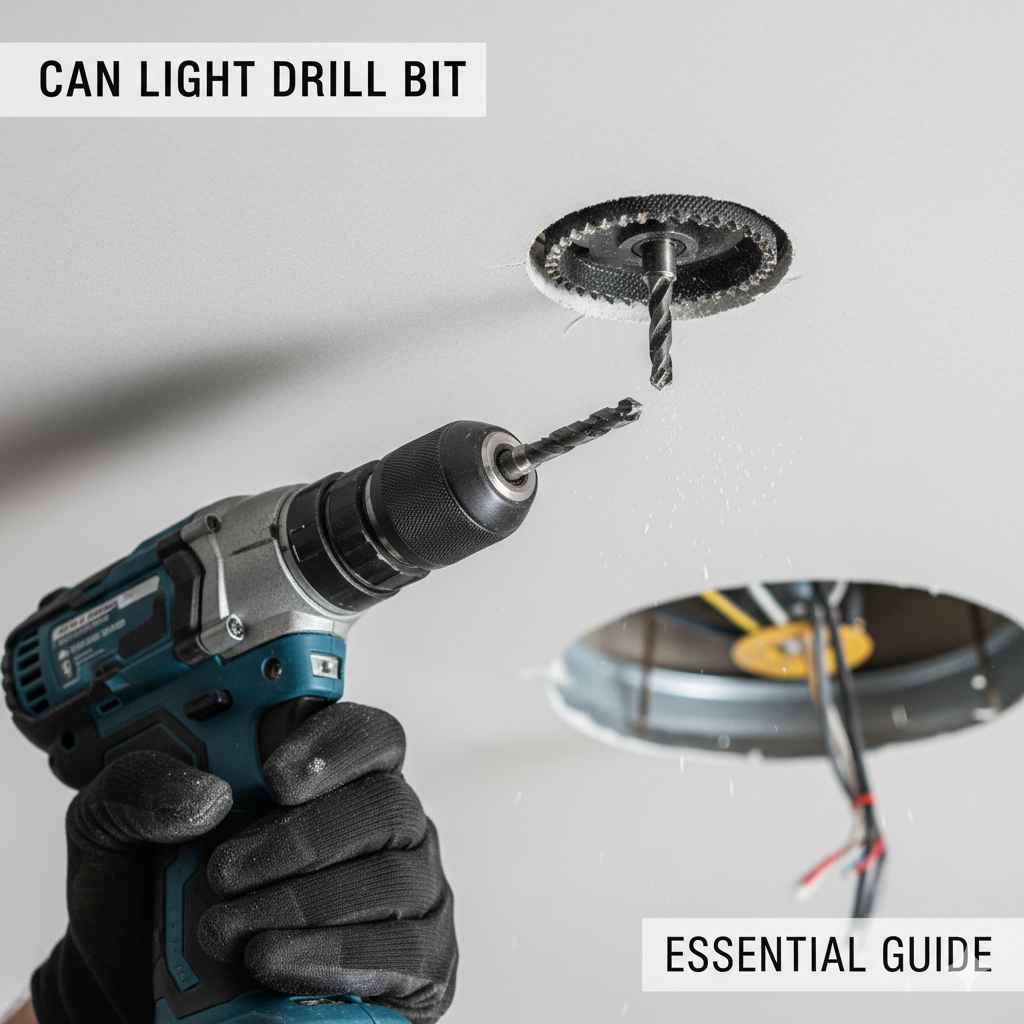
Can Light Drill Bit: Essential Guide
Yes, there are drill bits designed specifically for “light drilling” tasks, often called micro drill bits or small diameter drill bits. These are perfect for delicate materials, detailed work, and pilot holes in smaller projects or soft woods where a standard drill bit would be too aggressive. Choosing the right “can light drill bit” ensures precision and prevents damage.
Hey there, DIY friends! Md Meraj here, your go-to guide for all things woodworking. Ever found yourself staring at a tiny screw or a delicate piece of material, wondering if your trusty drill can handle such a delicate job? You’re not alone! Many of us have faced the frustration of trying to drill a small hole, only to end up with a splintered mess or a hole that’s way too big. It can be disheartening when a project demands precision that standard tools just can’t seem to deliver.
But don’t worry! The solution is simpler than you might think. There’s a whole world of specialized drill bits out there designed for exactly these kinds of tasks. We’re going to dive deep into what makes a “can light drill bit” (or more accurately, bits for light drilling) so useful, what types are available, and how to pick the perfect one for your next delicate project. Get ready to add some serious precision to your toolkit!
Understanding “Light Drilling” and Why You Might Need It
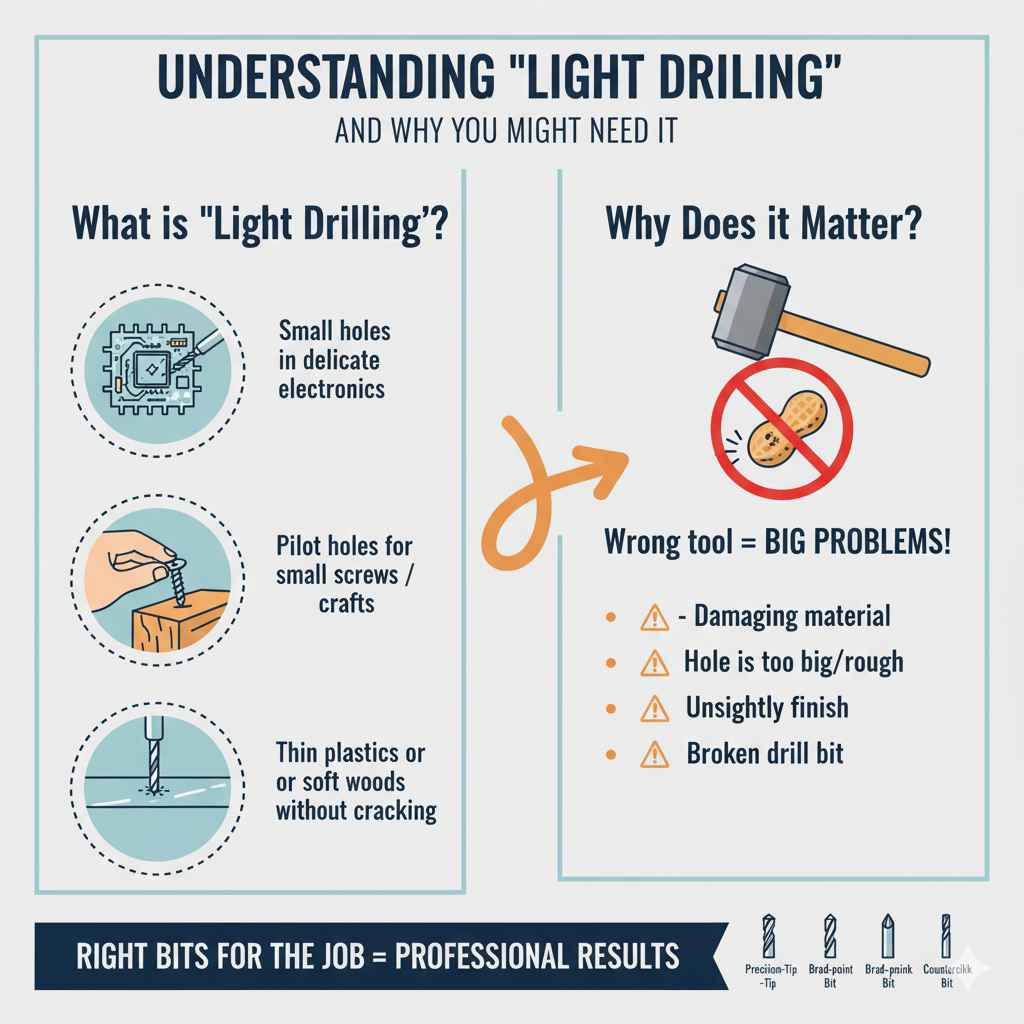
When we talk about “light drilling,” we’re essentially referring to drilling small holes or drilling into materials that are easily damaged. Think about fixing delicate electronics, creating pilot holes for tiny screws in craft projects, or even drilling through thin plastics or soft woods without causing them to crack or split.
Why is this important? Using the wrong drill bit for a small job is like using a sledgehammer to crack a peanut. You’ll likely end up:
- Damaging the material you’re working with.
- Making the hole too big for your needs.
- Creating a rough, unsightly finish.
- Potentially breaking your drill bit if it’s too thin and fragile for the force applied.
The “can light drill bit” concept isn’t about a specific brand or type named “can light,” but rather about the application – drilling small, precise holes. These tasks are common in many DIY scenarios, and having the right tools makes all the difference between a professional-looking result and a frustrating failure. Let’s explore the types of drill bits that help you achieve that finesse.
Types of Drill Bits for Light Drilling Tasks
When you need to drill a small, precise hole, you’re looking for bits that are designed for control and accuracy. These are often made from specialized materials and come in very small diameters. Here are the most common types you’ll encounter:
1. Micro Drill Bits (or Tiny Drill Bits)
These are precisely what they sound like: extremely small drill bits. They are often measured in fractions of a millimeter or in drill bit gauge sizes that go up to around 1/4 inch (6mm).
- Materials: Typically made from High-Speed Steel (HSS) for durability and heat resistance, or Tungsten Carbide for extra hardness and precision, especially for harder materials.
- Uses: Ideal for model making, intricate woodworking, circuit boards, jewelry making, and drilling tiny pilot holes.
- Chuck Requirements: Because they are so small, they often require a special chuck or collet system on your drill or rotary tool to grip them securely. Standard drill chucks might not be able to hold bits this small properly, leading to slippage or breakage.
2. Small Diameter Twist Drill Bits
These are the most common type of drill bit, but in smaller sizes, they are perfect for light drilling. They have a helical groove that helps clear away material as you drill.
- Materials: Usually HSS. Titanium-coated HSS bits offer increased hardness and longevity.
- Uses: Excellent for drilling pilot holes for wood screws, creating small screw holes in plastic, making small holes for dowels, or for general-purpose small drilling tasks.
- Sizes: You can find these in a wide range of small sizes, from very fine (e.g., 1/16 inch) up to about 1/4 inch.
3. Brad-Point Drill Bits for Wood
If you’re working with wood and need a clean, precise entry point, a brad-point drill bit is your best friend. They have a sharp center spur that prevents the bit from wandering, ensuring the hole starts exactly where you want it.
- Materials: Typically HSS.
- Uses: Perfect for starting pilot holes in softwoods and hardwoods without the bit skittering across the surface. Great for furniture making and projects where clean hole entry is crucial.
- Tip: The sharp spur makes them ideal for very fine detail work on wood.
4. Spade Bits and Forstner Bits (in very small sizes)
While typically used for larger holes, some spade bits and Forstner bits come in very small diameters. Forstner bits create flat-bottomed holes, which can be useful for counterboring or creating precise recesses.
- Uses: Small Forstner bits can be used for creating clean, precise shallow holes in wood for hardware like small hinges or jigs. Small spade bits are less common for very fine work but can be used for slightly larger “light” holes.
- Note: For true “light drilling,” micro twist bits or brad-point bits are usually more suitable due to their size and precision.
5. Specialty Bits for Rotary Tools (e.g., Dremel)
If your “light drilling” involves very small projects or intricate work, a rotary tool and its specialized bits are invaluable. These tools offer more control for delicate tasks.
- Types: Rotary tool bit sets often include micro drill bits, small engraving bits, and even tiny grinding stones.
- Uses: Model trains, jewelry, electronics repair, carving, and any task requiring extreme precision.
Choosing the Right “Can Light Drill Bit” for Your Project
Selecting the appropriate drill bit is key to success. Think about these factors:
1. Material You’re Drilling Into
The hardness and type of material will dictate the best bit and material composition.
- Softwoods (Pine, Cedar): HSS twist bits or brad-point bits work well.
- Hardwoods (Oak, Maple): HSS is good, but carbide-tipped or solid carbide bits offer better durability and heat resistance for repeated use. Brad-point bits are excellent for clean starts.
- Plastics: HSS bits are usually fine. Drill slowly to avoid melting the plastic. A brad-point bit can help prevent splintering on some plastics.
- Metals (Thin Sheet Metal, Small Fasteners): Use HSS bits specifically designed for metal. For very thin metal, small twist bits are best.
- Circuit Boards/Electronics: Micro drill bits made of tungsten carbide are essential for precision and to avoid damaging the board.
2. Desired Hole Size
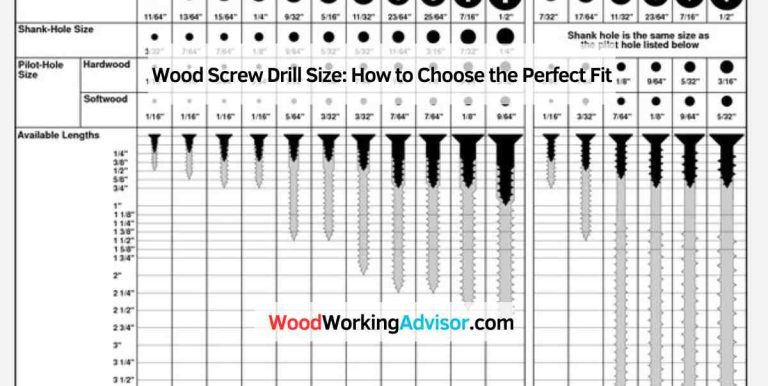
Measure accurately! Small holes are often measured in millimeters or by drill bit gauge numbers. If you need a hole for a specific screw or dowel, find the bit that matches its diameter.
A helpful resource for understanding drill bit sizes and their conversions can be found on the HomeTips drill bits guide, which often details common sizes and their uses.
3. Precision Required
For very delicate work or where the hole must be perfectly placed, brad-point bits or micro drill bits are superior. For general pilot holes in wood, a standard small twist bit is usually sufficient.
4. The Drill Itself
What kind of drill will you be using? A full-sized hammer drill might be overkill for micro-drilling. A variable-speed drill or a rotary tool offers much better control for these fine tasks. Ensure your drill’s chuck can securely grip the small bit.
Table: Drill Bit Material Comparison for Light Drilling
Here’s a quick look at common drill bit materials and their suitability for light drilling tasks:
| Material | Pros | Cons | Best For |
|---|---|---|---|
| High-Speed Steel (HSS) | Durable, relatively inexpensive, good heat resistance. | Can dull with extensive use on hard materials. | Wood, plastic, soft metals. General small-diameter drilling. |
| Titanium Coated HSS | Harder than standard HSS, lasts longer, drills faster. | Slightly more expensive than plain HSS. | Wood, plastics, aluminum, and some harder metals. Enhanced durability. |
| Cobalt | Very hard and heat-resistant, excellent for metals. | More brittle than HSS, can snap if flexed too much. More expensive. | Hard metals, stainless steel, and tough alloys. Also suitable for hardwoods. |
| Tungsten Carbide | Extremely hard and abrasion-resistant, stays sharp longer. | Very brittle, can shatter if dropped or subjected to impact. Expensive. | Hard composites, fiberglass, circuit boards, glass, tile (with specific coatings). Precision micro-drilling. |
Essential Steps for Successful Light Drilling
Even with the right bit, technique matters. Follow these steps for clean, precise holes:
Step-by-Step Guide:
- Select the Right Bit: Based on material, size, and precision needs (as discussed above). Ensure the bit is sharp!
- Mark Your Spot: Use a pencil, fine-tip marker, or an awl to mark the exact center of your desired hole. For extra precision on wood, gently tap an awl at the mark; this creates a tiny indentation that helps the drill bit’s tip center itself.
- Secure Your Workpiece: This is crucial! Clamp the material firmly to your workbench or a stable surface. Small pieces can be held with pliers or a vise. Ensure your hand is nowhere near the drilling path. Safety first!
- Set Up Your Drill:
- If using a variable-speed drill, start with the lowest speed setting.
- Ensure the drill bit is securely and centered in the chuck. For very small bits, a collet chuck on a rotary tool can provide the best grip.
- Start Drilling with Light Pressure:
- Hold the drill perpendicular to the surface.
- Begin drilling at a very low speed. Let the drill bit do the work.
- Apply gentle, consistent pressure. Too much force can break thin bits or damage your material.
- Clear Debris (if necessary): For small holes, debris usually clears itself. For slightly deeper holes or materials that produce dust, periodically pull the drill bit back slightly (while still spinning slowly) to clear the flutes of the bit.
- Control Depth: If you need a specific depth, you can use a drill bit depth stop, wrap a piece of tape around the bit as a visual marker, or simply stop drilling when your marker (like tape) reaches the surface.
- Complete the Hole: Once you’ve reached the desired depth, continue to drill for a moment to ensure a clean exit. Then, slowly withdraw the bit while it’s still spinning.
- Clean Up: Brush or blow away any dust or shavings from the hole and surrounding area.
Tools and Accessories for Precision Drilling
Beyond just the drill bit and drill, a few accessories can significantly improve your light drilling experience:
1. Drill Press
A drill press is invaluable for precision. It holds the drill bit perfectly perpendicular and provides consistent depth control. For very small holes and intricate work, a small benchtop drill press or a drill press attachment for a rotary tool can be a game-changer. The Occupational Safety and Health Administration (OSHA) provides safety guidelines for operating machinery like drill presses, emphasizing proper setup and material securing.
2. Depth Stops
These attach to your drill bit or drill press spindle to automatically prevent you from drilling too deep. They are essential for consistent results across multiple holes.
3. Clamps and Vises
As mentioned, workholding is critical for safety and precision. Small C-clamps, bar clamps, or a small hobby vise can securely hold your workpiece without damaging it.
4. Magnification and Lighting
For very fine detail work, a good magnifying lamp can help you see exactly where you’re placing the bit and inspect your work as you go.
5. Center Punch and Awl
These are small tools used to create a small indentation or pilot mark on the material surface. This guides the tip of the drill bit, preventing it from walking or wandering off-center.
Common Pitfalls to Avoid
Even with the best intentions, beginners can stumble. Here are some common mistakes when using small drill bits:
- Using Too Much Speed: High speeds can generate heat, melt plastic, and cause thin bits to break. Start slow!
- Applying Too Much Pressure: Let the bit cut. Forcing it is a fast way to snap a small bit or damage your workpiece.
- Not Securing the Workpiece: A moving piece means an inaccurate hole and a safety hazard. Always clamp your work.
- Using a Worn or Dull Bit: A dull bit requires more force, heats up faster, and produces rougher holes.
- Drill Bit Wobble: If your drill chuck is worn or the bit isn’t centered, you’ll get an oversized or irregular hole. Use a clean, well-maintained drill and a collet if possible for very small bits.
- Ignoring Material Properties: Trying to drill glass with a wood bit or hard steel with a regular HSS bit will lead to frustration and tool damage.
Troubleshooting Small Drilling Issues
What if things don’t go perfectly? Here are some quick fixes:
- Hole is slightly off-center: If it’s only by a tiny amount, you might be able to live with it. For a slightly larger correction, you can use a larger bit to re-drill around the existing hole and then fill the area with wood filler or epoxy before re-drilling accurately.
- Hole is too big/rough: For wood, you can fill the hole with wood filler or an epoxy mix, let it cure, and then re-drill the correct size hole. For plastics, sometimes you can use a plastic adhesive or filler.
- Bit is stuck: If the bit is binding, try backing it out gently. Ensure you’re not drilling into a knot or a dense section of material unexpectedly.
- Material is chipping/splitting: For wood, a brad-point bit is best. You can also try drilling halfway through from one side, then flipping the piece over and finishing the hole from the other side to minimize tear-out. For plastics, drilling slowly and potentially using a backing material can help.

Frequently Asked Questions (FAQ)
Q1: What is a “can light drill bit”?
A “can light drill bit” isn’t a specific type of bit. It refers to using a very small drill bit, often called a micro drill bit or a small diameter twist bit, for delicate tasks, like drilling small pilot holes for components used in or around light fixtures (hence, “can light” is likely a descriptive term for the application). The goal is precision for small jobs.
Q2: What’s the smallest drill bit size I can buy?
Micro drill bits can be extremely small, going down to fractions of a millimeter (e.g., 0.1mm to 0.5mm). Standard sets often start around 1/16 inch (approximately 1.6mm).
Q3: Can I use my regular cordless drill for very small bits?
Yes and no. You can use your cordless drill, but you must ensure it has a variable speed control and that the chuck can grip the tiny bit securely. For bits smaller than 1/16 inch, a rotary tool with a collet chuck is often much more effective and safer.
Q4: How do I prevent small drill bits from breaking?
Always use light, consistent pressure. Never force the bit. Drill at slow speeds, especially in harder materials. Make sure your workpiece is securely clamped. For materials like metal or hard plastic, consider using a lubricant to reduce friction and heat.