Can Particle Board Be Painted Simple Guide
Many DIYers wonder if particle board can be painted. It might seem tricky because particle board is different from wood. It can soak up paint unevenly, leaving a bumpy or blotchy finish.
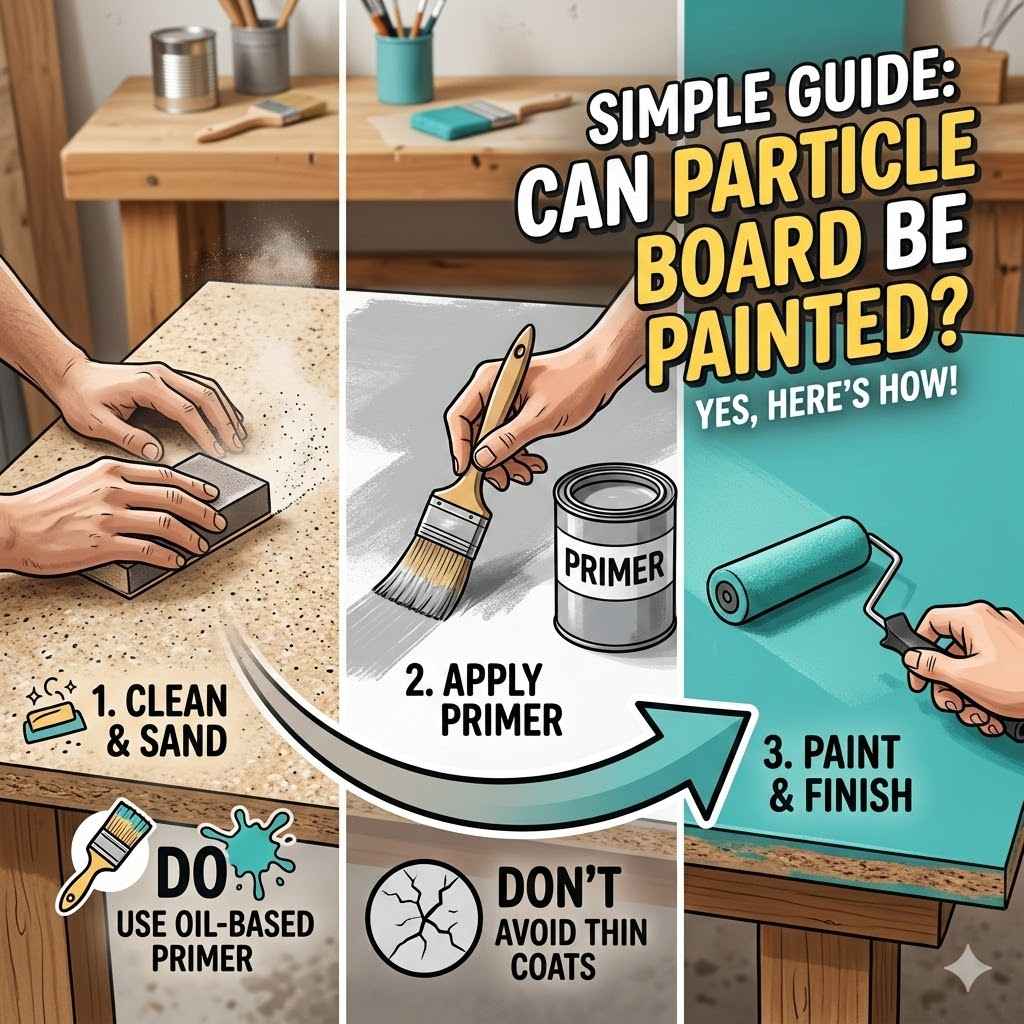
But don’t worry! You can get a smooth, great-looking paint job with the right steps. This guide will show you exactly how to paint particle board easily, even if you’re new to painting.
We’ll walk you through everything from preparing the surface to adding that final coat of color. Let’s get your particle board project looking fantastic.
Painting Particle Board Step By Step
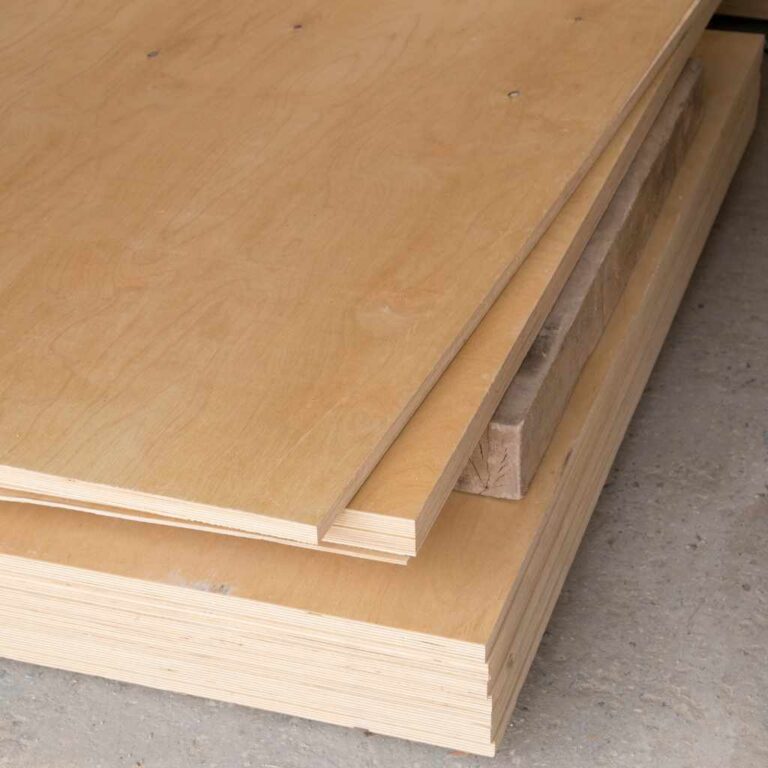
Particle board, also known as chipboard or low-density fiberboard (LDF), is an engineered wood product. It’s made from wood particles, such as wood chips, sawdust, and shavings, bonded together with a synthetic resin or binder under heat and pressure. This manufacturing process makes it a cost-effective alternative to solid wood.
However, its porous nature and uneven surface can present challenges when painting. Without proper preparation, paint can be absorbed unevenly, leading to poor adhesion, visible grain, and a less than desirable finish. This section breaks down the entire process into manageable steps.
Gathering Your Painting Supplies
Before you start painting, having all your materials ready is key. This saves you time and stops your workflow from being interrupted. You’ll need a few specific items to ensure the best results for your particle board project.
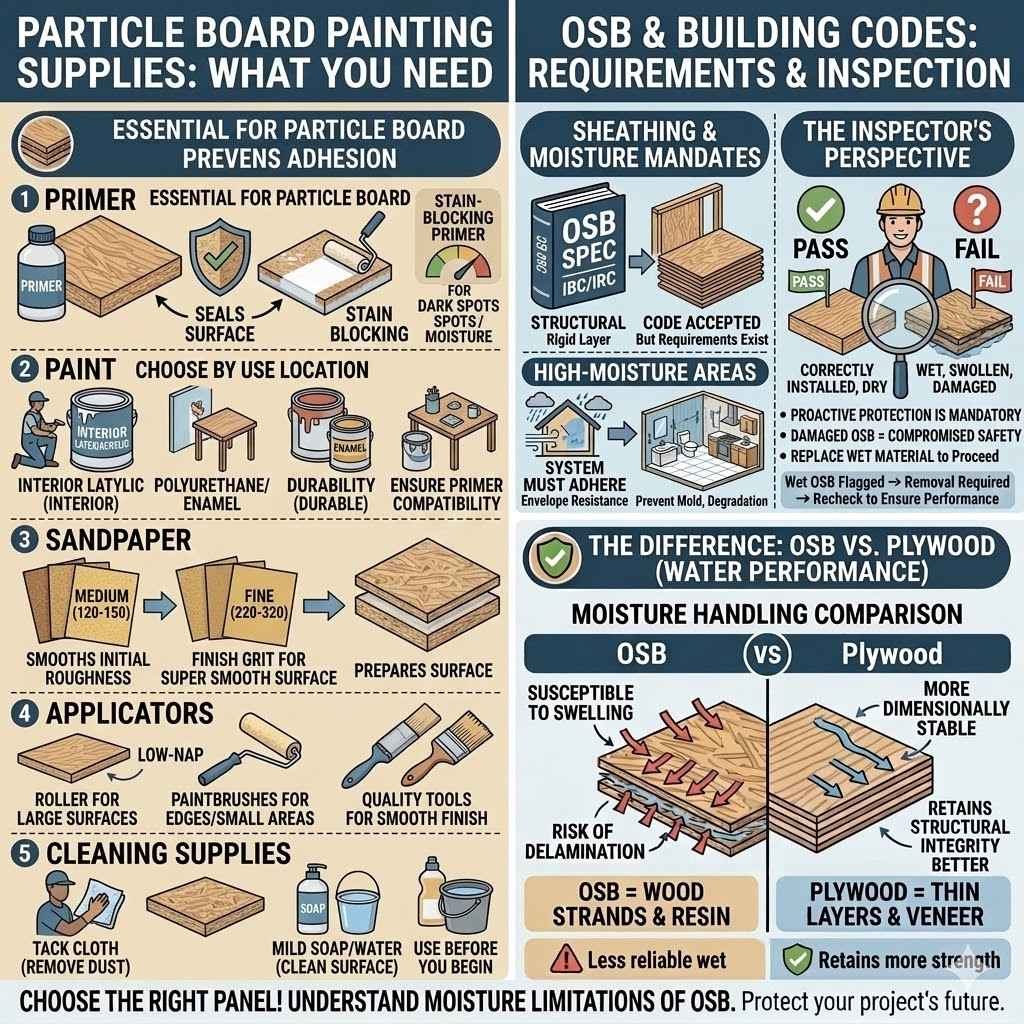
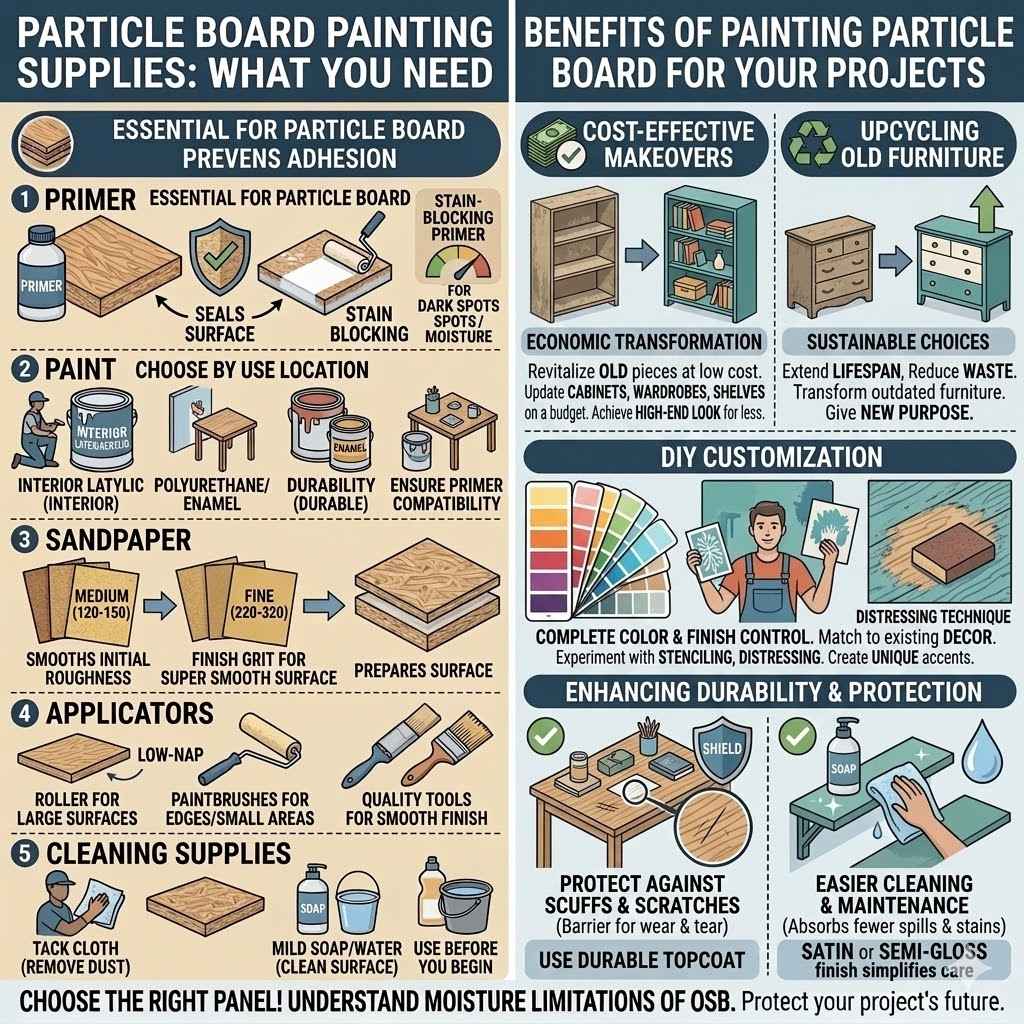
- Primer: A good quality primer is essential for particle board. It seals the surface, preventing paint from soaking in unevenly. It also helps paint adhere better, creating a smooth base.
- Look for a stain-blocking primer if your particle board has any dark spots or has been exposed to moisture.
- Paint: Choose the type of paint based on where the particle board will be used. For furniture or interior walls, latex or acrylic paints are common choices. For areas that need more durability, like tabletops, consider a polyurethane or enamel paint.
- Ensure the paint is suitable for the primer you’ve chosen.
- Sandpaper: You’ll need sandpaper in different grits. Start with a medium grit (around 120-150) for initial smoothing and then move to a fine grit (220-320) for a super smooth finish. Sandpaper helps remove rough edges and prepares the surface for primer and paint.
- Applicators: A good quality roller with a foam or low-nap cover is ideal for large, flat surfaces to get a smooth finish. For smaller areas or edges, high-quality paintbrushes are necessary. A smooth finish requires good tools.
- Cleaning Supplies: You’ll need a tack cloth or a damp cloth to remove dust after sanding. A mild soap and water solution can also be helpful for cleaning the surface before you begin.
Preparing the Particle Board Surface
This is arguably the most important step in achieving a great paint finish on particle board. Skipping or rushing this phase can lead to a poor outcome. Proper preparation ensures that your paint job looks professional and lasts longer.
Cleaning the Particle Board
Begin by thoroughly cleaning the particle board. Dust, grease, and any other debris can prevent paint from sticking properly. Use a soft cloth dampened with a mild soap and water solution.
Wipe down the entire surface and let it dry completely. Ensure there’s no lingering moisture.
Sanding for Smoothness
Particle board can have rough edges or uneven patches. Lightly sand the entire surface with medium-grit sandpaper (120-150 grit). This helps to smooth out any imperfections and creates a slightly rougher surface that primer and paint can grip onto better.
After sanding, wipe away all the dust with a tack cloth or a slightly damp rag. Repeat this sanding and wiping process with fine-grit sandpaper (220-320 grit) for an extra smooth feel. The goal is a surface that feels smooth to the touch.
Sealing the Edges
The edges of particle board are often more porous and can absorb paint more readily than the flat surfaces. This can lead to a noticeable difference in color and texture. To prevent this, you need to seal the edges thoroughly.
A wood filler or a specialized edge sealer can be applied. Once dry, sand the sealed edges smooth. This step is critical for an even finish.
Applying Primer to Particle Board
Priming is a non-negotiable step when painting particle board. It acts as a barrier and a base coat, ensuring your topcoat of paint looks its best.
Choosing the Right Primer
For particle board, an oil-based or shellac-based primer is often recommended. These primers are excellent at blocking stains and sealing the porous surface effectively. Water-based primers can also work, but you might need more than one coat.
A good stain-blocking primer is key.
First Coat of Primer
Apply a thin, even coat of primer to the entire particle board surface, including the edges. Use a roller for large areas and a brush for corners and edges. Work in smooth, overlapping strokes.
Avoid applying the primer too thickly, as this can lead to drips and an uneven finish.
Sanding Between Coats
Once the first coat of primer is dry, lightly sand the surface with fine-grit sandpaper (220-320 grit). This step removes any slight imperfections or raised grain caused by the primer. Wipe away all dust with a tack cloth.
This ensures a super smooth base for your paint.
Second Coat of Primer (If Needed)
For very porous particle board or if you’re painting a light color over a dark surface, a second coat of primer might be necessary. Apply the second coat, let it dry, and sand it lightly again. Your surface should feel very smooth after this stage.
Applying the Paint Coat
With your particle board properly primed and sanded, you’re ready to apply your chosen paint color. This is where your project starts to take shape.
First Coat of Paint
Apply your first coat of paint using the same techniques you used for the primer. Use a roller for large areas and a brush for details. Aim for thin, even coats.
It’s better to apply two or three thin coats than one thick one that might drip or peel.
Drying Time
Allow each coat of paint to dry completely according to the manufacturer’s instructions. Rushing this process can lead to smudging, peeling, or an uneven texture. Patience is rewarded with a better finish.
Sanding Between Paint Coats
Just like with primer, a light sanding between paint coats is beneficial. Use very fine-grit sandpaper (320-400 grit) and a tack cloth to remove dust. This step helps to create a smooth, flawless finish by knocking down any tiny bumps or imperfections.
Second Coat of Paint
Apply your second coat of paint. Again, ensure it’s thin and even. If you notice any areas that need more coverage, you can add a third coat after proper drying and light sanding.
Finishing Touches and Protection
Once your paint has dried completely, you might want to add a protective topcoat, especially if the particle board will be used in a high-traffic area.
Applying a Topcoat (Optional but Recommended)
A clear polyurethane or varnish can add durability and protection to your painted particle board. This is especially important for surfaces that will experience wear and tear, like tabletops or shelving. Apply one or two thin coats, allowing them to dry thoroughly between applications.
Choose a finish that matches your desired look, whether it’s matte, satin, or gloss.
Curing Time
Even after the paint and topcoat are dry to the touch, they need time to cure fully. Curing is the process where the paint hardens and reaches its maximum durability. This can take several days or even weeks.
During the curing period, be gentle with the painted surface and avoid placing heavy objects on it.
Can Particle Board Be Painted? Simple Guide to Common Issues
Many people face challenges when trying to paint particle board because its unique structure can cause problems. One of the most common issues is uneven paint absorption. Because particle board is made from small wood particles bonded together, it has a lot of tiny air pockets.
These pockets can soak up paint like a sponge. This means that if you don’t prepare it right, one area might look darker or more saturated than another. This is where a good primer becomes your best friend.
Another hurdle is the rough texture that particle board can sometimes have. If it’s not sanded properly, that roughness can show through your paint job, making it look unprofessional. Also, the edges of particle board are particularly prone to absorbing moisture and can swell or become fuzzy.
This guide aims to tackle these problems head-on. We want to make sure you can achieve a beautiful finish every time.
Dealing with Uneven Absorption
Uneven paint absorption is a frequent frustration when painting particle board. The inconsistent density and porosity of the material mean that paint can sink in differently across the surface. This results in patchiness, where some areas appear dull or darker than others.
A key solution is to use a high-quality primer designed to seal porous surfaces. This primer acts as a barrier, preventing the paint from being fully absorbed by the particle board. It creates a uniform surface that allows the paint to lay evenly.
Multiple coats of primer may be necessary for very porous materials.
The Role of Primer
Primer is not just an optional step; it’s critical for painting particle board. It seals the surface, creating an even base for paint. A good primer blocks the porous nature of the particle board, ensuring that the paint color appears consistent.
It also enhances paint adhesion, making the final finish more durable. Without primer, you’ll likely end up with a splotchy, unprofessional look that doesn’t last.
Types of Primers for Particle Board
When choosing a primer for particle board, consider its ability to seal and block stains. Oil-based or shellac-based primers are highly effective because they form a strong, impermeable barrier. They are excellent at preventing tannins and other wood components from bleeding through the paint.
Water-based primers can also be used, but opt for a high-quality, stain-blocking formula. Multiple coats of a water-based primer might be needed to achieve the same level of seal as a single coat of an oil-based or shellac-based alternative.
Tackling Surface Roughness
Particle board can sometimes have a rough or uneven surface straight from the store. This texture can become even more pronounced after painting if not properly addressed. The unevenness can be due to the manufacturing process or damage.
Sanding is the primary method to smooth out these imperfections.
Sanding Techniques
Begin sanding with a medium-grit sandpaper (around 120-150 grit) to remove any major imperfections, rough patches, or raised fibers. Always sand in the direction of the wood grain, if visible, or in uniform strokes. After the initial sanding, switch to a finer grit sandpaper (220-320 grit) to create a silky smooth surface.
This fine sanding removes the scratches left by the coarser grit and prepares the surface for primer and paint. Always clean away dust thoroughly after sanding using a tack cloth or a slightly damp microfiber cloth.
Using Wood Filler
For deeper gouges or significant unevenness, wood filler can be your best friend. Apply the wood filler to the damaged areas, ensuring it’s slightly proud of the surface. Once the filler is completely dry, sand it down flush with the surrounding particle board.
This process ensures a perfectly smooth and even surface. After filling and sanding, re-clean the entire area to remove all dust before proceeding with priming.
Managing Moisture and Swelling on Edges
The edges of particle board are its weakest point when it comes to moisture. They are more exposed and can readily absorb water, leading to swelling, puffiness, and a fuzzy texture. This makes painting the edges a particular challenge and requires extra attention.
Sealing Particle Board Edges
Before painting, thoroughly seal all exposed edges of the particle board. You can use a specialized edge sealer product, or a thick application of primer can also serve this purpose. Another effective method is to use a wood glue mixed with water to create a thin solution that can be brushed onto the edges.
This helps to harden the fibers and create a barrier. Allow the sealer to dry completely. Once dry, light sanding might be needed to smooth out any raised fibers.
Applying Multiple Coats
When painting the edges, apply multiple thin coats of both primer and paint. This ensures that the color is even and that the edges are adequately covered and sealed. Pay close attention to the corners and any other exposed ends, as these are most vulnerable to moisture damage and absorption issues.
The goal is to create a unified, sealed surface.
Benefits of Painting Particle Board for Your Projects
Painting particle board offers a significant transformation for DIY furniture, shelves, and other home decor items. It’s a budget-friendly way to update existing pieces or create new ones that match your style. Instead of buying new, you can revitalize old particle board items, giving them a fresh look.
This is especially great for upcycling projects where you want a custom color or finish. Beyond aesthetics, a good paint job also adds a layer of protection. It can shield the particle board from minor scuffs, spills, and dust, making it easier to clean and maintain.
This means your painted items can look good for much longer.
Cost-Effective Makeovers
Painting is one of the most economical ways to give old or plain particle board furniture a new lease on life. Instead of purchasing new, expensive pieces, you can transform existing items with just a few cans of paint and some supplies. This approach is incredibly budget-friendly, especially for large items like cabinets, wardrobes, or shelving units.
Upcycling particle board furniture with a fresh coat of paint allows you to achieve a high-end look without the high-end price tag. This makes interior design accessible for everyone.
Upcycling Old Furniture
Many homes have particle board furniture that, while functional, might be outdated in style or color. Painting offers a creative outlet to upcycle these pieces. For example, an old particle board dresser can be transformed into a modern statement piece with a vibrant color or a sophisticated matte finish.
This process not only saves money but also reduces waste by giving existing items a new purpose and extending their lifespan. It’s a sustainable choice that benefits both your wallet and the environment.
DIY Customization
When you paint particle board yourself, you have complete control over the color and finish. You can match your paint to existing decor, create a bold accent piece, or experiment with unique techniques like distressing or stenciling. This level of customization is often not possible with pre-finished furniture.
You can achieve a look that is uniquely yours, tailored to your personal taste and home aesthetic. This DIY approach empowers creativity.
Enhancing Durability and Protection
A well-executed paint job doesn’t just make particle board look good; it also adds a layer of protection. This can significantly extend the life of your particle board items and make them easier to care for.
Protecting Against Scuffs and Scratches
Paint provides a protective barrier against minor wear and tear. While particle board itself can be susceptible to dents and scratches, a good paint coating, especially with a durable topcoat, can offer some resistance. This is particularly useful for furniture that gets a lot of use, such as coffee tables, desks, or shelves where items are frequently moved or placed.
Easier Cleaning and Maintenance
Unpainted particle board can be difficult to clean, as it can absorb spills and stains easily. A painted surface, however, is much easier to wipe down. Most paints, especially those with a satin or semi-gloss finish, can be cleaned with a damp cloth and mild soap.
This makes maintaining your particle board furniture much simpler, keeping it looking fresh and clean with minimal effort.
Frequently Asked Questions
Question: What is the best type of paint to use on particle board
Answer: For most projects, a good quality latex or acrylic latex paint is suitable. If the particle board will see a lot of wear, consider an enamel paint or a polyurethane topcoat for added durability.
Question: Do I need to use a special primer for particle board
Answer: Yes, using a good quality primer is essential. A stain-blocking primer, especially an oil-based or shellac-based one, is highly recommended to seal the surface and prevent uneven absorption.
Question: How many coats of paint should I apply
Answer: It’s generally best to apply two to three thin coats of paint rather than one thick coat. This ensures even coverage and a smoother finish. Allow each coat to dry completely between applications.
Question: Can I paint particle board without sanding
Answer: While you might be able to apply paint without sanding, it’s not recommended for a good finish. Sanding prepares the surface, removes imperfections, and helps the primer and paint adhere properly.
Question: Will painting prevent particle board from swelling
Answer: Painting can help protect particle board from minor moisture exposure, especially if a good primer and topcoat are used. However, particle board is not waterproof, and prolonged exposure to moisture will still cause swelling.
Summary
Yes, you can absolutely paint particle board, and it can yield beautiful results. The key is proper preparation. By thoroughly cleaning, sanding, and sealing the surface, especially the edges, you create a stable base.
Using a quality primer is crucial to prevent uneven absorption and ensure your paint color looks consistent and vibrant. Applying multiple thin coats of paint, with light sanding between each, will give you a smooth, professional finish. Adding a protective topcoat further enhances durability.
Your particle board projects can look fantastic and last longer with these simple steps.