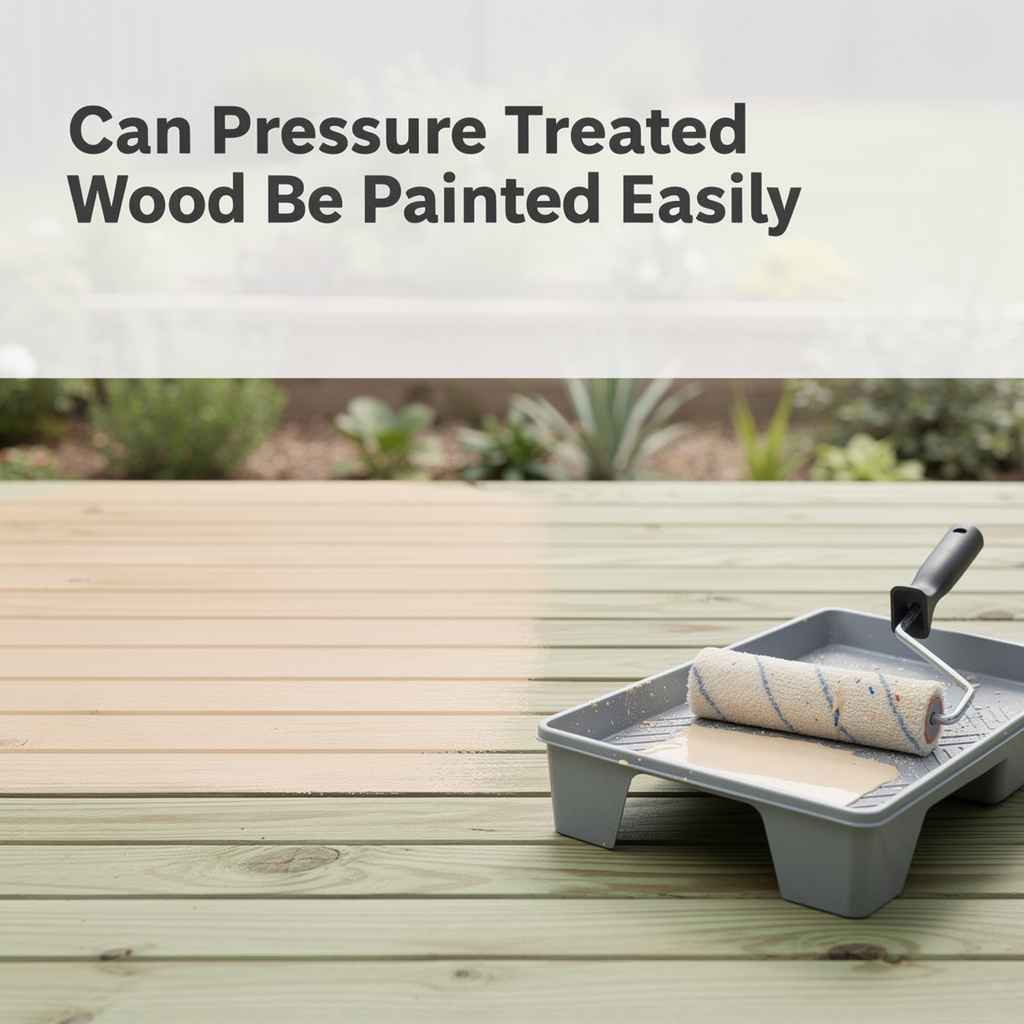
Can Pressure Treated Wood Be Painted Easily
Many DIYers wonder, Can Pressure Treated Wood Be Painted Easily? It sounds like a simple question, but getting it right can make a big difference in your project. This kind of wood is great for outdoor projects because it resists rot and bugs.
But its special treatment can sometimes make painting tricky if you don’t know the right steps. Don’t worry! This guide will walk you through everything you need to know.
We’ll make painting your treated wood project easy and give you beautiful results.
Preparing Pressure Treated Wood For Paint
Getting your pressure treated wood ready is the most important step to ensure paint sticks well and looks great for a long time. If you skip this part, you might end up with peeling paint, which is frustrating. This section explains how to properly clean and prepare the wood so your paint job is a success.
We cover everything from what kind of wood treatment matters to the best ways to get the surface clean and ready for color.
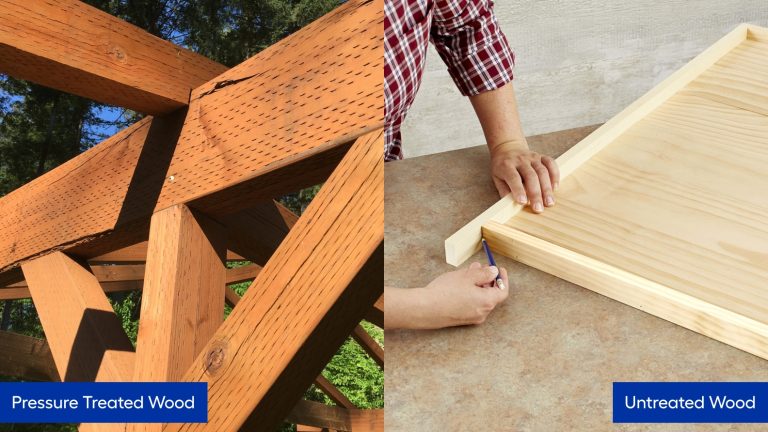
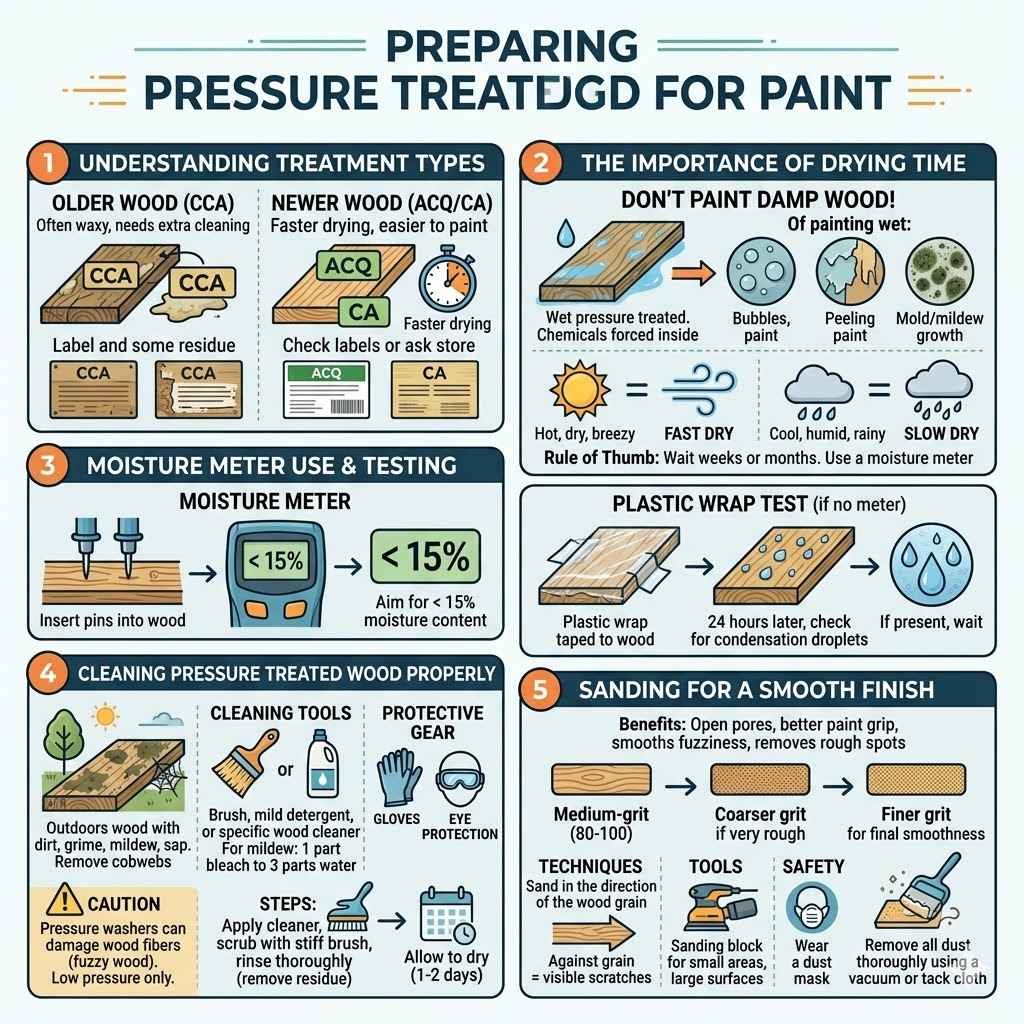
Understanding Pressure Treated Wood Types
Not all pressure treated wood is the same, and this can affect how it takes paint. The chemicals used to treat the wood can leave a residue or change the wood’s surface. Newer treatments, like alkaline copper quaternary (ACQ) or copper azole (CA), tend to dry out faster and are generally easier to paint than older treatments.
Older woods treated with chromated copper arsenate (CCA) might require more thorough drying and cleaning.
Knowing what chemicals were used helps you understand the wood’s needs. For instance, CCA treated wood, which is less common now for residential use, can sometimes have a more waxy surface. This waxy layer might need extra attention during the cleaning process.
Most modern lumber yards will label their wood so you can identify the treatment type. Always check the label or ask a store associate if you’re unsure.
The Importance of Drying Time
Pressure treated wood is wet when you buy it. The chemicals are forced into the wood under pressure, and water is part of that process. This moisture content needs to decrease significantly before you can paint.
Painting on damp wood is a recipe for disaster. Moisture trapped under the paint will eventually cause it to bubble, peel, or flake off. It can also lead to mold and mildew growth.
How long does it take to dry? It really depends on the weather. In hot, dry, and breezy conditions, wood can dry much faster.
In cooler, humid, or rainy weather, it can take weeks or even months. A good rule of thumb is to let the wood dry for at least a few weeks, or ideally, a few months, after you purchase it. You can test the moisture content using a moisture meter.
Aim for a moisture content of 15% or lower before you start prepping for paint.
Moisture Meter Use
A moisture meter is a handy tool for anyone working with wood, especially pressure treated wood. It helps you take the guesswork out of knowing when your wood is dry enough to paint. These meters are relatively inexpensive and easy to use.
You simply push the pins of the meter into the wood, and it gives you a reading of the moisture percentage.
For painting, you want the wood’s moisture content to be below 15%. If you don’t have a moisture meter, you can do a simple test. Place a small piece of plastic wrap over a section of the wood and tape down the edges tightly.
Leave it for 24 hours. If you see condensation or moisture droplets on the underside of the plastic wrap when you remove it, the wood is still too wet. Repeat this test on different parts of the wood, as some areas might dry faster than others.
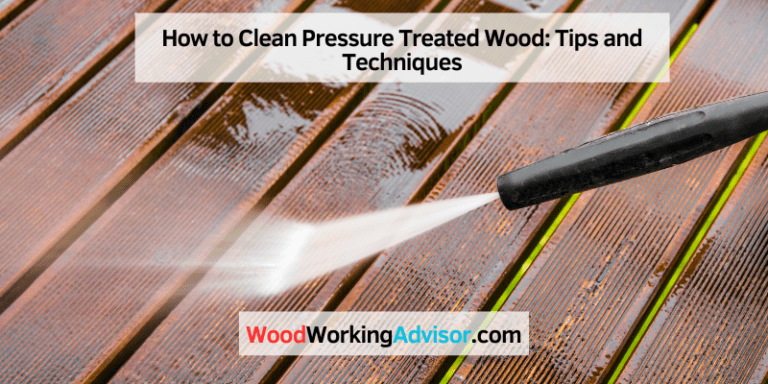
Cleaning Pressure Treated Wood Properly
Before you can paint, the wood needs to be clean. Over time, outdoor wood collects dirt, grime, mildew, and sap. These contaminants will prevent the paint from adhering properly.
Cleaning is essential to creating a smooth surface for your paint. It also removes any loose fibers or debris that could show through the paint finish.
Start by sweeping or brushing off any loose dirt and cobwebs. For tougher stains or mildew, you’ll need to use a cleaner. There are specific deck and wood cleaners available at most hardware stores.
You can also make a cleaning solution with mild detergent and water, or a mixture of one part bleach to three parts water for mildew. Always wear protective gear like gloves and eye protection when cleaning, especially if using bleach.
Choosing the Right Cleaner
When selecting a cleaner, consider the type of mess you’re dealing with. For general dirt and grime, a simple solution of dish soap and water works well. If you notice green or black spots, that’s mildew, and a cleaner specifically designed for mildew removal or a diluted bleach solution will be more effective.
Be careful with pressure washers; while they can clean wood quickly, using too much pressure can damage the wood fibers, creating a fuzzy surface that’s harder to paint.
After applying the cleaner, scrub the wood gently with a stiff brush. Then, rinse the wood thoroughly with clean water. Make sure to rinse away all the cleaner residue.
Leftover soap or bleach can affect how the paint adheres. Allow the wood to dry completely after cleaning. This might take another day or two, depending on the weather.
Patience here is key to a good paint job.
Sanding For a Smooth Finish
Sanding is a crucial step for creating a smooth surface that paint can grip. Even after cleaning, pressure treated wood can sometimes feel a bit rough or have a fuzzy texture, especially if it’s older or has been exposed to the elements. Sanding smooths out these imperfections and opens up the wood pores, allowing the primer and paint to bond better.
Start with a medium-grit sandpaper, something around 80 to 100 grit. Sand in the direction of the wood grain. This will remove any rough spots or splinters.
If the wood is particularly rough, you might start with a coarser grit like 60, but be careful not to over-sand and damage the wood. After using the medium grit, move to a finer grit, like 120 or 150, to create a really smooth surface. Always wear a dust mask while sanding to protect your lungs from wood dust.
Sanding Techniques
When sanding, whether you use a sanding block, orbital sander, or belt sander, always follow the grain of the wood. Sanding against the grain will create visible scratches that can be difficult to hide with paint. For smaller projects or intricate areas, a sanding block is perfect.
For larger surfaces like decks or fences, an orbital sander can save you a lot of time and effort. After sanding, it’s essential to remove all the dust thoroughly. A vacuum cleaner with a brush attachment or a tack cloth works well.
A clean surface is vital for paint adhesion.
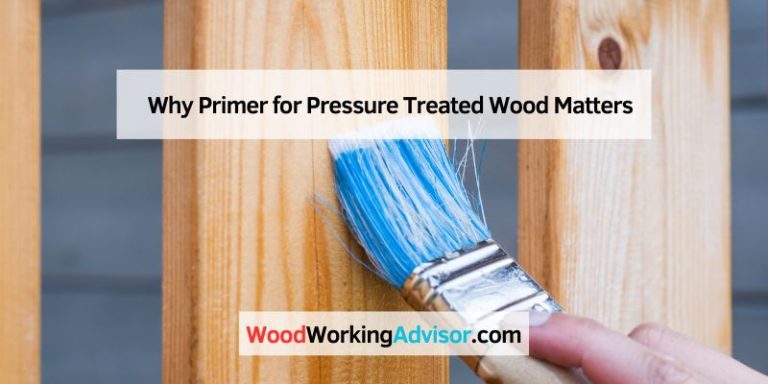
Priming Pressure Treated Wood Correctly
Priming is a step many people are tempted to skip, but it’s absolutely essential when painting pressure treated wood. Think of primer as the bridge between the wood surface and your top coat of paint. It helps the paint stick better, ensures a more even color, and can even help block any potential stains from the wood treatment from showing through.
This section breaks down why priming is so important and how to do it the right way.
The chemicals in pressure treated wood can sometimes react with paint, causing issues like discoloration or poor adhesion. A good quality primer acts as a barrier, preventing these reactions. It also helps to seal any remaining dust or tiny imperfections on the surface after sanding.
Using the correct primer means your paint job will last longer and look more professional. We’ll cover the best types of primers to use and how to apply them for the best results.
Why Primer is Non-Negotiable
Primer provides a uniform surface for the top coat. Pressure treated wood, even when clean and dry, can have variations in its porosity and texture. A primer seals these variations, creating a consistent surface for the paint.
This means you’ll get an even color, and you might need fewer coats of your final paint color, saving you time and money.
Furthermore, primers designed for exterior use and for difficult surfaces can help block stains. The chemicals in pressure treated wood, particularly if not fully dried or if they leach out over time, can sometimes bleed through lighter colored paints. A good stain-blocking primer prevents this, keeping your paint color true and vibrant.
It also provides an excellent surface for paint to adhere to, creating a more durable finish that is less likely to peel or chip.
Types of Exterior Primers
For pressure treated wood, you need an exterior-grade primer that is formulated for use on wood and that offers stain-blocking properties. Oil-based primers are often recommended for this application because they tend to penetrate the wood better and provide excellent adhesion. They are also very good at blocking stains.
Look for primers labeled as “stain-blocking” or “high-hiding.”
Water-based (latex) primers can also be used, but ensure they are specifically designed for exterior wood and are known for good adhesion and stain blocking. Some advanced water-based primers offer performance comparable to oil-based ones. Always read the product label to ensure it’s suitable for pressure treated wood and the conditions it will be exposed to (e.g., direct sunlight, moisture).
Applying Primer for Maximum Adhesion
Once you’ve chosen the right primer, application is key. Just like painting, you want to apply primer evenly. You can use a brush, roller, or sprayer, depending on the size and shape of your project.
For most DIY projects, a brush or roller is perfectly fine.
Start by stirring the primer thoroughly. Don’t shake it, as this can create air bubbles. Apply the primer in thin, even coats.
Avoid applying it too thickly, as this can lead to a less durable finish and potential drips. If using a brush, work in the direction of the wood grain. If using a roller, use a medium-nap roller for a smooth finish.
Ensure you get into all the nooks and crannies, especially if you are painting a fence or deck railings.
Primer Drying and Second Coats
Allow the primer to dry completely according to the manufacturer’s instructions. This is usually a few hours, but check the can. Some primers might recommend a second coat, especially if the wood is very porous or if you are painting a dark color over a light primer or vice versa.
If a second coat is needed, apply it thinly and evenly, just like the first.
Once the primer is dry and you’re satisfied with the coverage, you’re ready for the top coat. It’s important that the primer is fully cured before applying paint, not just dry to the touch. Check the primer can for recommended curing times before painting.
This waiting period ensures maximum adhesion and durability for your paint job.
Painting Pressure Treated Wood For Durability
Now for the fun part: applying the paint! But just like with priming, the way you apply the paint matters a lot for how long your beautiful finish will last. This section focuses on choosing the right paint and using the best techniques to ensure your painted pressure treated wood looks great for years to come, even when exposed to the weather.
We’ll discuss paint types, application tips, and how to make your paint job tough.
Using the right paint and applying it correctly will protect your wood and make it look fantastic. We will walk you through selecting a durable exterior paint and the best methods for applying it. You’ll learn how to get a smooth, even finish that can stand up to sun, rain, and everyday wear.
By following these steps, you’ll be able to confidently paint your projects and enjoy their beauty.
Choosing The Right Paint
When painting pressure treated wood, you want to use a high-quality exterior paint. These paints are formulated to withstand the elements and provide a durable finish. Latex (water-based) paints are often a good choice for exterior wood projects.
They are flexible, which helps them expand and contract with the wood as temperatures change, reducing the risk of cracking and peeling.
Oil-based paints can also be used, and they offer excellent durability and adhesion, but they can be more prone to cracking over time due to their stiffness. Always choose a paint specifically designed for exterior use. Look for paints with good UV protection to prevent fading and mildew resistance to keep your painted surfaces looking fresh.
The sheen of the paint can also affect durability; satin or semi-gloss finishes tend to be more durable and easier to clean than flat finishes.
Paint Sheen and Its Impact
The sheen of your paint refers to how much light it reflects. Common sheens include flat, satin, semi-gloss, and gloss. For exterior pressure treated wood, satin or semi-gloss finishes are often preferred.
A satin finish offers a soft sheen and is more durable and easier to clean than a flat finish. It can hide minor imperfections well and is a popular choice for decks, fences, and trim.
A semi-gloss finish is even more durable and washable. It reflects more light, which can make imperfections more noticeable, so it’s best for areas that get a lot of wear and tear or need frequent cleaning, like railings or doors. Gloss finishes are the most durable and easiest to clean but highlight every flaw in the surface.
Flat finishes are typically not recommended for high-traffic or exposed exterior surfaces because they are less durable and harder to clean.
Application Techniques for a Lasting Finish
Applying your paint with care is just as important as choosing the right product. Start by ensuring your primed surface is clean and dry. If you’re painting a large area like a fence or deck, using a sprayer can be very efficient, but it requires practice to get an even coat and may require back-brushing to ensure proper adhesion.
For most DIYers, a good quality brush and roller are ideal.
Apply paint in thin, even coats. It’s better to apply two thin coats than one thick coat. This allows the paint to dry properly and provides a more durable finish.
Work in sections, maintaining a wet edge to avoid lap marks. This means you should blend the end of one painted section into the beginning of the next before the first section dries. Always paint in the direction of the wood grain.
Temperature and Weather Considerations
The temperature and weather conditions during painting significantly impact the final result. Most exterior paints have a recommended temperature range for application, typically between 50°F (10°C) and 85°F (29°C). Avoid painting in direct, hot sunlight, as the paint can dry too quickly, leading to lap marks and poor adhesion.
Similarly, avoid painting when the humidity is very high, as this can slow down drying time and affect the paint’s ability to cure properly.
Do not paint if rain is expected within 24-48 hours. Rain can wash away uncured paint or cause the surface to become too wet, compromising the finish. Check the forecast before you start and plan your painting sessions accordingly.
Early morning or late afternoon on a clear, mild day is often the best time to paint.
Maintenance and Touch-Ups
Even the best-painted surfaces will require some maintenance over time. Periodically inspect your painted pressure treated wood for signs of wear, such as chipping, peeling, or fading. Cleaning your painted surfaces annually with mild soap and water can help prolong the life of the paint.
For minor touch-ups, clean the affected area and apply a thin coat of the matching paint.
If larger areas show significant wear, it might be time for a new coat of paint. The good news is that if your original paint job was done correctly, you can usually apply a new coat directly over the old one after proper cleaning and light sanding. This makes future maintenance much easier.
Proper upkeep ensures your painted projects continue to look their best.
Troubleshooting Common Painting Problems
Sometimes, even with the best intentions and preparation, painting pressure treated wood can present a few challenges. This section is designed to help you identify and fix common problems that can occur, ensuring you can still achieve a beautiful and lasting finish. We’ll cover issues like peeling, uneven color, and mold growth and provide simple solutions.
Learning to troubleshoot can save you time and frustration. We’ll explain why these problems happen and what you can do to correct them. Whether you’re dealing with a small issue or a larger problem, you’ll find clear, easy-to-follow advice here to get your project back on track.
Don’t let a painting mishap get you down; these fixes are usually quite manageable.
Dealing with Peeling or Chipping Paint
Peeling or chipping paint is usually a sign that the paint did not adhere properly to the surface. This can happen if the wood was not dry enough, was not properly cleaned, or if a suitable primer was not used. The moisture trapped in the wood or contaminants on the surface prevent the paint from bonding securely.
To fix peeling paint, you need to remove all the loose and flaking paint. Use a paint scraper or putty knife to gently lift the edges of the peeling paint. Once you have removed all the loose material, sand the edges of the remaining paint to create a smooth transition.
Then, clean the area thoroughly and allow it to dry completely. Apply a good quality stain-blocking primer, let it dry, and then repaint the area with your chosen exterior paint.
Why Moisture Causes Peeling
Moisture is the enemy of a good paint job on wood. When you paint over wood that is still wet, the water is trapped. As the wood expands and contracts with temperature changes, or as the water evaporates, it pushes against the paint film.
This pressure eventually overcomes the adhesion of the paint to the wood, causing it to bubble, peel, or blister. Even humidity can be enough to cause issues if the wood hasn’t had enough time to dry thoroughly after washing or rain.
The chemicals in pressure treated wood can also hold onto moisture. This means it’s extra important to be patient and ensure the wood is completely dry. A moisture meter is your best friend here.
It takes the guesswork out of it. If you skip this step, you are almost guaranteed to have problems with your paint job down the line, no matter how well you prepared everything else.
Addressing Uneven Color or Streaks
Uneven color or streaks in your paint can be frustrating. This often happens if the paint wasn’t stirred properly, if coats were applied too thinly or too thickly, or if you painted over an unevenly primed surface. Lap marks, where one section of paint dries before the next section is painted, can also create visible streaks.
If the paint is still wet, you may be able to fix streaks by lightly going over the area with a brush or roller, maintaining a wet edge. If the paint is dry, you’ll need to lightly sand the affected area to smooth out any ridges or imperfections. Clean off the dust and apply another thin, even coat of paint, making sure to blend the edges properly.
For significant color inconsistencies, a second coat of paint or even a primer might be necessary.
The Role of the Primer
A good primer is your first line of defense against uneven color. If your primer coat is patchy or doesn’t cover the wood surface uniformly, this unevenness will show through your paint. This is why it’s so important to ensure your primer is applied evenly and covers the entire surface.
If you notice some areas of the pressure treated wood are more absorbent than others, this can lead to blotchiness with the paint.
A stain-blocking primer can also help prevent the natural color or treatment chemicals of the wood from showing through your paint, especially if you are using a lighter paint color. If you’re painting a dark color, ensure your primer is a dark shade itself or that you apply enough coats of primer to create a solid base. A well-primed surface means your top coat of paint will look richer and more uniform.
Preventing Mold and Mildew
Mold and mildew can grow on painted surfaces, especially in damp, shaded areas. This is often due to moisture trapped in or on the wood, or the paint itself not having adequate mildewcides. Pressure treated wood, while resistant to rot, can still be a surface for mold to grow if conditions are right.
To prevent mold and mildew, start by ensuring the wood is thoroughly cleaned before painting, paying special attention to any existing mildew. Use a cleaner that kills mold and mildew. When choosing your paint and primer, look for products that contain mildewcides, which are additives that inhibit the growth of mold and algae.
Regular cleaning of the painted surface can also help prevent it from establishing itself.
Environmental Factors and Paint Choice
The environment where your painted wood is located plays a big role in whether mold and mildew will form. Areas that are constantly shaded, have poor air circulation, or are prone to getting wet are more susceptible. Choosing an exterior paint specifically formulated with mildewcidal additives is crucial for these areas.
These additives work by creating a surface that mold and mildew find inhospitable.
Also, ensure that water drains away from your painted surfaces. Proper ventilation around structures painted with exterior paint can also make a difference. If you live in a humid climate or an area with frequent rainfall, investing in paints and primers with enhanced mold and mildew resistance will pay off in the long run.
Regularly cleaning your painted surfaces, even just with soap and water, can remove organic matter that mold needs to thrive.
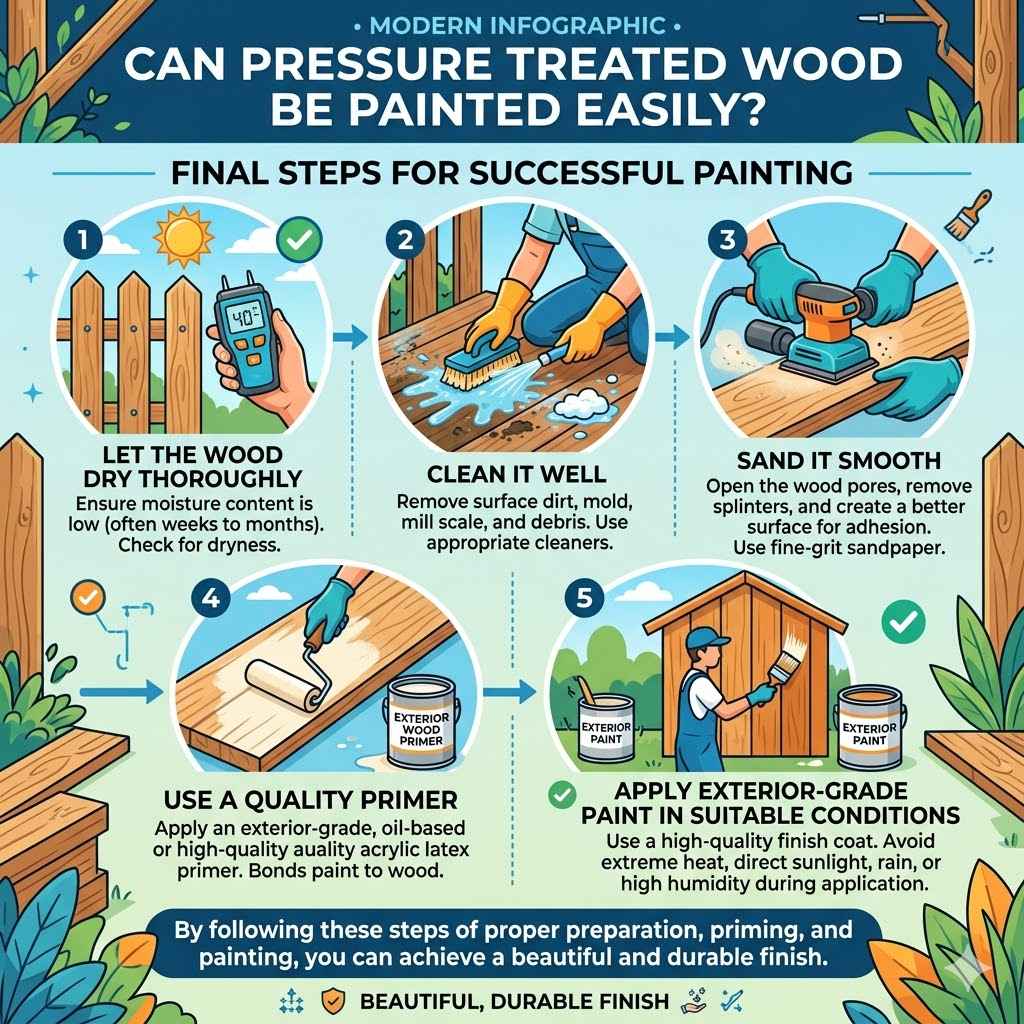
Can Pressure Treated Wood Be Painted Easily? Final Steps
So, can pressure treated wood be painted easily? Yes, it can. By following the steps of proper preparation, priming, and painting, you can achieve a beautiful and durable finish.
Remember to let the wood dry thoroughly, clean it well, sand it smooth, use a quality primer, and apply exterior-grade paint in suitable conditions. This ensures your painted projects will last and look great.
Frequently Asked Questions
Question: How long should pressure treated wood dry before painting?
Answer: It’s best to let pressure treated wood dry for at least a few weeks, and ideally several months, after purchase before painting. A moisture meter reading of 15% or lower is ideal.
Question: Can I paint pressure treated wood immediately after buying it?
Answer: No, you should not paint pressure treated wood immediately. It contains a lot of moisture from the treatment process and needs time to dry out considerably to prevent paint failure.
Question: Do I need a special primer for pressure treated wood?
Answer: Yes, it is highly recommended to use a high-quality exterior stain-blocking primer. This helps the paint adhere better and prevents chemicals from the wood from bleeding through.
Question: What is the best type of paint for pressure treated wood?
Answer: A high-quality exterior latex (water-based) paint is generally recommended for its flexibility and durability. Ensure it’s formulated for exterior use and has good UV and mildew resistance.
Question: What if I see mold on my painted pressure treated wood?
Answer: Clean the affected area with a solution of mild detergent and water or a diluted bleach solution (1 part bleach to 3 parts water). Ensure the area is dry before touching up with paint that contains mildewcides.
Conclusion
Painting pressure treated wood is achievable with the right approach. Focus on thorough drying, meticulous cleaning, and proper priming. Select a durable exterior paint and apply it in good weather.
This thoughtful process ensures your painted wood will look good and withstand the elements for a long time.