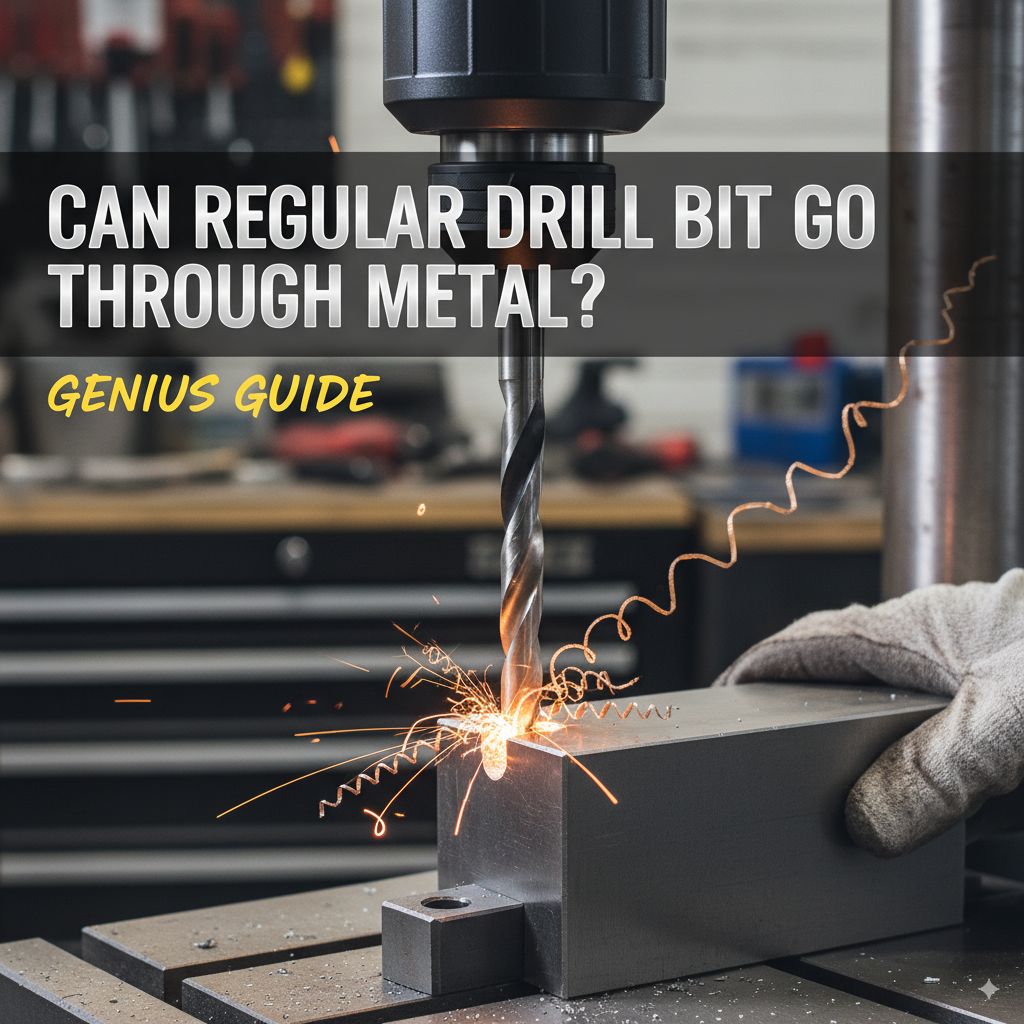
Can Regular Drill Bit Go Through Metal? Genius Guide
While a standard wood drill bit can technically make a hole in thin metal, it’s not ideal. For clean, efficient, and safe metal drilling, specialized metal drill bits are strongly recommended. Using the wrong bit can damage both the bit and the metal.
Ever found yourself with a metal project and a handy set of drill bits, wondering if your go-to wood bits will do the trick? It’s a common question for DIYers and homeowners stepping into new territory. Trying to drill metal with bits designed for wood can lead to frustration – dull bits, mangled metal, and messy holes are all too common. But don’t worry! Understanding the difference between drill bits and how to use them correctly makes all the difference. In this guide, we’ll break down what you need to know to confidently drill through metal, ensuring great results every time. Let’s get your projects moving forward safely and surely!
Understanding Drill Bits: Wood vs. Metal
When you look at a drill bit, you might think they all do the same job. However, the material they’re designed to cut dictates their shape, material, and sharpness. This is crucial when you’re asking, “Can a regular drill bit go through metal?” The short answer is: it’s complicated, and usually, not the best idea.
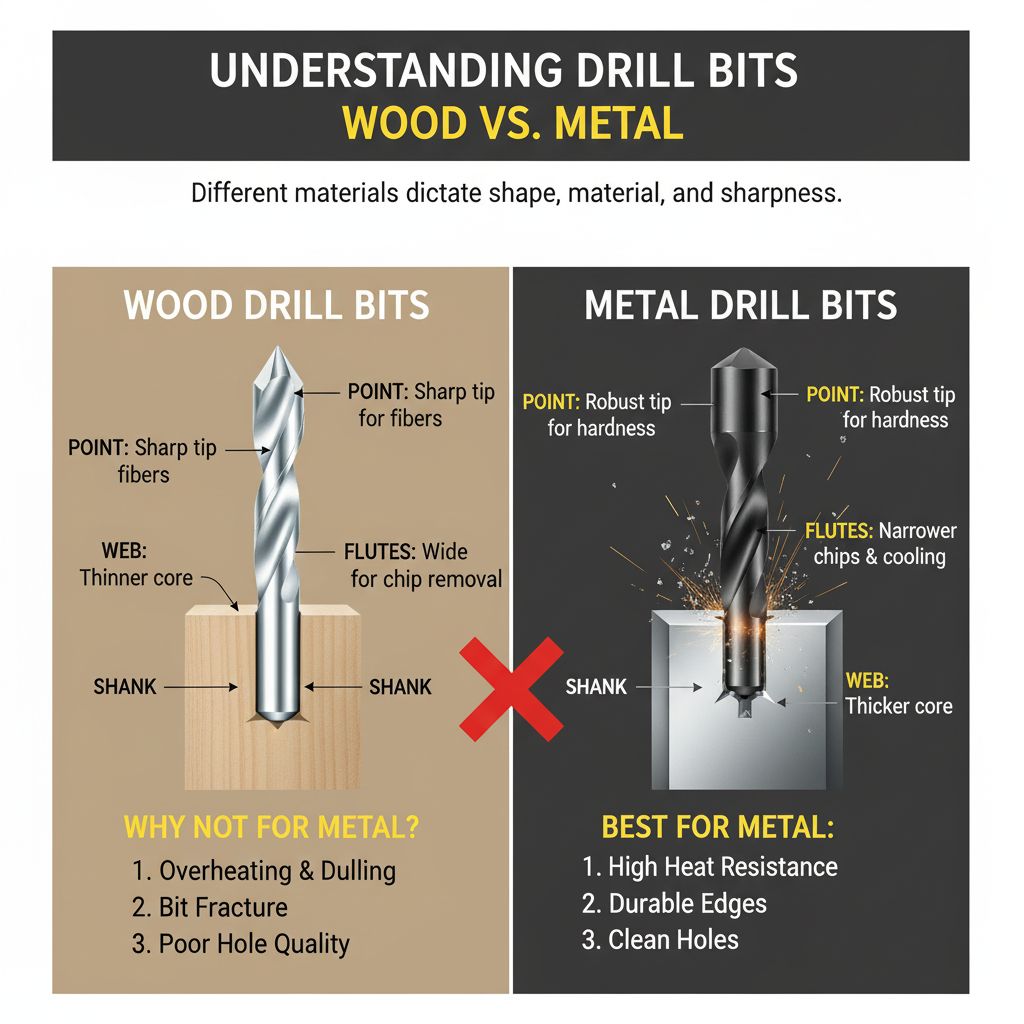
The Anatomy of a Drill Bit
Drill bits have several key parts that determine their function:
Point: This is the tip. For wood bits, it’s often designed to bite into wood fibers. For metal, it needs to be sharp and resilient to pierce tougher material.
Flutes: These are the spiral grooves that run up the body of the bit. They clear away debris after the cut and help cool the bit. The angle and depth of flutes differ between wood and metal bits.
Shank: This is the part that fits into your drill’s chuck. Most common shanks are cylindrical.
Web: This is the solid core of the bit between the flutes. Its thickness affects the bit’s strength.
Why Wood Bits Aren’t Great for Metal
Wood drill bits, often called twist bits, have a specific design for cutting through soft or medium-density wood. Their cutting edges are usually sharper with a shallower angle, designed to slice through wood fibers. When you try to use them on metal:
Overheating: The metal’s hardness causes extreme friction. Wood bits aren’t designed to withstand this heat, leading to rapid dulling or even melting of the bit’s cutting edges.
Dulling: Metal is much harder than wood. A wood bit’s cutting edges will quickly become blunt, making it difficult to penetrate the metal and producing a poor-quality hole.
Bit Fracture: The excessive force and heat can cause the brittle cutting edges of a wood bit to chip or break off.
Poor Hole Quality: Even if you manage to make a hole, it’s likely to be rough, oversized, or have burrs (sharp edges) that need extensive cleanup.
The Right Tool for the Job: Metal Drill Bits
To answer the question more directly: “can a regular drill bit go through metal” is a qualified yes for very thin, soft metals with extreme caution, but it’s highly inefficient and risky. For reliable, clean, and safe results, you need bits specifically made for metal.
Types of Metal Drill Bits
There are various types of drill bits designed for metal, each suited for different metals and applications. The most common for DIYers are High-Speed Steel (HSS) bits.
High-Speed Steel (HSS): This is the workhorse for most metal drilling tasks. HSS bits are made from a tool steel alloy that can withstand higher temperatures than standard carbon steel bits, allowing them to remain sharp and durable when drilling metal. They are affordable and widely available.
Cobalt Bits: These are HSS bits with added cobalt (typically 5-8%). Cobalt increases hardness and heat resistance, making them excellent for drilling harder metals like stainless steel or cast iron. They are more expensive but offer superior performance and longevity in tough materials.
Titanium Coated Bits: These are usually HSS bits with a thin titanium nitride (TiN) coating. The coating itself doesn’t make the bit harder, but it adds a layer of hardness and lubricity, reducing friction and heat. This extends the bit’s life and helps create cleaner holes. They are good for general-purpose metal drilling.
What Makes Metal Drill Bits Different?
Metal drill bits are constructed differently to handle the challenges of cutting metal:
Material: They are typically made from hardened steel, often HSS or alloys like HSS-Co (cobalt), to resist wear and heat.
Point Geometry: The tip (point) of a metal drill bit is usually ground to a specific angle (commonly 118° or 135°) that is optimized for piercing metal without “walking” (slipping) or overheating. A 135° point is often preferred for harder metals as it reduces the tendency to walk and produces a smaller chip load.
Flute Design: The flutes on metal bits are designed to efficiently remove hot metal chips and prevent them from re-welding to the bit.
Web Thinning: Many specialized metal bits feature a “thinning” of the web near the point. This makes it easier for the bit to start drilling into the metal with less pressure, reducing the risk of the bit wandering or breaking.
When Can a “Regular” (Twist) Bit Potentially Work on Metal?
If you’re in a pinch and absolutely cannot get a proper metal bit, and your project involves very thin, soft metals (like thin aluminum sheeting or very thin gauge steel), a standard sharp twist bit might manage to create a hole.
However, this comes with significant caveats:
Speed: You MUST use a very slow drill speed. High speeds create excessive heat that will ruin the bit.
Pressure: Apply steady, light pressure. Don’t force the bit.
Coolant: You will need a cutting fluid or coolant to manage heat. Even then, the bit will likely become dull quickly.
Risk: The risk of breaking the bit or creating a poor-quality hole is very high.
For most practical purposes, the answer to “can a regular drill bit go through metal” is a resounding no, if you want any semblance of good results and longevity for your tools.
The “Genius” Guide: How to Properly Drill Metal
Now that we understand the tools, let’s get down to how you, as a DIY enthusiast, can successfully drill metal. This method focuses on safety, efficiency, and achieving a clean result.
Step 1: Gather Your Tools and Materials
You’ll need more than just a drill and bits. Safety first!
Drill: A corded or strong cordless drill. Variable speed is a huge advantage.
Metal Drill Bits: A set of High-Speed Steel (HSS) bits is a great start. For harder metals, consider cobalt bits.
Safety Glasses: Absolutely essential. Metal filings can fly.
Gloves: Protect your hands from sharp edges and heat.
Cutting Fluid or Lubricant: This is critical for cooling and lubrication. You can buy specialized metal-cutting fluids, or use a bit of motor oil, WD-40 (sparingly), or even a paste.
Center Punch: To mark your drilling spot and prevent the bit from “walking.”
Hammer: To use with the center punch.
Clamps: To secure your workpiece firmly to a workbench or stable surface.
Marker or Scribe: To mark the pilot hole location.
Rag or Shop Towels: For cleaning up.
Deburring Tool (Optional but Recommended): For cleaning up sharp edges after drilling.
Step 2: Prepare Your Workspace and Workpiece
Safety and stability are paramount when working with metal.
Secure the Area: Ensure good lighting and ventilation. Metal dust and filings can be sharp and irritating.
Clamp Your Metal: Your workpiece MUST be securely held down. Use sturdy clamps to fasten it to a workbench, sawhorse, or a solid piece of scrap wood. The metal should not move at all when the drill bit makes contact. This prevents accidents and ensures a straight hole.
Mark Your Hole: Use a marker or scribe to clearly indicate where you need to drill.
Step 3: Mark the Precise Spot with a Center Punch
This is a key step that prevents frustration.
Position the Punch: Place the tip of a center punch directly on your marked spot.
Strike Firmly: Give the end of the punch a sharp, firm tap with a hammer. This creates a small indentation.
Why it Matters: This indentation acts as a guide for your drill bit, preventing it from “walking” or skidding across the smooth metal surface when you start drilling.
Step 4: Select the Right Drill Bit and Apply Lubrication
Choose a bit that’s slightly larger than the screw or bolt you plan to use, or the exact size if you need a precise hole.
Bit Selection: For most general tasks, HSS bits are fine. For stainless steel or harder alloys, opt for cobalt bits.
Lubrication is Key: Apply a drop or two of cutting fluid or lubricant directly to the spot where you’ll be drilling. This significantly reduces friction and heat, extending the life of your drill bit and ensuring a cleaner cut.
Step 5: Drill the Hole – Slowly and Steadily
Patience and control are your best friends here.
Drilling Technique for Metal
- Choose the Right Speed: This is crucial. For metal, you generally need to drill much slower than you would for wood. High speeds generate excessive heat. Refer to manufacturer guidelines or charts for recommended speeds for your drill bit size and material hardness. A good starting point for a 1/4-inch HSS bit in steel might be around 600-700 RPM, but consult a reliable speed chart.
- Start Slow: Begin drilling slowly, letting the center punch indentation guide the bit.
- Apply Steady Pressure: Once the bit has started to cut, apply steady, even pressure. Don’t force it; let the drill bit do the work.
- Clear Debris: Periodically lift the drill bit out of the hole to clear away metal shavings (swarf) and reapply lubricant. This prevents the bit from overheating and jamming.
- Cool Down: If the bit or metal feels hot to the touch (use gloves and be cautious!), stop drilling and let it cool down. Continuous drilling without breaks can ruin the bit.
- Persevere: Keep a steady rhythm of drilling, lifting, and lubricating until you break through the metal.
Step 6: Finish the Hole (Deburring)
Once the hole is drilled, you’ll often have sharp edges.
Remove Burrs: Use a deburring tool, a countersink bit, or even a larger drill bit spun by hand to lightly clean up the edges of the hole on both sides. This makes the finished product safer and looks more professional.
Clean Up: Wipe away any remaining metal shavings with a rag.
Troubleshooting Common Metal Drilling Problems
Even with the best intentions, you might encounter hiccups. Here are solutions to common issues.
Problem: Drill Bit Walks or Skids
Cause: The bit tip is slipping on the smooth metal surface because there’s no starting point.
Solution: Always use a center punch to create a pilot divot. If the bit continues to walk with a punch mark, try a bit with a 135° point angle or a self-centering drill bit.
Problem: Bit Gets Stuck or Binding
Cause: Not enough lubrication, too much speed, or the metal is too thin and deforming around the bit.
Solution: Slow down your drill speed dramatically. Apply more cutting fluid. Ensure the metal is rigidly clamped and not flexing. If drilling very thin sheet metal, consider drilling through a piece of scrap wood clamped to the metal to provide support.
Problem: Smoke and Overheating
Cause: Excessive friction due to high speed, insufficient lubrication, or a dull drill bit.
Solution: Immediately stop drilling. Let the bit and metal cool completely. Apply more cutting fluid. Ensure you are using the correct, slow RPM. If the bit has been overheated, it may be permanently damaged and will need replacement.
Problem: Hole is Rough or Oversized
Cause: Dull drill bit, wrong bit type, or excessive force.
Solution: Use a sharp, quality metal drill bit. Ensure you’re using sufficient lubrication. Try a slightly smaller pilot hole first if drilling a larger diameter hole.
Metal Drill Bit Speed Chart (General Guidelines)
Here’s a general idea of drill speeds. Always consult specific charts for your material and bit manufacturer when possible. These speeds are for HSS bits. For Cobalt bits, you may be able to increase speeds slightly.
| Drill Bit Diameter | Mild Steel (RPM) | Aluminum (RPM) | Brass (RPM) | Stainless Steel (RPM) |
|---|---|---|---|---|
| 1/16″ – 1/8″ | 1200 – 1800 | 1200 – 1800 | 1000 – 1500 | 400 – 600 |
| 3/16″ – 1/4″ | 800 – 1200 | 1000 – 1500 | 800 – 1200 | 300 – 500 |
| 5/16″ – 3/8″ | 500 – 800 | 800 – 1000 | 600 – 800 | 200 – 300 |
| 7/16″ – 1/2″ | 300 – 500 | 600 – 800 | 400 – 600 | 150 – 200 |
Note: These are general guidelines and assume proper lubrication and sharp bits. Stiffer metals like hardened steel may require even slower speeds and specialized bits.
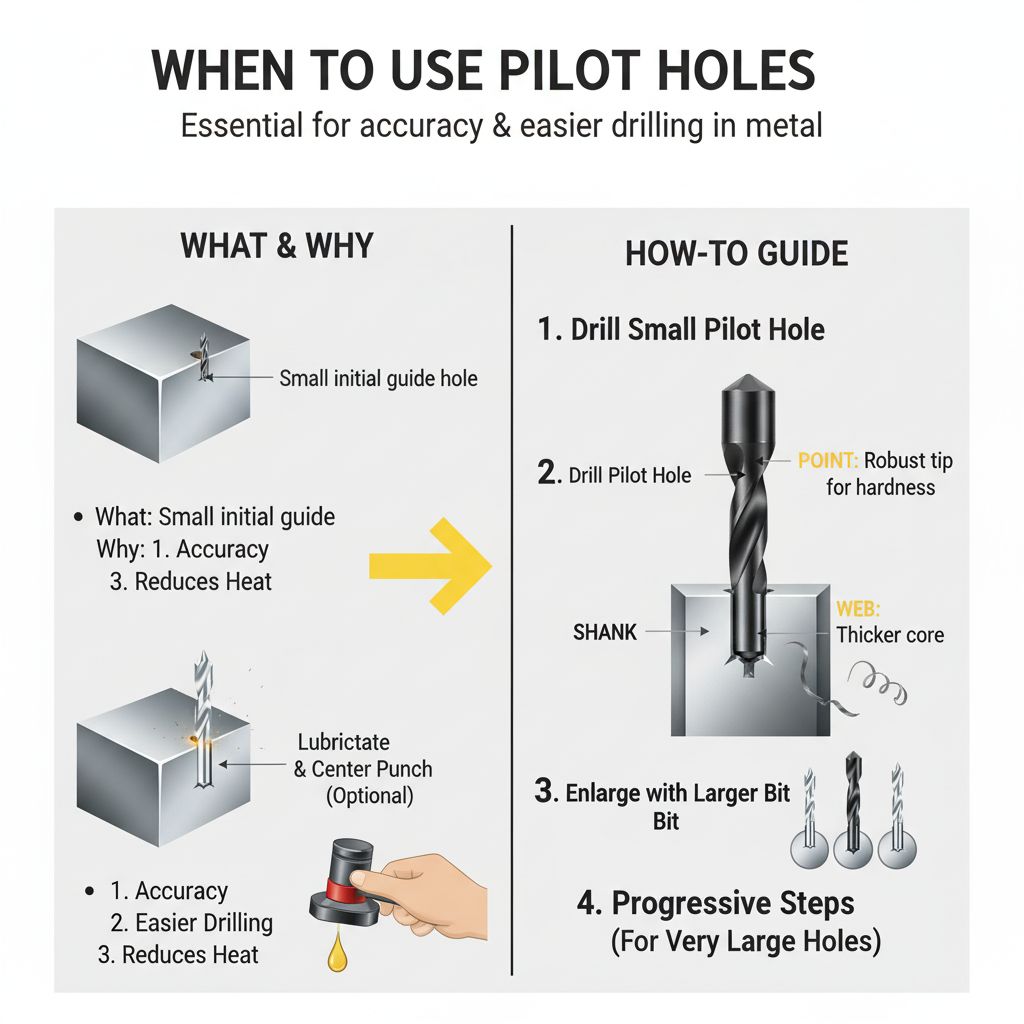
When to Use Pilot Holes
For larger holes, or when drilling through thicker metal, using a pilot hole is a common and smart practice.
What is a Pilot Hole? It’s a small initial hole drilled before drilling the final, larger hole.
Why Use Them?
Accuracy: It accurately guides the larger drill bit, ensuring the final hole is exactly where you want it.
Easier Drilling: It makes drilling the larger hole much easier, as the larger bit only needs to enlarge an existing hole, not cut through the entire material’s thickness from scratch.
Reduces Heat: A pilot hole helps manage heat and chip removal.
How to Use Pilot Holes:
1. Drill your initial small pilot hole using the appropriate small metal drill bit.
2. Apply lubricant and re-punch the center if needed.
3. Use a larger drill bit, with the pilot hole guiding it, to enlarge the hole to your desired size.
4. For very large diameters, you might need a series of progressively larger pilot holes.
Frequently Asked Questions (FAQ)
Here are some common questions beginner DIYers have about drilling metal.
Q1: Can I use my cordless drill for metal?
A: Yes, a cordless drill can absolutely be used for drilling metal, especially general woodworking projects that might involve thin sheet metal. Ensure your drill has sufficient power and, ideally, variable speed control. For tougher metals or frequent metal drilling, a corded drill often offers more consistent power.
Q2: What’s the difference between a wood drill bit and a metal drill bit?
A: Wood drill bits are designed for softer materials and have sharp, aggressive cutting edges. Metal drill bits are made from harder, heat-resistant materials (like HSS) with specifically ground points and flutes to cut through dense metal without overheating or dulling quickly. Using a wood bit on metal will likely damage the bit and make a poor hole.
Q3: How do I prevent drill bits from shattering when drilling metal?
A: Drill bits, especially smaller ones for metal, can be brittle. To prevent shattering, use slow drill speeds, plenty of cutting fluid or lubricant to reduce heat, and steady, consistent pressure. Avoid sudden jolts or forcing the bit, and ensure the metal workpiece is firmly clamped.
Q4: What is the best drill bit type for stainless steel?
A: Stainless steel is a hard and tough material. For drilling stainless steel, cobalt drill bits (HSS with cobalt alloy) are highly recommended. They offer superior hardness and heat resistance compared to standard HSS bits. Ensure you use slow speeds and a good quality cutting lubricant.