Can Veneer Be Sanded? Expert Tips for a Flawless Finish
Yes, veneer can be sanded, but it requires care. Veneer is a thin layer of real wood — usually just 0.6mm to 1.5mm thick — glued to a substrate, so sanding must be light and controlled rather than aggressive.
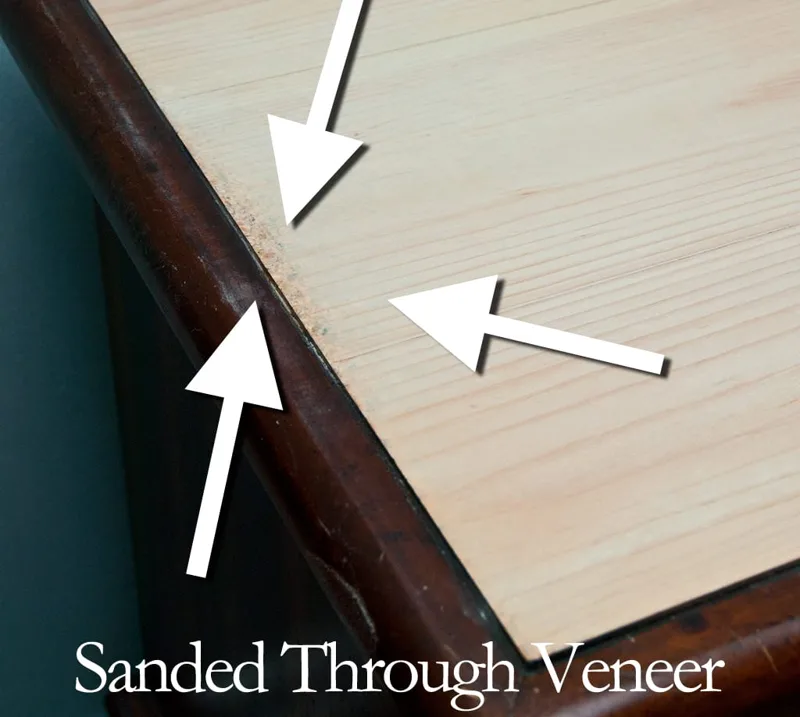
Sanding veneer can smooth out imperfections, level a slightly proud seam, or prep the surface for a fresh coat of stain or paint. But sanding too hard, too long, or with the wrong grit can cut straight through the face layer and expose the substrate underneath — and unlike solid wood, that damage cannot be sanded out or fixed with more sanding. This guide covers the right tools, the safe sanding technique for each type of veneer, the mistakes that ruin veneer fastest, and how to finish it once sanding is done.
Types Of Veneer
Natural wood veneer is cut or peeled straight from a real log, so it shows true wood grain and color, and every sheet is slightly unique. It is thin and unforgiving — sand it with a light hand and fine sandpaper, and check your progress often.
Engineered (reconstituted) veneer is manufactured from dyed and laminated wood fibers to mimic a consistent grain pattern. It’s more uniform and generally a bit more tolerant of sanding, but it can still be thin — always check the actual thickness before assuming it can take a heavier pass.
Paper-backed and phenolic-backed veneer use a thin wood face laminated to a flexible paper or resin-impregnated backing, which makes them easier to wrap around curves. The backing adds stability during application, but it does nothing to protect the face during sanding — the wood layer on top is just as thin and just as easy to sand through.
Tools Needed
You’ll need a few basic tools: a sanding block to keep pressure even, fine-grit sandpaper (220-grit or finer), a dust mask to keep wood dust out of your lungs, and a cloth to wipe the surface clean between passes.
A few extras make the job faster and safer: a random orbital sander on its lowest speed setting, a shop vacuum to keep dust off the work surface, and gloves and safety glasses to protect your hands and eyes.
Preparing The Surface
Sanding veneer requires care to avoid damaging the thin layer. Use fine-grit sandpaper for light sanding, and always sand gently rather than pressing hard to “speed things up.”
Cleaning The Veneer
First, remove dust and dirt from the veneer with a soft cloth. Wipe the surface with the cloth slightly dampened, then dry it immediately with a clean, dry cloth — veneer glue can loosen if moisture sits on the surface, so make sure no dampness remains before you sand.
Inspecting For Damage
Look for cracks, chips, or lifted edges before you start. Small cracks can widen during sanding if you don’t address them first. Fill minor damage with a color-matched wood filler and let it cure fully before sanding it flush — this keeps the surface even and prevents the sander from catching on a raised edge.
Sanding Techniques
Pick the right sandpaper for veneer — fine-grit like 220-grit keeps the veneer safe, while coarse sandpaper can cut through the thin wood in a few passes. Always test on a small, inconspicuous area first, and be gentle. Veneer is delicate and doesn’t forgive heavy-handed sanding.
Sanding by hand gives you the most control and the best feel for how much material is coming off. Machines are faster but rougher — if you use one, choose a random orbital sander on a low speed setting rather than a belt sander, which removes material far too quickly for veneer work. Use a sanding block for even hand pressure, and always sand with the grain to avoid cross-grain scratches.
How To Sand Veneer, Step By Step
- Clean and inspect first: Wipe the surface, let it dry fully, and fill any chips or cracks before sanding.
- Start with the lightest grit that will do the job: Begin at 220-grit. Only drop to 180-grit if the surface has a real defect to level, and never go coarser than that on veneer.
- Sand with the grain, not across it: Cross-grain scratches show through stain and are very hard to remove without more sanding.
- Use a sanding block or low-speed orbital sander: Keep the tool moving at all times — pausing in one spot for even a second or two is how sand-throughs happen.
- Check your progress every 10-15 seconds: Wipe away dust and look at the surface under raking light. Stop as soon as it’s smooth and even.
- Wipe clean with a tack cloth: Remove all dust before moving on to stain, paint, or sealant — trapped dust shows up as grit under the finish.
Sanding Veneer By Type: What Changes
Not every veneer tolerates sanding the same way. Face thickness and backing type are the two biggest variables — here’s how the common types compare.
| Veneer Type | Typical Face Thickness | Sanding Tolerance | Best Grit / Method |
|---|---|---|---|
| Natural wood veneer (modern) | ~0.6mm | Very low — one or two light passes only | 220-320 grit, by hand |
| Natural wood veneer (older/reclaimed) | ~1.0-1.5mm | Low to moderate | 180-220 grit, low-speed orbital |
| Paper-backed veneer | ~0.5mm | Very low — backing offers no cushion | 220 grit, by hand only |
| Phenolic/wood-backed veneer | ~0.6mm | Low — backing stiffens panel, not the face | 220 grit, light hand pressure |
| Engineered/reconstituted veneer | ~0.5-0.6mm | Low to moderate — more uniform, still thin | 220 grit, by hand or low-speed orbital |
Safety Precautions
Wear the right protective gear: safety goggles to protect your eyes, a dust mask to avoid breathing in fine wood dust, and gloves to guard against splinters. Ear protection helps if you’re running a sander for any length of time.
Make sure your workspace has good ventilation — open a window or run a fan to keep dust moving, and use a dust extractor or shop vac if you have one. Keep the area organized and free of obstacles; a clean workspace is a safer one.
Common Mistakes
- Over-sanding: The thin face layer wears away fast, exposing the substrate underneath and ruining the look permanently. Use light strokes and check often.
- Sanding against the grain: This scratches the veneer and the marks are very hard to remove. Always check grain direction before you start.
- Using a belt sander or coarse grit: Both remove material far faster than veneer can tolerate — a belt sander can cut through veneer in seconds.
- Skipping the small-area test: Testing pressure and grit on a hidden spot first catches problems before they show up on the visible surface.
- Sanding over wet glue lines or water damage: Sanding a damp or delaminating area can lift the veneer entirely instead of smoothing it.
Finishing Touches
A sealant protects the veneer surface and enhances its look. Apply a thin, even coat with a brush, avoiding drips and bubbles, and let it dry completely. Sand very lightly between coats with a high grit (320+) to knock down any raised grain, then apply a second coat for added protection.
Polishing adds the final shine. Use a soft cloth and small circular motions once the sealant has fully cured. This step brings out the depth of the grain and leaves the surface smooth to the touch.
Frequently Asked Questions
Can Veneer Be Sanded?
Yes, veneer can be sanded carefully. Use fine-grit sandpaper (220-grit or finer) and light pressure to avoid cutting through the thin wood layer.
How To Sand Veneer Furniture?
Sand veneer furniture gently with 220-grit sandpaper, always with the grain, checking your progress every few seconds so you stop before the finish wears through.
What Grit Sandpaper For Veneer?
Use 220-grit or finer for veneer. It smooths the surface without removing enough material to expose the substrate underneath.
Can You Refinish Veneer?
Yes. Sand lightly, clean the surface thoroughly, and apply new stain, paint, or sealant. Veneer can typically be refinished once or twice before the face layer gets too thin to sand safely again.
Can You Use An Orbital Sander On Veneer?
Yes, a random orbital sander on its lowest speed with fine-grit paper works well on veneer. Keep it moving constantly and never let it rest in one spot, which can sand through the face in seconds.
What Happens If You Sand Through Veneer?
Sanding through veneer exposes the substrate (usually plywood or MDF) underneath, which looks and stains completely differently from the veneer face. This damage can’t be sanded out — the fix is a color-matched veneer patch or, in some cases, a matching edge-banding strip.
Conclusion
Sanding veneer is entirely doable with the right care and tools. Always test on a small area first, use fine-grit sandpaper, and stay light-handed — veneer’s biggest risk is sanding too far, not too little. Match your technique to the veneer type in front of you, and follow up with a proper finish.
Be patient and check your progress often, and sanding veneer becomes a manageable, repeatable step in refinishing almost any piece of veneered furniture.
Sponsored / affiliate links. As an Amazon Associate I earn from qualifying purchases. I may earn additional commission from eligible campaigns.