Can You Drill Through Epoxy: Essential Guide
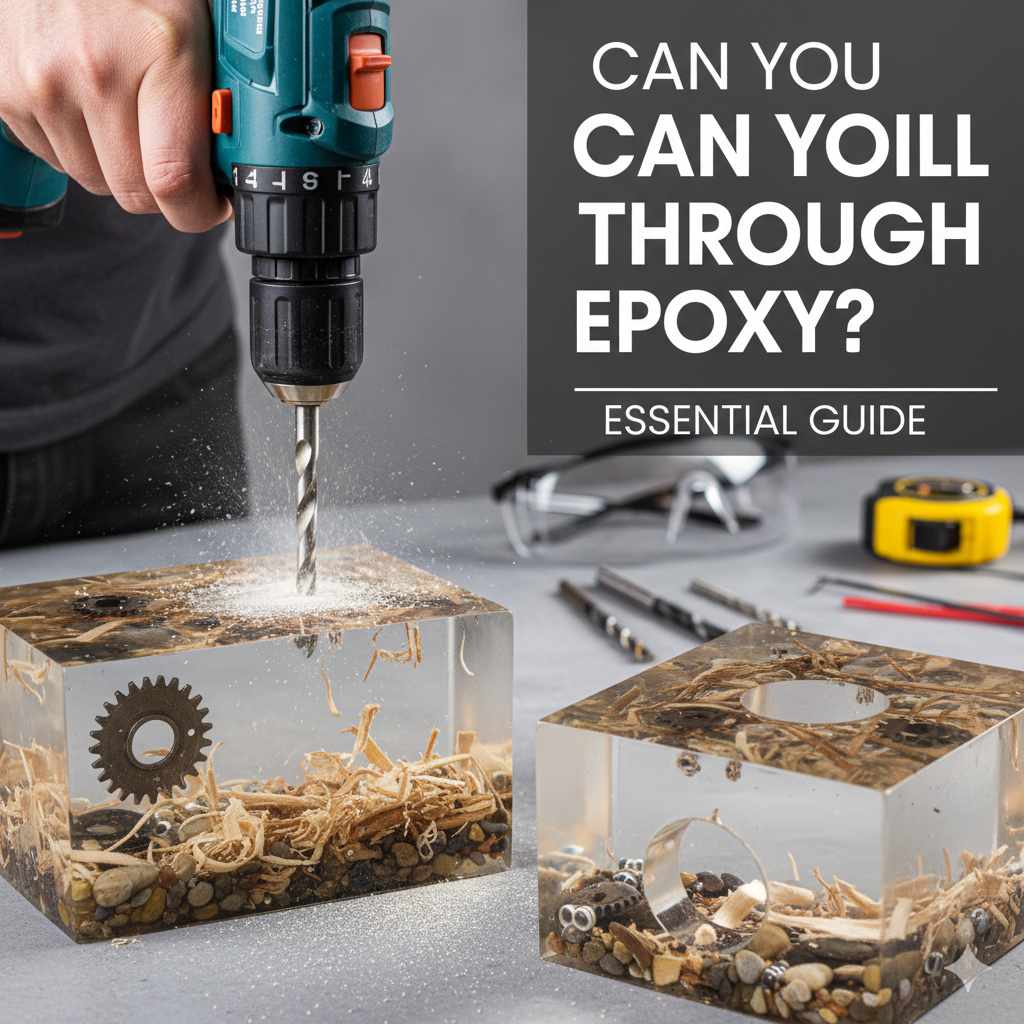
Yes, you can drill through epoxy! With the right drill bit and technique, drilling into cured epoxy is achievable, whether it’s an epoxy countertop, a decorative coating, or a resin art project. This guide will walk you through the process safely and effectively, ensuring a clean result without damaging your work.
Working with epoxy can be a fantastic way to achieve a durable and beautiful finish on many surfaces. You might be installing hardware, hanging artwork, or adding a unique touch to a piece of furniture. When the need arises to drill into cured epoxy, it’s natural to wonder if it’s even possible without causing cracks or chips. The good news is, it absolutely is! With a little know-how and the correct approach, you can make precise holes in your epoxy projects. This guide is designed to demystify the process, offering clear, step-by-step instructions so you can tackle your project with confidence. Let’s get started on making those perfect holes!
So, what exactly are we drilling into when we talk about epoxy? Epoxy resin itself is a tough, thermosetting polymer. When mixed and cured, it forms a hard, durable plastic-like material. This can be applied as a coating over wood, concrete, or other substrates, often used for countertops, tabletops, or decorative finishes. Because it cures to a solid state, drilling through it requires a slightly different approach than drilling into wood or metal. Understanding its properties is key to a successful drilling operation.
Why You Might Need to Drill Through Epoxy
There are several common reasons why a DIYer or homeowner might find themselves needing to drill through an epoxy surface:
Installing Fixtures: This is perhaps the most frequent reason. You might need to install a sink, faucet, hardware, or decorative elements onto an epoxy countertop or table.
Hanging Items: Attaching shelves, wall art, or other decorative pieces to a wall coated with epoxy might require drilling pilot holes.
Adding Features: Sometimes, you might want to add cable management grommets, drainage holes, or even integrated lighting to a custom epoxy project.
Repairs or Modifications: You may need to drill to access something beneath the epoxy or to make a modification to a cured piece.
The challenge often lies in the epoxy’s brittle nature once cured. Unlike wood, which can be forgiving, drilling too aggressively or with the wrong tool can lead to chipping, cracking, or spiderwebbing around the drill site. This is precisely why a step-by-step, informed approach is so important.
Understanding Cured Epoxy
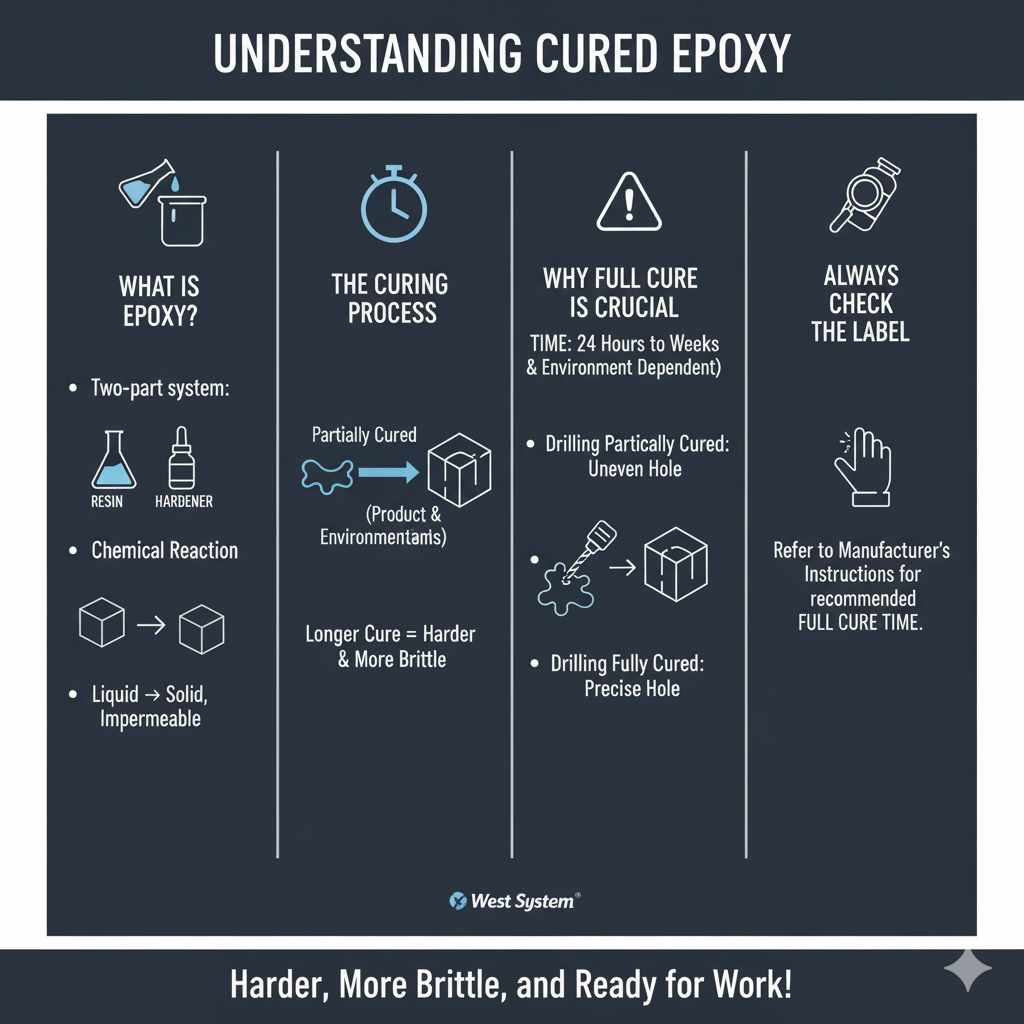
Before we dive into drilling, it’s crucial to understand what “cured epoxy” means. Epoxy resin is a two-part system: a resin and a hardener. When mixed, a chemical reaction occurs, causing the liquid mixture to harden and cure into a solid, impermeable substance. This curing process can take anywhere from 24 hours to several days or even weeks, depending on the specific epoxy product and environmental conditions. The longer it cures, the harder and more brittle it becomes.
Full cure is essential before attempting to drill. Drilling into partially cured epoxy can result in a gummy mess, gumming up your drill bit and potentially creating an uneven hole. Always refer to the epoxy manufacturer’s instructions for their recommended full cure time. For a general guide on epoxy curing times, you can check resources from reputable epoxy suppliers like West System.
Essential Tools and Materials
To successfully drill through epoxy, you’ll need a few key items. Having these ready will make the process smoother and safer:
| Tool/Material | Description | Why It’s Important |
|---|---|---|
| Drill | Corded or cordless drill with adjustable speed settings. | Provides the power needed to cut through the epoxy. Variable speed is crucial. |
| Drill Bits | Diamond-tipped or carbide-tipped masonry bits are ideal. Small pilot bits (e.g., 1/16″ to 1/8″) for marking and larger bits for the final hole. | These materials are hard enough to cut through epoxy without excessive wear or heat. |
| Safety Glasses | Sturdy, impact-resistant safety glasses. | Epoxy dust and debris can fly; protecting your eyes is non-negotiable. |
| Dust Mask | A respirator or a good quality dust mask (N95 or better). | Inhaling fine epoxy dust can be harmful to your lungs. |
| Gloves | Nitrile or work gloves. | To protect your hands from any remaining uncured epoxy residue or sharp edges. |
| Masking Tape | Painter’s tape or masking tape. | Helps prevent the drill bit from wandering and reduces chipping at the surface. |
| Center Punch (Optional) | A small, sharp tool to create a starter divot. | Helps guide the drill bit precisely and prevents it from skipping across the surface. |
| Water or Lubricant | Water, cutting oil, or a specialized masonry lubricant. | Cools the drill bit, reduces friction, and helps clear away dust. Crucial for preventing overheating and cracking. |
| Shop Vacuum (Optional) | For immediate clean-up of dust. | Keeps the work area clean and helps visualize your progress. |
When selecting drill bits, the key is hardness. Standard HSS (High-Speed Steel) bits, typically used for wood and metal, might not be sufficient or could wear out very quickly. For epoxy, you’re looking for bits designed for hard materials.
Diamond-Tipped Bits: These are often the best choice for drilling into very hard, brittle materials like tile, glass, and cured epoxy. The diamond particles embedded in the bit’s tip are extremely hard and can grind away the epoxy effectively.
Carbide-Tipped Masonry Bits: These are another excellent option. They have a very hard carbide tip brazed onto a steel shank and are designed for drilling into concrete and stone, making them suitable for cured epoxy.
Step-by-Step Guide to Drilling Through Epoxy
Now that you have your tools and a better understanding of epoxy, let’s get to the actual drilling. Safety first, always! Don’t rush, and take your time to achieve the best results.
Step 1: Site Preparation and Safety
First and foremost, put on your safety gear. This includes safety glasses, a dust mask, and gloves. Clear the area around where you’ll be drilling to ensure you have plenty of space and no trip hazards. If you’re drilling on a vertical surface, make sure it’s stable.
Ventilation: Ensure the area is well-ventilated. While drilling cured epoxy dust shouldn’t contain the volatile organic compounds (VOCs) of uncured resin, it’s still fine particulate matter.
Surface Protection: If working on a valuable surface, consider placing a protective sheet underneath the area to catch any debris or accidental slips.
Step 2: Mark Your Drilling Point
Precise marking prevents mistakes. Use a pencil or a marker to indicate exactly where you want the hole to be.
Center Punch: For very hard surfaces or where absolute precision is needed, a center punch can be used to create a small indentation. Gently tap the punch with a hammer at your marked spot. This gives the drill bit a place to rest and prevents it from wandering.
Masking Tape: Cover the marked spot with a piece of masking tape. This serves multiple purposes: it helps prevent the drill bit from slipping on the smooth epoxy surface as you start, and it can reduce surface chipping by acting as a protective layer. You can then re-mark your drilling point on top of the tape if necessary.
Step 3: Select and Prepare Your Drill Bit
Choose the appropriate drill bit for the job. For most applications, starting with a small pilot hole is highly recommended. If you need a 1/4-inch hole, start with a 1/16-inch or 1/8-inch bit. This makes drilling the larger hole much easier and cleaner.
Pilot Hole Advantage: The smaller pilot hole guides the larger bit and relieves some of the pressure, reducing the risk of cracking.
Bit Condition: Ensure your drill bit is sharp and in good condition. A dull bit will require more force, generate more heat, and increase the likelihood of damage.
Step 4: Set Up Your Drill
For best control, use your drill on a low to medium speed setting. High speeds generate excess heat, which can melt or crack the epoxy. If you have a variable speed drill, start slow.
Drill Mode: Make sure your drill is set to the standard drilling mode (not hammer drill mode, unless you are drilling into a concrete substrate through a thin epoxy layer). Hammer drilling will likely shatter the epoxy.
Step 5: Start Drilling (Pilot Hole First!)
Place the tip of your pilot drill bit precisely on your marked spot. Apply light, steady pressure and slowly squeeze the trigger. Let the drill bit do the work.
Angle: Keep the drill as perpendicular (straight up and down) to the surface as possible. Angled drilling can put uneven stress on the epoxy.
Lubrication: This is critical, especially for larger holes or harder epoxies. Periodically dip the drill bit in water or apply a masonry lubricant. You can also have a spray bottle of water handy to lightly mist the drilling area as you go. Alternatively, some people find success drilling into a small puddle of water placed on the surface around the drill site.
Why Lubricate? Drilling creates friction, which creates heat. Heat is epoxy’s enemy when drilling. Lubrication cools the bit and the material, preventing melting and cracking. It also helps flush out the dust.
Pecking Motion: “Peck” the drill bit in and out of the hole every few seconds. This helps clear away the dust and debris, allowing the lubricant to reach the cutting surface and preventing the bit from overheating.
Step 6: Drilling the Final Hole
Once your pilot hole is complete, switch to your larger drill bit. Repeat the process from Step 5, using the pilot hole as your guide.
Apply Steady Pressure: Continue with light, steady pressure. Let the drill bit’s sharpness and the tool’s power do the work. Avoid forcing the bit.
Pecking and Lubrication: Continue the pecking motion and lubrication as you drill through the entire thickness of the epoxy.
Emerging from the Other Side: As you near the other side of the epoxy, reduce pressure even further. This is where chipping is most likely to occur. If you’re drilling through an epoxy countertop, consider placing a scrap piece of wood on the underside of the countertop (if accessible) to support the epoxy as the bit breaks through.
Step 7: Finishing and Clean-Up
Once the drill bit has passed completely through the epoxy, withdraw it slowly.
Smooth Edges: Inspect the hole for any sharp edges or minor imperfections. You can use a small piece of fine-grit sandpaper (e.g., 220-grit or higher) to gently smooth the edges of the drilled hole if needed.
Clean the Area: Use a shop vacuum to clean up all dust and debris. Wipe down the surface with a damp cloth.
Drilling Different Types of Epoxy Projects
While the core principles remain the same, the specific type of epoxy project might influence your approach slightly.
Epoxy Countertops and Tabletops
These are typically thicker applications of epoxy. The key here is patience and ample lubrication. Because these surfaces are often highly visible, minimizing chipping is paramount. Using masking tape and drilling the pilot hole very carefully is extra important. Sometimes, an epoxy countertop will have a substrate underneath (like wood or particle board). When drilling, be aware of what lies beneath. You don’t want to drill into cabinetry or plumbing unexpectedly.
Resin Art and Molds
Thinner resin art pieces or items cast in molds can be more delicate. The epoxy might be only a few millimeters thick. For these, using a diamond-tipped bit designed for glass or tile is often best. Low speed, light pressure, and consistent cooling are paramount to avoid shattering the piece. If the piece is relatively small and thin, drilling might require securing it very firmly to prevent it from moving.
Applying Hardware to Epoxy-Coated Surfaces
When installing drawer pulls, cabinet knobs, or other hardware, you’ll usually be drilling through the epoxy coating into the underlying material (e.g., wood). In this case, the epoxy layer is just the first hurdle. A pilot hole through the epoxy will make it much easier to then drill into the substrate with a standard wood bit. The same principles of slow speed, light pressure, and lubrication apply to the epoxy portion.
Potential Challenges and How to Overcome Them
Even with the best preparation, sometimes things don’t go perfectly. Here are a few common issues and how to deal with them:
Drill Bit Wandering:
Solution: Use a center punch or a generous piece of masking tape to create a stable starting point.
Chipping and Cracking:
Solution: This is usually due to excessive speed, too much pressure, or dull bits. Slow down, ease up on the pressure, and ensure your bits are sharp. Lubrication is vital! For larger holes, consider starting with a smaller pilot hole. If a small crack does form, sometimes a clear epoxy repair kit can be used to fill it discreetly.
Overheating:
Solution: Insufficient lubrication or drilling too fast. Increase lubrication (water or cutting fluid) and slow down the drill speed. Use the pecking motion to clear dust and allow cooling.
Bit Getting Stuck:
Solution: This can happen if the epoxy is very deep or if dust isn’t being cleared. Back the bit out slightly (while it’s still spinning slowly) to help clear the hole, then continue. Ensure you are using adequate lubrication.
When to Consider Professional Help
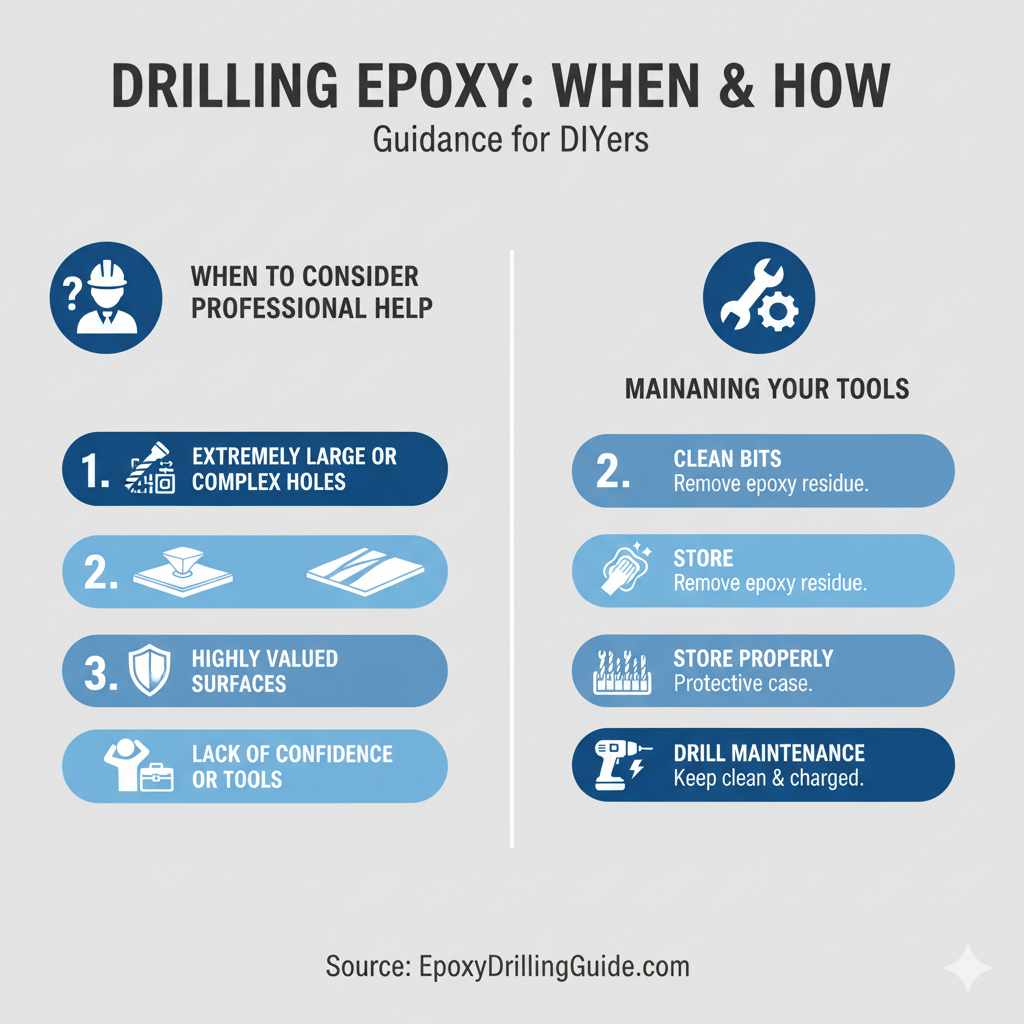
While drilling through epoxy is a manageable DIY task, there are times when calling a professional might be wise.
Extremely Large or Complex Holes: If you need to drill very large holes or multiple holes in a critical area.
Highly Valued Surfaces: If the epoxy surface is extremely expensive or has significant aesthetic importance, and you can’t afford any risk of damage, a professional might be better suited.
Lack of Confidence or Tools: If you don’t feel comfortable with the tools or the process, it’s always better to seek help.
Maintaining Your Tools
Proper care ensures your tools last and perform well.
Clean Bits: After drilling, clean your diamond or carbide bits thoroughly to remove any epoxy residue. This prevents buildup and keeps them sharp.
Store Properly: Store your drill bits in a protective case to prevent damage.
Drill Maintenance: Keep your drill clean and ensure its battery is charged (if cordless).
Frequently Asked Questions About Drilling Epoxy
Q1: Can I use a regular HSS drill bit for epoxy?
A1: While you might be able to drill through very thin epoxy sections with a sharp HSS bit, it’s not recommended for thicker applications. HSS bits will dull quickly and are more likely to cause chipping or cracking. Diamond-tipped or carbide-tipped bits are far superior for epoxy. For more on drill bit types, Material Handling and Safety provides guidance.
Q2: How do I prevent the drill bit from slipping on smooth epoxy?
A2: The best methods are to use a center punch to create a small starting divot or to cover the drilling spot with painter’s tape. The tape provides grip and helps prevent the bit from skittering across the surface.
Q3: Is it messy to drill through epoxy?
A3: Yes, drilling epoxy will create fine dust. Some small chips can also occur. Always wear a mask to avoid inhaling the dust. Using a shop vacuum to immediately clean up dust as you work can help manage the mess.
Q4: What is the best way to cool the drill bit while drilling epoxy?
A4: The most effective methods are using water or a specialized masonry lubricant. Periodically dipping the bit or using a spray bottle to mist the area helps significantly. The “pecking” motion also aids in cooling by clearing dust and allowing lubricant to reach the bit.
Q5: My epoxy is cracked after drilling. Can I fix it?
A5: Minor cracks can often be repaired using a clear epoxy filler or a crack repair kit specifically designed for resins. For larger cracks or severe damage, the repair might be more extensive or might require replacing the epoxy section if possible.
Q6: Do I need to use a pilot hole?
A6: Using a pilot hole is highly recommended, especially for larger diameter holes. It makes drilling the final hole much easier, more precise, and significantly reduces the risk of cracking or chipping the epoxy.
Conclusion
Drilling through epoxy might sound daunting, but as you can see, it’s entirely within the reach of the average DIYer. By understanding the material, equipping yourself with the right tools—particularly diamond-tipped or carbide-tipped bits—and following a careful, deliberate process, you can create clean, precise holes without damaging your beautiful epoxy projects. Remember to prioritize safety by wearing your protective gear, work at a slow, steady speed, and don’t forget the crucial step of lubrication to keep things cool and clean. With a bit of practice and this guide, you’re well-equipped