Can You Glue Foam Together? Essential Guide
Yes, you absolutely can glue foam together! Choosing the right adhesive is the secret. Different foams (like Styrofoam, craft foam, or dense insulation foam) need specific glues to create strong, lasting bonds without dissolving the material. We’ll show you the best, easiest methods for a perfect, non-melting join every time.
Welcome to the workshop! If you’ve ever tried to stick two pieces of foam together only to watch them melt or wrinkle, you know the frustration. Foam—whether it’s soft craft foam for a costume or rigid foam insulation for a project—seems tricky to bond. You might think you need specialized magic, but I promise, the fix is much simpler.
As a woodworker, I handle all sorts of materials, and foam is common in crafts and home improvement. The key is avoiding harsh chemicals that attack the foam structure. I’m here to clear up the confusion. We will walk through exactly which glues work best for every type of foam and provide simple, safe steps for strong adhesion.
Ready to master foam gluing? Let’s start by understanding what kinds of foam you might be working with!
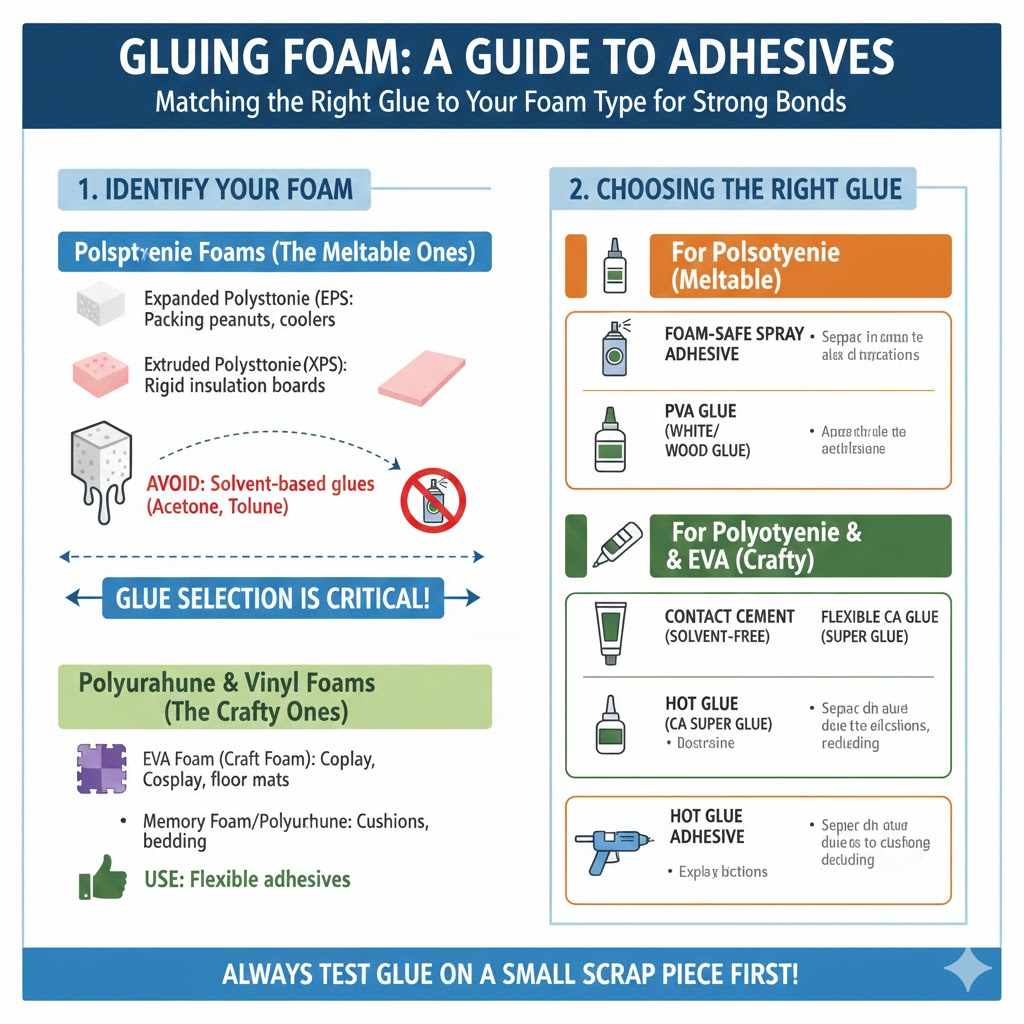
Understanding Your Foam: Not All Foams Are Created Equal
Before you grab any bottle, we must identify your material. Gluing foam is rarely about the glue itself; it’s about making sure the glue won’t eat the foam. There are two main categories you’ll encounter:
1. Polystyrene Foams (The Meltable Ones)
These are often found in craft projects or basic packing. They are sensitive to solvents. If you use a glue containing acetone or toluene (common in solvent-based contact cements), the foam will literally melt into a gooey mess. This includes:
- Expanded Polystyrene (EPS): The classic white packing peanuts and cooler material. Very lightweight and prone to dissolving.
- Extruded Polystyrene (XPS): The pink or blue rigid foam insulation boards often used for rigid insulation or model making.
2. Polyurethane and Vinyl Foams (The Crafty Ones)
These are usually more forgiving, but still need the right product for a flexible, lasting bond. They don’t dissolve easily with typical glues.
- EVA Foam (Craft Foam): Used heavily in cosplay, costuming, and floor mats. It’s durable and flexible.
- Memory Foam/Polyurethane Foam: Found in cushions and bedding. It requires a flexible adhesive.
The Golden Rule of Foam Gluing: Test Before You Commit
This is the single most important piece of advice I can give you, friend. Always test your chosen glue on a small scrap piece of your exact foam material first. Apply a small dab, wait five minutes, and see what happens. If it dissolves, bubbles up, or turns sticky, move on to the next option on our list. This tiny step saves you from ruining your main project!
The Best Glues for Gluing Foam Together (The Tested Favorites)
Now that you know what you’re working with, let’s look at the adhesives that won’t destroy your project. These options are recommended because they create strong, clean bonds when dealing with the unique texture of foam.
Option 1: Construction Adhesive (The Heavy-Duty Fix for Rigid Foam)
When you are working with thick insulation foam like XPS, you need something strong that stays put. Specific construction adhesives are formulated to be “foam-safe.” These are generally solvent-free or use specialized solvents that don’t react aggressively with polystyrene.
When to Use It: Bonding large sheets of insulation foam (XPS/EPS) for workshops, dioramas, or cold storage lining.
- Pros: Incredibly strong, excellent gap-filling properties, good structural support.
- Cons: Very slow cure time (sometimes 24+ hours), messy to apply, less flexible.
Option 2: Contact Cement (The Professional’s Choice for Craft Foam)
Contact cement is fantastic for EVA foam (craft foam) because it dries strong and remains flexible—perfect for items that need to bend, like costume pieces or floor mats. The trick is using a foam-safe variety. Standard contact cement will melt the foam, but modern, water-based, or rubber-based formulations designed for foam work wonders.
How it Works: You coat both surfaces, let the adhesive dry tack-free, and then press them together for an instant, permanent bond.
- Pros: Very fast setting once surfaces meet, highly durable and flexible.
- Cons: Requires good ventilation (even water-based types benefit from airflow), precise application is needed since you can’t easily reposition once pressed.
Option 3: Hot Glue (The Quick and Easy Fix)
Low-temperature hot glue guns are the go-to for quick assembly on many craft projects, but use caution. While many foam types handle hot glue fine, high heat can slightly scorch or warp soft foams (like thin EPS sheets).
When to Use It: Quick fixes, securing lightweight embellishments to foam, or when speed is essential on EVA foam projects.
- Pros: Instant grab, requires almost no clamping time, easy to remove if you make a mistake (if the heat wasn’t too high).
- Cons: Adds bulk to the seam, low structural strength for heavy items, heat sensitivity on some foams.
Option 4: Specific Craft/Hobby Glues (Best for Precision)
For lightweight items or small detail work, specialized craft glues designed for porous materials often work best. These are generally PVA-based (white glue) or specialty polymer glues that cure clear and remain flexible.
Examples: E6000 (excellent for EVA foam due to flexibility) or tacky craft glue (safe for polystyrene). Always check the label for compatibility.
- Pros: Often non-toxic, cleans up easily with water (if water-based), results in a very clean, nearly invisible line.
- Cons: Long drying times (may require clamping for hours), lower shear strength than contact cement.
Choosing Your Weapon: A Cheat Sheet for Different Foams
To make things really easy, here is a quick reference table summarizing the best adhesive choice based on what you are sticking together. Always remember that even within these categories, formulation matters!
| Foam Type | Ideal Adhesive Choice | Why It Works |
|---|---|---|
| EVA Craft Foam (Costumes, Mats) | Foam-Safe Contact Cement or E6000 | Creates a flexible, strong bond that resists movement. |
| Rigid Insulation Foam (XPS/EPS) | Solvent-Free Construction Adhesive | Provides structural strength needed for insulation or large models without melting. |
| Styrofoam Balls/Shapes (Lightweight) | Clear Tacky Glue or Low-Temp Hot Glue | These lightweight adhesives do not use harsh solvents that eat the foam. |
Step-by-Step Guide: Gluing Foam for a Perfect Bond
Following a careful process is just as important as picking the right glue. Whether you are sticking two sheets of insulation board or two curved costume pieces, these steps will ensure your join lasts.
Preparation: The Foundation of Success
Great adhesion starts before the glue touches the foam. Always clean your surfaces!
- Clean the Surfaces: Ensure the foam pieces you plan to join are completely free of dust, oils, or release agents (sometimes found on foam packaging). A light wipe with a clean, dry cloth usually does the trick. Do NOT use water or solvents here.
- Check the Fit: Dry-fit the pieces. They should sit perfectly flush with minimal gaps. If you have a large gap (more than 1/8 inch), you might need a specialized gap-filling adhesive, or you may need to shave down the foam slightly using coarse sandpaper (a foam sanding block is great for this).
- Ventilation: If you are using contact cement or solvent-based glues, make sure you are working outdoors or in a very well-ventilated area, like a garage with doors and windows open. Safety first, always!
Application Methods Based on Glue Type
Method A: For Flexible Bonds (Contact Cement / E6000)
This method requires you to bond surfaces instantly, so measure twice, apply once!
- Apply Thin Layers: Using a cheap plastic spreader or spatula, apply a thin, even coat of contact cement to both surfaces that will touch. Try to coat the entire area you plan to join.
- Wait for the Tack: This is crucial. Allow the glue to dry according to the manufacturer’s instructions—usually 10 to 15 minutes. The glue should feel tacky (sticky to the touch) but not wet. This solvent-free drying process is what prevents the foam from dissolving.
- Mate the Pieces: Bring the two tacky surfaces together precisely. Press them firmly together. For a secure bond, especially with rigid foam, run a smooth roller or a heavy book over the joint to ensure maximum contact area.
- Cure Time: Although the bond is immediate, it reaches full strength after 24 to 72 hours, depending on the product.
Method B: For Structural Bonds (Construction Adhesive)
This is used when the glue needs to fill small irregularities and bear weight.
- Apply Beads: Using a caulk gun, apply the adhesive in wavy beads across one surface, ensuring you cover about 80% of the area. Do not run the glue around the very edge, as it will squeeze out excessively when pressed.
- Press Firmly: Bring the two pieces together. Construction adhesives often require you to physically clamp them or place heavy weights on them to maintain constant pressure while they cure.
- Wipe Excess: Immediately wipe away any adhesive that squeezes out the sides using a damp rag or specialized solvent (check your product’s requirements—sometimes water works, sometimes not).
- Secure and Wait: Clamp or secure the joint and leave it untouched for the full cure time listed on the package (often a full day).
Finishing Up: Clamping and Curing
Foam needs even pressure while setting, unlike wood, which clamps tightly. Excessive localized pressure can dent soft foam.
- Use wide, smooth clamps or heavy, evenly distributed weights. If using clamps on insulation board, consider padding the jaws with extra scrap foam or wood blocks to spread the pressure across a wider area.
- Be patient! Rushing the curing process is the number one reason foam joints fail under stress.
Safety First: Working Safely with Foam Adhesives
As your woodworking mentor, my primary concern is always your safety. Many adhesives used for foam, especially solvent-based ones, can irritate your skin, eyes, and lungs. Working safely ensures your project is fun and rewarding, not regrettable.
Essential Safety Checklist:
- Ventilation is Key: Whenever using contact cement or epoxy-style adhesives, open up your workspace. Good air exchange removes harmful fumes quickly.
- Wear Gloves: Most strong adhesives are very difficult to remove from skin once dry, and some can cause irritation or absorption issues. Nitrile gloves are highly recommended.
- Eye Protection: Even simple liquid glue can splash. Safety glasses protect your vision while you work, especially when dealing with pressurized caulk guns or applying glue forcefully.
- Read the SDS: Familiarize yourself with the Safety Data Sheet (SDS) for any chemical adhesive you buy. Reputable manufacturers make these available online. For more general safety information regarding shop practices, you can always refer to resources provided by organizations like the Occupational Safety and Health Administration (OSHA) regarding chemical handling.
Advanced Tips: Gluing Foam to Other Materials
Sometimes you need foam to stick to something sturdy, like wood or metal. This requires a robust, universal adhesive, often heavy-duty construction grade.
Bonding Foam to Wood (Framing Projects)
If you are attaching insulation foam to a wood frame (like building cabinet backs or custom display stands), you have a few great options:
- Spray Foam Adhesive: Some specialized polyurethane spray foams are designed to stick well to wood while still adhering to foam. These expand slightly, helping to fill minor voids between the slightly uneven foam surface and the wood.
- Construction Adhesive: A good bead of foam-safe construction adhesive works excellently between the wood stud and the back of the foam sheet. Apply to the wood side, press the foam onto it, and clamp overnight.
Bonding Foam to Metal (Display Cases or Hardware)
Metal is non-porous, which makes adhesion tricky. You need a chemical bond, not just a mechanical grip.
- Epoxy: Two-part epoxy is excellent for bonding foam to metal, as it adheres strongly to both surfaces. Make sure you use a slow-curing epoxy if you are working with large foam areas, as it gives you more time to align everything.
- E6000: Due to its strong rubbery base, E6000 often provides a good intermediate bond that can handle the slight expansion and contraction difference between metal and foam.
The one material to watch out for when gluing foam is thin plastic sheeting (like polystyrene or clear acrylic). Standard CA (cyanoacrylate, or super glue) and many solvent glues will craze (turn cloudy or milky) clear plastic near the glue line. If bonding plastic to foam, always opt for a flexible, clear PVA or E6000.
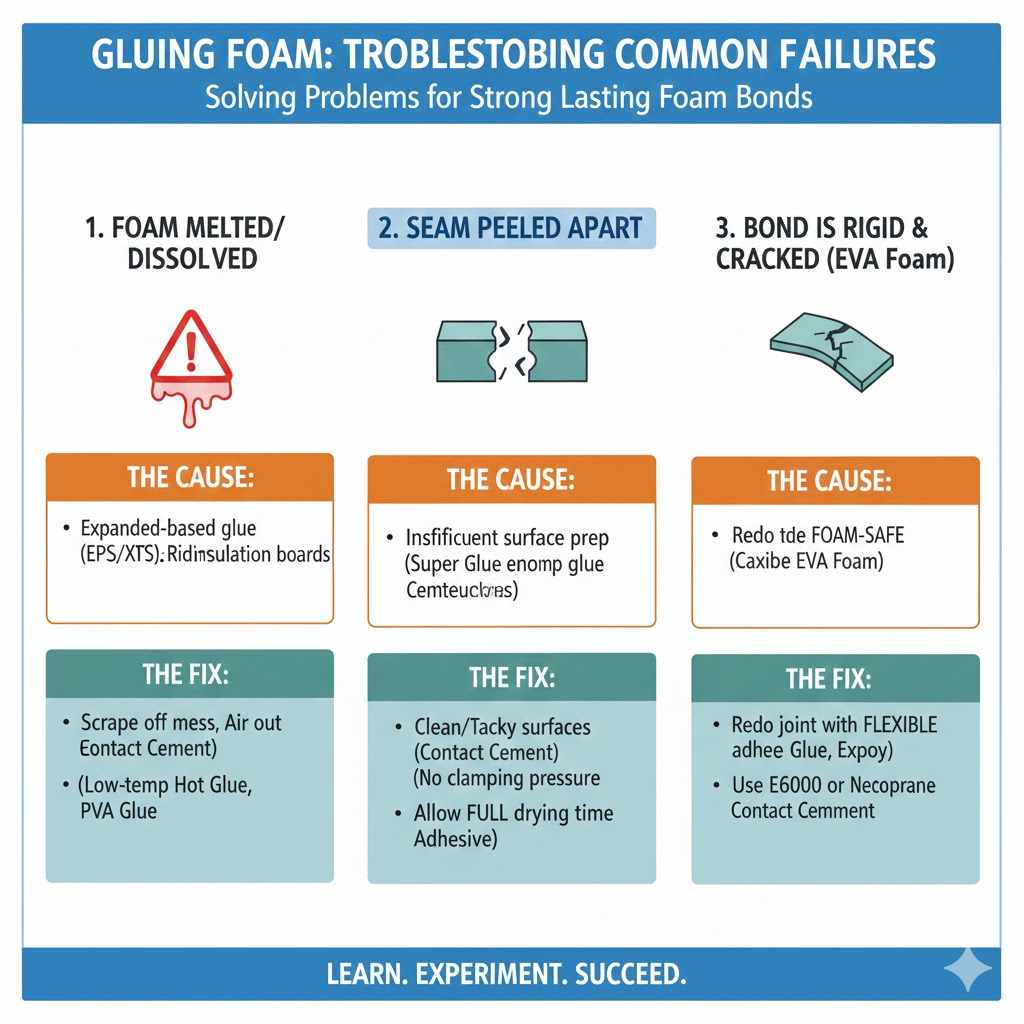
Troubleshooting Common Foam Gluing Failures
Don’t worry if your first attempt isn’t perfect. We all learn by troubleshooting. Here are the most common issues and how to fix them, mentor-style.
Problem 1: The Foam Melted/Dissolved
The Cause: You used a solvent-based glue (like many standard super glues or standard contact cements) on Polystyrene (EPS/XPS) foam. The solvents chemically break down the foam structure.
The Fix: Scrape off the gooey mess completely. Allow the foam to air out. Then, reapply the glue only after you switch to a confirmed foam-safe alternative, like low-temp hot glue or a PVA-based craft glue.
Problem 2: The Seam Peeled Apart Easily
The Cause: Usually due to insufficient surface preparation or not allowing enough cure time.
The Fix: For contact cement failure, the surfaces likely weren’t tacky enough or were pressed together unevenly. For construction adhesive failure, you probably didn’t use enough clamping pressure. For crafts, if you used tacky glue, you didn’t let it dry long enough—it needs to be fully dry before the pieces see any stress.
Problem 3: The Bond is Strong, But Not Flexible (EVA Foam Projects)
The Cause: You used a rigid glue like super glue or epoxy on flexible EVA foam.
The Fix: When EVA foam bends, the rigid glue line cracks first. You need to redo the joint using a flexible adhesive like E6000 or a specialized neoprene-based contact cement, allowing the bond to move with the foam.
Frequently Asked Questions (FAQ) for Beginner Foam Glues
Q1: Can I use Super Glue (CA glue) on foam?
A: Maybe, but cautiously. Most super glues contain solvents that aggressively attack Styrofoam (EPS/XPS), causing melting or puffing. Use CA glue only on denser craft foam (EVA) or if you use a thick, specialized “foam-safe” super glue accelerant/primer kit. Always test first!
Q2: Which glue is best for Styrofoam packaging foam?
A: Look for glues labeled “Styrofoam Safe.” The best options are often white school glue (PVA), specific tacky glues, or hot glue used on a low-temperature setting. Avoid anything containing strong petroleum distillates or acetone.
Q3: How long do I need to clamp foam after gluing?
A: This depends heavily on the glue. For low-temp hot glue, clamping isn’t needed; it sets in seconds. For contact cement, clamping time is minimal (a hard press for 30 seconds is often enough). For construction adhesives, plan on 4 to 12 hours under moderate, widespread pressure.
Q4: If I am gluing foam to plastic, what should I use?
A: If the plastic is flexible (like vinyl), E6000 is usually your best bet as it maintains flexibility on both sides. If the plastic is rigid (like ABS or acrylic), a two-part epoxy often provides the necessary chemical adhesion for a long-lasting structural bond.
Q5: Can I paint over glued foam seams?
A: Yes, most cured adhesives, once dry, are paintable. However, flexible bonds (like contact cement seams on EVA foam) might need a thin layer of sealant or flexible primer before painting, as thick acrylic paint can sometimes stiffen the seam and cause it to crack when the foam moves.
Q6: What is the safest way to join rigid insulation foam?
A: The safest and strongest method involves using a solvent-free, polyurethane construction adhesive designed for foam boards. This prevents melting while providing excellent thermal and structural integrity for your structure.
Conclusion: You’ve Mastered Foam Adhesion!
See? Gluing foam isn’t rocket science—it’s just material science! You now know that the entire secret to successful foam adhesion lies in identifying your foam type and matching it with a compatible, solvent-free or highly controlled adhesive. Whether you are crafting a detailed costume prop with flexible EVA foam using contact cement, or permanently sealing rigid insulation boards with construction adhesive, patience and preparation are your best tools.
Take your time for that crucial test application, ensure your surfaces are clean, and always respect the curing time. You are no longer a beginner wondering if you can glue foam—you are now an expert knowing exactly how to glue foam for a durable, professional-looking result. Get out to the workshop, feel confident in your material choice, and enjoy creating something solid from something light!