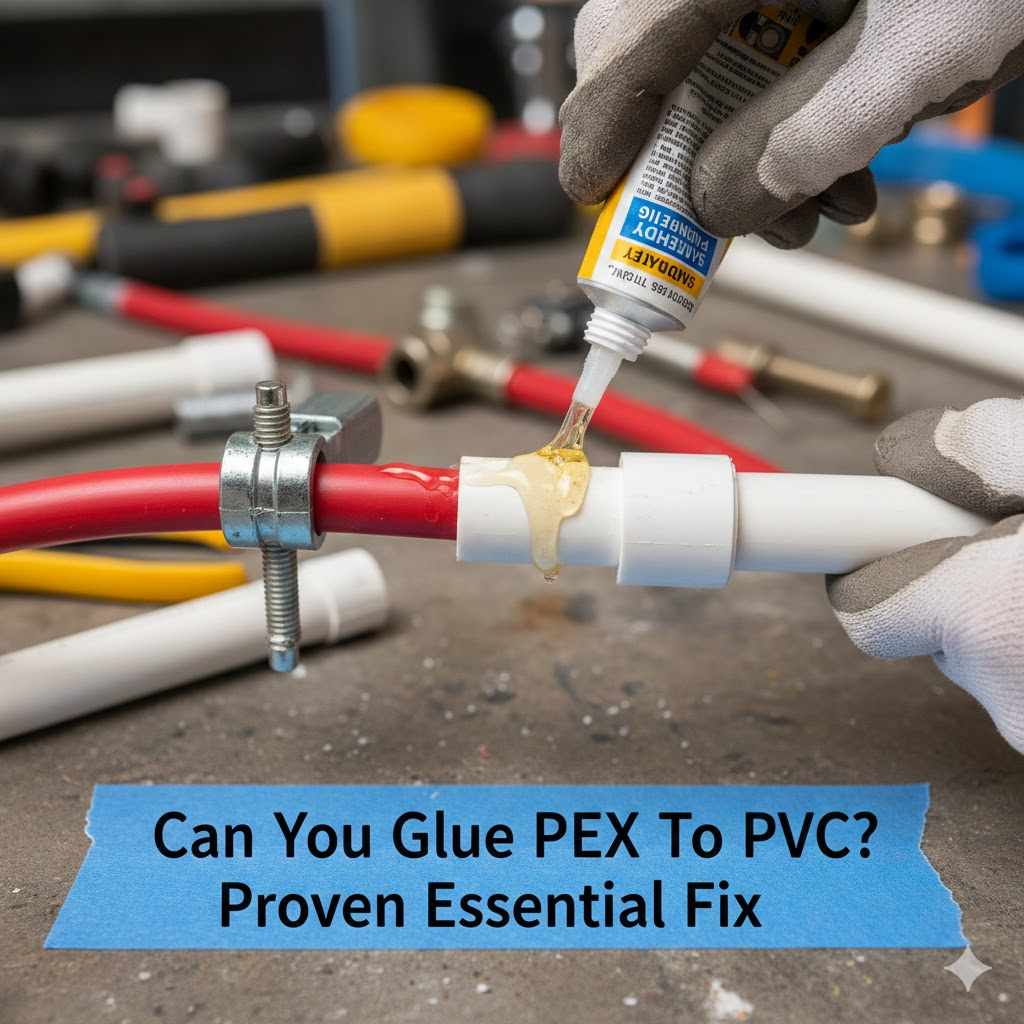
Can You Glue PEX To PVC? Proven Essential Fix
No, you cannot effectively glue PEX directly to PVC pipe using standard solvent cements designed for PVC. PEX is flexible polyethylene, and PVC cement creates a chemical weld only on rigid vinyl materials. Joining these two dissimilar plastics requires specific transition fittings and proper methods to ensure a durable, leak-free connection.
We’ve all been there—staring at a pipe repair job where different materials meet, wondering if the handy tube of glue in your toolbox will do the trick. Mixing plumbing materials like PEX (cross-linked polyethylene) and PVC (polyvinyl chloride) happens often in renovations or additions. It can be frustrating when two common plastics won’t just stick together! Good news!
While a simple glue joint isn’t the answer, there are proven, durable methods that let you join PEX to PVC safely. This guide walks you through exactly what you need, why simple gluing fails, and how to create a professional-grade fix, step-by-step.
Why You Can’t Just Glue PEX to PVC: Understanding Plastic Differences
When you grab a can of standard plumbing glue—let’s call it solvent cement—you might think it’s universal. For PVC pipes, this stuff is fantastic. It chemically melts the surfaces of the PVC, fusing them into one strong piece as the cement dries. This process is called solvent welding.
PEX, on the other hand, is a completely different beast. It’s a type of polyethylene, which is plastic that bends, resists chemicals well, and does not react to PVC solvent cement at all. Think of it like trying to glue two pieces of flexible rubber together with something meant for hard plastic; the bond won’t hold up to water pressure.
The Chemical Mismatch Explained
To understand the issue better, let’s look at what each material responds to:
- PVC (Polyvinyl Chloride): Rigid, used widely for drainage and cold water supply. It softens and fuses perfectly with chlorinated solvents (PVC cement).
- PEX (Cross-linked Polyethylene): Flexible tubing, often used for radiant heating and modern water distribution. It is chemically inert against the solvents in PVC cement, meaning no melting or fusion occurs.
Because PEX doesn’t soften under PVC cement, any attempt to glue them will result in a weak bond that will almost certainly fail under water pressure, leading to leaks and headaches down the road. If you’re working on pressurized water systems, safety and durability are key. Always rely on mechanical connections.
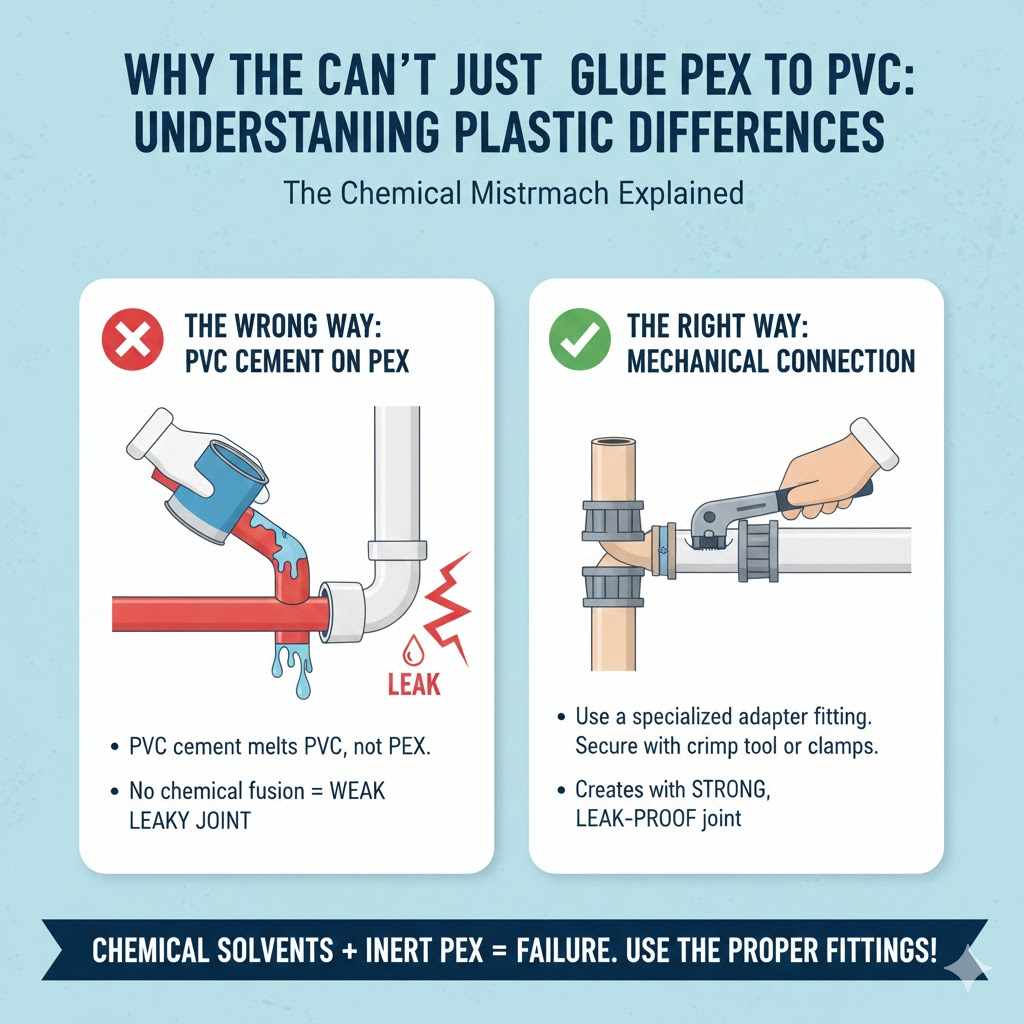
The Proven Solution: Transition Fittings
The secret to connecting PEX and PVC is not glue; it’s using specialized, manufacturer-approved transition fittings. These fittings act as a safe bridge, creating a mechanical lock on the PEX side and a solvent-weldable connection on the PVC side.
These transition fittings are critical for maintaining the integrity and lifespan of your plumbing system. You can find reliable standards and guidelines regarding materials approved for potable water systems from organizations like the International Code Council (ICC).
Types of Transition Fittings You Will Need
The exact fitting depends on what you are transitioning from and to, but generally, you are looking for a fitting that has connections designed specifically for each material.
Here are the common components you will use in a PEX-to-PVC connection:
- PVC Adapter (Female or Male Threaded or Slip): One end is designed to solvent-weld onto your existing rigid PVC pipe.
- PEX Crimp or Compression Fitting: The other end of the assembly must be ready to securely grip the PEX tubing using clamps, rings, or crimps.
The most common and recommended piece is often a Transition Fitting with Female Pipe Threads (FPT) on one end and a barb for PEX on the other. This lets you screw the PVC side onto a corresponding male-threaded adapter previously solvent-welded onto the PVC line.
| Method | Materials Joined | Durability | Recommendation |
|---|---|---|---|
| Solvent Weld (Glue) | PVC to PVC | Excellent (Permanent Fusion) | Recommended for PVC-to-PVC |
| Crimp/Clamp Connection | PEX to PEX Fitting | Excellent (Mechanical Lock) | Standard PEX connection method |
| Glue PEX to PVC | PEX to PVC | Very Poor (Will Fail) | Never Use! |
| Transition Fitting | PEX to PVC | Excellent (Certified Mechanical Joint) | The only safe method |
Gathering Your Tools and Materials for a Strong Fix
Before we start turning wrenches and cutting pipe, let’s make sure the workshop is set up correctly. Having the right tools ensures a clean job that you can trust for years. Remember, in plumbing, clean cuts and correct measurements equal quality craftsmanship.
Essential Tools List
- PEX Cutter (or a very sharp utility knife, though a proper cutter is safer and cleaner)
- PVC/ABS Plastic Pipe Cutter or a Fine-Tooth Hacksaw
- Deburring Tool or Sandpaper (to smooth cut edges)
- Tape Measure and Permanent Marker
- PEX Crimp Tool or PEX Clamp Tool (depending on your chosen fitting type)
- Adjustable Wrenches or Channel Locks
Necessary Materials
- PEX Tubing: Make sure the PEX type (A, B, or C) matches your fitting requirements if necessary (though most fittings are universal now).
- PVC Pipe: The existing pipe you are connecting to.
- Transition Fitting: Must be approved for the intended use (e.g., potable water).
- PVC Primer and Cement: For the PVC side of the joint only.
- Crimp Rings/Clamps or Expansion Rings: Specific to your PEX connection style.
Safety first! Always wear safety glasses when cutting pipe or using chemical cements. Have rags handy to wipe up any spills immediately.
Step-by-Step Guide: Safely Transitioning from PVC to PEX
We will tackle this in two clear phases: first, preparing and connecting the rigid PVC side, and second, securing the flexible PEX side. We’ll assume you are cutting out a section of old PVC pipe and inserting a new transition piece.
Phase 1: Preparing and Joining the PVC Side
This process creates a secure, leak-proof anchor point on the rigid pipe side.
Step 1: Shut Off and Drain the Water
Before touching any pipe, find the main water shutoff valve and close it. Open the lowest faucet in the house to drain any residual pressure and water from the lines you are working on. You must work with dry pipes.
Step 2: Measure and Cut the Existing PVC
Measure the length of the section you need to remove. Use your pipe cutter or fine-tooth hacksaw to make square, clean cuts through the existing PVC pipe. Aim for smooth, straight edges.
Step 3: Clean and Dry All Surfaces
This is crucial for a proper solvent weld. Use sandpaper or a cloth to lightly scuff the outside surface of the remaining PVC pipe ends and the inside surface of the coupling/adapter you are attaching. Wipe away all dust with a clean rag. Both surfaces must be completely dry.
Step 4: Prime the PVC Surfaces
Apply the purple PVC primer generously to the outside ends of the cut PVC pipe and the inside socket area of your PVC transition fitting (the end meant for the PVC). The primer cleans and chemically prepares the plastic for the cement.
Step 5: Apply PVC Cement and Assemble
Quickly apply a liberal, even coat of PVC cement over the primed areas (outside the pipe end, inside the fitting socket). Immediately push the fitting onto the pipe with a slight twisting motion, ensuring the pipe seats fully to the bottom of the socket. Hold the joint firmly for about 30 seconds while the solvent starts to bond the plastics.
Important: Curing time matters. For water lines, always check the cement can for recommended initial set times before proceeding. Many experts recommend letting the solvent weld cure for at least an hour, though consult local codes for potable water guidelines. You can review best practices from organizations like The Engineering Toolbox on PVC Joining for reference.
Phase 2: Securing the PEX Tubing Connection
Now we move to the flexible PEX end. This relies on mechanical clamping, not glue.
Step 6: Prepare the PEX Pipe
Measure the PEX tubing to the required length. Use your PEX cutter to make a clean, straight cut. Use a deburring tool or fine grit sandpaper to smooth the outer edge of the PEX pipe end. This prevents the fitting barb from being damaged when inserted.
Step 7: Install the Crimp/Clamp Ring (If Applicable)
Slide the PEX ring or stainless steel crimp clamp over the end of the PEX pipe. Make sure it slides easily. It must be positioned so that it sits squarely over the connection point where the barb will go.
Step 8: Insert the PEX Barb Fitting
Push the PEX end of your transition fitting firmly onto the PEX pipe. You must push it all the way until the pipe stops against the fitting’s internal stop or shoulder. This ensures maximum sealing surface area.
Step 9: Crimp or Clamp the Fitting
Using your crimp tool or clamp pliers, tighten the ring/clamp securely around the PEX tubing directly over the fitting barb. If using a crimp tool, ensure the tool provides a solid “crimp” that confirms a successful connection.
If you are using expansion fittings (PEX-A systems), use the expansion tool to widen the PEX end slightly, seat the fitting, and allow the PEX to shrink tightly around the fitting as it cools.
Step 10: Final Checks and Testing
Double-check every connection. Is the PVC joint firm? Is the PEX crimp solid? Allow adequate time for the PVC cement to fully cure (often several hours, check the can!). Once cured, slowly turn the water back on. Watch the transition joint closely for any signs of weeping or leaks. A correctly installed transition fitting will provide a connection as strong as the pipes themselves.
Alternative: Using Threaded Connections for Easy Disassembly
While the direct solvent-weld adapter mentioned above is very common, sometimes you want the ability to separate the PEX system from the PVC system later without cutting pipe. This is where threaded connectors shine.
The Threaded Assembly Method
This method requires slightly more components but offers excellent serviceability.
- Connect a Male Threaded Adapter to the PVC: Solvent-weld a PVC male adapter (MIP) onto the existing PVC pipe, following Steps 1–5 above.
- Install a Transition Nipple/Union: Screw a short nipple or union into that new MIP fitting. One end of this nipple should terminate in the necessary connection type for PEX (often a threaded connection if using specific PEX ball valves or specialized fittings).
- Connect the PEX End: Attach a female-threaded fitting (rated for PEX) to the PEX line using the correct crimp/clamp method described in Phase 2.
- Complete the Seal: Thread the PEX female fitting onto the nipple protruding from the PVC side. Use PTFE tape (Teflon tape) on the male threads to ensure a watertight seal between the two threaded components.
This threaded approach lets you completely disconnect the PEX portion for maintenance or future changes simply by unscrewing the assembly, offering great flexibility in a home workshop setting.
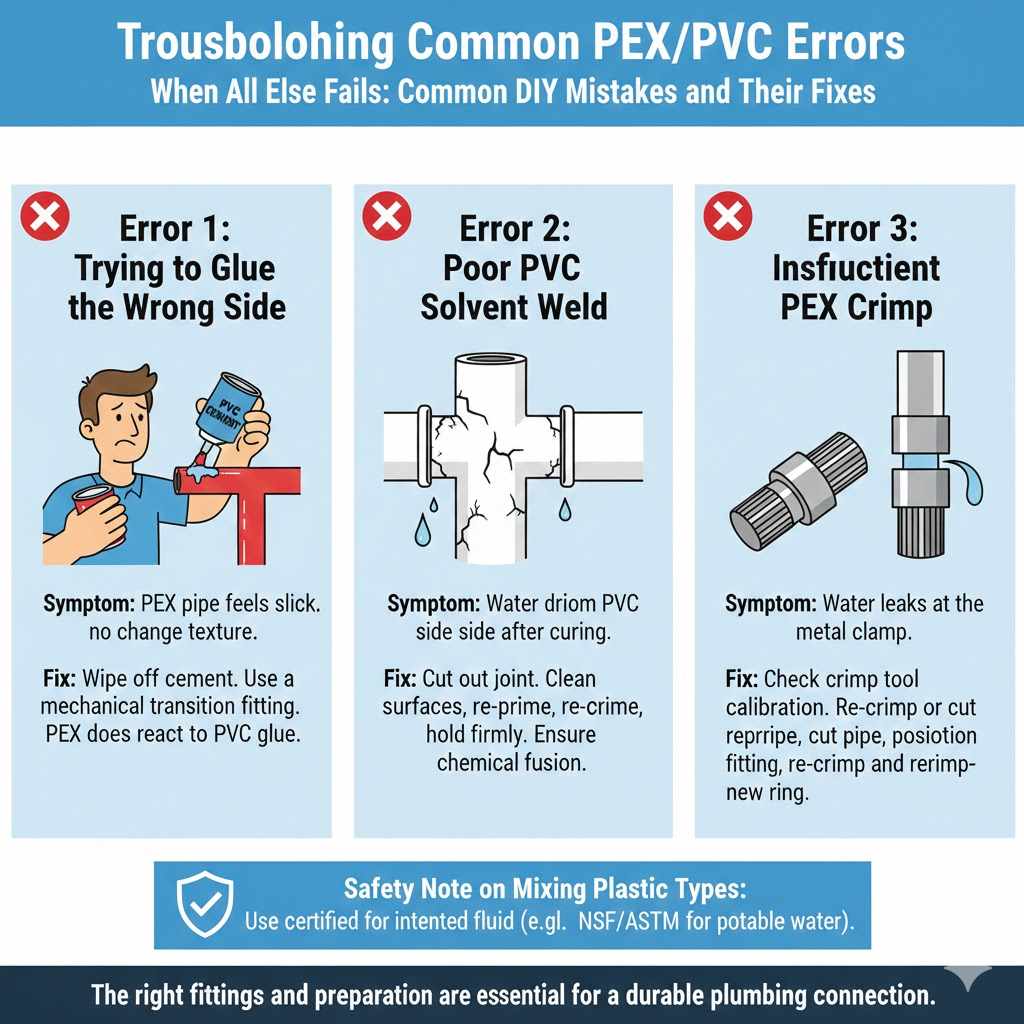
When All Else Fails: Troubleshooting Common PEX/PVC Errors
Even with the right parts, things can sometimes go awry. As a DIYer, catching these small errors early saves big repairs later. Here are the most frequent mistakes when mixing PEX and PVC.
Error 1: Trying to Glue the Wrong Side
Symptom: You applied PVC cement to the PEX pipe, and it feels slick but doesn’t change texture.
Fix: Stop immediately. Wipe off the excess cement. PEX is impervious to this glue. You must remove the fittings you planned to use and start over with a mechanical transition fitting.
Error 2: Poor PVC Solvent Weld
Symptom: Water drips from the PVC side of the connection, even after curing.
Fix: The weld failed due to dirt, dampness, or not holding the joint long enough. You might need to cut out the failed joint, clean the surfaces meticulously, re-prime, re-cement, and hold firmly. Remember, PVC cement needs chemical fusion; if the joint moves before setting, the weld breaks.
Error 3: Insufficient PEX Crimp
Symptom: Water leaks right at the point where the metal ring or clamp grips the PEX.
Fix: The clamp did not compress enough, or the PEX wasn’t pushed fully onto the barb. If using a crimp tool, ensure it is calibrated correctly. If using adjustable pliers, make sure you compress fully until the tool indicates success. In minor cases, you might be able to re-crimp carefully, but often the best fix is to cut the pipe just behind the failed ring, slide on a new ring, reposition the fitting, and re-crimp.
Safety Note on Mixing Plastic Types
Always ensure any transition fittings you use are certified for your intended fluid. For example, a fitting used for landscape irrigation drainage might not be approved for hot, potable drinking water. Look for markings like NSF or ASTM certification on the packaging of your transition components.
FAQ Section: Beginner Questions on Pipe Connections
Q1: Is PEX stronger than PVC pipe?
A: Not necessarily stronger, but PEX is much more durable against physical impacts (it bends instead of shattering) and performs better in freezing conditions because it can expand slightly. PVC is excellent for rigid structural support and drainage systems.
Q2: What kind of glue do I use on PEX pipes?
A: You do not use glue on PEX pipes for plumbing connections. PEX is joined using mechanical connections like crimps, clamps, or expansion rings with specialized brass or plastic fittings.
Q3: Can I use PVC cement on CPVC pipe?
A: No. While CPVC looks like PVC, it requires a special yellow primer and cement labeled specifically for CPVC. Using PVC cement on CPVC will cause a weak joint or cracks.
Q4: Do I need plumber’s tape (Teflon tape) on PEX crimp joints?
A: No. PTFE tape is only used on threaded joints (like connecting metal to metal, or plastic threads to metal threads). It is never used with mechanical crimp or barbed PEX connections.
Q5: How long does the PVC cement need to cure before turning the water on?
A: For small diameter cold water lines, initial set might be 15 minutes, but for reliable, high-pressure systems, most professionals advise waiting at least 1–2 hours, or up to 24 hours for the very best results, depending on temperature and humidity. Always check the label on your specific cement brand.
Q6: Where do I buy these special transition fittings?
A: You can find PEX-to-PVC transition fittings at any major home improvement store in the plumbing aisle. Look specifically in the section dedicated to PEX systems, and ask an associate if you are having trouble locating the correct material conversion pieces.
Conclusion: Confident Connections Between PEX and PVC
As we’ve seen, the temptation to use that old tube of PVC glue on PEX is strong, but it’s a shortcut that never pays off in long-term reliability. When dealing with dissimilar plastics like PEX and PVC, success relies entirely on using the correct mechanical bridge—the transition fitting.
By carefully preparing your PVC surfaces for a solvent weld, and utilizing the appropriate crimp or clamp mechanism for your PEX line, you create a joint that is leak-free and incredibly durable. Remember the fundamentals: dry surfaces for gluing, clean barbs for crimping, and always use parts rated for the job. You now have the expertise to confidently tackle these mixed-material plumbing tasks, ensuring your repairs are done right, the first time, just like a seasoned craftsman.