Can You Hot Glue Felt? Proven Essential Hacks
Yes, you absolutely can hot glue felt! Hot glue is a fast, strong, and beginner-friendly adhesive for most felt crafts. The key is choosing the right glue stick temperature, using proper technique, and prepping the felt correctly for a bond that lasts.
Welcome to the workshop! If you’re staring at a pile of colorful felt squares and a glue gun, you might be wondering if this quick adhesive will hold up. Many beginners worry that felt’s fuzzy surface will resist the glue. Don’t worry; it’s one of the easiest materials to work with once you know the simple tricks. I’m Md Meraj, and I’ve spent years teaching folks like you that crafting doesn’t have to be complicated. We are going to walk through exactly how to get a solid, reliable bond every single time. Get ready to make your felt projects stick beautifully, from simple decorations to sturdy costume pieces!
Can You Hot Glue Felt? The Short Answer for DIYers
The quick answer is a resounding yes. Hot glue is one of the best friends for felt crafting. Felt is a non-woven textile, meaning it doesn’t fray like woven fabrics, which makes it perfect for quick-stick applications. Because hot glue cures so fast, you don’t have the long drying times associated with liquid fabric glues.
However, there are small details that separate a temporary stick from a permanent, lasting bond. We need to pay attention to the type of felt and the temperature of the glue. Let’s dive into making sure your felt holds together, no matter what you are building.
Understanding Your Materials: Felt Types and Glue Suitability
Not all felt is created equal, and this makes a difference in how it accepts glue. Before we start applying heat, let’s quickly review what you’re working with.
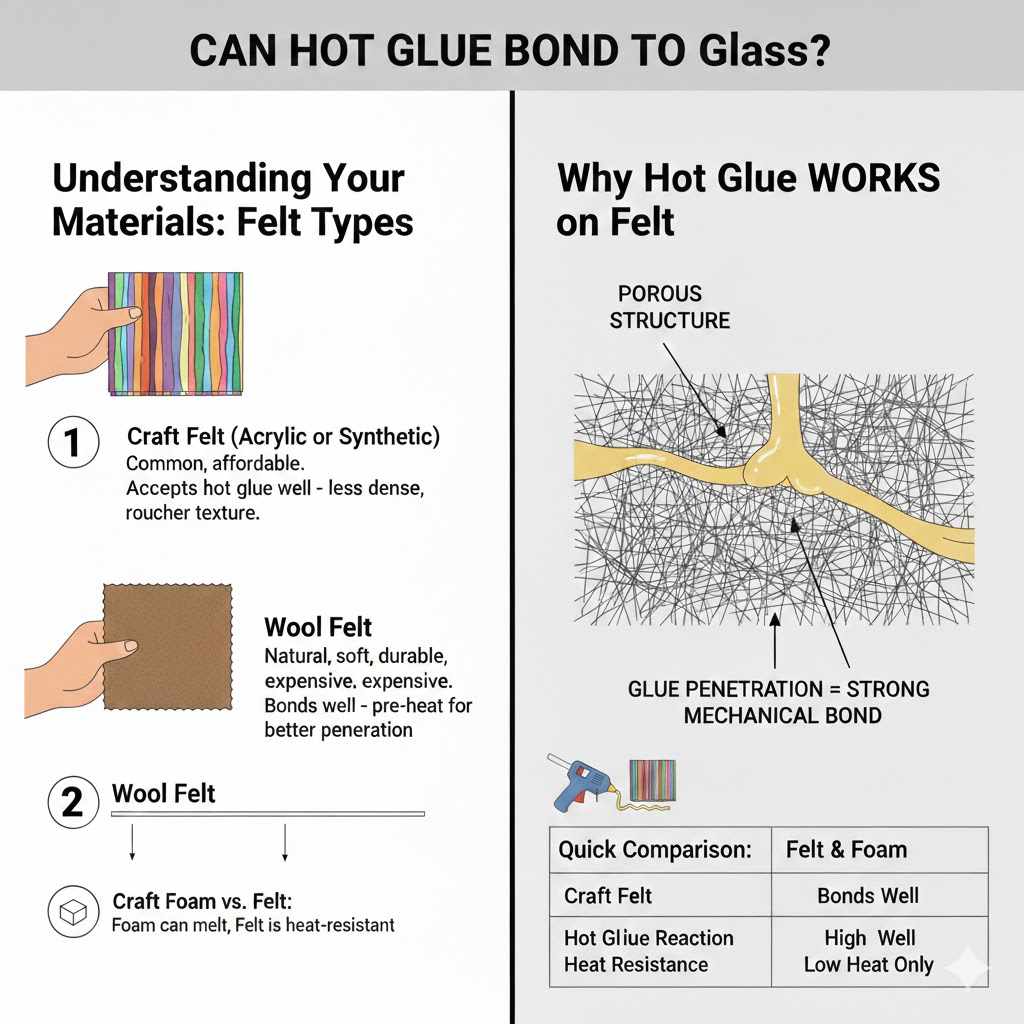
1. Craft Felt (Acrylic or Synthetic Felt)
- What it is: This is the most common and affordable felt, often found in large sheets at craft stores. It’s usually made from acrylic or synthetic fibers.
- How it reacts to glue: This type generally accepts hot glue very well because its fibers are less dense and often have a slightly rougher texture than wool.
2. Wool Felt
- What it is: Made from natural wool fibers. It’s softer, has a better drape, and is more durable. It’s usually more expensive.
- How it reacts to glue: Wool felt also bonds well, but because it is naturally thicker and denser, it often benefits more from pre-heating the surface slightly to ensure the glue penetrates the base fibers.
3. Craft Foam vs. Felt Misunderstandings
Sometimes beginners confuse felt with craft foam (like EVA foam). While hot glue works great on foam, remember that foam melts if the glue is too hot. Since felt is heat-resistant enough for standard hot glue guns, melting isn’t usually a concern, but watch out for extreme temperatures.
Essential Hack 1: Choosing the Right Hot Glue Stick Temperature
This is arguably the most important step for any successful hot glue project, especially with fabric. Most standard craft glue guns come with high-temperature settings, but for thin materials like felt, temperature control is key.
The Three Temperature Tiers
You generally have three choices for glue sticks:
- Low Temperature: Ideal for beginners and projects involving delicate materials or children (when closely supervised). Low-temp glue sets incredibly fast and is less likely to scorch delicate fibers. It provides a moderately strong hold, which is often plenty for lightweight felt decorations.
- High Temperature: This provides the strongest, most durable bond. Use this when bonding felt to heavier items like wood, thick cardboard, or when creating three-dimensional structures that need to bear some weight.
- Dual Temperature Guns: These guns allow you to switch settings. For most felt projects, start on the low setting. If you are attaching the felt to a very hard, slick surface (like polished metal), switch to high for maximum adhesion strength.
Pro Tip: Always test your temperature setting on a scrap piece of felt first. If you see any browning or scorching where the glue touches the felt, immediately switch to the low-temperature setting. Craft materials can be surprisingly sensitive!
Essential Hack 2: Preparation is Everything—Surface Taming
Felt has a fuzzy texture. That texture is great for decoration, but it can sometimes prevent the adhesive from sinking in deeply enough for a lasting bond.
A. Ensure Clean Surfaces
Just like when woodworking, the surface must be clean. Dirt, dust, or lint left over from cutting can act as a barrier between the glue and the fibers. Give your felt pieces a quick wipe or shake to remove any stray fuzz.
B. The Secret to Penetration: Pre-warming the Felt
This hack is my go-to for structural felt pieces:
- Take your glue gun and run it on a medium or high setting for about five minutes to ensure it is fully heated.
- Quickly touch the tip of the hot glue nozzle (just barely!) to the area of the felt where you plan to apply the glue. You are not melting the felt; you are just adding a tiny bit of ambient heat to the fibers.
- This slight warmth makes the felt fibers relax and open up microscopically.
- Immediately apply your bead of glue. The warm fibers will suck the molten glue in deeper, resulting in a much stronger mechanical grip than simply applying cold glue onto cool felt.
C. Managing Thickness for Dimensional Projects
If you are stacking layers of felt (common in creating flowers or layered decals), the inner layers won’t get as much direct heat penetration.
- Apply a thin layer of glue to the first layer.
- For the second layer, instead of laying down a heavy bead of glue, use a hot spatula or a spare wire tip (used carefully!) to gently spread a thinner layer of hot glue across the entire surface of the first piece. Thin, even coverage provides more overall adhesion than one thick dollop.
Essential Hack 3: The Right Application Technique
It’s not just about the heat; it’s about how you put the glue down. Mastering the bead shape ensures you have maximum surface area contact.
Applying the Glue Bead
For general bonding between two felt pieces:
- Use a Medium Bead: Don’t use the thickest setting your gun offers. A slightly thinner, continuous bead allows the glue to spread under pressure without oozing out the sides (which wastes glue and creates mess).
- Apply to ONE Surface: Always apply the hot glue to the piece you want to secure first (e.g., apply glue to the backing felt piece). Applying it to the piece that is easier to maneuver keeps the other piece stable while you work.
- Apply Evenly, Especially on Curves: If you are gluing a curved edge, lay down the glue bead along the center line of where the two pieces will meet. As you press the pieces together, the glue will spread perfectly toward the edges.
Pressure and Dwell Time
This is where felt’s quick-drying nature comes into play. You have a very small window of opportunity.
Once you bring the two felt pieces together, press firmly and steadily for at least 10 to 20 seconds. While hot glue sets instantly to the touch, the full strength of the bond takes a minute or two to maximize, especially in thicker areas. Think of it like clamping wood—firm pressure is crucial for immediate, tight contact.
For reference on materials that challenge adhesives, the National Institute of Standards and Technology (NIST) discusses how different material surface energies affect bonding, which explains why non-porous materials are harder to glue than fibrous materials like felt.
Essential Hack 4: Dealing with Tricky Surfaces (Felt to Non-Felt)
Most of the time, you are gluing felt to felt. But what if you are making ornaments and need to attach felt to plastic, wood, or glitter foam? Hot glue is usually the hero here, but application needs tweaking.
Felt to Wood or Cardboard
These surfaces are porous and usually accept hot glue excellently. Use high-temp glue for the strongest possible hold, especially if the wood or cardboard will be handled often.
Felt to Plastic (Like Toy Eyes or Hooks)
Plastic is the tough customer because it’s smooth (low surface energy). Hot glue can work, but you must maximize contact area:
- If possible, roughen the plastic surface lightly with fine-grit sandpaper. This gives the hot glue microscopic ridges to grab onto.
- Apply the glue quickly and press the felt down firmly. High-temp glue works best here for strength.
- Use a wider, flatter bead pattern rather than a narrow string.
Felt to Glitter or Sequins
This is very frustrating because the glue sticks to the glitter flakes, not the actual felt or base material underneath.
- The Solution: Always glue felt onto the base material first. Then, glue decorative elements onto the felt. If you must cover glitter, dab a layer of glue on the felt, let it partially cool (becoming slightly tacky, not runny), and then gently press it onto the glittered area. Allow this to cure undisturbed.
Quick Comparison Table: When to Use Which Glue Type
This table summarizes the best glue scenarios based on your project needs.
| Project Type / Goal | Recommended Glue Stick Temp | Adhesion Strength Expected | Why This Choice? |
|---|---|---|---|
| Simple Kids’ Crafts (Non-stressed items) | Low Temperature | Good (Fast setting) | Reduces burn risk; sets very quickly before the felt shifts. |
| Attaching Felt to Wood/Cardboard Bases | High Temperature | Very Strong | Achieves deep penetration into the porous wood/cardboard fibers. |
| Layering Thick Felt Shapes (e.g., 3D flowers) | Medium/High Temperature | Strong, Flexible | Ensures a solid grip between multiple dense fabric layers. |
| Felt attached to Smooth Plastic | High Temperature | Moderate to Strong | Needs maximum “stickiness” to overcome the slick surface. |
Step-by-Step Guide: The Perfect Felt Bond
Let’s put all these hacks together into one clear process. Follow these steps to ensure your felt craft is professional and lasting.
Phase 1: Setup and Prep
- Prepare Workspace: Lay down a silicone mat or parchment paper. Hot glue is messy, and this protects your table.
- Cut Pieces: Ensure all felt pieces are cut precisely. Unlike woven fabric, felt does not require seam allowances.
- Gun Prep: Load your glue gun. If you have a dual-temp gun, set it to Low unless you are gluing felt to wood/metal, in which case use High. Let it heat fully (about 5 minutes).
- The Warm-Up Trick (Optional but Recommended): Gently touch the very edge of the felt surface where glue will go with the heated nozzle tip for just one second. Remove the nozzle.
Phase 2: Gluing and Bonding
- Apply Glue: Draw a thin, consistent bead of hot glue onto the felt surface you intend to be the base piece. Aim for coverage over about 80% of the surface area you want covered.
- Wait 2 Seconds: Allow the glue to sit on the felt for just 1–2 seconds. This lets the initial searing heat dissipate slightly while keeping the glue molten enough to flow.
- Placement: Carefully place the second felt piece exactly where you want it.
- Press Firmly: Apply firm, even pressure directly down onto the seam, holding for a full 15–20 seconds. If you see glue ooze out slightly at the edges, that’s good—it means you have full coverage!
- Inspect: Once released, check that the edges are tightly met. If there are small gaps, you can apply a tiny amount of low-temp glue on the side using the tip of the nozzle, but avoid reheating the main bond area if possible.
Troubleshooting Common Felt Gluing Issues
Even with the best hacks, things can sometimes go awry. Here are fixes for the usual suspects.
Problem 1: The Felt “Wrinkles” or Warps After Gluing
Cause: This usually happens when too much glue is applied, or the glue was too hot, causing the acrylic fibers to contract as they cool, or if you twisted the pieces while pressing.
Fix: When attaching to flat surfaces, use thinner glue lines and spread them more evenly (Hack 3). For 3D shaping, apply glue in sections rather than one long strip, allowing each section to set before moving to the next, which lets the felt relax naturally.
Problem 2: The Glue Balling Up and Not Sticking
Cause: The felt surface was too cool, or the glue cooled too fast before bonding (often happens with synthetic felt). You didn’t apply enough pressure or you used a glue gun that wasn’t hot enough.
Fix: Revisit Hack 2: Pre-warming the felt surface is critical here. If you have a dual-temp gun, switch to High for that specific bond location.
Problem 3: Messy Strings or Excess Glue Strings
Cause: Standard with all hot gluing, especially when working with textiles.
Fix: The classic trick works best: right after bonding two pieces, pull the glue gun straight back and slightly up while twisting it a quarter turn. For any leftover wisps, use the tip of a wooden skewer or toothpick to gently pluck them away while they are still warm, or let them cool completely and they usually snap right off.
For projects requiring archival quality or extreme flexibility, you might consider alternatives, but for general home décor and crafts, hot glue remains a top contender. Understanding textile science basics, like those discussed in academic textile handling guides, confirms that surface porosity drives adhesive choice.
Caring For Your Hot Glued Felt Creations
Durability isn’t just about the initial bond; it’s about how the item handles real life. How you care for the item will affect the long-term strength of your hot glue application.
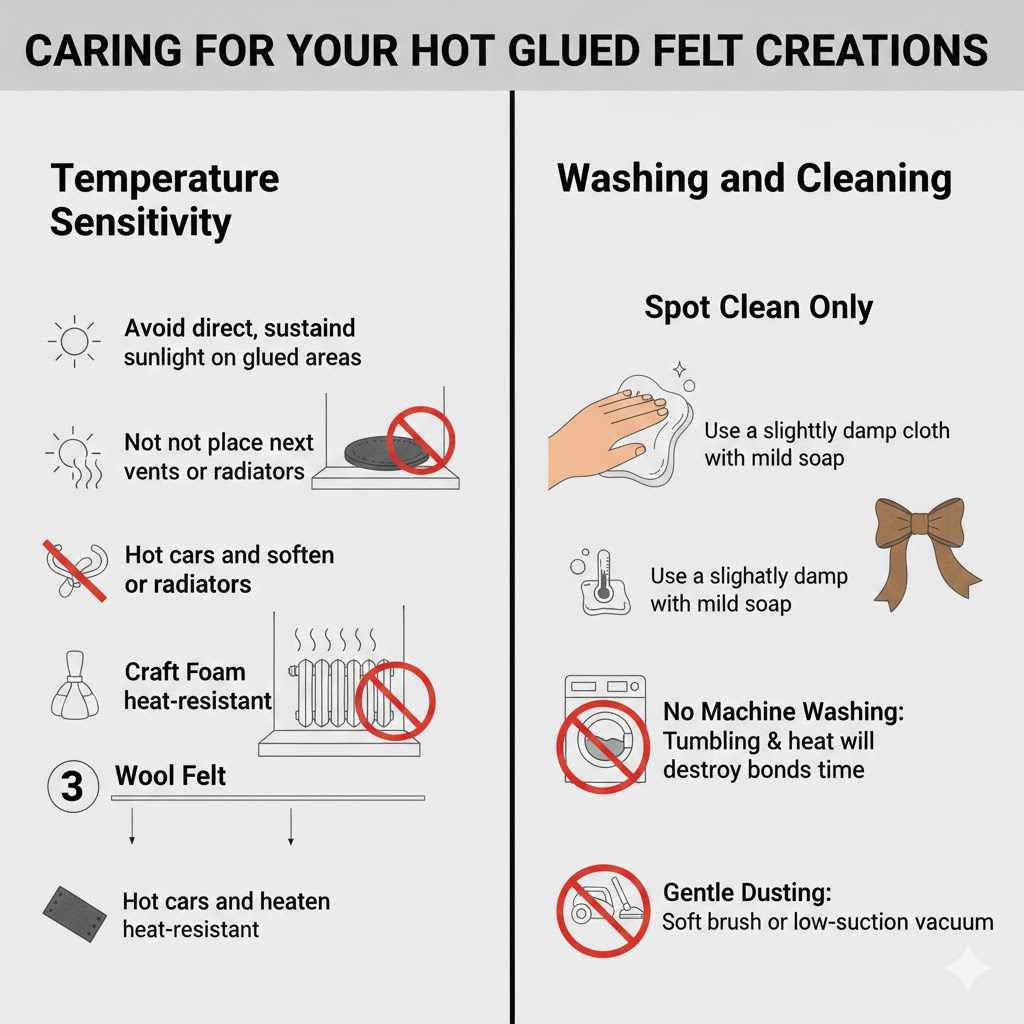
Temperature Sensitivity
Keep in mind that hot glue softens when exposed to heat. If your felt creation will be placed near a heater, a very sunny window (especially if the felt is dark), or in a hot car, the glue joint might fail over time.
- Avoid direct, sustained sunlight on glued areas.
- Do not place items next to vents or radiators.
Washing and Cleaning
Hot glue does not react well to immersion or soaking. If your felt project needs cleaning:
- Spot Clean Only: Use a slightly damp cloth with mild soap to blot the area around the glue seam.
- No Machine Washing: Never put a hot-glued felt item in a washing machine or dryer. The tumbling and heat will destroy the bonds.
- Gentle Dusting: For dust removal, use a soft brush or a handheld vacuum set to the lowest suction setting.
FAQ: Your Hot Glue and Felt Questions Answered
I know when starting out, you have lots of little questions. Here are some common ones I hear in the workshop.
Q1: Will hot glue ruin the color of my felt?
A: Generally, no. High-temp glue can leave a slight oily shadow on very thin, light-colored felt if applied too heavily. Using a moderate bead or the pre-warming hack helps prevent this.
Q2: How long does hot glue take to fully cure on felt?
A: Hot glue is “set to touch” in seconds. However, for maximum structural strength, allow the bond to rest and fully harden for about 15 to 30 minutes before putting it under any stress or handling it heavily.
Q3: Is hot glue permanent on felt?
A: For most practical purposes, yes. It’s very difficult to remove without tearing the felt. If you needed to remove it, soaking in rubbing alcohol or applying specialized adhesive remover might work, but expect damage to the fabric.
Q4: Can I iron felt that has been attached with hot glue?
A: Absolutely not! Hot glue will melt almost instantly when ironed, ruining your project and potentially your iron. If you need to use heat on felt, use a very low setting on a press cloth, but avoid the glued seams completely.
Q5: Why do my layered felt pieces keep separating when I pick them up?
A: This means you likely have coverage gaps. When gluing layers, you need full, edge-to-edge coverage, not just dots in the middle. Reapply using a very thin, spread-out layer of glue for maximum surface area contact.
Q6: Is hot glue safe for projects that a child might touch?
A: The dried glue is non-toxic and generally safe. However, the application process (the molten glue gun) poses a burn risk. Always use low-temp glue and close adult supervision for crafting with children.
Conclusion: Go Forth and Craft with Confidence
There’s no need to fear the glue gun when working with felt. By understanding the role of temperature, taking a moment to prepare your surfaces, and applying firm, immediate pressure, you’ve got all the essential hacks you need for bonds that rival any professional application.
Remember the key takeaways: Low temp for quick crafts, High temp for durability, and always pre-warm synthetic felt slightly for superior grip. You have the materials, you have the technique, and now you have the confidence. Grab your felt pieces and start building those wonderful projects you’ve been dreaming up. Happy crafting, and may all your seams be strong and true!