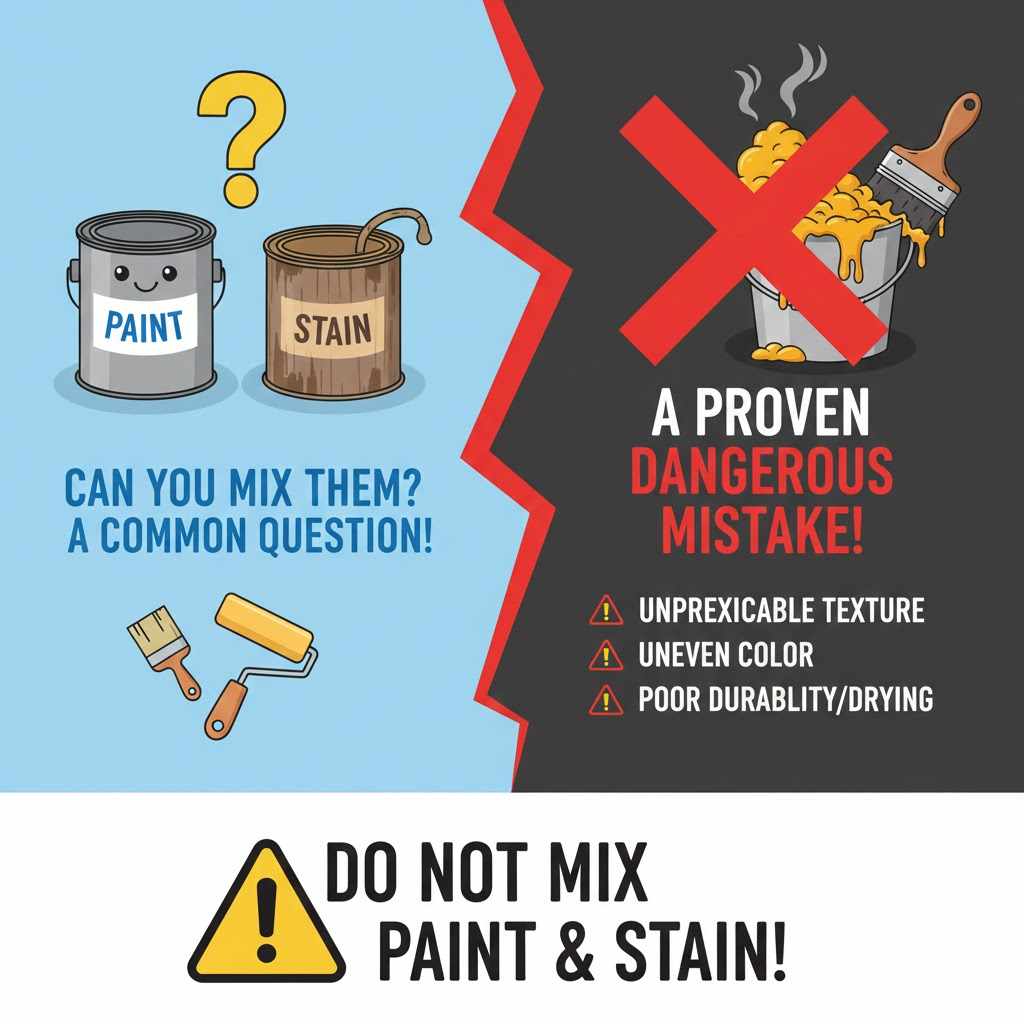
Can You Mix Paint With Stain? A Proven Dangerous Mistake
No, you absolutely should not mix paint with stain. Paint is designed to form a film on top of a surface, while stain is made to penetrate and color wood fibers. Combining them creates a chemically unstable, lumpy mixture that will not apply correctly, dry properly, or adhere to the wood, resulting in a failed project.
Hello, fellow makers! I’m Md Meraj, and in my workshop, I’ve seen just about everything. One question I hear a lot comes from a place of pure creativity: “Can I mix paint with stain to create a custom color?” It sounds like a clever shortcut to get a unique finish. You have a vision, and you want to bring it to life.
But this is one shortcut that leads to a dead end. Mixing these two products is one of the most common—and frustrating—mistakes a beginner can make. It can ruin your materials and your beautiful project. Don’t worry, though. Today, we’re going to explore exactly why this doesn’t work and, more importantly, I’ll show you the right ways to get the custom-colored finish you’re dreaming of. Let’s build your skills the right way!
Why Paint and Stain Are Not Meant to Be Mixed
To understand why this mixture fails, we need to look at what paint and stain are actually designed to do. Think of it like trying to mix melted butter and water for a sauce—they are fundamentally different and will fight against each other. Paint and stain have completely opposite jobs.
- Paint Covers: Its job is to create a solid, protective layer that sits on the surface of the wood. It hides the wood grain completely.
- Stain Colors: Its job is to soak into the wood fibers, changing their color while allowing the natural grain and texture to show through.
Because they have different goals, they are made with completely different ingredients that are not compatible.
Understanding How Paint Works
Paint is like a tiny, liquid shield. It’s a thick liquid made up of four main parts:
- Pigments: These are finely ground powders that provide the color.
- Binders: This is the most important part. It’s a glue-like substance (like acrylic or alkyd resins) that holds the pigments together and makes the paint stick to the surface. When it dries, the binder forms a hard, continuous film.
- Solvents: This is the liquid that keeps the paint spreadable (like water for latex paint or mineral spirits for oil-based paint). It evaporates as the paint dries.
- Additives: These are special ingredients that might make the paint dry faster, resist mold, or level out more smoothly.
The key takeaway is that paint is a film-forming finish. It’s designed to stay on top of the wood, not go into it.
Understanding How Stain Works
Stain, on the other hand, is designed to be absorbed. It’s much thinner than paint and has a different recipe:
- Pigments or Dyes: These provide the color. Pigments are fine particles that get lodged in the wood pores, while dyes are microscopic and dissolve completely, coloring the wood fibers themselves.
- Binders: Stain has a very small amount of binder compared to paint. It’s just enough to help seal the color into the wood, but not enough to create a film on the surface.
- Solvents: This makes up the bulk of the stain. The solvent’s job is to carry the color deep into the wood before evaporating.
Stain is a penetrating finish. It must soak into bare wood to work. If anything is blocking its path—like a layer of paint—it will fail.
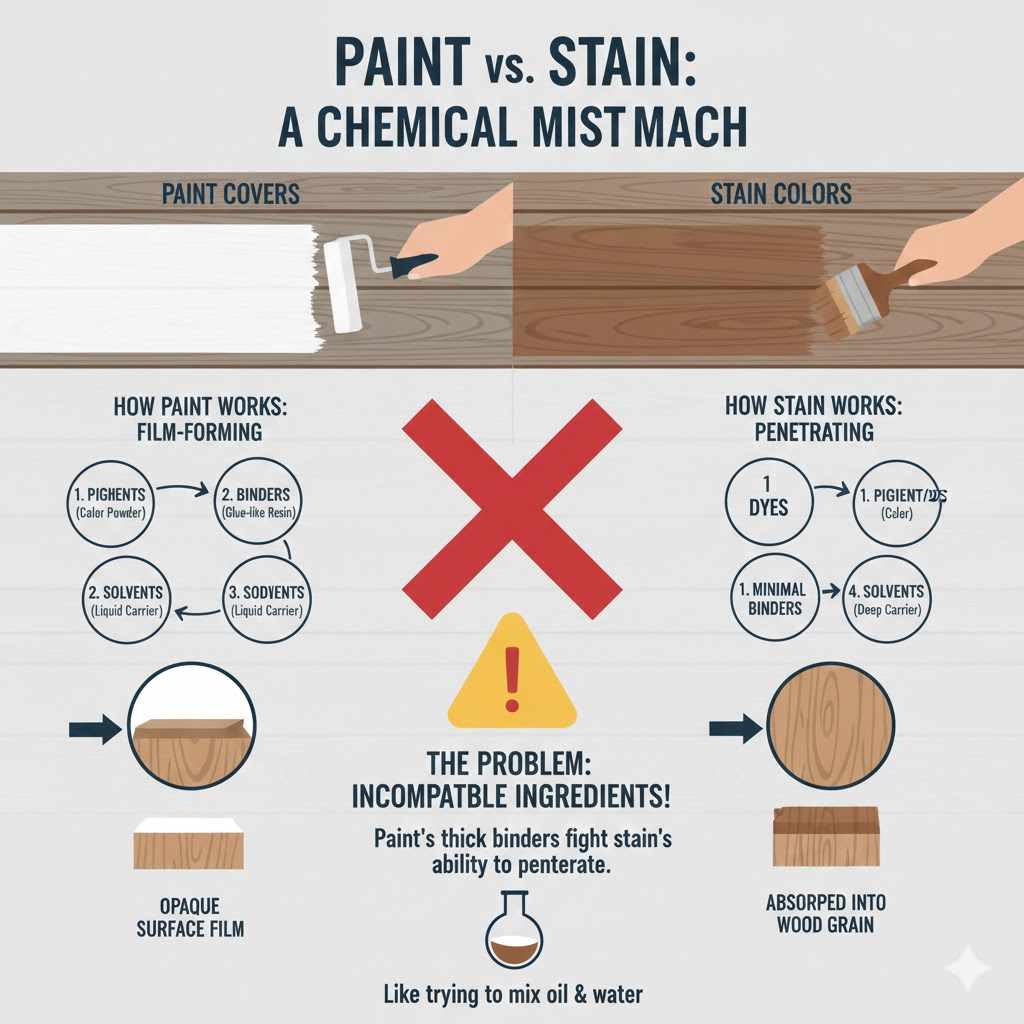
The Chemical Clash: What Happens When You Mix Them?
When you pour paint into stain (or vice-versa), you are forcing two incompatible chemical formulas to combine. The most immediate problem is the clash between the binders. The high concentration of binder in paint has no way to mix with the low-binder, high-solvent formula of stain.
The result is a gooey, separated mess. The paint’s binder will start to clump together, turning the mixture into something resembling cottage cheese. It won’t be a smooth, consistent liquid. Instead, you’ll have globs of paint floating in thin, watery stain.
This is especially true if you try to mix products with different bases, like a water-based (latex) paint and an oil-based stain. As the old saying goes, oil and water don’t mix. But even mixing oil-based paint with oil-based stain is a bad idea because their formulas are still designed for completely different tasks.
Quick Comparison: Paint vs. Stain
This table makes the differences crystal clear:
| Feature | Paint | Stain |
|---|---|---|
| Primary Job | To cover and protect the surface. | To color and enhance the wood grain. |
| Application Method | Sits on top of the wood. | Soaks into the wood fibers. |
| Binder Content | High (to form a strong film). | Very low (just enough to seal in color). |
| Consistency | Thick, like cream. | Thin and watery. |
| Final Look | Opaque (hides the grain). | Transparent (shows the grain). |
The Disastrous Results on Your Wood Project
Let’s say you ignore the clumpy texture and try to apply this mix to your project. I can tell you from experience, the outcome won’t be pretty. You’re setting yourself up for a finish that is guaranteed to fail.
Here are the common problems you will face:
- Awful Application: The lumpy mixture is impossible to apply smoothly. You can’t brush it, roll it, or wipe it on evenly. You’ll get streaks, clumps, and bare spots.
- Poor Adhesion: The concoction won’t bond properly to the wood. The stain part tries to penetrate, but the paint part tries to form a film, and neither can do its job. The finish will easily scratch or peel off.
- Splotchy, Uneven Color: Because the pigments aren’t suspended properly, the color will be completely inconsistent. Some areas might be dark, while others are light or have no color at all.
- It May Never Fully Dry: The chemistry of both products has been disrupted. The solvents may get trapped under clumps of binder, preventing the finish from ever curing properly. Weeks later, it could still be sticky or tacky to the touch.
- Weak, Unprotective Finish: Even if it does eventually dry, the resulting surface will have no durability. It will offer no real protection against moisture or wear and tear.
- A Total Waste of Time and Money: Ultimately, you’ll have wasted good paint, good stain, and precious time, only to end up with a project that needs to be completely stripped and sanded down to bare wood before you can start over.
Safer Alternatives: How to Get the Look You Want
I know this sounds discouraging, but don’t worry! Your creative idea was a good one—you just need the right technique to achieve it. There are several safe, professional methods to get a colored finish that still shows some wood grain.
Option 1: Use a Gel Stain
If you want a finish with rich color that’s easier to control than traditional stain, a gel stain is your best friend. It’s much thicker, like pudding, and is designed to sit more on the surface of the wood. This makes it fantastic for preventing blotchiness on woods like pine or for staining tricky surfaces like fiberglass doors.
How to use it:
- Prep your surface by cleaning and lightly sanding it.
- Apply the gel stain with a foam brush or rag.
- Let it sit for a few minutes (check the can for instructions).
- Wipe away the excess with a clean, lint-free cloth, moving in the direction of the wood grain. The more you wipe, the more grain you reveal.
- Let it dry completely before adding a protective topcoat like polyurethane.
Option 2: Create a “Color Wash” with Thinned Paint
This is the proper way to use paint to create a translucent, stain-like effect. A color wash (also called pickling) gives wood a subtle tint of color while letting the grain peek through. It’s a beautiful look for farmhouse or coastal-style projects.
How to make a color wash:
- Choose Your Paint: Water-based latex or acrylic craft paint works best for this.
- Mix with Water: In a separate container, mix your paint with water. A good starting ratio is 1 part paint to 2 parts water. For a more transparent look, try a 1:4 ratio. Mix thoroughly.
- Test on Scrap Wood: Always, always test your mixture on a scrap piece of the same wood as your project. This lets you see the true color and adjust your paint-to-water ratio before you commit.
- Apply and Wipe: Brush the color wash onto your wood. Let it sit for a minute or two, then use a clean rag to wipe off the excess. The longer you let it sit, the more color it will leave behind.
- Seal the Finish: Once the color wash is completely dry (at least 24 hours), protect it with a water-based polyurethane or another clear topcoat.
Option 3: Use a Solid Color Stain
If you want the solid color of paint but the penetrating properties of a stain, a solid color stain is the product you need. These are popular for outdoor projects like decks and fences because they provide excellent protection from the elements while soaking into the wood to prevent peeling.
A solid color stain looks just like a flat paint when applied—it will hide the wood grain—but it’s chemically engineered to bond with wood fibers, making it far more durable in outdoor settings than regular paint. You can find excellent options from trusted brands like Behr or Cabot.
What to Do If You’ve Already Mixed Paint and Stain
If you’re reading this article after you’ve already made the mixture—or even applied it—take a deep breath. It’s a frustrating moment, but it’s fixable.
- Step 1: Stop Immediately. Do not apply any more of the mixture to your project. The more you put on, the harder it will be to remove.
- Step 2: Dispose of the Mixture Safely. You can’t just pour this down the drain or throw it in the trash. Mixed paint and stain should be treated as household hazardous waste (HHW). Let the can air dry in a well-ventilated area until it solidifies, or contact your local waste management facility for their guidelines. For more information, check out the EPA’s guidance on HHW.
- Step 3: If You’ve Applied It, You Must Remove It. Unfortunately, there’s no way to save the finish. You need to strip it back to bare wood. You can use a chemical paint and varnish stripper (be sure to work in a well-ventilated area and wear protective gear) or start sanding. Begin with a coarse grit sandpaper (like 80-grit) to remove the gunk, then move to finer grits (120, then 220) to smooth the wood for a new finish.
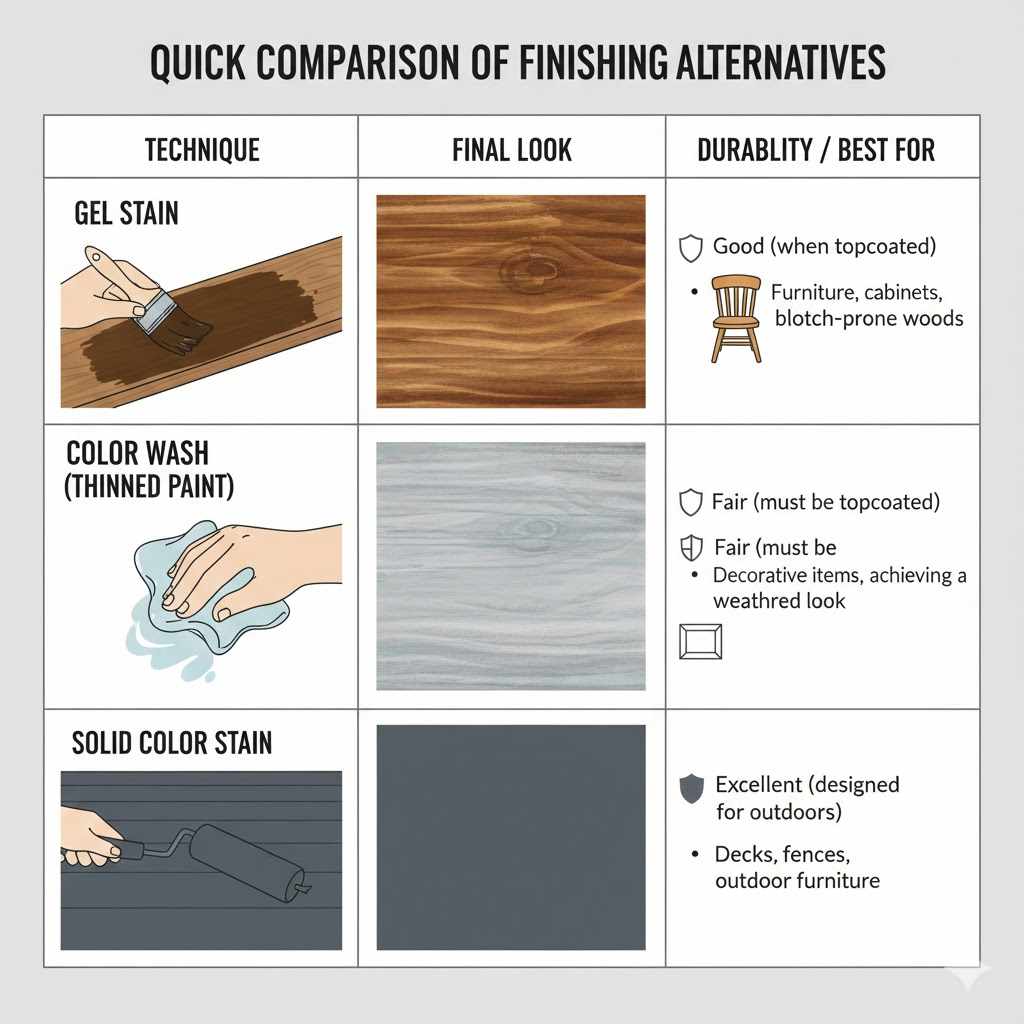
Quick Comparison of Finishing Alternatives
Choosing the right method depends on the look you want. Here’s a simple guide:
| Technique | Final Look | Durability | Best For |
|---|---|---|---|
| Gel Stain | Rich, even color with visible grain. | Good (when topcoated). | Furniture, cabinets, blotch-prone woods (pine, cherry). |
| Color Wash (Thinned Paint) | Light, transparent tint with visible grain. | Fair (must be topcoated). | Decorative items, picture frames, achieving a weathered look. |
| Solid Color Stain | Opaque color that hides the grain. | Excellent (designed for outdoors). | Decks, fences, outdoor furniture, siding. |
Frequently Asked Questions (FAQ)
1. Can I mix oil-based paint with oil-based stain?
No, you should still avoid this. Even though they share the same base (oil), their chemical formulas and binder-to-pigment ratios are completely different. The paint will overwhelm the stain’s ability to penetrate, leading to the same clumpy, uneven, and poorly-adhering finish.
2. What if I just add a tiny bit of paint to tint my stain?
This is still a very risky idea. Even a small amount of paint can introduce enough binder to interfere with the stain’s absorption. You’re more likely to get a streaky mess. It’s much safer to have your stain professionally tinted at the hardware store or to use one of the approved alternative methods described above.
3. Can you put paint over a stained surface?
Yes, absolutely! This is a very common practice. The key is to make sure the stain is 100% dry and cured (wait at least 48-72 hours). Then, you must prep the surface correctly. Lightly scuff sand the stained wood to give the primer something to grip onto, wipe away the dust, apply a quality primer (a shellac-based one is great for blocking stain from bleeding through), and then paint as usual.
4. Can you put stain over a painted surface?
No, this will not work. Stain must soak into bare wood fibers. Paint creates an impenetrable film on the surface. If you wipe stain over paint, it will just sit on top, look wet and messy, and never dry properly. You’d have to completely strip all the paint off before staining.
5. What is the difference between a color wash and a regular stain?
The main difference is how they interact with the wood. A regular stain soaks deep into the wood fibers. A color wash is essentially a very thin layer of paint that sits on the very top surface of the wood. It tints the wood, but it doesn’t penetrate in the same way.
6. How do I make my paint look like wood grain?
If you want to create a faux wood grain look on a painted or non-wood surface, you’ll need a special technique. This usually involves applying a base coat of paint (a tan or beige color), then applying a layer of a darker colored glaze on top, and using a special wood-graining rocker tool to create the pattern. It’s a fun finishing technique that takes a little practice!
Conclusion: Craft with Confidence
So, can you mix paint with stain? The answer is a clear and simple no. While it starts as a creative impulse, it ends in a frustrating mess that damages your project and wastes your materials. The chemistry just doesn’t work.
But the good news is that you don’t need to! With reliable techniques like using a gel stain, creating a color wash, or choosing a solid color stain, you have all the tools you need to create beautiful, custom-colored finishes safely and effectively. The best path in woodworking is always the one that combines creativity with proven, reliable methods.
Mistakes are a part of learning, but by understanding the “why” behind the rules, you empower yourself to work smarter. Now you can move forward on your project with the confidence of knowing you’re doing it the right way, guaranteeing a finish you can be proud of for years to come. Happy building!